e-motion Smart Sire-e User manual
E-motion
Smart Sire-e
NL: Gebruiksaanwijzing
EN: User manual
DE: Gebrauchsanweisung
FR: Manuel d’instructions
DA: Brugervejledning
SV: Bruksanvisning


Nederlands
Nederlands
32
Gebruikershandleiding
1 Overzicht onderdelen ............................................................................3
1.1 Stuurbediening.........................................................................3
1.2 Batterijpakket en lader .............................................................4
2 Stuurbedieningsunit ..............................................................................5
2.1 Uitleg gebruik bedieningsknoppen ..........................................5
2.2 Uitleg display............................................................................7
2.3 Wisselen van km/h naar mph...................................................8
2.4 Foutmeldingen .........................................................................8
2.5 Snelheidssensor* informatie...................................................10
3 Batterijpakket en lader ........................................................................11
3.1 Batterijpakket en opladen ......................................................11
3.2 Laadadvies .............................................................................12
3.3 Batterijpakket uitnemen .........................................................13
3.4 Batterijpakket terugplaatsen ..................................................13
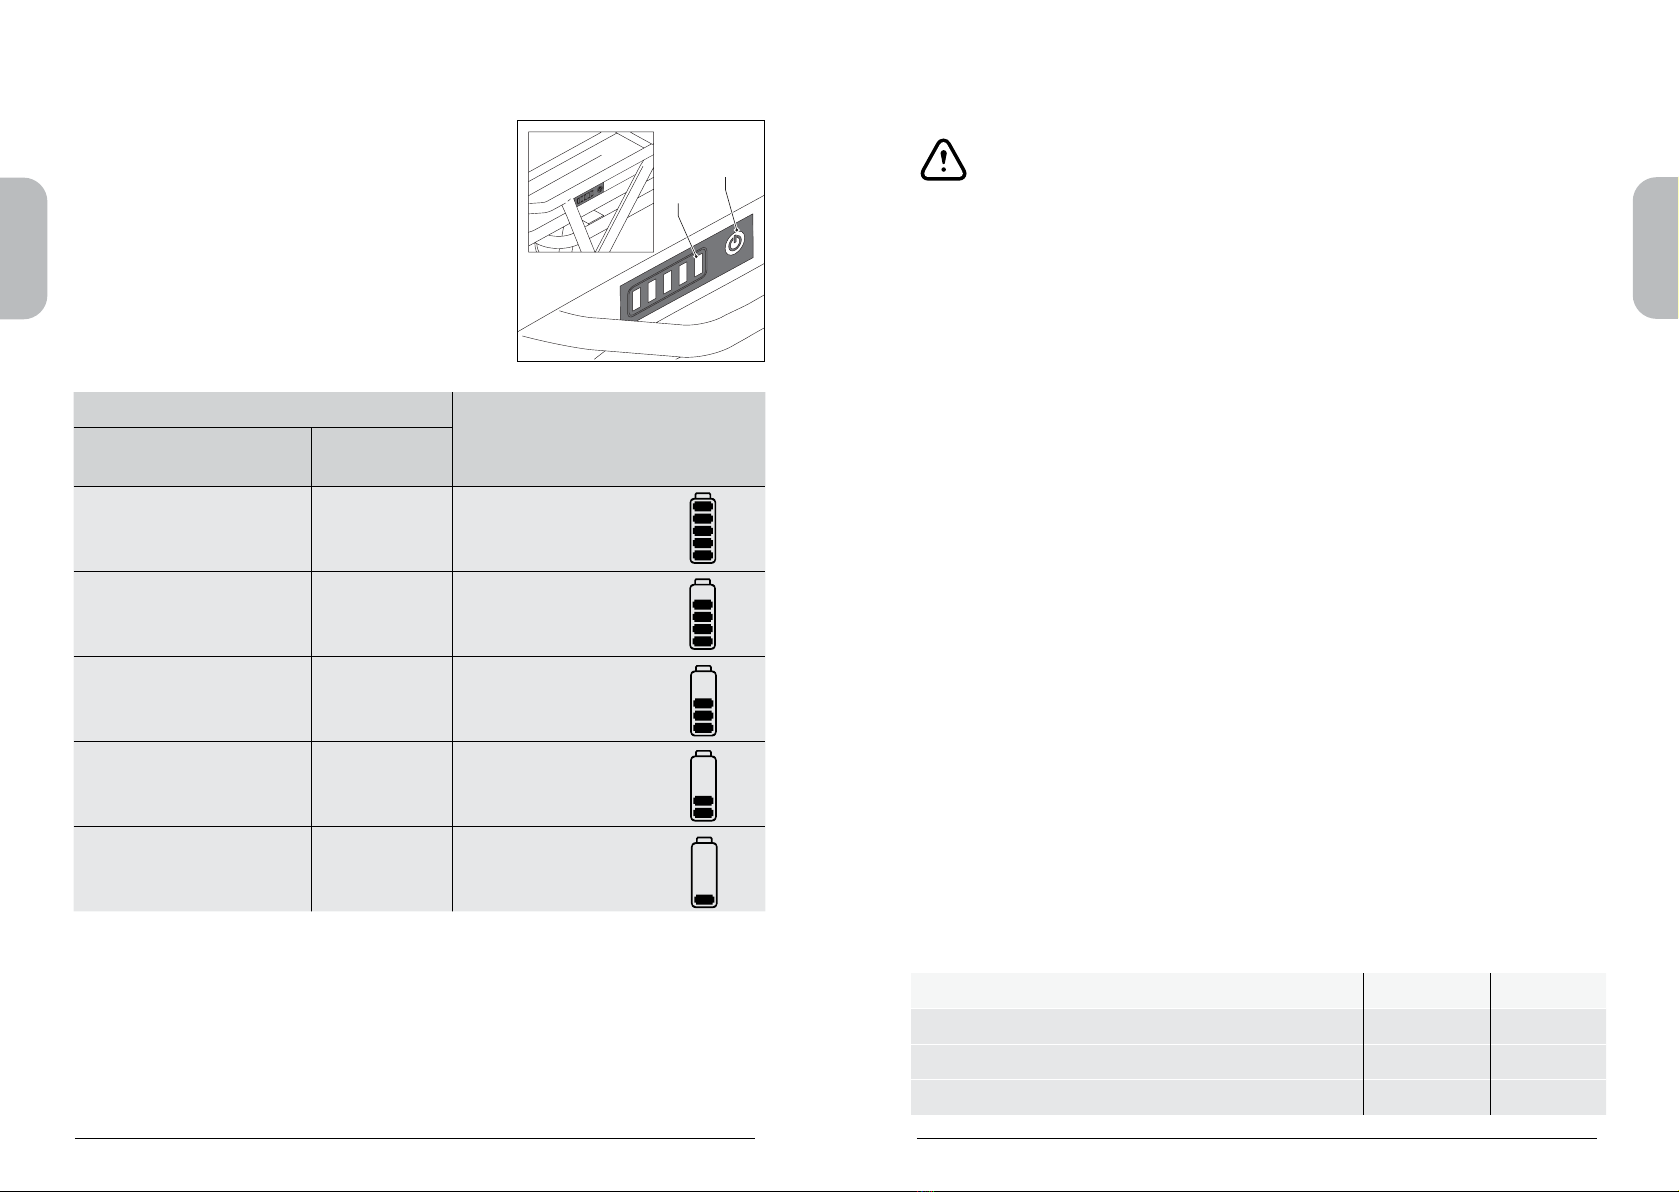
3.5 Vullingsgraad batterijpakket...................................................14
3.6 Waarschuwingen....................................................................15
4 Actieradius ..........................................................................................16
5 Technische gegevens..........................................................................17
6 Garantiebepalingen en wettelijke eisen...............................................18
7 Connected E-bike ...............................................................................20
8 Fietspas...............................................................................................21
1 Overzicht onderdelen
1.1 Stuurbediening
A Sire-e display
* Uitsluitend voor e-bikes met middenmotor
Inhoud
A
A
Nederlands
Nederlands
54
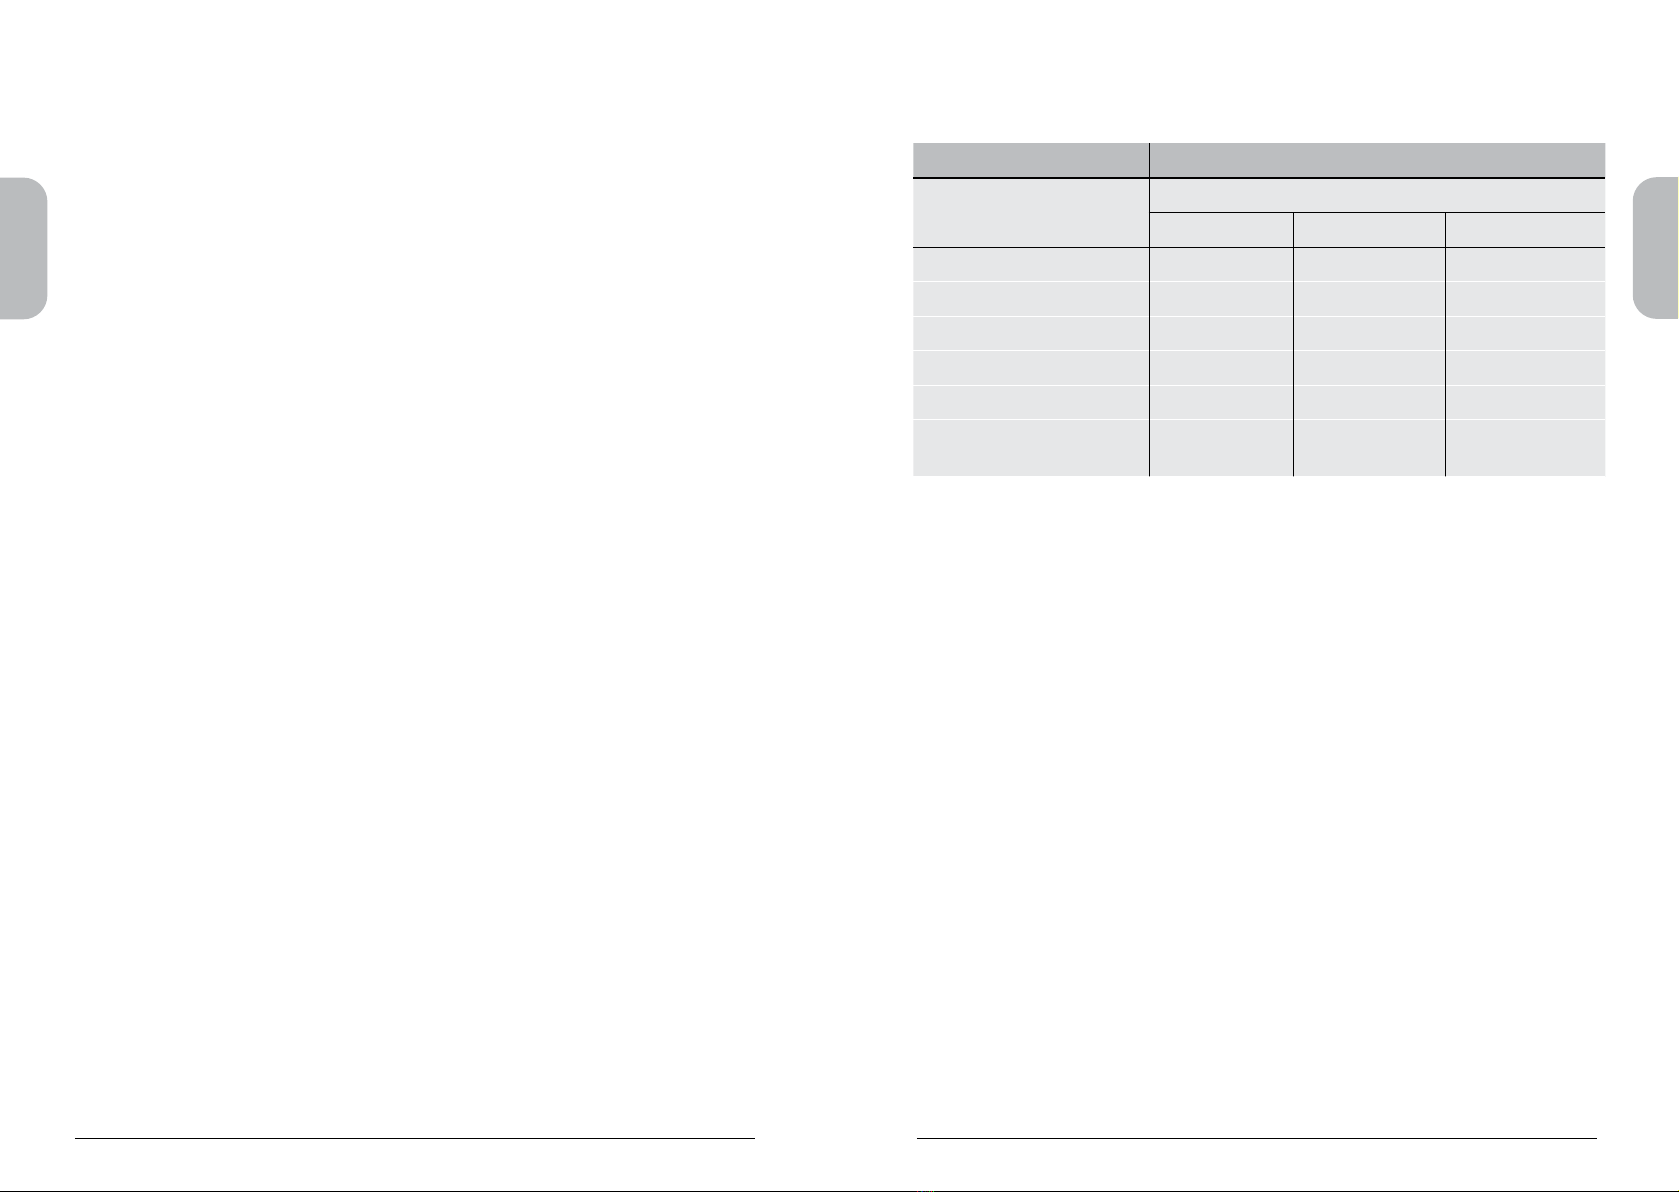
1.2 Batterijpakket en lader
F
G
DA
B
C
J
I
H
E
A Batterijpakket F Indicatielampje
B Weergave vullingsgraad G Laadstekker
C Contactpunt docking station H Slot
D Oplaadpunt I Sleutel
E Lader J Docking station
2 Sire-e Display met stuurbediening
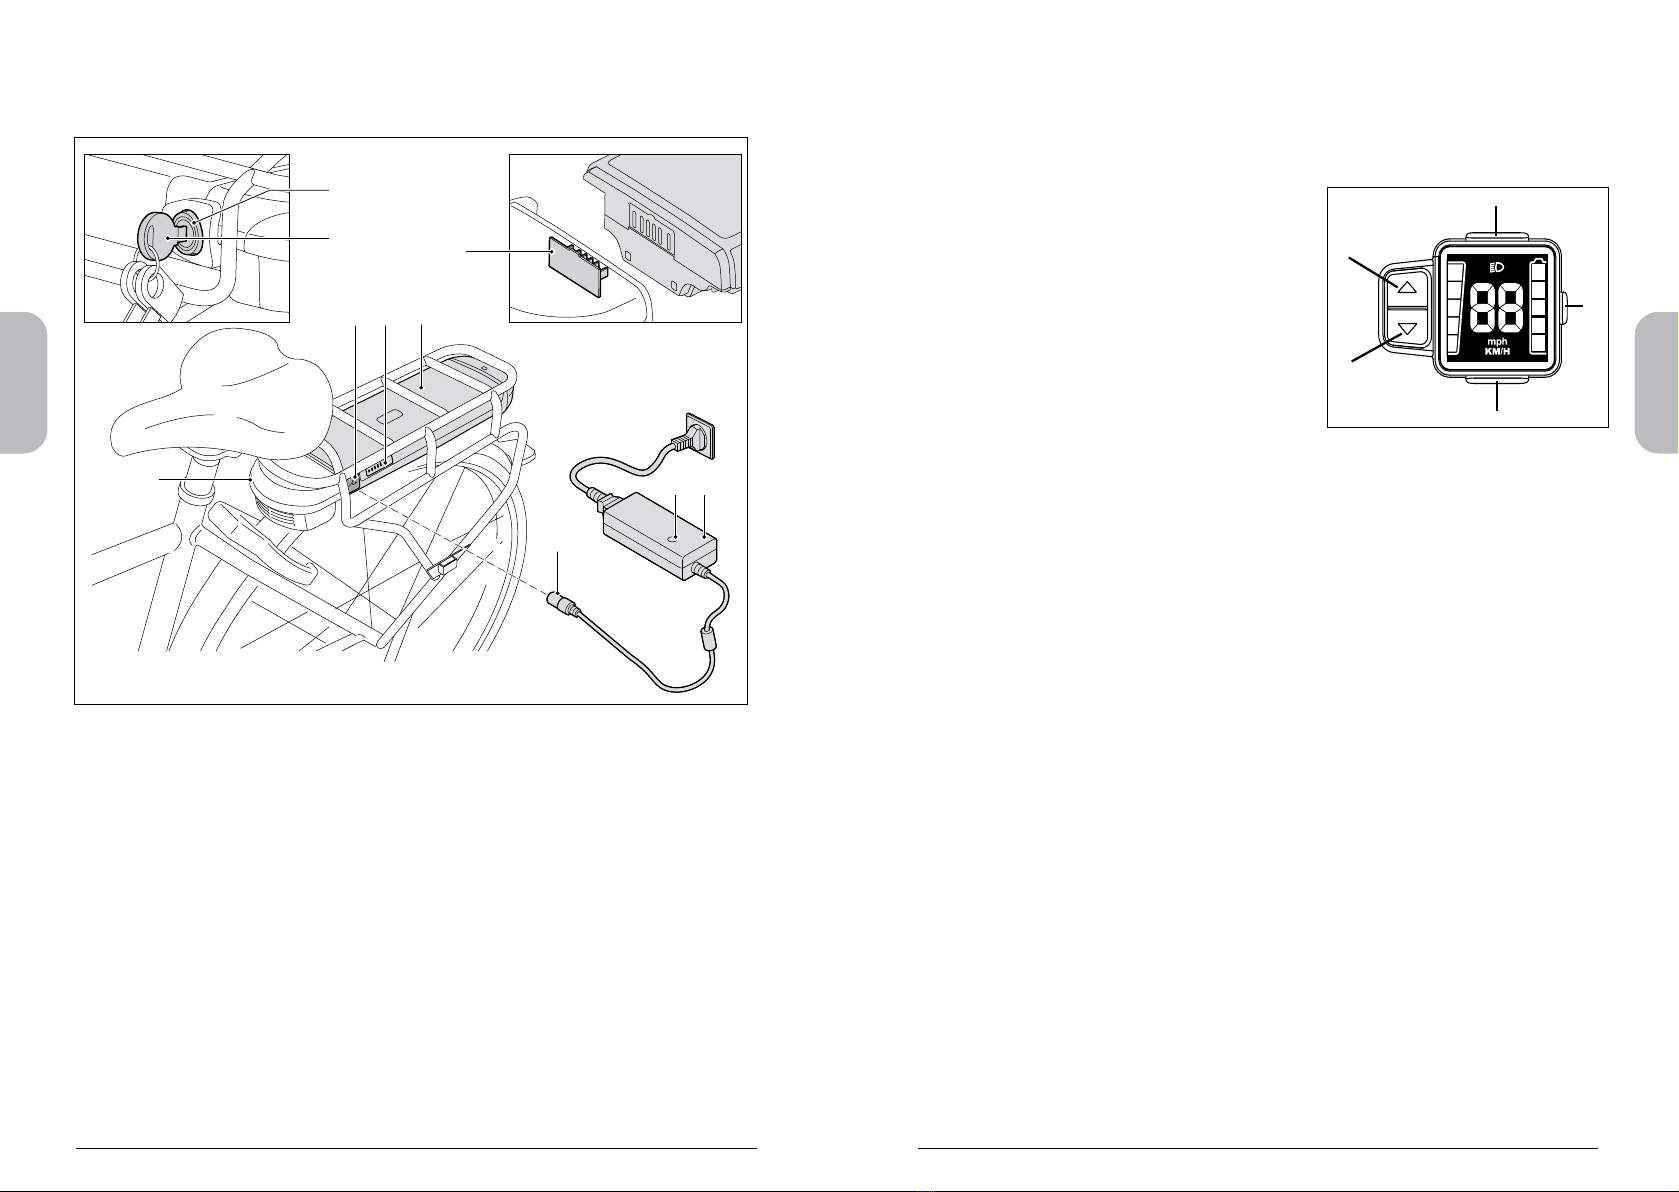
2.1 Uitleg gebruik bedieningsknoppen
A In- en uitschakelen systeem
B Parkeerhulp / boostfunctie
C Ondersteuning - (pijl omlaag)
D Ondersteuning + (pijl omhoog)
E Verlichting
A
E
D
C
B
De e-bike schakelt vanzelf uit als deze langer dan
10 minuten niet gebruikt wordt.
A. In- en uitschakelen systeem
Gebruik voor het in- en uitschakelen van het systeem de Aknop.
U kunt het systeem op ieder moment in- en uitschakelen; ook tijdens het
etsen. Druk voor het inschakelen 1 seconde op de Aknop. Druk voor
het uitschakelen drie seconden op de Aknop. Bij het inschakelen van
het systeem gaat de verlichting direct aan en staat de ondersteuning in
stand 0.
B. Parkeerhulp
Als u de ets bijvoorbeeld uit een kelder haalt kan de parkeerhulp u extra
ondersteuning geven, zodat u de ets niet geheel op eigen kracht
omhoog hoeft te duwen.
Wilt u gebruikmaken van de parkeerhulp-optie, houd dan knop B
ingedrukt terwijl u naast de ets loopt.
Zonder te trappen geeft de parkeerhulp ondersteuning tot ±4 km/uur.
Tijdens het gebruik van de parkeerhulp branden alle 5 ondersteuningindica-
tielampjes.
Boostfunctie
U kunt de boostfunctie gebruiken bij het wegrijden. Daarnaast kan de
boostfunctie de ondersteuning een extra impuls geven tijdens het etsen.
Dit is handig als u bijvoorbeeld iemand inhaalt of een heuvel op etst. De
impuls is het sterkst voelbaar bij een laag ondersteuningsniveau.
De boostfunctie kan aangezet worden door knop Bingedrukt te
houden en kracht te zetten op de pedalen. Bij het loslaten van de Bknop of
het stoppen met trappen stopt de boostfunctie.

Nederlands
Nederlands
76
2.2 Uitleg display
B
A
CD
E
A Verlichtingsindicatie
B Batterijindicatie
C Snelheidindicatie
D Variableweergave
E Ondersteuningindicatie
A. Verlichtingsindicatie
De verlichtingsindicatie is zichtbaar op het display zodra het systeem wordt
ingeschakeld of wanneer de verlichting achteraf handmatig wordt geactiveerd
(zie § 2.1).
B. Weergavevullingsgraad
Op het display wordt de vullingsgraad van het batterijpakket weergegeven
aan de hand van de vijf niveaus in het batterij-icoon (zie 3.5).
C. Snelheid
Geeft de huidige snelheid weer in hele km/h of mph.
D. Variableindicatie
Weergave van hele km/h of mph (zie 2.3).
E. Weergave ondersteuningsniveau
Op het display wordt het ondersteuningsniveau weergegeven aan de hand
van de vijf blokken aan de linkerzijde (vijf ondersteuningsniveaus).
Stand 0 géén ondersteuning
Stand 1 zéér matige ondersteuning
Stand 5 maximale ondersteuning
De boostfunctie is alleen te activeren zodra de ondersteuningstand is geac-
tiveerd en tijdens het etsen.
Tijdens het gebruik van de boostfunctie branden alle 5 ondersteuningindica-
tielampjes.
De knop Bkan dus gebruikt worden voor de parkeerhulp en boostfunctie.
C en D Wijzigen ondersteuningsniveau
Met behulp van de knoppen Cen Dkunt u de mate van ondersteuning instel-
len. Er zijn vijf ondersteuningsniveaus beschikbaar. U kunt met behulp van de
knoppen Cen Daltijd aangeven of u meer of minder ondersteuning wenst.
E. Verlichting
Zodra het systeem is ingeschakeld, gaat de verlichting automatisch aan. De
verlichting kan uitgeschakeld worden door de knop Ekort in te drukken.
Druk kort op de Eknop, om de verlichting weer in te schakelen.
Ongeacht de laatste stand van de verlichting (aan of uit), zal bij het opnieuw
inschakelen van het systeem de verlichting automatisch aan gaan.
Nederlands
Nederlands
98
2.3 Wisselen van km/h naar mph
Druk gelijktijdig voor 3 seconden de Atoets en B toets in om te wisselen van
km/h naar mph (mijlen).
Deze keuze blijft bewaard wanneer het systeem wordt opgestart.
A
B
2.4 Foutmeldingen
Bij een storing kan er een foutmelding verschijnen op het display.
Dit is herkenbaar door het knipperen van de snelheidsindicatie, er wordt i.p.v.
de snelheid een foutmelding getoond. De weergave van km/h of mph valt
weg.
Foutmelding overzicht
Kijk voor een overzicht van foutmeldingen op pag. 9
Foutmelding Omschrijving Actie
33 Motor fout Controleer motor bekabeling of neem contact
op met de dealer
35 Motor fout Neem contact op met de dealer
36 Motor fout Neem contact op met de dealer
37 Motorcontroller
waarschuwing
Motorcontroller te warm, laten afkoelen.
40 Motor waarschu-
wing
Motor te warm, laten afkoelen.
41 Snelheidssensor
fout
Controleer de snelheidssensor (zie 2.5)
48 Motor fout Neem contact op met de dealer
70 Communicatie
fout
Controleer bekabeling of neem contact op met
de dealer
71 Display fout Neem contact op met de dealer
Nederlands
Nederlands
1110
1. Sluit de lader (A) aan op de netspanning (B).
2. Sluit de laadstekker (C) van de lader aan op het contactpunt van het
batterijpakket (D).
3. Tijdens het laden brandt het lampje (E) op de lader rood.
Wanneer het batterijpakket volledig geladen is, dan brandt het lampje
groen. Na 24uur wordt het laden automatisch stopgezet. Het lampje op
de lader blijft groen branden.
Let er bij het terugplaatsen op dat de contactpunten van het batterij-
pakket en het docking station (F) goed op elkaar aangesloten worden. Zie
3.4 voor instructies.
2.5 Snelheidssensor* informatie
Het systeem van uw e-bike heeft informatie nodig om goed te kunnen
functioneren. De snelheidsinformatie wordt verkregen door de sensor bij het
achterwiel en een magneet in het wiel. Het kan gebeuren dat de magneet
verschuift door bijvoorbeeld het schoonmaken van de e-bike of het op-/
afnemen van de e-bike op de fietsendrager.
Als de magneet verschuift kan er geen snelheid gemeten worden. In dit
geval kunt u nog wel veilig naar huis of u e-bike dealer fietsen, maar enkel
met beperkte snelheid en ondersteuning. Dit probleem kan verholpen
worden door de wielmagneet weer in de juiste positie te zetten, zie hiervoor
onderstaande afbeelding. Wanneer u de magneet weer op de juiste plek heeft
gepositioneerd zal de fiets normaal functioneren. Neem anders contact op
met uw dealer.
<20 mm
3 Batterijpakket en lader
3.1 Batterijpakket opladen
E
C
D
F
D
A
B
* Uitsluitend voor ebikes met middenmotor

Nederlands
Nederlands
1312
Temperatuurgrenzen Minimum Maximum
Opladen 0 °C 45 °C
Gebruik van trapbekrachtiging -15 °C 45 °C
Opslag (minimaal 60 - 80 % vullingsgraad) -10 °C 35 °C
3.2 Laadadvies
• Laad voor het eerste gebruik van de ets het batterijpakket één keer
helemaal op totdat het indicatielampje op de lader groen wordt.
• Nadat het batterijpakket volledig is opgeladen stopt het laden automa-
tisch na 24 uur.
• Het batterijpakket hoeft niet helemaal leeg te zijn voor het opladen.
• Het batterijpakket blijft in goede conditie, wanneer u de ets na ieder
gebruik (ongeacht de afstand) weer oplaadt.
• Een batterijpakket dat leeg is en niet wordt opgeladen, kan defect raken.
• Ieder batterijpakket loopt na verloop van tijd leeg. Dit proces heet ‘zelf-
ontlading’. Een batterijpakket dat leeg is en niet wordt opgeladen kan
door zelfontlading binnen twee maanden een diepteontlading krijgen en
hierdoor defect raken. De garantie vervalt in geval van diepteontlading.
• In geval van langdurige stalling: laad het batterijpakket volledig op en
koppel het batterijpakket los van de lader. Laad het batterijpakket mini-
maal een keer per twee maanden op. U kunt er ook voor kiezen om het
batterijpakket aan de lader aangesloten te laten. U dient dan wel de lader
minimaal één keer per twee maanden te ontkoppelen en opnieuw aan te
sluiten aan het batterijpakket.
• Het batterijpakket laadt niet onder circa 0ºC en boven circa 45ºC.
• Stel het batterijpakket niet bloot aan vuur of hitte. Leg het batterijpakket
nooit in vuur.
• Het beste is opladen bij kamertemperatuur (20ºC). Dit verlengt de levens-
duur en verhoogt de prestaties van het batterijpakket.
• Een volledige laadbeurt duurt ca. 4,5 - 7,5 uur. Dit is afhanklijk
van uw batterijpakket en lader.
• Het batterijpakket kan zowel binnen als buiten de ets geladen
worden.
• Let er bij het terugplaatsen op dat de contactpunten van het
batterijpakket en het docking station (E) goed op elkaar aange-
sloten worden. zie 3.4 voor instructies.
Het batterijpakket is met behulp van een slot beveiligd tegen diefstal.
1. Steek de bijgeleverde sleutel (A) in het slot van het batterijpakket (B)
en draai een kwartslag.
2. Zorg ervoor dat het klepje (C) van de laadplug dicht zit.
3. Schuif het batterijpakket (B) voorzichtig uit de bagagedrager.
4. Neem na gebruik de bijgeleverde sleutel uit het slot.
• Haal het batterijpakket uit de bagagedrager wanneer u de ets
met de auto vervoert.
• Een correct geïnstalleerd batterijpakket kan niet meer zonder
sleutel worden verwijderd.
3.3 Batterijpakket uitnemen
1. Schuif het batterijpakket (A) voorzichtig in de bagagadrager. Zorg ervoor
dat de contactpunten van het batterijpakket (A) en het docking station (B)
goed op elkaar aangesloten worden.
2. Zet het batterijpakket op slot ter fixatie en om diefstal te voorkomen.
3. Neem na gebruik de bijgeleverde sleutel uit het slot.
B
A
3.4 Batterijpakket terugplaatsen
A
B
C
Nederlands
Nederlands
1514
De indicatie van de vullingsgraad op het
batterijpakket maakt gebruik van een
geavanceerd meetsysteem dat uitgaat van de
beschikbare stroomsterkte in de batterij en geeft
in alle gevallen een indicatie van de vullingsgraad.
Druk op knop Fom de vullingsgraad (G) op het
batterijpakket af te lezen.
Aantal brandende leds
Weergave vullingsgraad
Op batterijpakket Op stuurbe-
dieningsunit
5x groen 5 80 - 100 %
4x groen 4 60 - 80 %
3x groen 3 40 - 60 %
2x groen 2 20 - 40 %
1x groen 1 0 - 20 %
P
P
O
O
W
W
E
E
R
R
G
F
3.5 Vullingsgraad batterijpakket
Lees de onderstaande waarschuwingen goed door. De fabrikant
van de E-bike is niet verantwoordelijk voor ongelukken of
storingen veroorzaakt door oneigenlijk gebruik van (delen van)
de E-bike. De garantie kan in zo’n geval mogelijk vervallen.
• Laad het batterijpakket altijd op met de bij de fiets geleverde lader
en in de buurt van een volwassene.
• Gebruik geen andere lader.
• Gebruik nooit een ander stroomsnoer/kabel dan is meegeleverd.
• Steek het stroomsnoer nooit onvolledig in het stopcontact.
• Gebruik nooit een product waarvan de kabels beschadigd zijn.
• Plaats geen zware voorwerpen op de kabel.
• Controleer tenminste één keer per maand de stekker/kabel en
controleer op ongewone zaken zoals roest, (diepe) krassen,
scheuren etc.
• Zorg dat er geen kortsluiting plaatsvindt bij het aansluiten van het
batterijpakket.
• Laat het batterijpakket niet vallen en beschadig het niet.
• Dompel het batterijpakket niet in water of in een andere vloeistof.
• Houd het batterijpakket uit de buurt van kinderen.
• Maak het batterijpakket niet open.
• Zorg voor een goede ventilatie tijdens het opladen.
• Stop geen vloeistoffen of metaal in de lader.
• Sluit de lader niet aan met natte handen.
• Raak de lader niet aan in geval van bliksem.
• Gebruik de lader niet in een zeer vochtige omgeving.
• Gebruik de lader niet voor andere doeleinden.
• Sluit de lader niet aan op de netspanning als de lader niet gebruikt
wordt.
• Open of beschadig de motor nooit.
• Spuit de fiets niet schoon met een hogedrukspuit (een te krachtige
waterstraal kan de elektronica in de elektrische onderdelen
beschadigen).
• Laad het batterijpakket niet op in de vrieskou of volle zon.
3.6 Waarschuwingen
Temperatuurgrenzen Minimum Maximum
Opladen 0 °C 45 °C
Gebruik van trapbekrachtiging -15 °C 45 °C
Opslag (minimaal 60 - 80 % vullingsgraad) -10 °C 35 °C
Nederlands
Nederlands
1716
4 Actieradius
De actieradius geeft weer hoeveel kilometer er gereden kan worden met een
volledig opgeladen batterijpakket. De meest actuele actieradiusgetallen staan
op de website van het etsmerk.
De actieradius is van diverse factoren afhankelijk en wordt beïnvloed door:
Capaciteit (Ah) en spanning (V) van het batterijpakket;
• Ondersteuningsniveau;
• Omgevingstemperatuur;
• Windkracht;
• Bandenspanning (min. 4 bar);
• Rijsnelheid;
• Aantal berijders en de mate van geleverde trapkracht (door beiden);
• Rijgedrag;
• Toestand van de weg;
• Gewicht van eventuele bepakking (denk aan etstassen);
• Gebruik van versnellingen
Met het ouder worden van het batterijpakket neemt de actieradius merkbaar
af.
Gewicht en prestaties Specicatie
Batterijpakket Li-ion batterijpakket, 36 V
317 Wh 396 Wh 522 Wh
Gewicht batterijpakket 2,55 kg 3 kg 3,1 kg
Maximum vermogen 250 W 250 W 250 W
Capaciteit 8,8 Ah 11 Ah 14,5 Ah
Laadtijd 80%* 3 uur 4.30 uur 6 uur
Laadtijd 100% 4.30 uur 6 uur 7.30 uur
Maximale snelheid geleverd
door ondersteuning 25 km/uur 25 km/uur 25 km/uur
* de snelheid van het laden neemt af als het batterijpakket boven de 80% vullings-
graad zit.
5 Technische gegevens

Nederlands
Nederlands
1918
6 Garantiebepalingen en wettelijke eisen
Garantiebepalingen
De volgende garantiebepalingen vullen uw geldende wettelijke rechten aan.
Wanneer geldt de garantie?
De leverancier van uw batterijpakket geeft een garantie op eventuele
materiaal- of constructiefouten aan uw batterijpakket als de volgende
voorwaarde vervuld is:
• U kunt enkel aanspraak maken op de garantie, als u een garantie- of
aankoopbewijs kunt voorleggen. De garantieperiode begint op de dag
van aankoop.
• De garantie vervalt als diepteontlading geconstateerd wordt (zie 3.2).
Waarschuwingen
Lees de onderstaande waarschuwingen goed door. De fabrikant van de
E-bike is niet verantwoordelijk voor ongelukken of storingen veroorzaakt door
oneigenlijk gebruik van (delen van) de E-bike. De garantie kan in zo’n geval
mogelijk vervallen.
Zie 3.6 voor de uitgebreide lijst met waarschuwingen.
Garantieperiode e-bike
Op de elektrische onderdelen van uw e-bike (display, aandrijfsysteem
en batterijpakket) wordt 2 jaar fabrieksgarantie gegeven. Voor de
garantieperiode van de overige onderdelen verwijzen wij u naar de
garantiebepalingen, zoals vermeld in het instructieboekje van de fabrikant.
Verlengde garantie
U heeft de mogelijkheid om binnen de eerste 2 jaar na aankoop van uw
nieuwe e-bike een driejarige verlenging van uw garantie bij te kopen. Vraag
uw dealer naar de prijzen en exacte voorwaarden.
Wettelijke eisen
Volgens de Europese wetgeving is het beschreven voertuig een fiets,
omdat de fiets voldoet aan de volgende regels:
* De ondersteuning is alleen actief als de gebruiker zelf trapt.
* De ondersteuning is actief tot maximaal 25 km/uur.
* Het geleverde vermogen is maximaal 250 Watt.
Milieu
Conform de milieuregeling voor de inname en verwerking van batterijen
en accu’s van het ministerie van VROM adviseren wij u bij een defect aan
het batterijpakket van uw fiets deze altijd in te leveren bij uw dealer. Deze
is verplicht uw batterijpakket in te nemen en zal zorgen voor de verdere
verwerking door de producent. U betaalt hiervoor de verplicht gestelde
verwijderingsbijdrage.
Periodiek onderhoud
Uw e-bike heeft regelmatig een periodieke onderhoudsbeurt nodig. Uw
dealer kan u exact adviseren en informeren over het optimale onderhoud van
uw fiets.
Conformiteit
Hierbij verklaart de fabrikant van uw e-bike dat het product voldoet aan alle
eisen en andere relevante bepalingen van de machinerichtlijn 2006/42/EC,
de EMC-richtlijn 2014/30/EC, de EN-normen voor EPAC’s (Electrically Power
Assisted Cycle) EN15194. De conformiteitverklaring wordt geleverd bij de
e-bike.

Nederlands
Nederlands
2120
Smart app*
Wanneer uw ets is voorzien van een GSP-Logo, dan beschikt uw ets over
een Track & Trace functie. Vereiste is dan wel dat u de functie activeert met
de Smart App.
Installatie**
Installeer de Smart App voor uw Apple™ of Android™ smartphone en meld
uw nieuwe ets aan. U kunt uw ets nu volgen en beschikt over de Smart
functies.
Activeren
Na de registratie via de Smart App, ontvangt u een e-mail waarmee u uw
abonnement kan activeren.
Informatie
Voor meer informatie kijk op de desbetreende website van uw etsmerk
onder “Smart”.
Belangrijkste kenmerken:
• Track & Trace; eenvoudig te traceren bij vermissing
• Sabotagemelding; melding bij plotselinge beweging of vallen
• Snelheidsalarm; push bericht in geval van snelheid boven 50 km/u
• Accu reminder; herinnering om op te laden na etsrit
• Altijd connected; inzicht in etsrit historie
7 Connected E-bike
* Controleer of de Smart app en de track & trace functie beschikbaar is in uw land.
** De Smart App is te vinden in de Play store™ of App store™ onder “Sparta Smart”
of “Batavus Smart”.
8 Fietspas
Fabrieksgarantie*
We raden u aan om uw ets te registreren op mijnets.nl. Door het aanmel-
den van uw ets met de Fietspas is uw fabrieksgarantie geregistreerd en
optimaal geregeld.
Op tijd het juiste onderhoud
Na registratie ontvang u op tijd alle onderhoudsmeldingen van uw ets. Re-
gelmatige onderhoudsbeurten bij een erkende dealer zijn erg belangrijk voor
de veiligheid en garantie van uw ets.
Alle gegevens op een plek
Zowel u en uw ets-dealer hebben alle gegevens over uw ets op één plek
beschikbaar. De Fietspas is het digitale onderhoudsboekje van uw ets.
*Mits onderhoud uitgevoerd is volgens garantiespecicaties, kijk voor meer informa-
tie op mijnets.nl/garantie

English
English
2322
1 Parts overview.....................................................................................23
1.1 Sire-e display..........................................................................23
1.2 batterypack and chager .........................................................24
2 Display and control unit.......................................................................25
2.1 Functions control unit.............................................................25
2.2 Function display .....................................................................27
2.3 Change from km/h to mph.....................................................28
2.4 Errormessage .........................................................................28
2.5 Speedsensor* information......................................................30
3 Battery pack and charger....................................................................31
3.1 Battery pack and charger.......................................................31
3.2 Advice for charging ................................................................32
3.3 Removing the battery pack ....................................................33
3.4 Re-installing the battery back ...............................................33
3.5 Filling battery pack.................................................................34
3.6 Warnings ................................................................................35
4 Range..................................................................................................36
5 Technical data .....................................................................................37
6 Guarantee conditions and legal requirements ....................................38
7 Connected E-bike ...............................................................................40
Usermanual 1 Parts overview
1.1 Sire-E display
A Sire-e display
A
A
* only for e-bikes with mid engine
Table of contents
English
English
2524
1.2 Batterypack and charger
F
G
DA
B
C
J
I
H
E
2 Sire-e Display with steering wheel control
2.1 Explanation of the use of control buttons
A Turning the system on and o
B Parking aid / boost function
C Support - (arrow down)
D Support +(arrow up)
E Light
A
E
D
C
B
The e-bike switches o automatically if it has not
been used for more than 10 minutes.
A. Switching the system on and o
Use the A button to turn the system on and o.
You can turn the system on and o at any time, even while cycling. To switch
on, press the A button for 1 second. To switch o, press the Abutton for
three seconds. When the system is switched on, the lighting is switched on
immediately and the support is in position 0.
Position 0 does not provide any support, Position 1 very moderate support to
position 5 provides maximum support.
B. Parking aid
For example, if you take the bike out of a basement, the parking aid can give
you extra support so that you don’t have to push the bike up under your own
steam.
If you want to use the parking assistance option, press and hold the B
while walking next to the bike.
Without pedalling, the parking aid provides support up to ±4 km/hour. When
using the parking aid, all 5 support indicators light up.
Boost function
You can use the boost function when driving o. In addition, the boost func-
tion can give the support an extra boost when cycling. This is useful when,
for example, you overtake someone or cycle up a hill. The impulse is most
strongly felt at a low level of support.
The boost function can be activated by pressing button B.
and put pressure on the pedals. When you release the Bbutton or stop ped-
aling, the boost function stops.
A battery pack F indicator
B state of charge display G chargerplug
C docking station contact point H lock
D charging point I key
E charger J docking station

English
English
2726
2.2 Explanation display
B
A
CD
E
A Lighting indication
B Battery indication
C Speed indication
D Variable display
E Support indication
A. Lighting indication
The lighting indicator is visible on the display as soon as the system is
switched on or if the lighting is subsequently manually activated (see section
2.1).
B. Display lling degree
The display shows the degree of lling of the battery pack according to the
ve levels in the battery icon (see section 3.5).
C. Speed
Displays the current speed in whole km/h or mph.
D. Variable indication
Display of whole km/h or mph (see 2.3).
E. Support level display
The display shows the support level using the ve blocks on the left (ve sup-
port levels).
Position 0 no support
Position 1 very moderate support
Position 5 maximum support
The boost function can only be activated once the support mode has been
activated and while cycling.
When using the boost function, all 5 support indicators light up.
Button Bcan therefore be used for the parking aid and boost function.
C and D Change support level
Using buttons Cand D, you can adjust the level of support. Five levels
of support are available. You can always use buttons Cand Dto indicate
whether you want more or less support.
E. Lighting
As soon as the system is switched on, the lighting is switched on automati-
cally. The lighting can be switched o by pressing button E briey.
Briey press the Ebutton to switch the lights on again.
Regardless of the last position of the lighting (on or o), when the system is
switched on again, the lighting will switch on automatically
English
English
2928
2.3 Switching from km/h to mph
Press the Abutton and the Bbutton simultaneously for 3 seconds to switch
from km/h to mph (miles).
This choice will be retained as soon as the system is restarted.
A
B
2.4 Error messages
In the event of a fault, an error message may appear on the display.
This is indicated by the ashing of the speed indicator, and the
instead of the speed, an error message is displayed.
For an overview of error messages, see page 29.
Error message overview
Error message description actie
33 Engine fault Check engine cabling or contact your dealer.
35 Engine fault Contact the dealer
36 Engine fault Contact the dealer
37 Motor controller
warning
Motor controller too hot, let it cool down.
40 Engine warning Motor too hot, let it cool down.
41 Speed error Check the speed sensor (see 2.5).
48 Engine fault Contact the dealer
70 Communication
error
Check cabling or contact the dealer
71 Display error Contact the dealer

English
English
3130
3 Battery pack and charger
3.1 Charge the battery pack
E
C
D
F
D
A
B
1. Connect the charger (A) to the mains voltage (B).
2. Connect the chargerplug (C) of the charger to the contact point of the
battery pack (D).
3. The indicator lamp glows red while the battery is still charging. When the
battery pack is fully charged, charging will stop automatically after 24
hours. The small lamp on the charger will continue to glow green.
2.5 Speedsensor information
Your E-bike's system needs information to function properly. The speed
information is obtained by the rear wheel sensor (behind the chain casing)
and a magnet in the wheel. Sometimes the magnet becomes dislodged, for
instance when cleaning the E-bike or when loading/unloading the E-bike on
the bicycle carrier.
If the magnet becomes dislodged, then the speed can no
longer be measured. In this case you can still cycle home safely, or take
your E-bike to the dealer, but only with limited speed and assistance. The
problem can be solved by returning the magnet to the correct position,
see the figure below. If you have returned the magnet to the correct
position, the bike will function normal again. Otherwise contact your dealer.
<20 mm
* only for ebikes with mid engine

English
English
3332
3.2 Advice for charging
• Before using the bike for the first time, charge the battery pack completely
until the indicator lamp on the charger turns green.
The indicator lamp glows red while the battery is still charging.
• Always charge the battery pack using the charger supplied with the bike.
Never use another charger.
• When the battery pack is fully charged, charging will stop automatically
after 24 hours. The small lamp on the charger will continue to glow green.
• The battery pack does not need to be empty before you can charge it. The
battery pack will stay in good condition if you recharge the bike after every
trip (regardless of the distance).
• A battery pack can become defective if it is emptied and not recharged.
• The warranty on the battery pack will be invalidated if a deep discharge is
detected.
• In the event of long-term stalling: Charge the battery pack fully and
disconnect the charger from the battery pack. Charge the battery
pack at least once every two months. You can also leave the battery
pack connected to the charger if you wish. If you do that, disconnect
the charger once every two months and reconnect it to make sure the
charging process is started again.
• The battery pack will not charge if the temperature is lower than about
0ºC or above about 45 ºC. This prolongs the service life and improves the
performance of the battery pack.
Temperature ranges Minimum Maximum
Charge 0 °C 45 °C
Use of peddling assistance -15 °C 45 °C
Storage (minimum state of charge 60 - 80 %) -10 °C 35 °C
• A full charge will take approximately 4.5 - 7.5 hrs. This de-
pends on your battery pack.
• With models equipped with a removable battery pack, the
battery pack can be charged both in and outside the bicycle.
• When placing back, ensure that the contact points of the
battery pack meet those of the docking station (F).
3.3 Removing the battery pack
3.4 Re-installing the battery back
A
B
C
B
A
1. Carefully slide the battery pack (A) into the luggage rack. Make sure
that the battery pack (A) and the docking station (B) are well connected.
2. Lock the battery pack to fix it in place and prevent theft.
• Take the battery pack out of the luggage carrier when transpor-
ting the bicycle by car.
• A correctly installed battery pack can no longer be removed
without a key.
1. Insert the supplied key (A) into the lock of the battery pack (B)
and turn through 45 degrees.
2. Make sure that the cover (C) of the charging plug is closed.
3. Carefully slide the battery pack (B) out of the luggage rack.
The battery has a lock to secure it against theft.

English
English
3534
3.5 Indication state of charge display
Theindication of the state of charge of the battery pack is displayed on the
handle bar control unit by means of five LEDs (E). See next page.
NB
The indication of the state of charge on the battery
pack uses an advanced measurement system and
is more accurate in all cases.
Press on button Fin order to read the charge level
(G) on the battery pack.
Number of LED lits Indication state
of charge
On battery pack On handle
bar control
5x green 5 80 - 100 %
4x green 4 60 - 80 %
3x green 3 40 - 60 %
2x green 2 20 - 40 %
1x green 1 0 - 20 %
P
P
O
O
W
W
E
E
R
R
G
F
3.6 Warnings
Carefully read the warnings given below. The manufacturer is
not responsible for accidents or faults caused by improper use
of (parts of) the E-bike.
• Always charge the battery pack with the charger supplied with the bike
and near an adult.
• Do not use any other charger.
• Never use a power cord / cable other than the one supplied.
• Never plug the power cord into the socket incompletely.
• Never use a product whose cables are damaged.
• Do not place heavy objects on the cable.
• Check the plug / cable at least once a month and check for unusual
things such as rust, (deep) scratches, cracks etc.
• Make sure there is no short circuit when connecting the battery pack.
• Do not drop the battery pack or damage it.
• Do not immerse the battery pack in water or any other liquid.
• Keep the battery pack out of the reach of children.
• Do not open the battery pack.
• Ensure good ventilation during charging.
• Do not put liquids or metal in the charger.
• Do not connect the charger with wet hands.
• Do not touch the charger in case of lightning.
• Do not use the charger in a very humid environment.
• Do not use the charger for other purposes.
• Do not connect the charger to the mains if the charger is not being used.
• Never open or damage the engine.
• Do not spray the bike with a high-pressure spray (too powerful a jet of
water can damage the electronics in the electrical components).
• Do not charge the battery pack in freezing cold or full sun.
Temperature ranges Minimum Maximum
Charge 0 °C 45 °C
Use of peddling assistance -15 °C 45 °C
Storage (minimum state of charge 60 - 80 %) -10 °C 35 °C

English
English
3736
4 Range
The range (i.e. the number of miles/kilometres that you can ride with a fully-
charged battery pack) greatly depends on the pedal assistance setting you
use. This table gives an indication of the range for each pedal assistance
setting.
The above values are measured with the use of a new battery pack.
There are factors which affect the range to a greater or lesser extent, causing
deviation from the above table. Follow the instructions below to get as close
as possible to the values shown in the above table.
• Use the accelerator in moderation. Using the accelerator takes up a lot of
power, especially at low speeds.
• Keep pedalling hard enough under your own steam. This will draw less
power from the battery pack.
• Make sure your tyres have enough pressure: at least 4 bar.
• When setting off, use a low gear insofar as possible and change gears as
necessary to increase the range.
• As far as possible, cycle at a constant speed. Frequent stops and starts
use up a lot of battery power.
• Follow up the charging instructions (see §3.1) carefully and keep your bike
and battery pack maintained regularly to keep them in top condition.
• As far as possible, load and keep the battery pack at room temperature.
This will have a positive effect on the range. Remember that you will get
noticeably less range from your E-bike when the ambient temperature is
less than 10 °C.
• Keep in mind that the rider’s weight, the age of the battery pack,
wind speed and the state of the road all affect the range.
The average range will decline with the aging of the battery pack.
5 Technical data
Weight and performance Specication
Battery pack Li-ion battery pack, 36 V
317 Wh 396 Wh 522 Wh
Weight of battery pack 2,55 kg 3 kg 3,1 kg
Maximum power 250 W 250 W 250 W
Capacity 8,8 Ah 11 Ah 14,5 Ah
Charging time 80%* 3 hours 4.30 hours 6 hours
Charging time 100% 4.30 hours 6 hours 7.30 hours
Maximum speed delivered
by peddling assistance 25 km/hour 25 km/hour 25 km/hour
* the charging speed decreases when the battery pack is over 80% fully charged.
Table of contents
Languages:
Other e-motion Bicycle Accessories manuals


