Eagle Group Spec-Master User manual

Eagle Foodservice Equipment, Eagle MHC, and SpecFAB®are divisions of Eagle Group. ©2022 by the Eagle Group
• 100 Industrial Boulevard, Clayton, Delaware 19938-8903 U.S.A.
• Phone: 302/653-3000 • 800/441-8440
• Fax: 302/653-2065 • www.eaglegrp.com
OPERATIONS MANUAL & INSTRUCTIONS
Spec-Master®Hot Food Table
with Sealed-in Wells
EG10103 revised 08/22
(continued on next page)
INSTRUCTION SHEET
#386978
Retain this manual for future reference.
CAUTION
INSPECT CONTENTS IMMEDIATELY AND FILE CLAIM WITH DELIVERING
CARRIER FOR ANY DAMAGE. SAVE YOUR BOX AND ALL PACKING MATERIALS.
YOU ARE RESPONSIBLE FOR DAMAGE TO YOUR UNIT IF RETURNED IMPROPERLY PACKED.
Contact the factory, the factory representative or Eagle’s authorized service center in your area.

These models are designed, built and sold for commercial use. However, if these models are positioned so the general
public can use the equipment, MAKE SURE THAT ALL CAUTIONS, WARNINGS AND OPERATING INSTRUCTIONS
ARE CLEARLY POSTED NEAR EACH UNIT so that anyone using the equipment will use it correctly and not injure
themselves or harm the equipment.
CANADIAN INSTALLATION MUST COMPLY WITH CSA-STANDARD C.22.2 No. M1982 General Requirements -
Canadian Electrical Code, Part II, 109-M1981 - Commercial Cooking Appliances.
NOTICE: Local Codes regarding installation vary greatly from one area to another. The National Fire Protection
Association, Inc., states in its NFPA 96 latest edition that local codes are “authority having jurisdiction” when it comes to
requirements for installation of equipment. Therefore, INSTALLATIONS SHOULD COMPLY WITH ALL LOCAL CODES.
READ THE INSTALLATION, OPERATING AND MAINTENANCE INSTRUCTIONS THOROUGHLY BEFORE
INSTALLING OR SERVICING THIS EQUIPMENT. Improper installation, adjustment, alteration, service or
maintenance can cause property damage, injury or death.
•
Check the data plate on this unit before installation. Connect the unit only to the voltage and frequency listed on
the data plate. Connect only to 1 or 3 phase as listed on the data plate.
•
Disconnect electrical power supply and place a tag at disconnect switch, indicating that you are working on the
circuit.
•
Do not open any panels that require the use of tools.
•
Do not store or use gasoline or other flammable vapors or liquids in the vicinity of this or any other appliance.
•
This unit is not intended to hold potentially hazardous foods, such as uncooked meats.
WARNINGS
IMPROPER GROUNDING COULD RESULT IN ELECTRICAL SHOCK. This appliance is equipped with a three-prong
(grounded) plug for your protection against electrical shock hazard and should be plugged directly into a properly
grounded three-prong receptacle. DO NOT CUT OR REMOVE THE GROUNDING PRONG FROM THIS PLUG.
Spec-Master®Hot Food Table with Sealed-in Wells
SAFETY TIPS AND WARNINGS
SHOCK HAZARD!
2
(continued on next page)

Spec-Master®Hot Food Table with Sealed-in Wells
(continued on next page)
OPERATIONS MANUAL & INSTRUCTIONS
The Hot Food Table will work most efficiently when used with hot water in the pan liner. The hot water will give a better distribution
of heat and help keep food from drying out. It is not designed for cooking foods but merely to keep cooked foods at desired
temperatures for serving.
During initial operation, a little smoke or odor may be detected. This will occur when the coating on the heating element burns off.
This should stop after a half hour of operation.
This unit is equipped with a variable control for different heat selections.
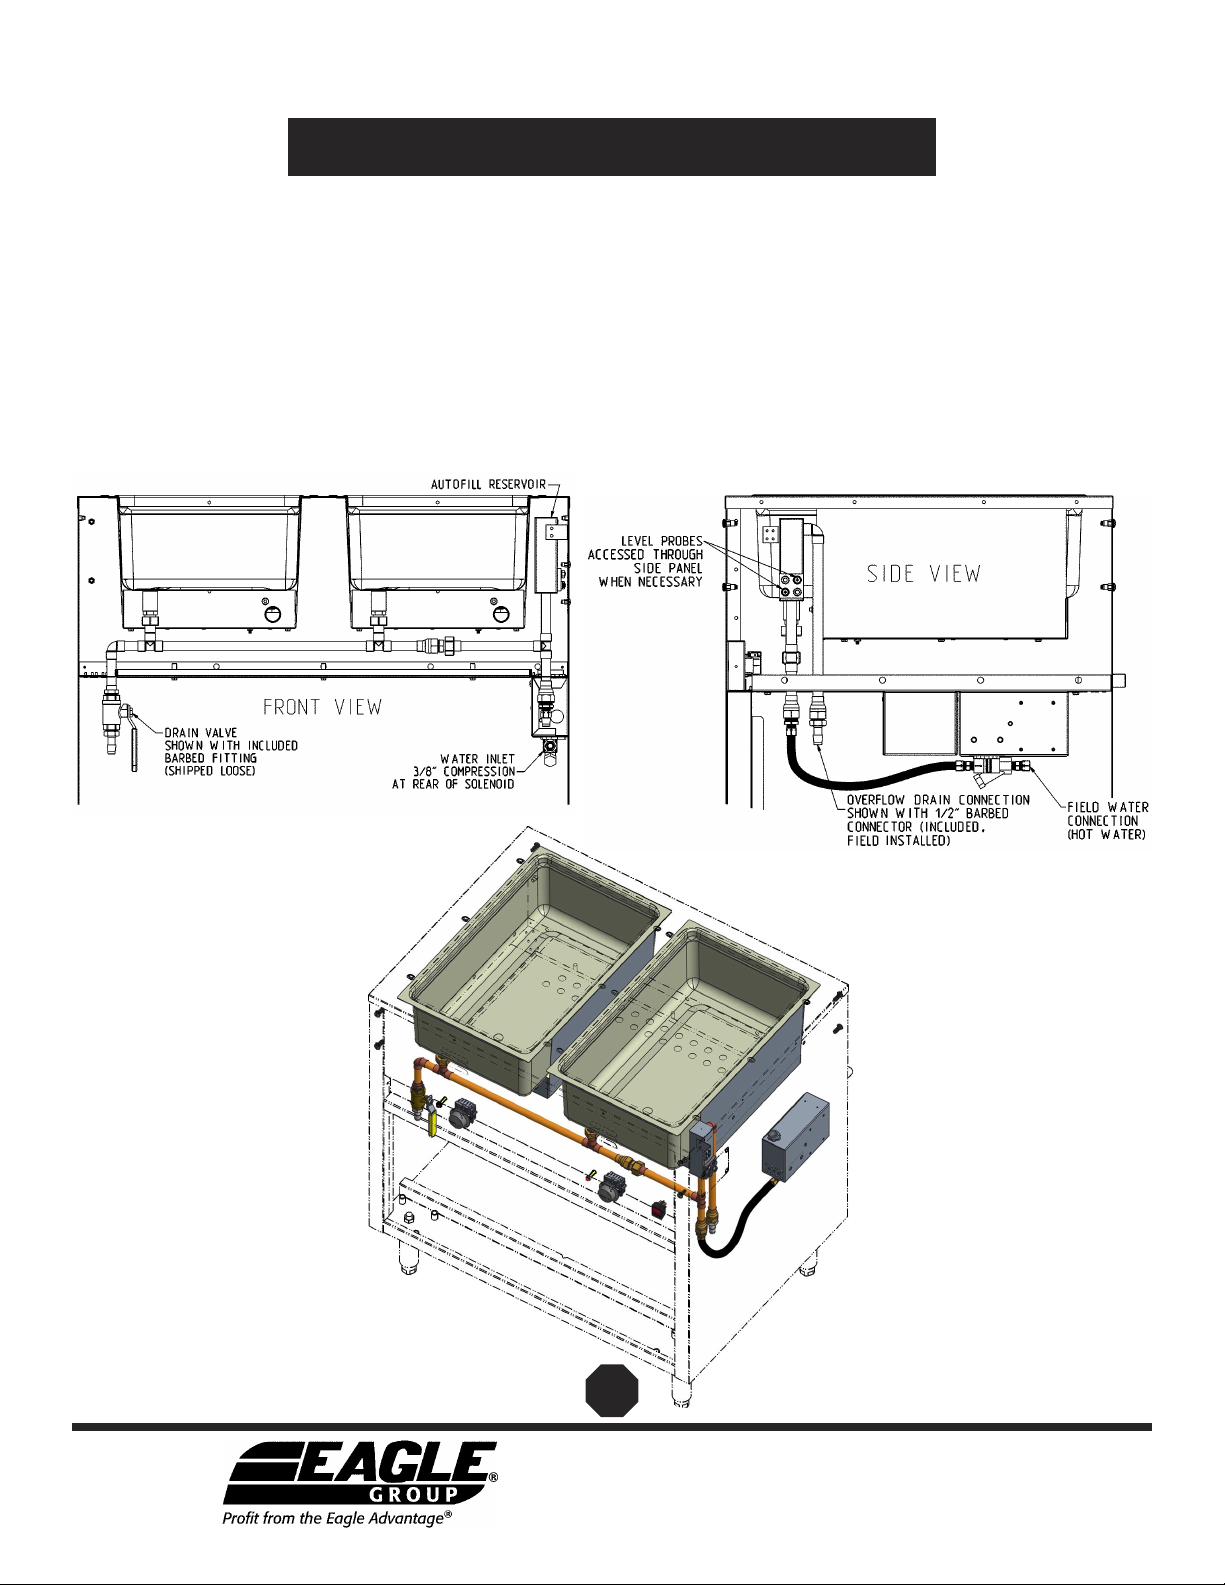
WET OPERATION WITH COVER
(IF USING AUTOFILL®, PLEASE SEE BACK PAGE)
1. Ensure unit is level in both directions, adjust feet in or out as necessary.
2. Ensure drain valve is in the closed position.
3. Pour hot water (minimum of 185°F [85°C]) into first well. Water will flow through manifold and fill all the wells, stop when a depth
of about 1" has filled all the wells. This may take a few minutes to level out between all wells.
4. Set dial to highest position for 45 minutes with well covered to preheat unit, place food pan with precooked food (minimum 150˚)
into well and cover food pans with lids. (Note: Indicator light is the set point for the control knob.)
5. Adjust to desired setting for proper food temperature. This will vary with the type of food, type of pans and individual serving tem-
perature. NSF requires a minimum temperature of 150˚F in food product.
6. To increase temperature turn knob toward highest setting, to decrease turn knob toward lowest setting.
7. Change water, clean well and wipe dry after every 24 hours of operation. Water may have to be added to pan during operation
depending on operating time and temperature setting.
8. Food pans must be covered to maintain temperature when food is not being served and to prevent food from drying out.
The above instructions are starting suggestions only and may be changed to suit your individual needs. With so many different
applications for this item it is impossible to have standard settings to suit all situations.
NOTE: If unit is used dry, the bottom of the well will take on a brown colored appearance where the heater is located.
The discoloration will not come off with normal cleaning procedures, but in no way will it affect the operation of the unit.
CAUTION:
1. This equipment is designed and sold for commercial use only by personnel trained and experienced in its operation, and is not
sold for consumer use in and around the home, nor for use directly by the general public in food service locations.
2. Do not immerse unit in water.
3. All repairs should be performed by an authorized service center.
4. Unit should be turned off when not in use. It is recommended that unit be disconnected from power supply by removing plug from
receptacle or shutting off power disconnect supply to the unit.
5. Unit must be operated with legs provided to prevent overheating and damage to surface below or cord.
3

(continued on next page)
4
1. The inside of the water compartment and outer shell should be washed daily, using a clean cloth or sponge and
mild detergent.
MAINTENANCE
2. Use a plastic scouring pad to remove any hardened food particles or mineral deposits. DO NOT use chemicals, steel wool, or
scrapers to clean the unit.
Spec-Master®Hot Food Table with Sealed-in Wells
OPERATIONS MANUAL & INSTRUCTIONS

Install legs onto Stationary Units.
If your unit is a Mobile Unit, skip this page and refer to page 6.
(continued on next page)
Spec-Master®Hot Food Table with Sealed-in Wells
ASSEMBLY INSTRUCTIONS
STATIONARY UNIT
plate
leg
figure 1a
unit
5
1. After removing crate above shipping pallet, gently lay the unit onto its back.
Caution: Use cardboard or other material to prevent scratching.
2. Carefully unbolt unit from shipping pallet.
3. Attach legs to unit.
• At each corner, align leg and plate with center hole on unit, as shown in figure 1a.
• Screw leg into threaded hole until snug.
• Repeat on remaining corners.
4. Place unit upright.

Install casters onto Mobile Units.
If your unit is a Stationary Unit, go back to page 5.
Spec-Master®Hot Food Table with Sealed-in Wells
ASSEMBLY INSTRUCTIONS
Note: Casters with brake typically go at the REAR of the unit.
1. After removing crate above shipping pallet gently lay the unit onto its back.
Caution: Use cardboard or other material to prevent scratching.
2. Carefully unbolt unit from shipping pallet.
2. Affix casters to unit.
• At each corner, align holes in caster plate with the four outer holes on unit, as shown in figure 1b.
• Run bolt through washer and caster plate, into each hole, as shown in figure 1b.
• Repeat on remaining corners.
3. Place unit upright.
MOBILE UNIT
figure 1b
caster plate
washer
bolt
unit
6
(continued on next page)

1. Attach support shelf brackets to support shelf, using
acorn nuts, washers, bolts and predrilled holes.
Note: acorn nuts must be at the top.
2. Install 1/4˝-20 x 3/4˝ screws into threaded fasteners on
hot food table. Do not tighten.
3. Align keyholes in mounting brackets with screws and
mount support shelf/bracket assembly to table. Tighten
screws.
4. Hook metal plate shelf into bottom flange of plate shelf
brackets.
5. Using keyholes on support shelf brackets, mount plate
shelf/bracket assembly onto support shelf/bracket
assembly.
6. Align holes in cutting board with acorn nuts, and place
cutting board onto support shelf.
Assemble the cutting board and plate shelf.
Refer to the illustration below and follow the assembly instructions.
SUPPORT
SHELF
BRACKET
PLATE SHELF
BRACKET
WASHER
HEX BOLT
ACORN NUT
10-32 X 3/4˝
SCREWS
STAINLESS STEEL SUPPORT SHELF
METAL PLATE SHELF
CUTTING BOARD
Spec-Master®Hot Food Table with Sealed-in Wells
ASSEMBLY INSTRUCTIONS
7
(continued on back page)

Eagle Foodservice Equipment, Eagle MHC, and SpecFAB®are divisions of Eagle Group. ©2022 by the Eagle Group
• 100 Industrial Boulevard, Clayton, Delaware 19938-8903 U.S.A.
• Phone: 302/653-3000 • 800/441-8440
• Fax: 302/653-2065 • www.eaglegrp.com
(End)
INSTRUCTIONS
AutoFill®
Water System
1. Attach a continuous flowing hot water source to the 3⁄8˝ compression water connection inlet.
2. Screw the barbed fitting into the drain line and connect a 1⁄2˝ tube for the overflow drain. run to an appropriate floor sink.
3. Plug unit into proper power source stated on model/serial plate. Turn water source on and the AutoFill®ON/OFF switch to “ON”.
(Remember that the solenoid will make a “pop” sound the first time this is turned on.) The AutoFill®system will fill and maintain
the proper water level in all wells. If there is a desire to run the unit without automatically filling the wells with water, simply turn
the ON/OFF switch to the “OFF” position. The AutoFill®system runs independently of the hot wells, so the wells are still
operational.
For further details about the AutoFill®Water System, call the factory at 1-800-441-8440.
Table of contents
Other Eagle Group Commercial Food Equipment manuals
Popular Commercial Food Equipment manuals by other brands

Federal
Federal SSRC Series Installation & operation instructions

Taylor
Taylor C602 Replace

A.J.Antunes
A.J.Antunes Roundup SDC-500 owner's manual

CARTER-HOFFMANN
CARTER-HOFFMANN CRISP N HOLD Operator's manual

Dover
Dover Hillphoenix AGB-RG Installation & operation manual

Delfield
Delfield Taco Bueno Installation, operation and maintenance manual