eagletone.com
Manuel de l’utilisateur EAGLETONE FLOWER LED
2
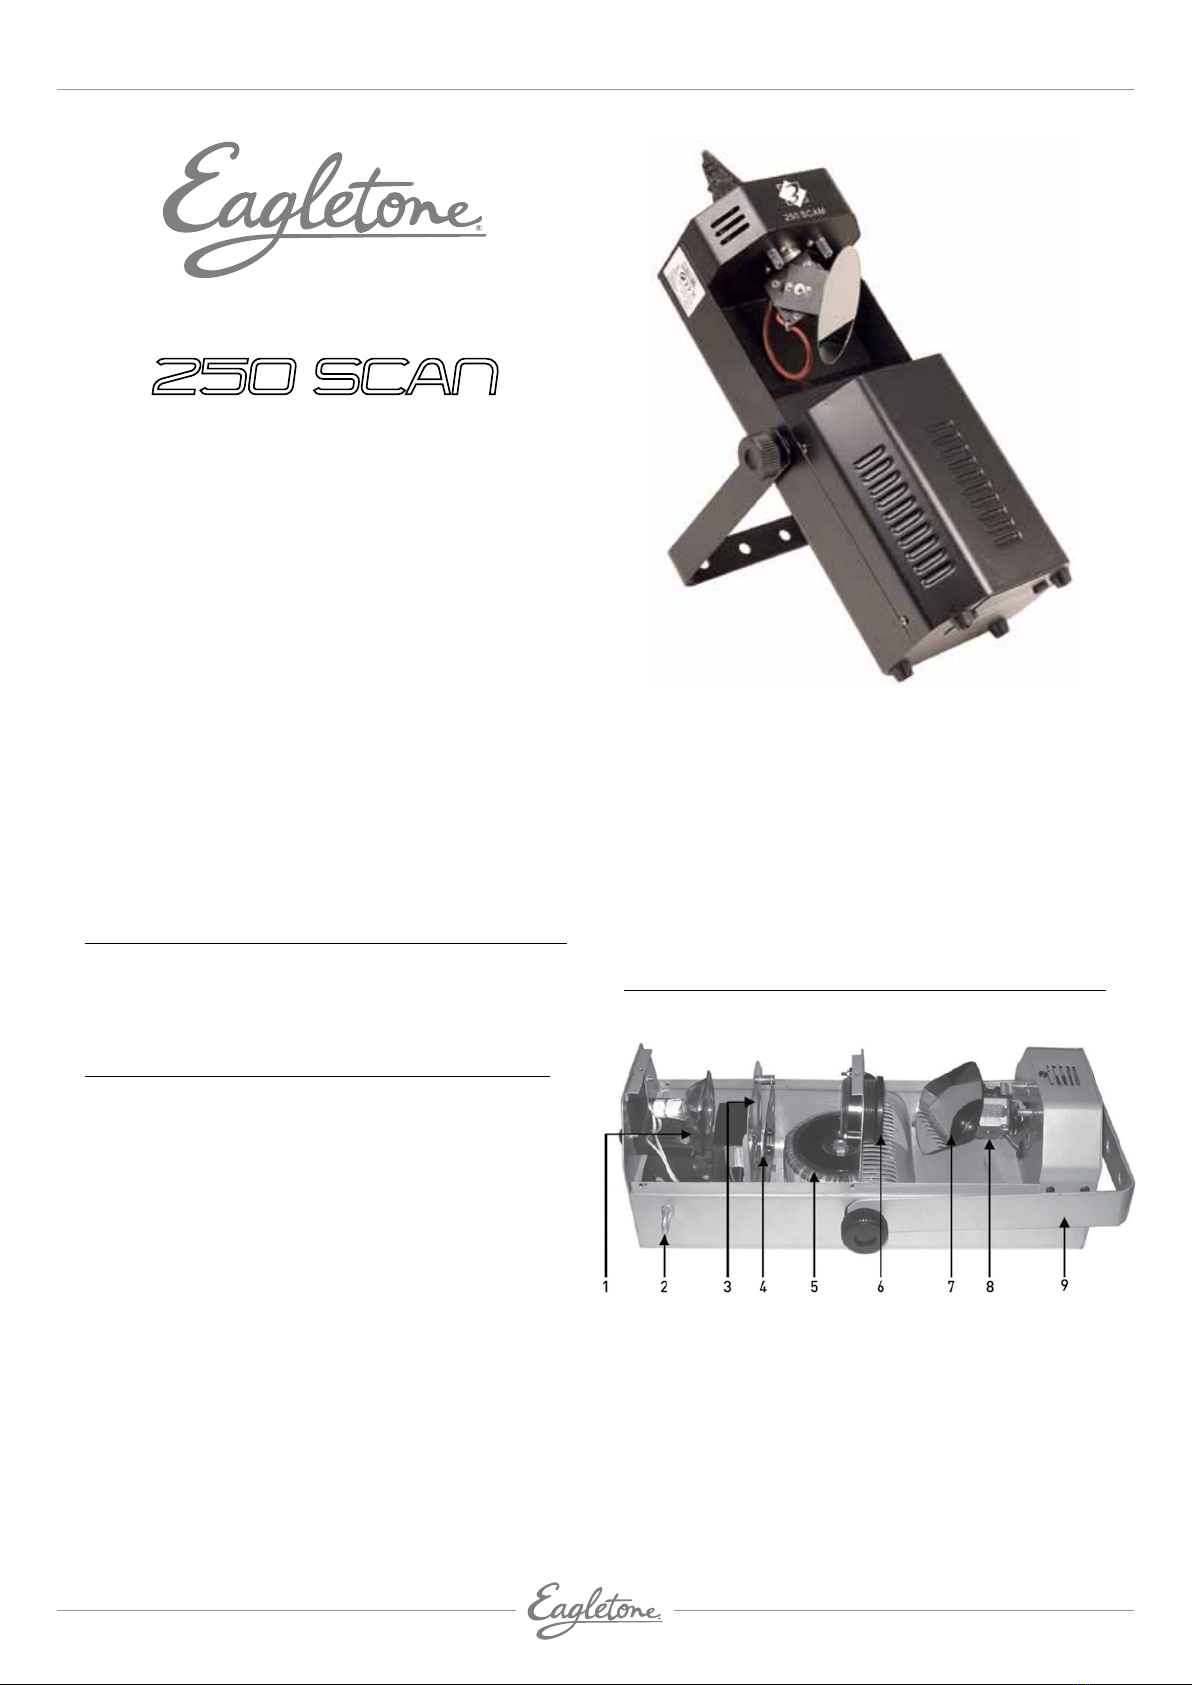
INSTALLATION
• Ce projecteur peut être installé n’importe où tant qu’une
distance minimum de 1 m est respectée entre celui-ci et
tout objet environnant ou personne. Le projecteur doit être
fixé de manière sûre et sécurisée et être correctement
raccordé à la terre.
• Assurez-vous que le voltage et la fréquence électrique de
l’endroit où vous vous situez est compatible avec ceux de
l’appareil.
• L’EAGLETONE 250 SCAN s’allume dès qu’il est
correctement connecté. Une fois en marche, le mécanisme
réinitialise sa position. La lampe s’éteint automatiquement
et le moteur pas à pas retourne à son point initial. Le
système de calibrage interne mémorise la position du
moteur.
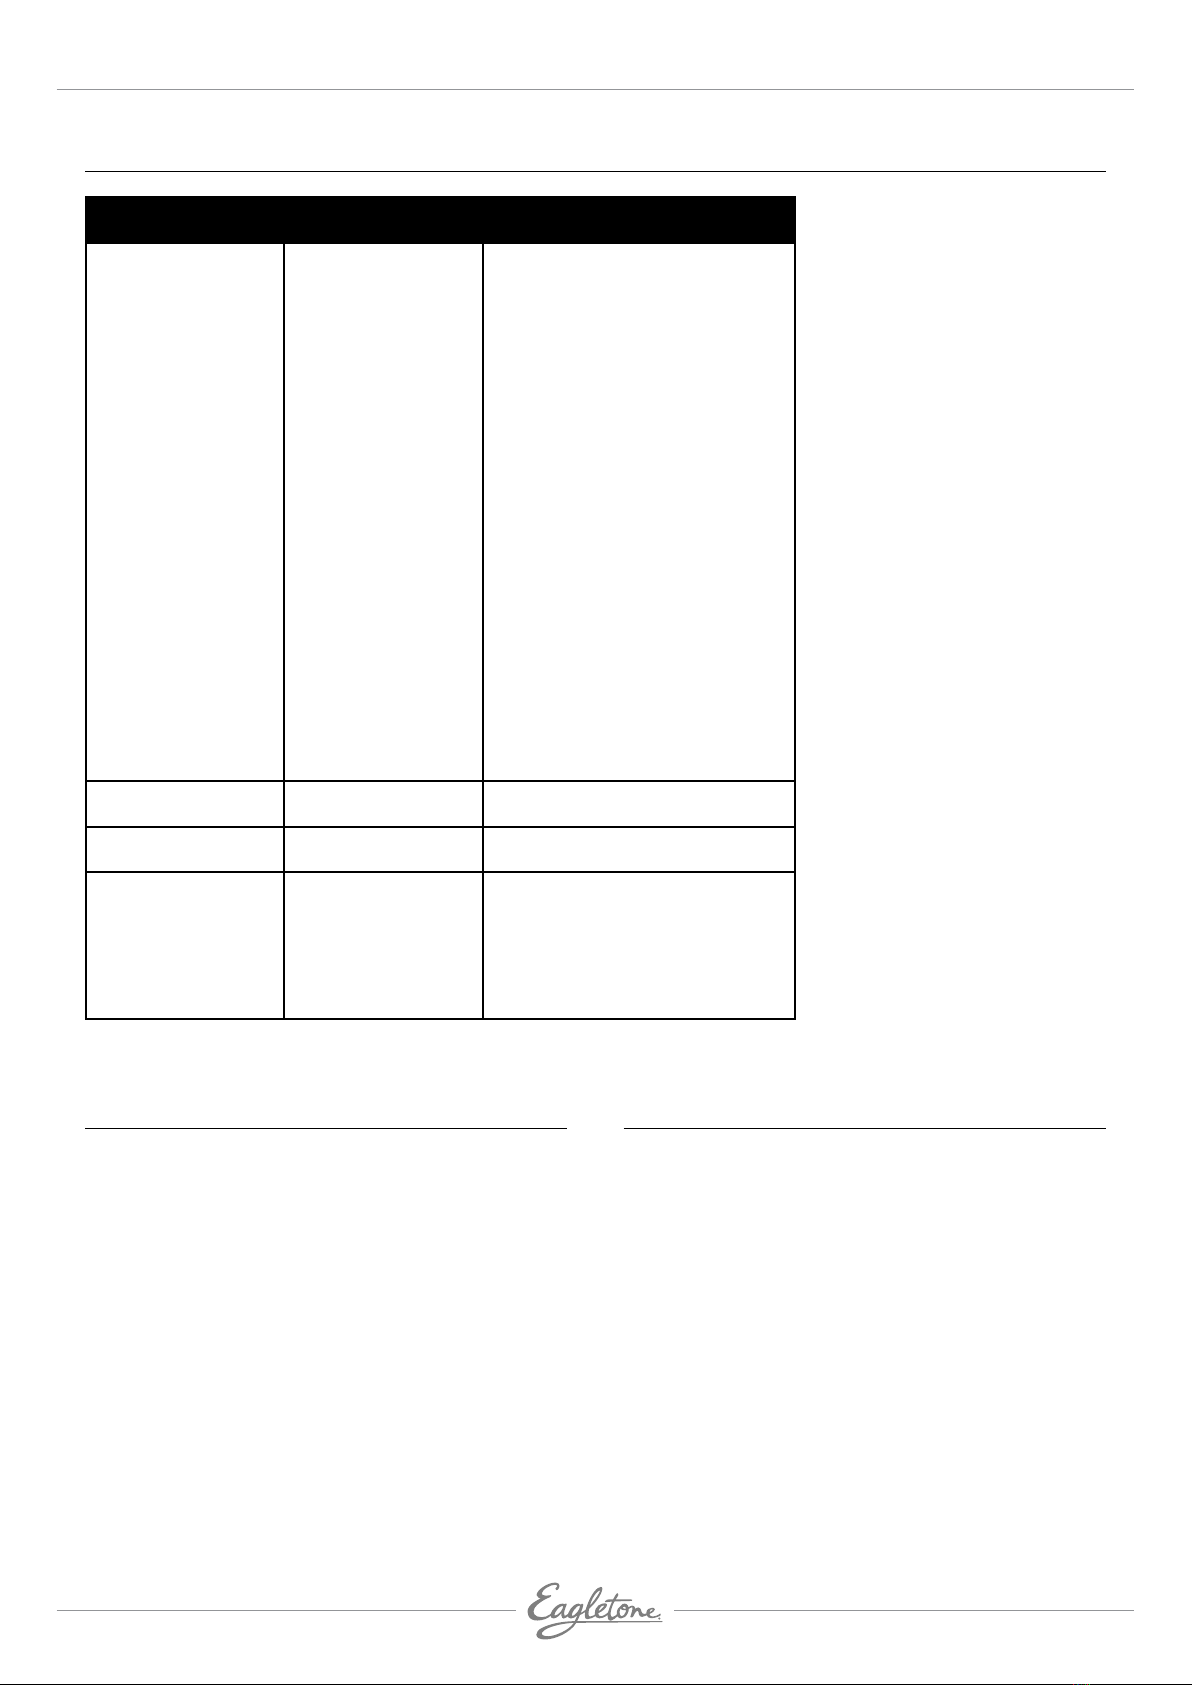
• CONNEXION EN DMX 512. Cet appareil peut être contrôlé
par le signal standard DMX 512 à l’aide de câbles d’entrée
et de sortie XLR DMX (d’une résistance comprise entre
100 et 120 à 3 broches (attention : un câble micro n’a ni la
même impédance, ni la même bande passante, il sera donc
générateur de pannes).
• Le câble ne doit pas dépasser une longueur de 100 m afin
d’éviter toute perte de signal. Si le câble est trop long, il
captera les interférences produites par d’autres appareils
électriques. Veillez à bien terminer la ligne (en son point le
plus éloigné du contrôleur) par un bouchon équipé d’une
résistance de 120 reliant les points 2 et 3 du connecteur
XLR afin d’absorber les réflexions du signal.
Remarque : Lorsque vous utilisez un contrôleur, chaque
projecteur dispose de son propre numéro d’adresse
numérique, utilisant chacun 4 canaux. Ainsi, le numéro
d’adresse du premier projecteur doit être paramétré sur 1,
celui du deuxième projecteur sur 5, celui du troisième sur 9,
etc. (Cette méthode d’adressage doit être adaptée au type
de contrôleur utilisé et n’est fourni qu’à titre indicatif. Si
vous utilisez un contrôleur DMX 192, vous devez calculer les
valeurs en intervalles de 6.)
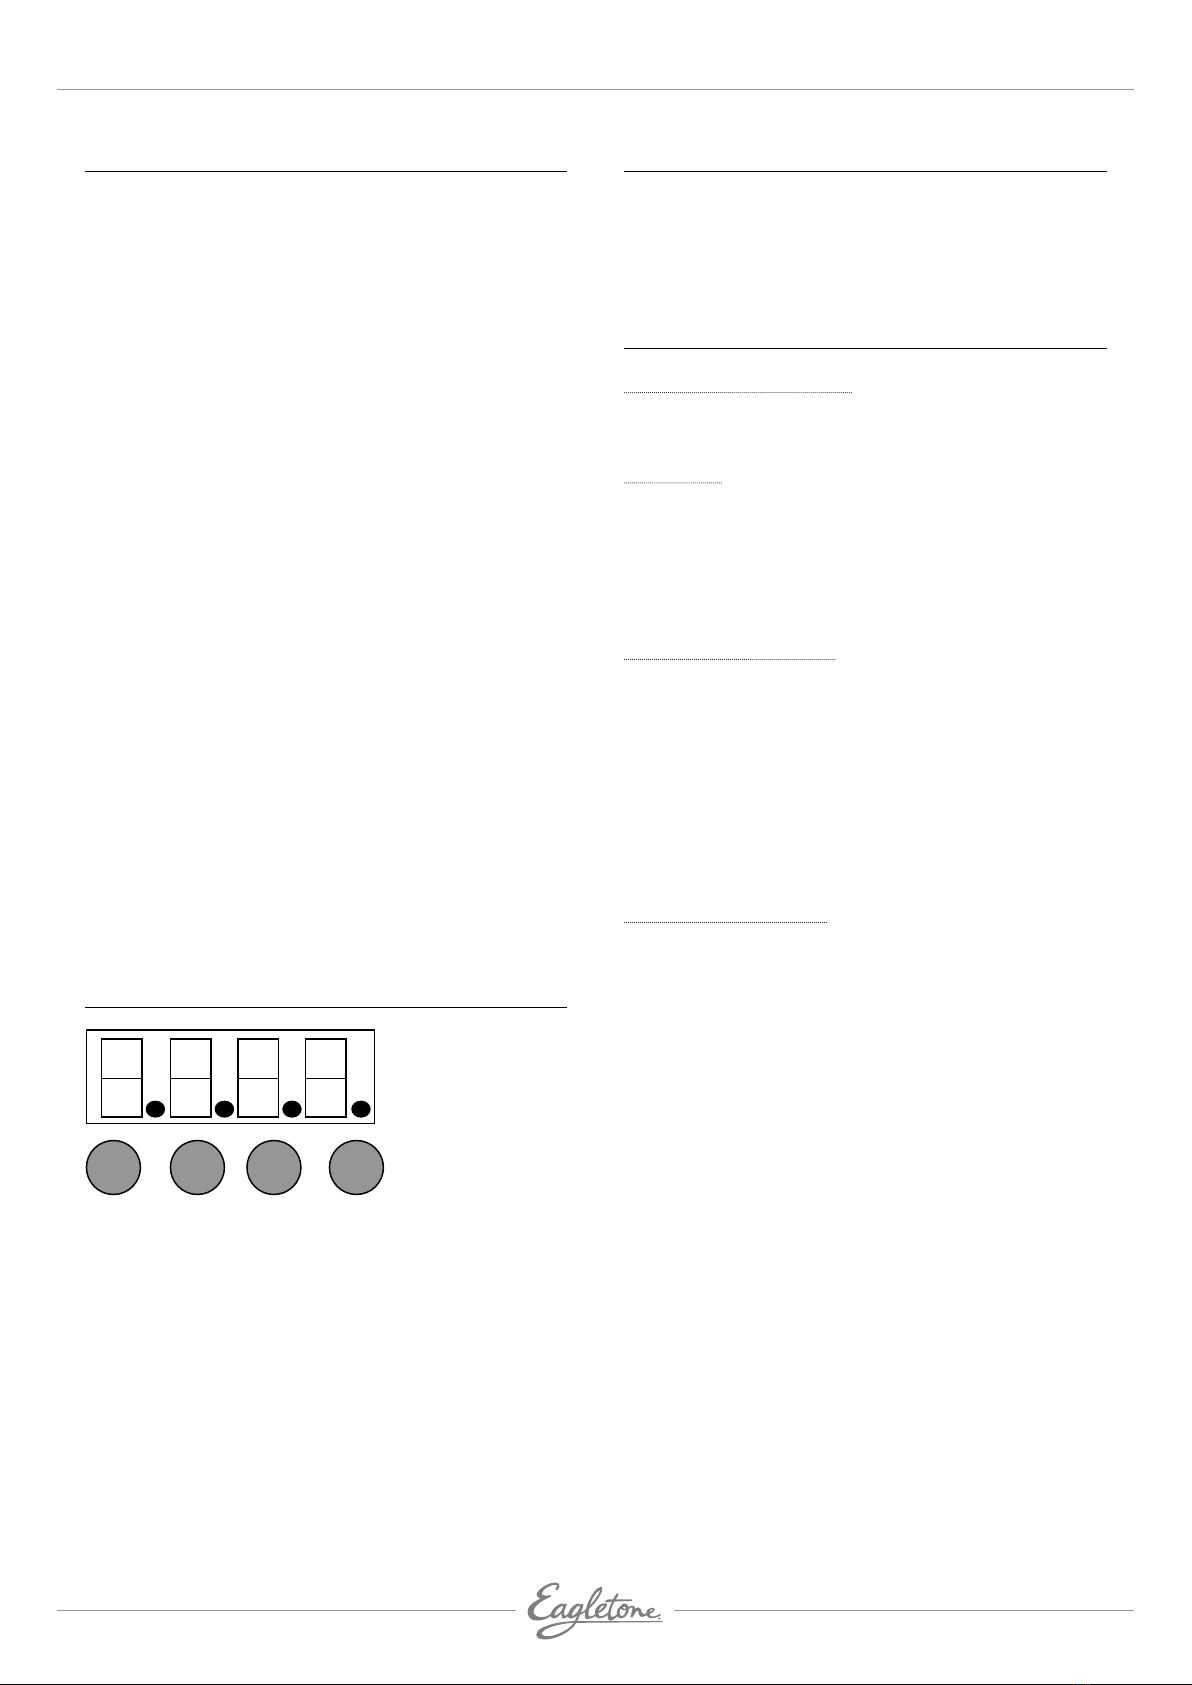
PANNEAU DE COMMANDE
Mode: sélectionne le mode de fonctionnement.
Func: sélectionne la fonction du projecteur
UP/DOWN: modifie les paramètres du projecteur
SÉLECTION DES FONCTIONS
Une fois que le projecteur est sous tension, appuyez sur
le bouton FUNC, puis, à l’aide des boutons UP et DOWN,
sélectionnez l’une des fonctions suivantes :
• P0/P1 : Pan inverse,
• T0/T1 : Tilt inverse
• D1/ : extinction du panneau d’affichage digital.
INSTRUCTIONS D’UTILISATION
Mode de fonctionnement
Lorsque le projecteur est allumé, appuyez sur le bouton
MODE, puis choisissez parmi les modes suivants :
Mode DMX
001 : Utilisez les boutons UP/DOWN pour sélectionner le
canal désiré de A001 à A512 et ainsi mettre le projecteur en
mode DMX. Quand le projecteur reçoit un signal d’entrée,
le point de A.001 sur l’affichage du projecteur clignote. Si
le projecteur ne reçoit aucun signal, le point sur l’affichage
reste éteint.
Mode MASTER (Maître)
• Mode Sound Active (activation par le son) : Utilisez les
boutons UP/DOWN pour sélectionner « G.-1- » sur l’écran
d’affichage.
• Mode Slow-running (lent) : Utilisez les boutons UP/DOWN
pour sélectionner « G.-2- » sur l’écran d’affichage.
• Mode Fast-running (rapide) : Utilisez les boutons UP/DOWN
pour sélectionner « G.-3- » sur l’écran d’affichage.
• Mode Blackout (affichage désactivé) : Utilisez les boutons
UP/DOWN pour sélectionner « G.-4- » sur l’écran
d’affichage.
Mode SLAVE (Esclave)
• S.-1- : Appuyez sur les boutons UP/DOWN, lorsque « S.-1- »
s’affiche, cela signifie que vous avez choisi le premier
projecteur.
• S.-2- : Appuyez sur les boutons UP/DOWN, lorsque
« S.-2- » s’affiche, cela signifie que vous avez choisi le
deuxième projecteur.
• S.-3- : Appuyez sur les boutons UP/DOWN, lorsque
« S.-3- » s’affiche, cela signifie que vous avez choisi le
troisième projecteur.
• S.-4- : Appuyez sur les boutons UP/DOWN, lorsque
« S.-4- » s’affiche, cela signifie que vous avez choisi le
quatrième projecteur.
Remarque : En général, un jeu complet est compose de
quatre projecteurs.