EastLink Maestro User manual

Eastlink Maestro
Quick Start Guide
30800036 – May 2018

A Whole New TV Experience
Welcome to a whole new TV experience with Maestro! You now have
the power to watch or record six shows at once, pause Live TV in any
room and continue in another, and control your TV experience easily from
your tablet or smartphone using the free Follow Me TV app. Plus, you
can access Netix and YouTube from any Maestro connected TV in your
home. This guide will get you started with the basics, but there’s so much
more to discover.
For more Maestro instructions, visit eastlink.ca/maestrosupport.

Maestro is as easy as A, B, C, D
Use the handy A, B, C, D buttons at the top of the remote as shortcuts to:
A - DVR - Go to RECORDED TV
B - VOD - Go to VIDEO ON DEMAND
C - GRID - Activate the GRID GUIDE
D - LIVE TV - Go to full screen LIVE TV
1
2
3
4
dvr
vod grid
liveTV
1
23
4
3

Using the Guide
Not sure what to watch? Find the programming guide by pressing the
(grid) button on your remote.
To browse programming, use these buttons on your Eastlink remote:
ARROW buttons – move through the guide
SKIP button – skips forward 24 hours
REPLAY button – moves backward 24 hours
BACK and NEXT buttons – moves horizontally through the guide
OK button – tunes to the current program, or to an action menu if the
program is in the future
MENU button – returns to the main menu
4

Searching for Programming
Do you already have a show in mind? Use the SEARCH capability in
the main menu to nd your favourite programming by Title, Keyword or
Category.
During a search, Maestro will list programming that is currently airing or
will air in the next 12 days. It will also display Pay Per View, OnDemand
and Recorded programming.
TIP: Search using the Maestro DVR Follow Me TV app on your
smartphone or tablet.
See page 10 for details.
5

Seing DVR Recordings
Want to watch your favourite show on your time? To record a show,
simply press the RECORD button when in the guide or select a
program in the future and choose RECORD in the on-screen menu. You
can record the program once or as a series (multiple episodes of the
same program).
Viewing DVR Recordings
To view recorded programs, simply press the (DVR) button at the top of
the remote. To watch a program, select it, and press OK. If you’ve already
watched a portion of the program, you can choose whether to resume
where you left off or start over from the beginning.
6

Viewing DVR Recordings
When you press INFO with a recorded program in focus, you’ll get the
following list of options in the action menu:
PLAY/START OVER - Launches the program from the beginning
RESUME - Launches the program from the point you left off (if you’ve
already watched a portion)
LOCK - Prevents someone from watching a recorded program
without a PIN
SEE ALL TIMES - Displays all times that the selected program airs
KEEP UNTIL - The oldest program is automatically deleted as you
need more space unless you change the settings using this option
RECORDING OPTIONS - Allows you to manage when programs
are deleted
RECORD SERIES - Allows you to record all episodes of a show
DELETE - Removes the selected program
7

OnDemand
Instantly access free primetime TV shows from Global, HGTV, City and
more OnDemand, plus an extensive library of Movie Rentals. Press the
(VOD) button at the top of the remote and browse through the folders
to watch your favourite programming at any time.
OnDemand Controls
1
2
3
1
2
3
ARROW - Move back or forward.
BACK - Returns to the previous screen
OK - Select the items in the centre focus or executes on options in
an action menu
8

Netix & YouTube
Watch Netix and YouTube on any Maestro connected TV by following
these instructions:
Access your Netix account
•Select the Netix Channel – 2500, or press “Menu” on your Maestro
remote, and go to the right. Press the “OK” button on your remote when
the Netix logo is highlighted.
Netix will launch as it would on your tablet or smartphone.
The rst time you launch it, you’ll need to login to your Netix account.
Use your remote to enter your usual Netix username and password.
You will only have to do this one time, on each Maestro enabled TV. It
may take a few minutes to load the content the rst time.
Use your remote control arrow buttons to browse Netix and press “OK”
to select a title. You can fast forward or pause your show or movie with
your Maestro remote.
To exit Netix, press the “Menu” button on your remote.
•
•
•
•
Access YouTube
•
•
•
•
•
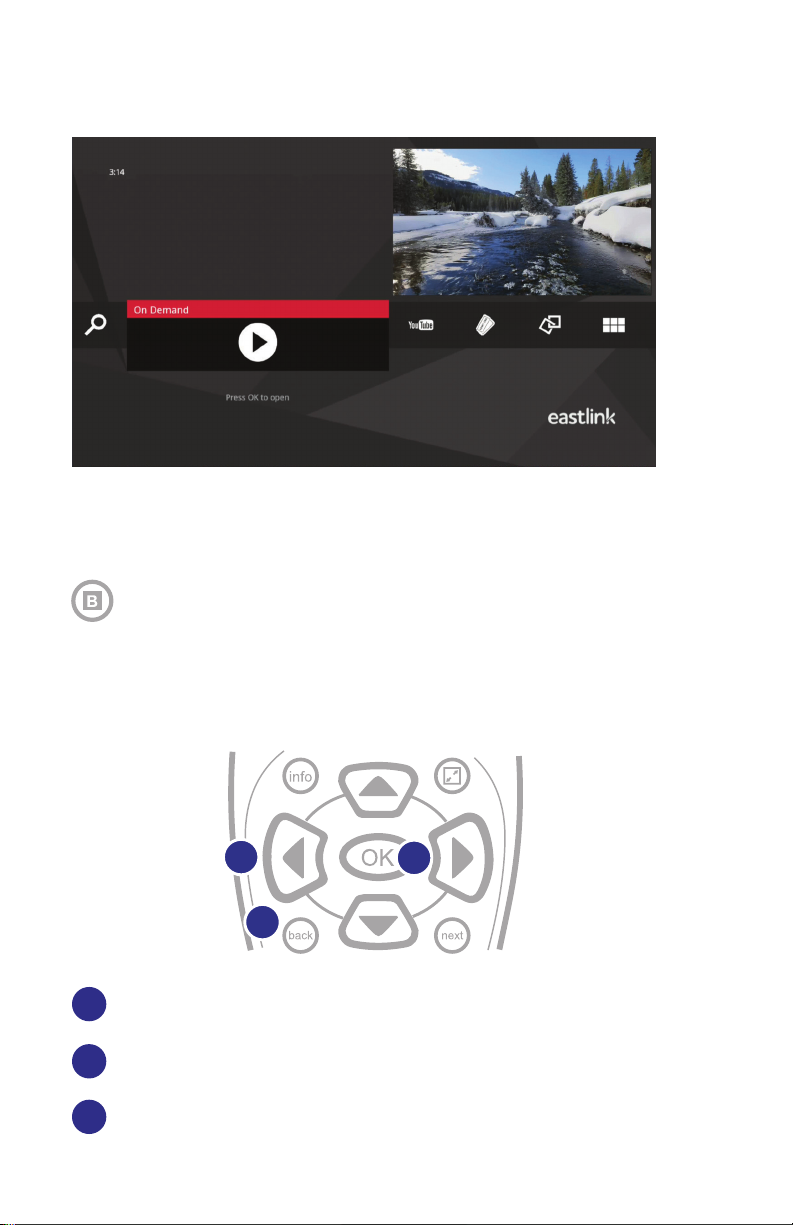
Press “Menu” on your Maestro remote, and go left or right.
Press the “OK” button on your remote when YouTube is highlighted.
YouTube will launch as it would on your tablet or smartphone.
Use your remote control arrow buttons to browse YouTube and press
“OK” to select a title. You can fast forward or pause your show or movie
with your Maestro remote.
To exit YouTube, press the “Menu” button on your remote.
9

Follow Me TV App
For an even better TV experience, download our free Follow Me TV App
on the App Store or Google Play to:
Browse and search the 12 day guide
View program details
Use your tablet or smartphone as a remote control
Schedule and manage DVR recordings from anywhere
Instantly stream live TV and DVR recordings directly to
your tablet or smartphone from anywhere in Canada.
For more information, visit eastlink.ca/cabledigitaltv/maestro
-
-
-
-
-
Pair a Device to the Maestro Media Gateway:
Go to the App Store or Google Play from your tablet or smartphone,
search for “ARRIS” and install the “ARRIS Follow Me TV App”
With your tablet or smartphone, ensure your WiFi access point is
your home WiFi network
Launch the app and follow the on-screen instructions
To generate a pairing code from the Maestro guide, click the MENU
button on your remote and scroll horizontally to SETTINGS, then
down to the uppermost ACCESS TO MEDIA PLAYER, or EASTLINK
MAESTRO, and press OK
Select ADD to generate an 8 digit pairing code
Enter this pairing code into the app
Once you see a ‘SUCCESS’ message on the TV screen, you can
now use the app to control your Maestro DVR
1.
2.
3.
4.
5.
6.
7.
10

Quick Tips
With the SETTINGS option, you can use MENU CUSTOMIZATION to
choose the folders that you want to see in the main menu. You can also
change how you view your guide and channel listings, customize the
channels you see in the guide, and set up parental controls.
The FAVOURITES feature is a convenient way to access your favourite
programming quickly. When viewing something you’d like to add, press
INFO and choose to add that item to your favourites.
11

Your Remote
OK
info
dvr
vod grid
liveTV
back next
skip
replay
play
rew fwd
pause
rec stop
mute
123
456
789
0
last
abc
ghi
pqrs
clear TV
input
tuv wxyz
jkl mno
def
chvol
menu
1
5
7
9
11
14
12
15
18 19
20
21
16 17
13
10
8
6
23
4
A – DVR - Goes to RECORDED TV
B – VOD - Goes to ON DEMAND
C – GRID - Activates the GRID GUIDE
D – LIVE TV - Goes to full screen LIVE TV
INFO - Brings up action menu related to the
1
2
3
4
5
6
7
8
9
item in focus
ZOOM - Alternates between full screen and
the menu
ARROWS - Move back or forward. Hold to
move more quickly through the content.
OK - Selects the items in centre focus or
executes on options in an action menu
BACK - Moves back horizontally through the
TV programming display
NEXT - Moves forward horizontally through the
TV programming display
MENU - Returns one step at a time toward the
top level of the main menu
REPLAY - Rewinds a predened number
of seconds. Takes a vertical list of TV
programming back 24 hours
SKIP - Skips forward a predened number
of seconds. Takes a vertical list of TV
programming forward 24 hours
PLAY - Begins playing the item in focus.
Resumes show from last position
REWIND - Rewinds the show. Press up to 3
times for 3 speeds
PAUSE - Pauses the show
FAST FORWARD - Fast forwards the show.
Press up to 3 times for 3 speeds
RECORD - Records show in progress or in
centre focus
STOP - Exits a recorded show or stop a
recording
NUMBER PAD - Entering numbers will take you
directly to the corresponding channel.
FIND BY KEYWORD or TITLE:
- Numbers 2-9 to enter letters
- CLEAR clears the entire entry
- 0 adds a space
- 1 backspaces
TV INPUT – Toggles between various devices
hooked up to your TV
10
11
12
13
14
15
16
17
18
19
20
21
Other manuals for Maestro
1
Table of contents
Other EastLink DVR manuals