Eastwood 12526 User manual

DEEP SCRATCH REMOVAL KIT
INSTRUCTIONS
Part #12526

The EASTWOOD DEEP SCRATCH REMOVAL KIT for glass includes the same high quality, profession-
al abrasives and materials used by glass restoration shops to work out scratches and other damage.
This procedure is highly labor intensive and does require a significant amount of time and patience
to achieve results which, when done properly, can be highly satisfactory. Works well on laminated or
tempered glass.
NOTE: This kit will not repair heavily pitted or excessively deep scratches in glass. Attempts to do so
will remove uneven amounts of glass, causing waves and optical distortion.
2Eastwood Technical Assistance: 800.544.5118 >> techelp@eastwood.com
SAFETY INFORMATION
Read and understand all instructions thoroughly.
WARNING! HEALTH HAZARD!
• DO NOT breathe any dust released from handling and mixing or spray mist
produced by this product. IMPORTANT! A large amount of silica dust and slurry
is generated by this procedure. Inhalation of silica dust can cause nose and
throat irritation. Repeated exposure to silica dust can result in lung inflammation
and silicosis, a serious and permanent lung disease. Persons with impaired lung
function or asthma type conditions may experience additional breathing difficul-
ties as a result of the irritant properties of the compound.
• Always wear appropriately rated and fitting NIOSH approved breathing apparatus
while mixing, during use and while cleaning up.
• Wear appropriate eye protection when mixing and handling to avoid the possibil-
ity of any dust or mixed product splashing into eyes.
• Wear chemical and solvent resistant gloves while handling product before, during
and after application.
• Wear protective clothing to avoid any possible skin contact with product.

To order parts and supplies: 800.345.1178 >> eastwood.com 3
CAUTION!
• Store in a cool, dry area. Dispose of unused amounts and empty containers at an
approved hazardous waste disposal facility only.
• If product is spilled, contain material with inert absorbent and dispose of at an
approved hazardous waste disposal facility only.
• Do not use on cold glass (less than 32°F).
• Do not exceed 1500 RPM! Exceeding 1500 RPM and applying excessive pres-
sure can create heat which will permanently damage, distortion and/or crack the
glass.
• Keep the work surface wet at all times while polishing to avoid heat which will
permanently damage, distort and/or crack the glass.
• This process creates a large amount of wet slurry and spatter. It will cause
a mess. Use drop cloths, heavy blankets or other suitable material to protect
vehicle paint, trim and adjacent work areas from spatter.
• If spatter should contact paint finish, Do Not let it dry but carefully wash it off
with large amounts of water. Do Not attempt to wipe it away or scratching will
occur.
INCLUDES
(1) 1/2 lb. jar of Glass Polishing
Compound.
(1) 3” Hook and Loop Backing Pad
with 5/8”-11 female thread.
(1) 3” Smooth-Faced, Pressure-
Sensitive type Backing Pad
with 5/8”-11 female thread.
(1) 5/8”-11 male thread x 1/4”
shank adapter spindle for drill
chuck use.
(1) Hook and Loop backed Felt Glass Polishing Pad.
1 each of 3 Glass Scratch Removal Abrasive Discs: 1 Coarse (Green), 1 Medium (Blue),
1 Fine (Orange).

4Eastwood Technical Assistance: 800.544.5118 >> techelp@eastwood.com
ITEMS REQUIRED
• A cordless or pneumatic power tool capable of at least 600 RPM but no greater than 1500
RPM. NOTE: A pneumatic or cordless electric tool is strongly recommended to avoid electrical
shock as this process requires the use of water. (Be sure to adhere to tool manufacturer’s use
and safety instructions.
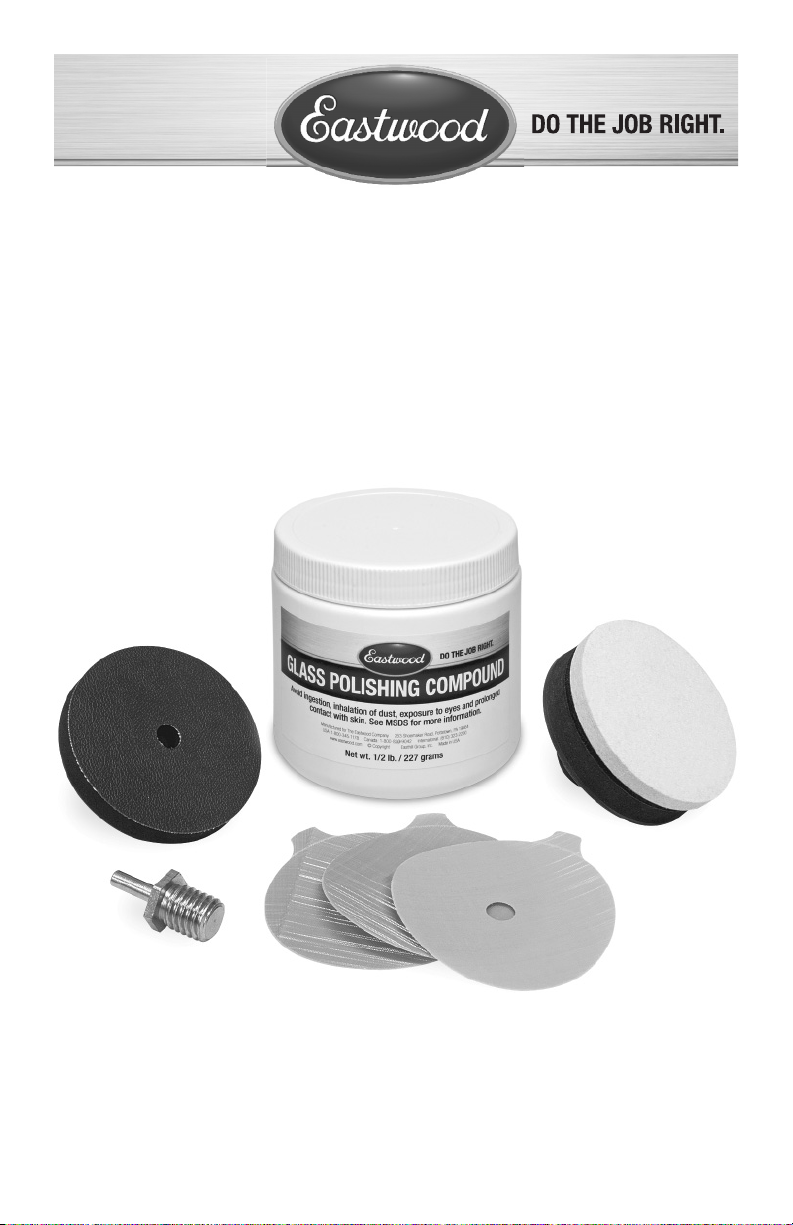
• A properly fitted Respirator Mask such as Eastwood #11456 or equivalent.
• Eye protection. Eastwood #43090 Safety Goggles or equivalent.
• Hand Protection such as Eastwood #43098 disposable gloves or equivalent.
• Source of slow-running fresh water or a pump spray bottle.
• Non-permanent marker, grease pencil, crayon or tape.
• Plastic drop-cloth or other material to protect the vehicle and surrounding areas from spatter.
SCRATCH REMOVAL PROCESS
1. Using a non-permanent marker, crayon, grease pencil or masking tape, trace an outline of the
area to be repaired on the inside of the glass.
2. Remove any trim, wipers or accessories that may be required to gain access to the entire dam-
aged area.
3. The spatter and slurry from this process is highly abrasive. Be sure to cover and protect all
paint and trim areas thoroughly before beginning.
4. Assess the depth of scratch. IMPORTANT NOTE: Use of the Coarse (Green) and Medium (Blue)
Abrasive Discs can cause waves and permanent damage of the glass surface!
5. Always use the mildest abrasive disc that you feel will remove the scratch. Be aware that it
is very difficult to avoid creating waves in the glass when using the Coarse (Green) Abrasive
Disc. If the damage is severe and the Coarse disc is needed, keep it completely flat against the
surface at all times and use plenty of water keeping the pad and glass wet.
6. If using a machine with a 5/8”-11 threaded shaft, thread the Smooth-Faced backing pad
directly on the shaft. If using a cordless drill, thread the adapter spindle into the 3” backing pad
then insert the 1/4” shank into the chuck and tighten.
7. Peel the protective paper from the back of the Abrasive Disc and while taking care to center the
disc on the face of the 3” backing pad, press it in place.
8. Wet the glass surface with water.
9. Work the abrasive evenly in overlapping passes across the damaged area, with a steady light
pressure, keeping the disc as flat against the glass surface as possible. Try to keep the working
area as localized as possible. This will minimize the work required to remove the “frosted”
appearance of the repaired area. IMPORTANT NOTE: Do not be alarmed as the “frosted” ap-
pearance will diminish as you progress to finer abrasives finally restoring full clarity once the
glass polishing step is completed.

To order parts and supplies: 800.345.1178 >> eastwood.com 5
10. Keep the surface wet as you recondition the glass using a pump spray bottle or slowly running
hose. Allowing the glass and abrasive disc to become dry will quickly create heat and perma-
nently damage the glass.
11. Stop work often, dry the glass with CLEAN towels to check your progress, re-wet and continue.
12. These steps should be repeated often for best results.
13. Once the initial damage is satisfactorily removed, proceed to “Polishing Glass” to restore the
glass to like new clarity.
POLISHING GLASS
1. Using a non-permanent marker, crayon, grease pencil or masking tape, trace an outline of the
area to be repaired on the inside of the glass.
2. The spatter and slurry from this process is highly abrasive. Be sure to cover and protect all
paint and trim areas thoroughly before beginning.
3. If using a machine with a 5/8”-11 threaded shaft, thread the 3” Hook and Loop backing pad
directly on the shaft. If using a cordless drill, thread the adapter spindle into the 3” backing pad
then insert the 1/4” shank into the chuck and tighten.
4. Taking care to center the disc on the face of the 3” Hook and Lop backing pad, press the felt
pad in place on the Backing Pad.
5. Place the felt pad face down in 1/4” of clean water and let it soak for several minutes allowing
it to soften.
6. Begin with a clean container; mix the Glass Polishing Compound with water to create a
toothpaste-like consistency. NOTE: It is extremely important to maintain cleanliness throughout
the entire process as any foreign material can quickly cause scratches on the glass.
7. Pre-wet the glass surface and apply a small amount of the compound directly to the surface.
Using an even, steady motion and while keeping the pad surface flat against the surface; work
the polishing pad over the area keeping the pad speed between 600 RPM and 1500 RPM.
8. CAUTION: exceeding 1500 RPM and excessive pressure can generate heat and permanently
damage the glass.
9. Apply water frequently to keep the compound wet and avoid heat buildup which can perma-
nently cause damage to the glass. For best results, use the compound sparingly…more is not
better.
10. The best results are achieved by repeating: Polish area, clean and dry surface, polish again,
clean and dry again until the glass is satisfactorily clear.
11. After the glass is polished to like new clarity, wash the surface and surrounding areas with a
sponge and clean water.
12. Remove the previously applied outline from the inside of the glass.
13. Wash the polishing pad thoroughly and when dry, put it back into the plastic bag to keep clean
for future use.

6Eastwood Technical Assistance: 800.544.5118 >> techelp@eastwood.com
REPLACEMENT ITEMS
#12540 Glass Felt Polishing Wheel and Spindle Kit #12540.
#12539 3 Pack of abrasive discs (1 Coarse, 1 Medium, 1 Fine).

To order parts and supplies: 800.345.1178 >> eastwood.com 7

© Copyright 2015 Easthill Group, Inc. 5/15 Instruction item #12526Q Rev 0
If you have any questions about the use of this product, please contact
The Eastwood Technical Assistance Service Department: 800.544.5118 >> email: techelp@eastwood.com
PDF version of this manual is available online >> eastwood.com/12526manual
The Eastwood Company 263 Shoemaker Road, Pottstown, PA 19464, USA
US and Canada: 800.345.1178 Outside US: 610.718.8335
Fax: 610.323.6268 eastwood.com
Table of contents
Other Eastwood Sander manuals

Eastwood
Eastwood 31455 User manual

Eastwood
Eastwood 31672 User manual

Eastwood
Eastwood PRO MINI ANGLE User manual

Eastwood
Eastwood 31658 User manual

Eastwood
Eastwood 31820 User manual

Eastwood
Eastwood 31294 User manual

Eastwood
Eastwood 21630 User manual

Eastwood
Eastwood 32489 User manual

Eastwood
Eastwood 32488 User manual

Eastwood
Eastwood BUFF MOTOR User manual
Popular Sander manuals by other brands

Power Craft
Power Craft PBS-950N User guide & warranty

HIKOKI
HIKOKI SV13YA Handling instructions

XU1
XU1 XDS-300 operating instructions

Universal Tool
Universal Tool UT8788 General Safety Information & Replacement Parts

Ozito
Ozito BGBS-240 instruction manual

Craftsman
Craftsman Nextec 320.61326 Operator's manual