EBN X-TPC 790 User manual

I
User’s Manual
X-TPC 790

II
Copyrights
© 2016 All rights reserved. The information in this
document is subject to change without prior notice
in order to improve reliability, design and function
and does not represent a commitment on the part
of the manufacturer.
This document contains proprietary
information protected by copyright. All rights
are reserved. No part of this manual may be
reproduced by any mechanical, electronic, or
other means in any form without prior written
permission of the manufacturer.
All trademarks are property of their respective
owners
Liability Disclaimer
In no event will the manufacturer be liable for
direct, indirect, special, incidental, or
consequential damages arising out of the use
or inability to use the product or documentation,
even if advised of the possibility of such
damages.
Regulatory Information
CE mark compliance
This device complies with EMC Directive
2004/108/EC issued by the Commission of the
European Community.
Warning: This a Class B product. In a
domestic environment this product may
cause radio interference, in which case the
user may be required to take adequate
measures
Safety Statement for Lithium
Battery

3
Contents
Copyrights ....................................................................................................................II
Liability Disclaimer.......................................................................................................II
Regulatory Information................................................................................................II
CE mark compliance ................................................................................... II
Safety Statement for Lithium Battery......................................................... II
Contents........................................................................................................................3
1. Introduce...................................................................................................................4
1.1 Standard Features......................................................................... 4
1.2 Optional Features.......................................................................... 4
1.3 Package List .................................................................................. 5
1.4 System Specification .................................................................... 6
2. Your Ruggedized Tablet Tour ..................................................................................8
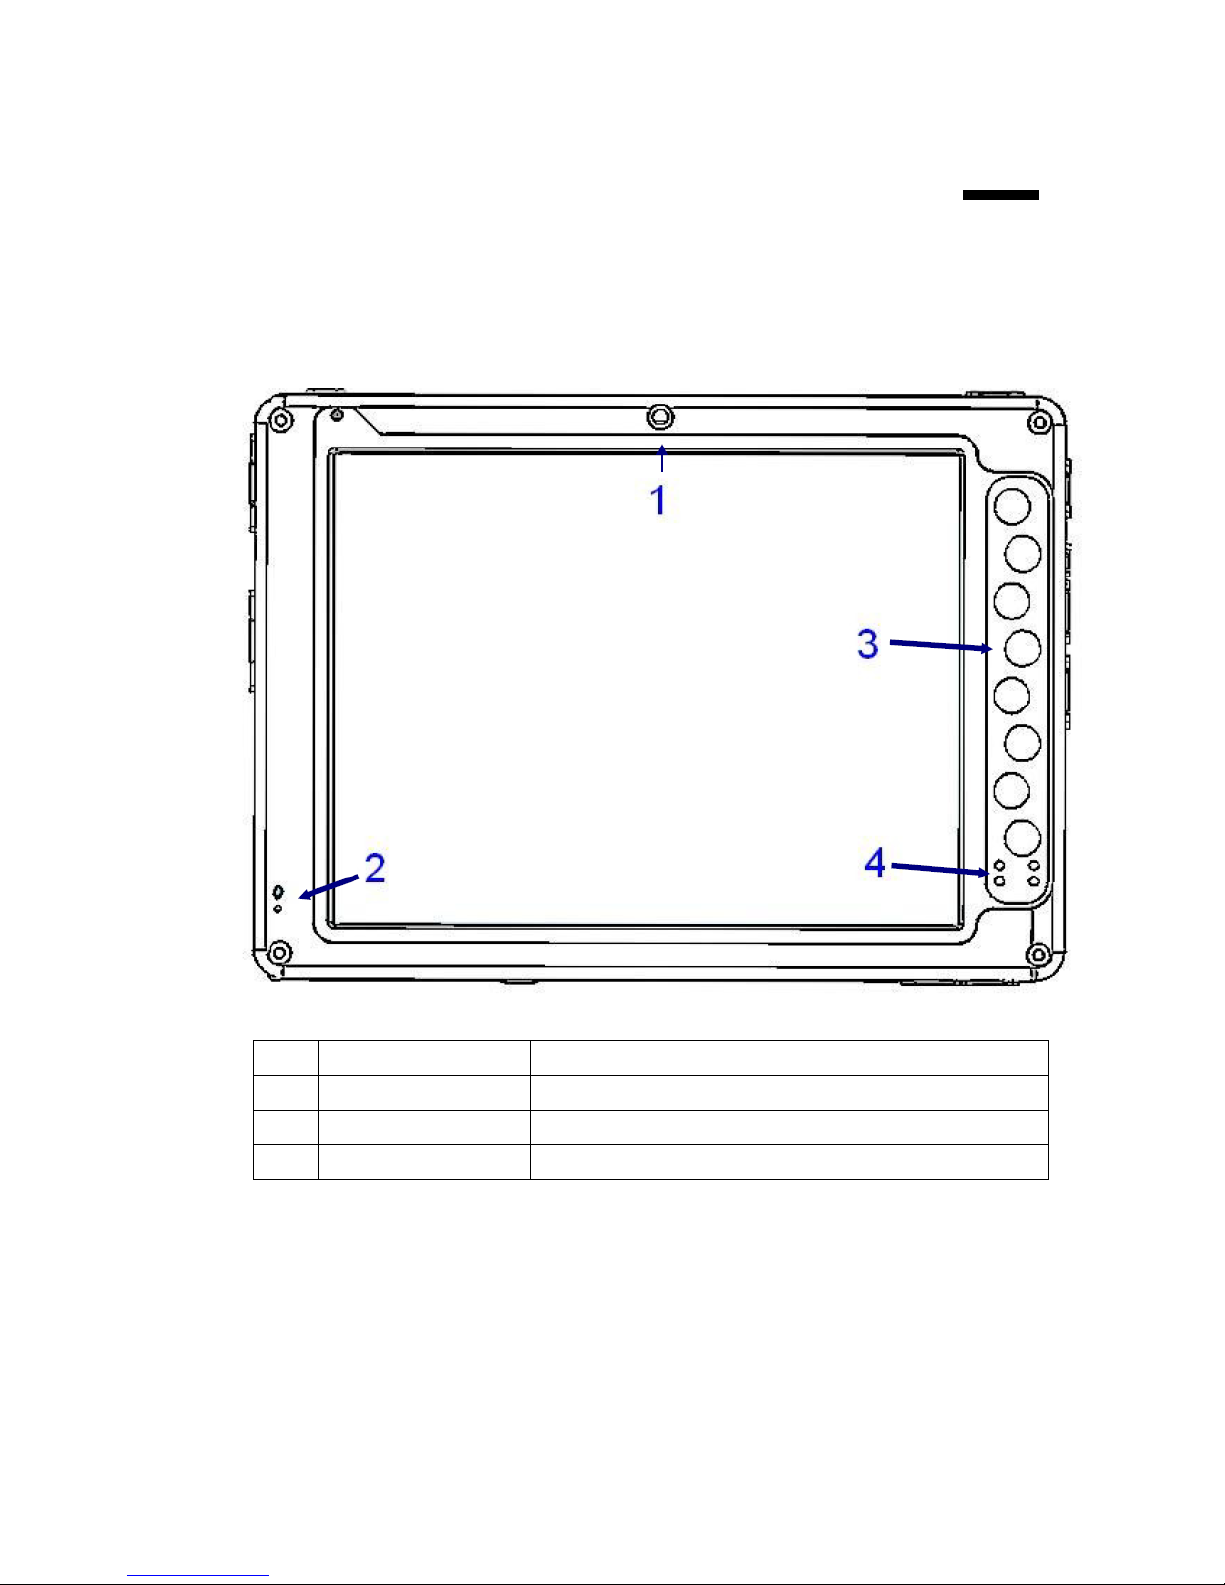
2.1 Front View...................................................................................... 8
2.2 Front View.................................................................................... 10
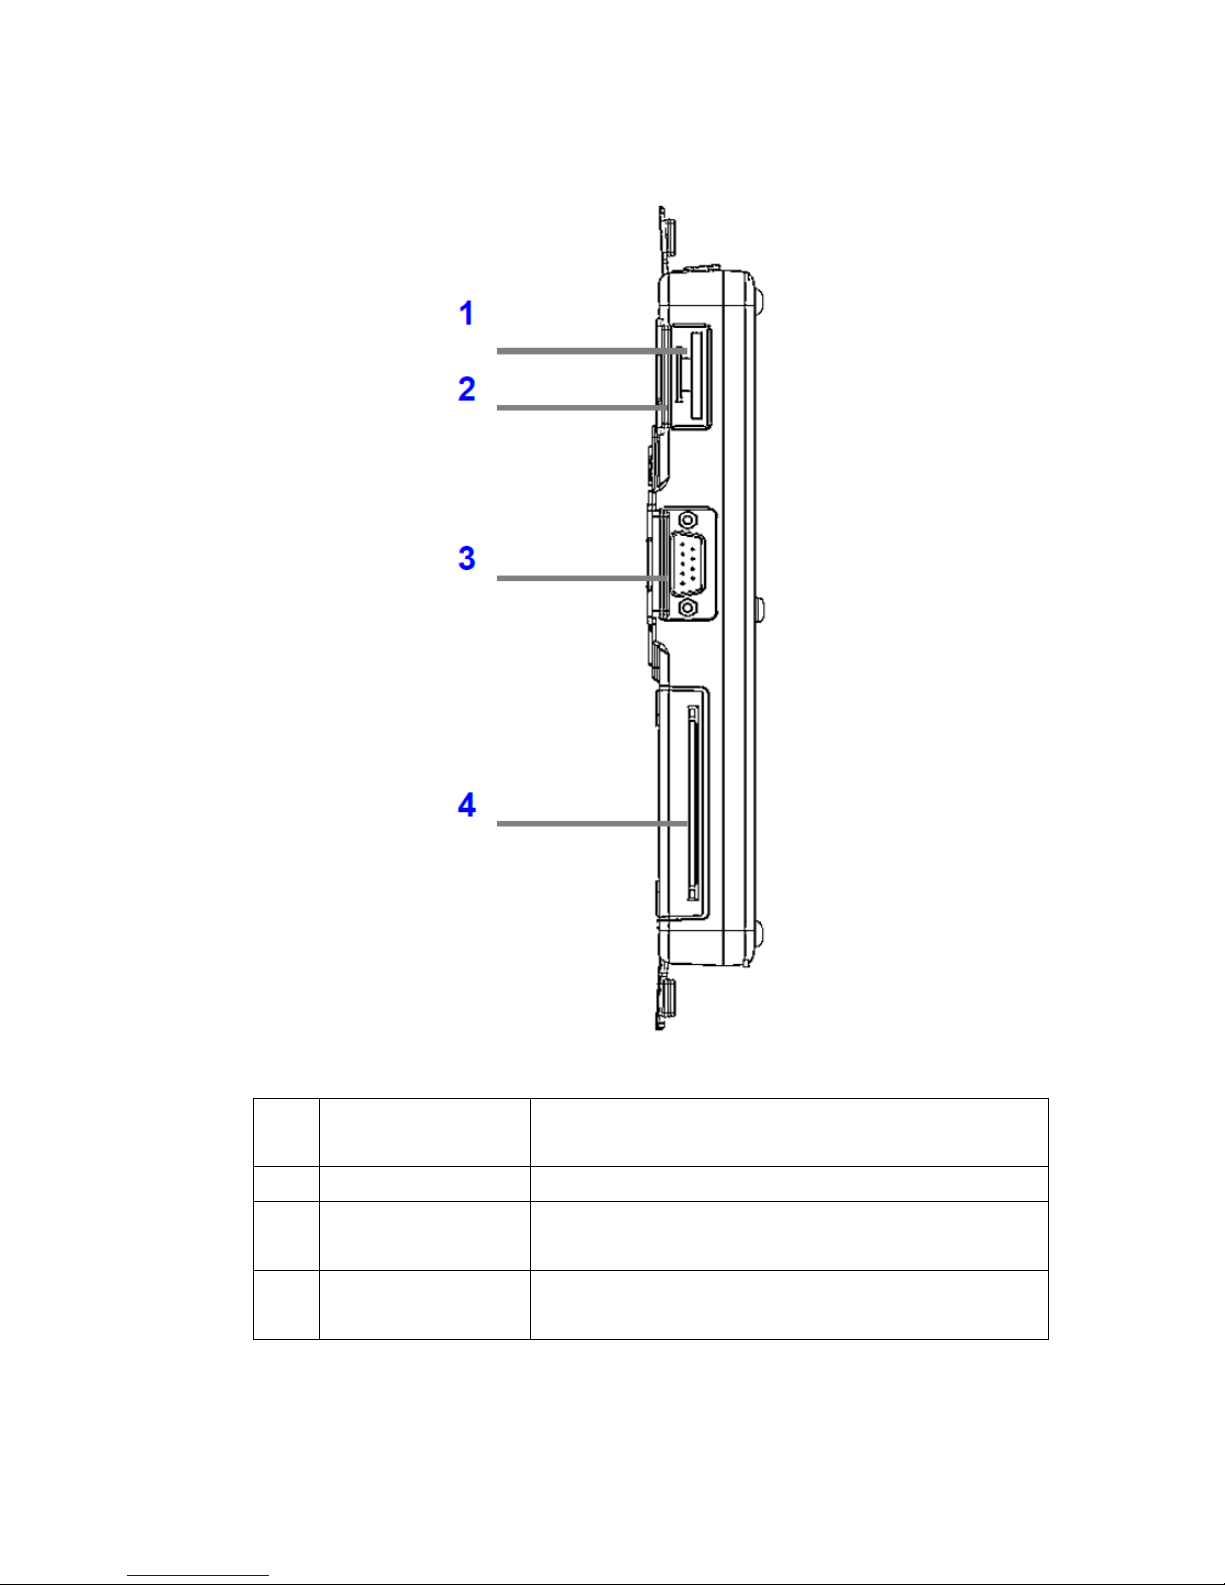
2.3 Right View.................................................................................... 11
2.4 Top View....................................................................................... 12
2.5 Bottom View ................................................................................ 12
2.6 Rear View ..................................................................................... 13
3. Getting Started .......................................................................................................14
3.1 Battery Pack Installation............................................................. 14
3.2 Connect the AC Power Adaptor ................................................. 14
3.3 Turn On the Tablet....................................................................... 15
3.4 Using the Stylus Pen................................................................... 15
3.4.1 LCD Brightness setting .............................................................. 15
3.4.2 'Button Driver Installation........................................................... 16
3.4.3 Programmable Software Buttons-“Customize Setting”........... 17
3.5 Connecting Devices.................................................................... 18
3.5.1 Connecting to a local area network........................................... 18
3.5.2 Connecting a monitor or projector ............................................ 18
3.5.3 Connecting USB-compatible devices........................................ 19
3.5.4 Connecting a device to the serial port ...................................... 19
3.5.5 Connecting your headphone, ext. microphone or ext. speaker19
4. How to Replace or Install the Components..........................................................21
4.1 Replace the Battery Pack ........................................................... 21
4.2 Replace the Memory Module (DDR3L) ...................................... 22
4.3 Replace the Storage Device (SATA SLIM) ................................. 23
4.4 WWAN Mini PCI-e Card Installation ........................................... 24
4.5 Hand Strap Mechanism Installation........................................... 25
5. Specification...........................................................................................................26

4
1.
1. Introduce
The BT1X20a series rugged tablet PC are designed, manufactured, tested and
maintained to meet the environmental and physical real-world challenges faced by
today’s mobile workers. The BT1X20a, an Intel Cedar Trial platform based rugged
tablet PC with 10.4”/9.7”/11.6”LCD display, which provide IP54 grade water/dust
proof & 1.2 meter drop proof, it is absolutely be a perfect model for indoor/outdoor
mobile IT management, entertainment, VOIP application and distinctive application in
various fields.
1.1 Standard Features
Platform: Intel Bay-Trail E3825 1.33GHz
E3845 1.91GHz
N2930 1.83GHz
N2807 1.58GHz
10.4”/9.7”/11.6”TFT LCD Display with resistive-type touch panel
IEEE 802.11 b/g/n wireless LAN and Bluetooth 4.0/3.0 HS module
integrated.
Two 2-megapixel cameras built-in for visual information collecting and
video conference
One SD/SDHC card reader slot for storage expansion.
Bumper system and gasket protection mechanisms for support 1.2
meter drop & IP54
Detachable Li-Ion battery pack. (hot-swap design when with 2nd battery
optional module)
Device bay designed for 2nd Battery module or integrate the customized
unique function easily
With 1 reserved Mini PCI-e Slots for optional WWAN function upgrade.
7 easy-to- go programmable function buttons
Built-in G-Sensor for display auto rotation.
1.2 Optional Features
Dual touch type (Digitizer + Resistive) or P-cap standard.
Optical bonding or sunlight readable touch panel.
3.5G & GPS communication function.
2nd battery module which designed for main battery Hot-Swappable
function

5
IEEE 802 11ac/b/g/n + BT4.0
Docking station with USB2.0, 10/100 LAN and battery charging
1.3 Package List
Standard
Check to make sure your package includes the following items:
Battery Pack
AC to DC Power Adapter
Rubber Bumper Set
BT1X20a Tablet PC
Optional accessories
Your package may also include any optional accessories you ordered.
Docking Station
Docking station
Power options
2nd battery module.
Car adapter
Additional accessories
Rubber jacket

6
1.4 System Specification
Dimension
275 x 198 x 27.4mm
Model
BT1X20a
Main Board (BT1)
CPU: Intel Bay Trail
Bay Trail-I/M/D SoC (E3825/45, N2930, J1900)
Core Logic
Embedded in SOC
Graphic
DX11, Gen7 Graphics, On-die GPU within SoC
SO-DIMM (DDR-IIIL)
One DDR-III SO-DIMM, Max. 4GB (DDR-III
1066/1333/1600 MHz)
LCD & Touch
LCD type
10.4”/9.7” or 10.1”/11.6” TFT (LED backlight),
LVDS/eDP interface
Resolution
10.4”/9.7” or 10.1”/11.6” TFT (LED backlight),
LVDS/eDP interface
Brightness
Normal 250 ~ 340 nits, options for 500+, 750+
and 1000 nits
Touch Type
Resistive, Dual touch (Digitizer + Resistive),
P-CAP (multi-fingers)
Screen
Standard Air, Optical Bonding or Sunlight
Readable solution
Camera
Front
2.0 M CMOS camera
Rear
2.0 M CMOS camera or 5.0 M CMOS camera
(optional)
Storage
SATA Device
SATA SLIM SSD: 32/64/128/256/512 GB
(MLC/SLC), mSATA
Card Reader
SD/SDHC, SIM slot
Communications
LAN
10/100/1000 Mbps Ethernet built-in
WLAN
802.11b/g/n or ac/b/g/n in Mini Card type
module
B.T.
Bluetooth V4.0/V3.0 + HS (within specified
Wi-Fi Combo module)
3.5G (Optional)
3G, HSP, CDMA2000 modules and others
stuffed in Mini Card
Input / Output Ports
USB3.0
4 Standard Ports
Built-in Audio
Mono microphone and Stereo speakers
Input / Output Ports
Audio Jacks 4
pole jack for stereo Headphone
LAN
RJ45 connector (10/100/1000 Mbps)
Display Output
D-SUB 15pin VGA port
COM port
D-Sub 9-pin RS232 port

7
Cradle port (Optional)
18-pin connector for USB, CRT, RS232 and
charging signals for external
Docking Station
Device port (Optional)
18-pin connector for USB and Battery signals
for Device Bay
Internal Slot
PCI/e Mini Card slot
One full-sized and one half-sized PCI/e Mini
Card slot r, split them as 3 sets of half-sized
PCI/e Mini Card slots
Indicators & Buttons
LED Indicator
4 LEDs for Power, Battery, Storage & Wireless
status
Hotkeys at bezel
7 programmable keys
Power & Battery
DC Power Adaptor
AC Input: 100~240V, DC: +19V, 3.4A (65W)
Battery Pack
4-cell Detachable & Rechargeable Li-ion 14.8V
@1880mAh Battery
Pack, supports Hot Swappable with 2nd
Battery Pack exists
Battery Running Time
4 hours under normal usage mode
(with 2nd battery pack included, total ~ 6 hrs)
Device Bay Option)
Combo drive as Smart Card and RFID Reader
2nd Battery Pack (Hot Pluggable, with Main Battery exits)
GPS Module Option)
USB GPS Module
Dharma DGM-U2525B GPS Engine + Built-In
Active Antenna
Environmental
EMC & Safety
CE/FCC Class B, cUL
IP Rating
IP54
Drop Proof
1.2m (4fts) drop
Operating Temperature
0 ゚C to +40 ゚C
Dimension (W x H x D)
275 x 198 x 27.4 mm
Net Weight
1.3Kg, with 4-cell Battery Pack and 2nd battery
pack
Options
Operating System
Windows FES7, W7P/E, windows 8.1 industry

8
2.
2. Your Ruggedized Tablet Tour
2.1 Front View
1
Front Camera
2.0Mpixels CMOS front camera for video conference
2
Built-in Microphone
Built-in Mono Microphone.
3
Programmable Buttons
7 easy-to- go programmable function buttons
4
LED Indicator
Indicates Power/Charging/Storage/Wireless function status.

9
LED Icon
Description
Power Indicator
Green Light –System On.
Blinking Green –System is in Standby Mode (S3)
No Light –Power is Off.
Battery Charge Status Indicator
Green –Battery Full Charged
Orange –Charging Battery
Blinking Red –Low Battery
Wireless (WiFi/BT/WWAN) Indicator
Blue –Connected to Access Point
Flash Blue –Date Access
Storage Access Indicator
Flash Green–Access the storage device
Programmable
Buttons
Default Function
○
F1
Esc Key
Escape same as standard Esc key.
○
F2
Task Manager Key
Press to turn on Task Manager.
○
F3
Enter Key
Enter same as standard Enter key.
I.E. (Internet) key
Press to launch I.E.
○
F4
Volume Up
Press to increase speaker volume.
○
F5
Volume Down
Press to decrease speaker volume.
○
F6
Mute
Press to enable/disable sound.

10
2.2 Front View
1
SD/SD_HC Slot
Support SD/ SD HC Card,. Press an SD card into the
SD/SD_HC card slot until it latches into place.
2
SIM Socket
SIM card slot for system with WWAN mini card installed
3
RS232 Port (DB9)
Standard D-SUB 9 pins connector for the devices that use
the RS-232 data transfer standard.
4
Device Bay(optional)
Device bay for 2nd battery module
(or other function extending in the future)

11
2.3 Right View
1
USB2.0 Port
For Universal Serial Bus 2.0 devices.
2
DC-IN Jack
For the AC adapter or optional auto adapter.
3
RJ45
RJ-45 supports 10/100/1000Mpbs local area network (LAN)
4
VAG Port(DB15)
Standard D-SUB 15pins for connects to external display
5
Vent
For heat exchange with air.

12
2.4 Top View
1
Battery Latch
For lock or release the battery pack (on the battery pack)
2
Power On/Off Button
Power Button for turn on/off or suspend/resume the tablet
Press & hold for more than 4 seconds to force power off.
3
Battery Pack
Detachable Main battery pack (4S1P)
4
USB2.0 Port
For Universal Serial Bus 2.0 devices
2.5 Bottom View
1
Stereo Speaker
Embedded Stereo Speaker (1W x 2)
2
4 Poles Audio jack
For stereo earphone and mono external mic.
3
Cradle Port
For charging or/and function expansion docking station
4
USB2.0 Port x 2
For Universal Serial Bus 2.0 devices

13
2.6 Rear View
1
Back Camera
2.0 M or 5.0M(optional) rear side CMOS camera
(Only 5.0M camera with flash lamp)
2
Battery Pack
Detachable Main battery pack (4S1P)
3
Storage Device Cover (door)
Cover for SSD storage (SATA SLIM) configurable
4
Device Bay(Optional)
Device bay for 2nd battery or other function extending.
(Fixed by screw)
5
Stylus Pen Room
Room for resistive stylus or digitizer pen
6
RAM & Mini PCI-e Slot Cover
(door)
Cover for DDR3 memory module and mini card
configurable
7
Vent
Back vent for heat exchange with air

14
3.
3. Getting Started
3.1 Battery Pack Installation
Insert the battery pack into system unit. Slide both battery latch tabs to lock the pack
3.2 Connect the AC Power Adaptor
IMPORTANT! Damage may occur if you use a different adapter to power the tablet or use the
manufacture specified adapter to power other electrical devices. You may damage both your
battery pack(s) and the tablet with a faulty AC-DC adapter.

15
3.3 Turn On the Tablet
Press and release the power button at the top side of the unit to turn on the Tablet
3.4 Using the Stylus Pen
IMPORTANT! DO NOT touch the screen with sharp objects or any other type of writing
instrument.
It can damage the screen.
The Standard BT1X20a has a resistive touch screen. It allows you to use
your stylus pen or finger to interact with the tablet.
If the tablets with P-Cap type Touch configuration please use your finger for
operation. (For fine operation, please purchase the specified Touch Pen for
P-Cap touch)
If the tablet with “Dual Touch”configuration (WACOM Digitizer + Resistive
Type Touch), you can use finger or Digitizer Pen for operation
3.4.1 LCD Brightness setting
Choose “Tablet & Pen settings”icon LCD Brightness setting

16
3.4.2 'Button Driver Installation
Select “Setup”on the My Computer window.
Click the “Next”button on the Button Driver –
Install Shield Wizard window.
Click the “Install”button on the Button Driver –
Install Shield Wizard window.
Click the “Continue Anyway”button on the
Hardware Installation window.
Select “Yes, I want to restart my computer now”
and click the “Finish”button.

17
3.4.3 Programmable Software Buttons-“Customize
Setting”
F2 - On Screen Keyboard F3 –Screen Rotation

18
3.5 Connecting Devices
Refer to the following subsections for information about connecting external
devices to your BT1X20a series tablet PC.
Note: If the device you want to use does not appear to be working with your X20-A, the
device may need to be enabled in the computer’s configuration program. Contact your
supplier
3.5.1 Connecting to a local area network
Connect a local area network (LAN) cable’s RJ-45 connector to the internal
LAN interface card.
3.5.2 Connecting a monitor or projector
Connect one end of a VGA cable to the VGA port on the right side of the
X20-A. Connect the other end to the VGA port on the monitor or projector.

19
3.5.3 Connecting USB-compatible devices
Connect any USB-compatible devices to the computer’s 4 USB ports.
3.5.4 Connecting a device to the serial port
You can connect a terminal or other device that uses the RS-232 data transfer
standard.
3.5.5 Connecting your headphone, ext. microphone
or ext. speaker

20
You can use the docking station (CD3X) when you are at your work station or
office desk. When docked,
you can charge power to the Tablet PC and transfer data to another PC or
server. The CD3X docking station
provides complete connectivity (such as LAN, USB) for using the tablet PC on
a desktop. Besides, you can
charge your spare battery pack as the below photo (external charger
function).
Table of contents