Echanfit CBE3004 User manual

ECHANFIT
User Manual
Adjustable Weight Bench

- 1 -
CONTENTS
Important Safety Notice--------------------------------------------------------------------------------------03
Specifications--------------------------------------------------------------------------------------------------04
Bench Maintenance------------------------------------------------------------------------------------------04
Warm Up Suggestion----------------------------------------------------------------------------------------05
Assembly Instruction------------------------------------------------------------------------------------06~08
Exploded-View-------------------------------------------------------------------------------------------------09
Part List----------------------------------------------------------------------------------------------------------10
Function of Backrest Cushion------------------------------------------------------------------------------11
- 2 -
Thank you for purchasing the ECHANFIT CBE3004 Adjustable Weight Bench. Please read
this user manual carefully and keep it for future reference. If you need any assistance,
please contact our support team with your product model number and Amazon order
number.
Package Contents
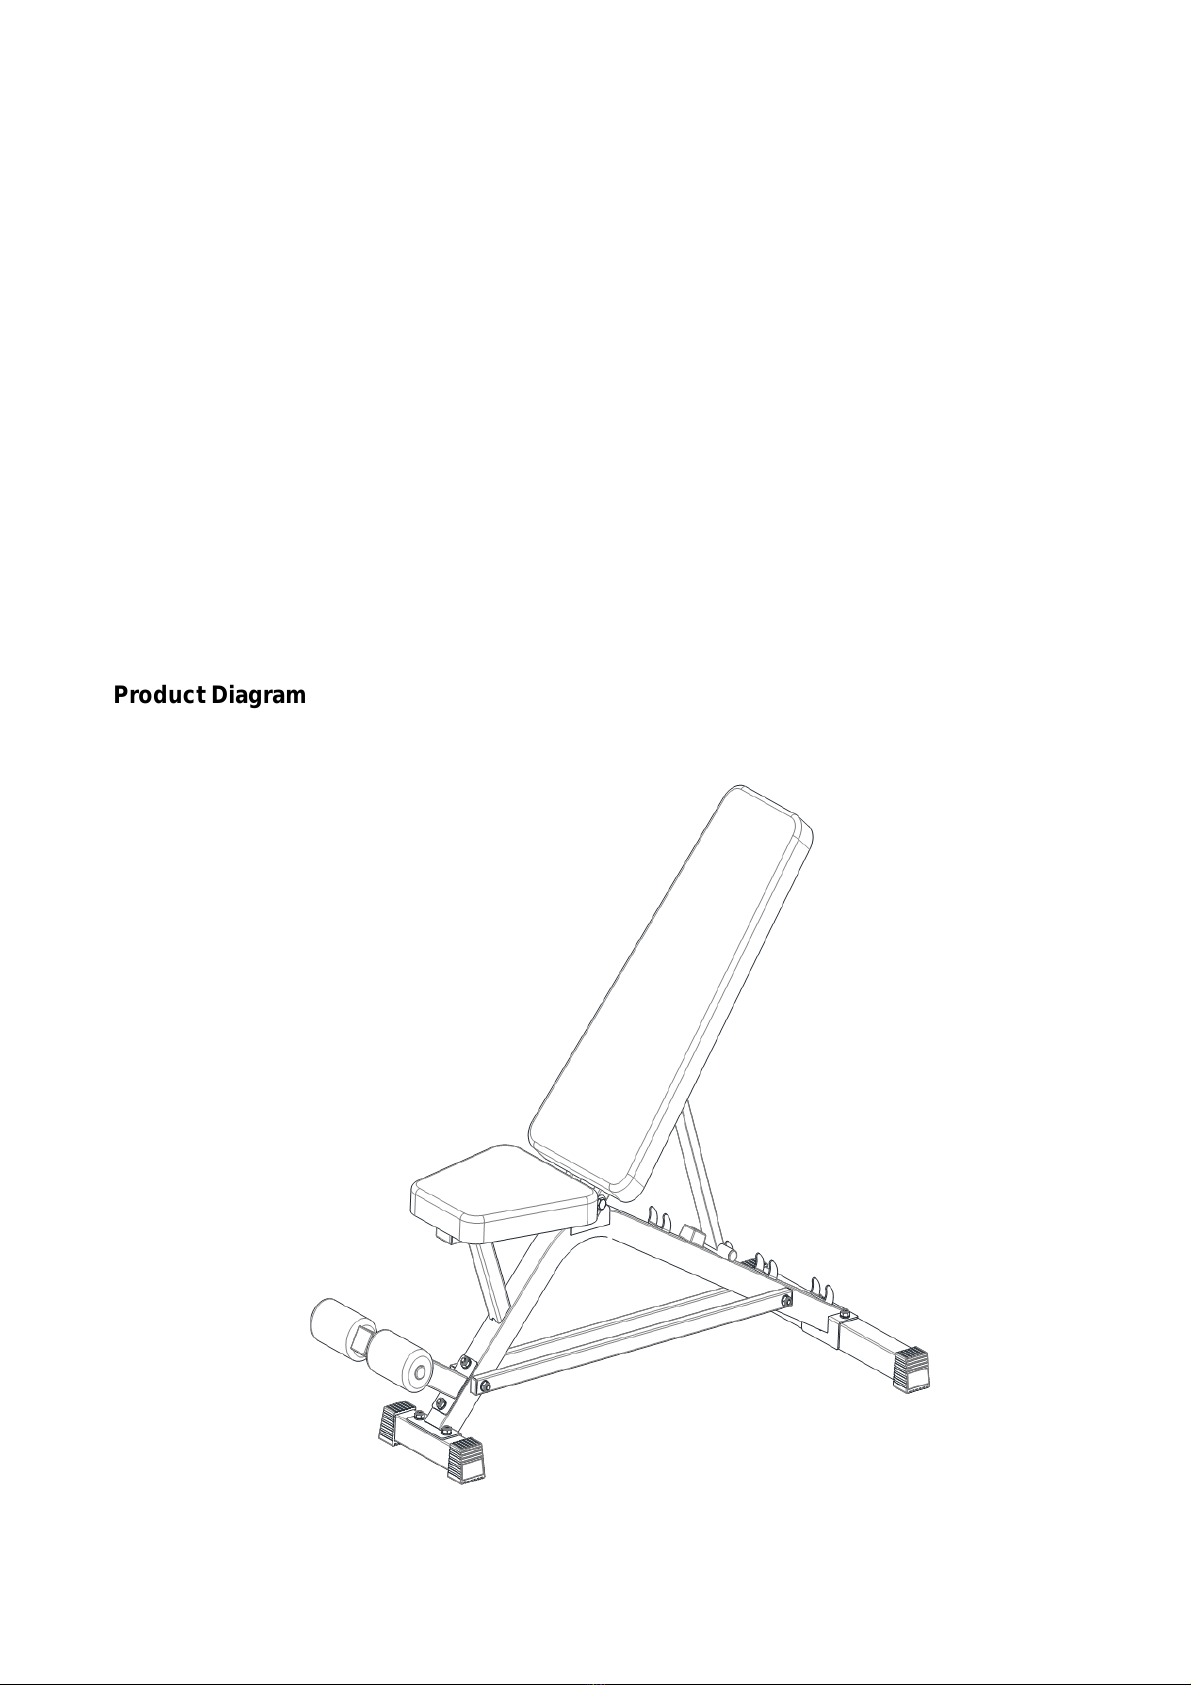
⚫Adjustable Weight Bench CBE3004
⚫User Manual
⚫Toolkits
Product Diagram

- 3 -
IMPORTANT! Please retain user’s manual for maintenance and adjustment instructions.
Your satisfaction is very important to us, please do not return until you have contacted.
IMPORTANT SAFETY NOTICE
Note the following precaution before assembling or using the adjustable weight bench.
1. Keep children and pets away from the adjustable weight bench at all times. Do not leave
unattended children in the same room with the adjustable weight bench.
2. Before starting workout, determine the current physical condition. If you are undergoing
some treatment on heart rate, blood pressure and cholesterol, please follow the doctor's
advice.
3. If the user experiences dizziness, nausea, chest pain, rapid heartbeat, shortness of
breath or any other abnormal symptoms, stop the workout at once, consulta physician
immediately.
4. Position the adjustable weight bench on a clear, level surface away from water and
moisture. Place mat under the unit to help keep the adjustable weight bench stable and to
protect the floor.
5. Check all screws and nuts are locked before using adjustable weight bench for the first
time and ensure that the trainer is in the safe condition.
6. Keep your hands and feet away from moveable parts during using. Do not sharp things
around the bench.
7. Always wear appropriate workout clothing when exercising. Running or aerobic shoes
are also required.
8. This adjustable weight bench can be used for indoor and family training at a time. And
Maximum load (user weight+dumbbell weight): 500 pounds.
9. Be careful when moving the adjustable weight bench.
10. Please keep this manual and installation tools properly.
11. This weight bench cannot be used as medical equipment.

- 4 -
SPECIFICATIONS
Adjustable Bench Positions: 5 back positions+2 foot pad positions
Dumbbell Rack: a level of storage
Dumbbell Capacity: 2 Pairs
Max Dumbbell Rack Weight Capacity: 77lbs
Max Dumbbell Piece Diameter: 180mm
Body Frame: 1.5mm durable steel frame
Seat and Backrest Cushion: faux soft leather
Net Weight: 37.04lbs
Gross Weight: 42.33lbs
Product Dimensions: 55.31* L *25 W *19.49H inches
Package Dimensions: 45.28 L * 18.50W * 5.71H inches
BENCH MAINTENANCE
1. Check and tighten all parts before using the bench. If any parts are worn or damaged, do
not use it and contact customer service to replace the parts.
2. After each using, wipe bench free of sweat with a clean, dry cloth. Upholstery can be
cleaned with a mild detergent or spray cleaner.
3. If the bench without check regularly may affect the safety level of the bench.
4. The bench can be cleaned using a wet cloth and a mild non-abrasive cleaner. Do not use
solvents or bleach.
Warning: Before starting any exercise program, consult your doctor. Please read all the
instructions before using this fitness equipment, which is not applied for children under 14
years of age. Check if damage and do not use once there is damaged or missing parts.
- 5 -
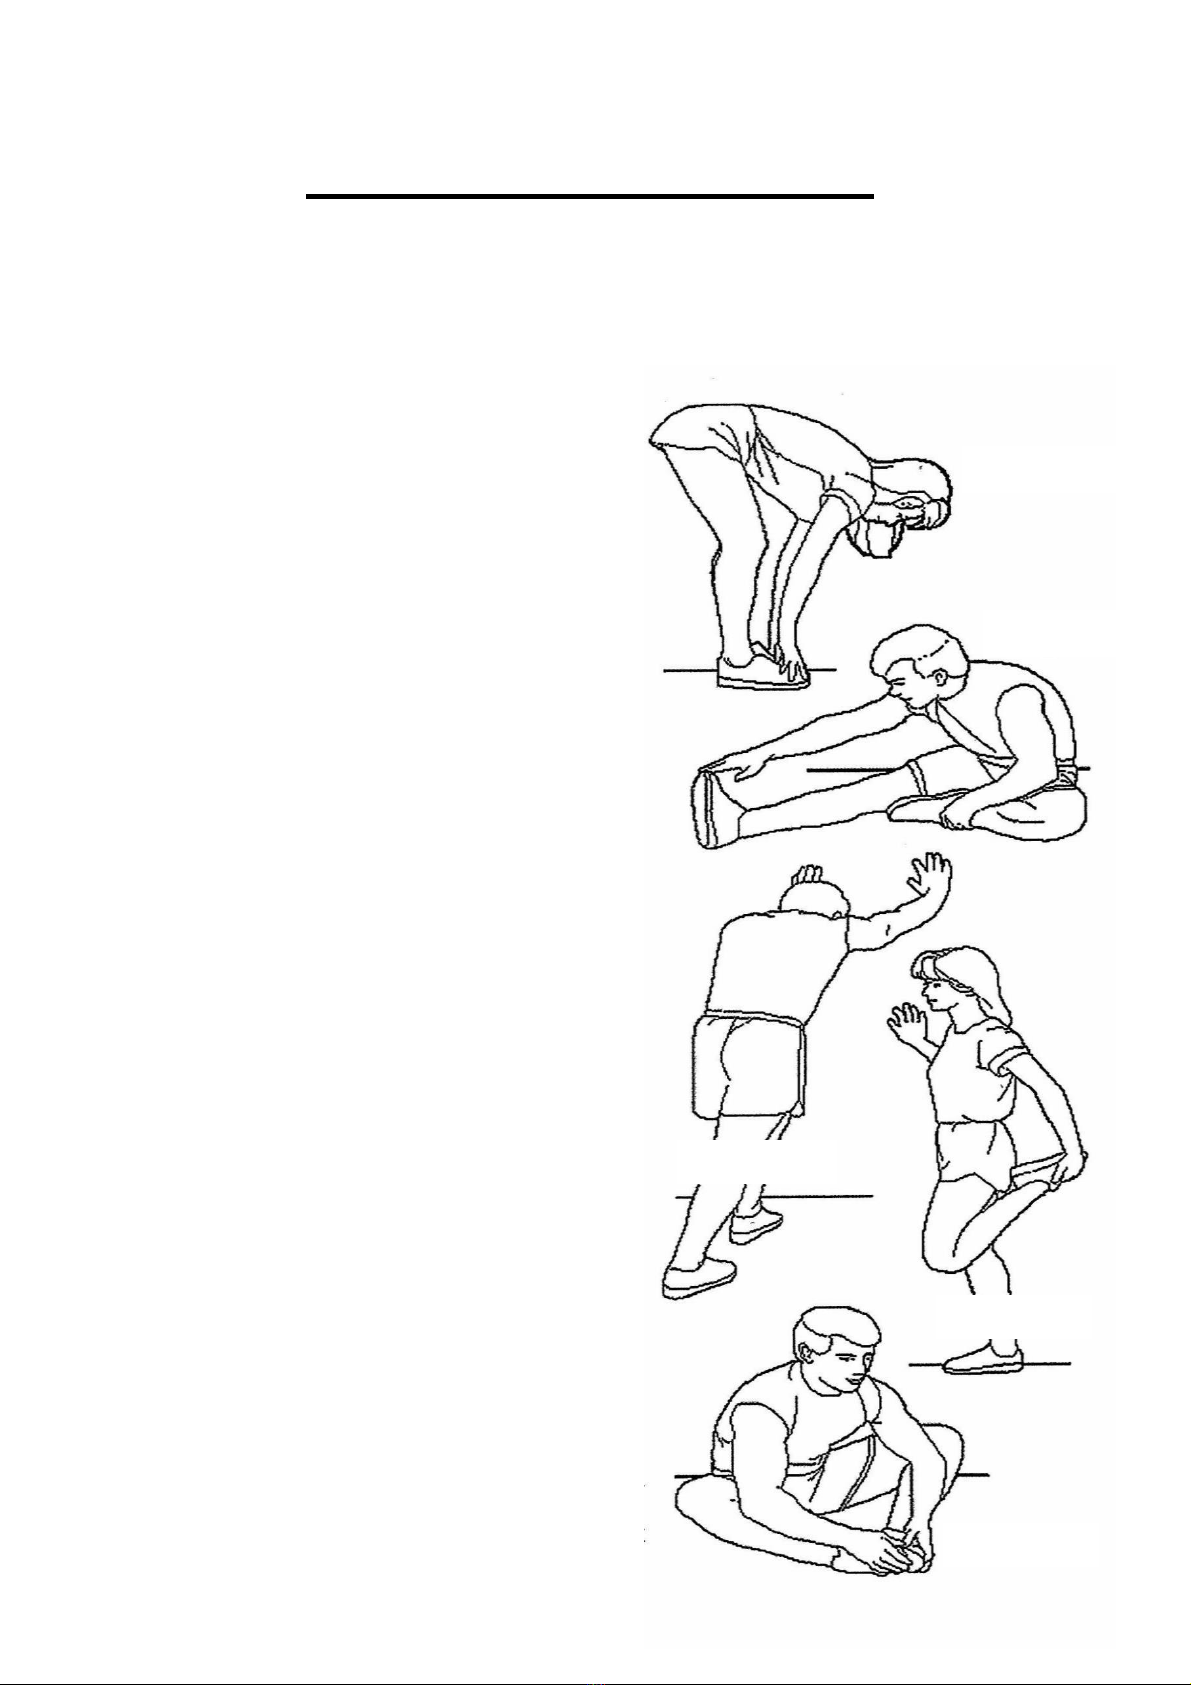
WARM UP SUGGESTION
Stretch exercise preparing
No matter how you exercise, you'd better stretch your body first. Then wake up your
muscles. a 5 -10 minutes warm up is helpful. Please follow the chart below for five times, 10
seconds or more on each leg, and relax again after you finished workout.
1.Down stretch
Bend your knees slightly, slowly bend forward,
relax your back and shoulders, and touch your
toes with your hands as far as you can. Hold for
10 to 15 seconds, then relax. Repeat 3 times (see
picture 1)
2.Hamstring stretch
Sit on a clean cushion with one leg straight. Draw
the other leg in so that it fits snugly against the
inside of the straight leg. Try to touch your toes
with your hands hold for 10 to 15 seconds, then
relax. Repeat 3 times for each leg (see picture 2)
3.Calf and foot tendon stretch
Stand with two hands against the wall or a tree
and keep one foot behind. Keep your hind legs
straight and on your heels, and lean toward a wall
or tree. Hold for 10 to 15 seconds, then relax.
Repeat each leg three times (see picture 3)
4.Quadriceps stretch
Balance with your left hand against a wall or
table, then extend your right hand backward,
holding the right heel and slowly pulling toward
the hip until you feel a tight muscle in front of your
thighs. Hold for 10 to 15 seconds, then relax.
Repeat 3 times for each leg (see picture 4)
5.Muscle of the inner thigh stretch
Sit with your feet facing each other, knees out.
Grab your feet with both hands and pull towards
your groin. Hold for 10 to 15 seconds, then relax.
Repeat 3 times (see picture 5)
Picture 2
Picture 3
Picture 1
Picture 4
Picture 5

- 6 -
ASSEMBLY INSTRUCTION
1. PREPARATION
a. Assembly tools: Open end wrench or adjustable wrench (self-provided).
b. Strongly recommended to be assembled and moved by two or more people.
c. Remove all components from the package before assembly.
d. Keep the wrapped cardboard, carton and PE bags if needed.
f. Be sure to tighten nuts and bolts by hand first, then tighten all them by tools.
2. HARDWARE

- 7 -
3. GETTING STARTED
Step1:
Assembly the Body Frame (1) as
shown, and put the Part (4) into the
second gear to facilitate the rear
assembly. Fix 4 Outer Hex Bolts (19),
8 Washers (26) and 4 Nylon Nuts
(30) to fix the Part (2) and Part (3) in
Body Frame (1) as shown. Then
tighten Bolt (19).
Note:
1. The long side of tube plug of Part
(2), Part (3) should be on the
ground.
2. That the support of Part (4) shall
not be a rubber cushion.
Step 2:
Assembly 4 Outer Hex Bolts (21), 8
Washers (27) and 4 Outer Hex
Bolts (20), fix the Part (10) and (11)
as shown position of the Body
Frame and tighten the Bolts (21)
and (20).
Note:
The long side of the Seat Cushion
(10) should be inside, and the long
side of the Backrest Cushion (11)
should be down.

- 8 -
Step 3:
Assembly 2 Outer Hex Bolts (22), 4
Washer Bolts (22), 4 Washers (26),
2 Nylon Nuts (30) on the Body
Frame (5), tighten the Bolt (22).
The Part (6) should be passed
through the hole of the Foot Hook
Tube (5) which can be selected
according to the height and
personal requirement. Then hung
on both sides of the Part (6) with a
Foam Column (12).
Step 4:
Using 2 Outer Hex Bolt (23), 4
Washers (26), 2 Nylon Nuts (30) to
assemble 2 Parts (8) at right
position of Body Frame, Then
Tighten Bolt (23).

- 9 -
EXPLODED-VIEW
1
2
3
4
5
6
7
7
8
8
9
9
9
9
10
11
12
12
13
13
14
15
15
16
17
17
17
17
17
17
17
18
18
19
20
20
20
21
21
21
21
22
23
23
19
24
24
25
26
26
26
26
26
26
26
26
26
26
26
26
26
26
27
27
27
27
27
27
27
28
28
28
29
30
30
30
30
30
30

- 10 -
PART LIST
No
Component
Specification
Quantity
Remark
1
Body frame
Welding group
1
2
Front base tube
50*50*1.5*250
1
3
Rear base tube
50*50*1.5*560
1
4
Backrest supporting frame
Welding group
1
5
Foot hook group
Welding group
1
6
Foam roller tube
Φ25*t1.5*320
1
7
Backrest supporting
30*20*t1.5*740
2
8
Dumbbell supporting tube
30*20*t1.5*843
2
9
Square plug
50*50
4
Assembly
10
Seat cushion
(215+320)*320*50
1
11
Backrest cushion
(240+330)*780*50
1
12
Foam column
OD80*ID23*135
2
13
Round glug
Φ25*t1.5
2
Assembly
14
Square plug
45*45*t1.5
1
Assembly
15
Rectangular plug
50*25*t1.5
2
Assembly
16
Cushion pad
40*40*25
1
Assembly
17
Rectangular plug
30*20*t1.5
8
Assembly
18
Plastic tube plug
DiameterΦ22*1.0-2.0T*14.5L
Environmental
2
Assembly
19
Outer hex bolt
M10*65
4
20
Outer hex bolt
M8*45
4
21
Outer hex bolt
M8*20
4
22
Outer hex bolt
M10*70
2
23
Outer hex bolt
M10*105
2
24
Outer hex bolt
M12*130
2
25
Swastika screw
ST4.2*18 φ10
1
Assembly
26
Washer
M10
16
27
Washer
M8
8
28
Washer
M12
4
29
Nylon nut
M12
2
30
Nylon nut
M10
8

- 11 -
FUNCTION OF BACKREST CUSHION
1. Flat Angle
2. 30°Degree Angle
3. 50°Degree Angle
4. 90°Degree Angle
5. Negative Angle

- 12 -
Warranty and Customer Support
For questions, support, or warranty claims, contact us at the address below that
corresponds with your region. Please include your Amazon order number and product
model number.
Please note, ECHANFIT can only provide after sales service for products purchased
directly from ECHANFIT. If you have purchased from a different seller, please contact them
directly for service or warranty issues.

- 13 -
Model: CBE3004
XIAMEN CAMELON TECHNOLOGY CO., LTD.
https://www.amazon.com/echanfit | service@camelonfit.com
Table of contents
Popular Fitness Equipment manuals by other brands


Tumble Star
Tumble Star Air Track Care Instructions

Proteus
Proteus PMS7088 owner's manual

BH FITNESS
BH FITNESS Multigym Plus G112B Instructions for assembly and use

Steens Industrier AS
Steens Industrier AS Physical instruction manual

ARmedical
ARmedical AR-018 User's manual & warranty card

Tunturi
Tunturi CT80 user manual