Steens Industrier AS Physical User manual
INSTRUCTION MANUAL
File: Txx BM 2000 ENG 03.doc Date: 14.06.2010 Page 1 of 21
GB/ENG
/
US
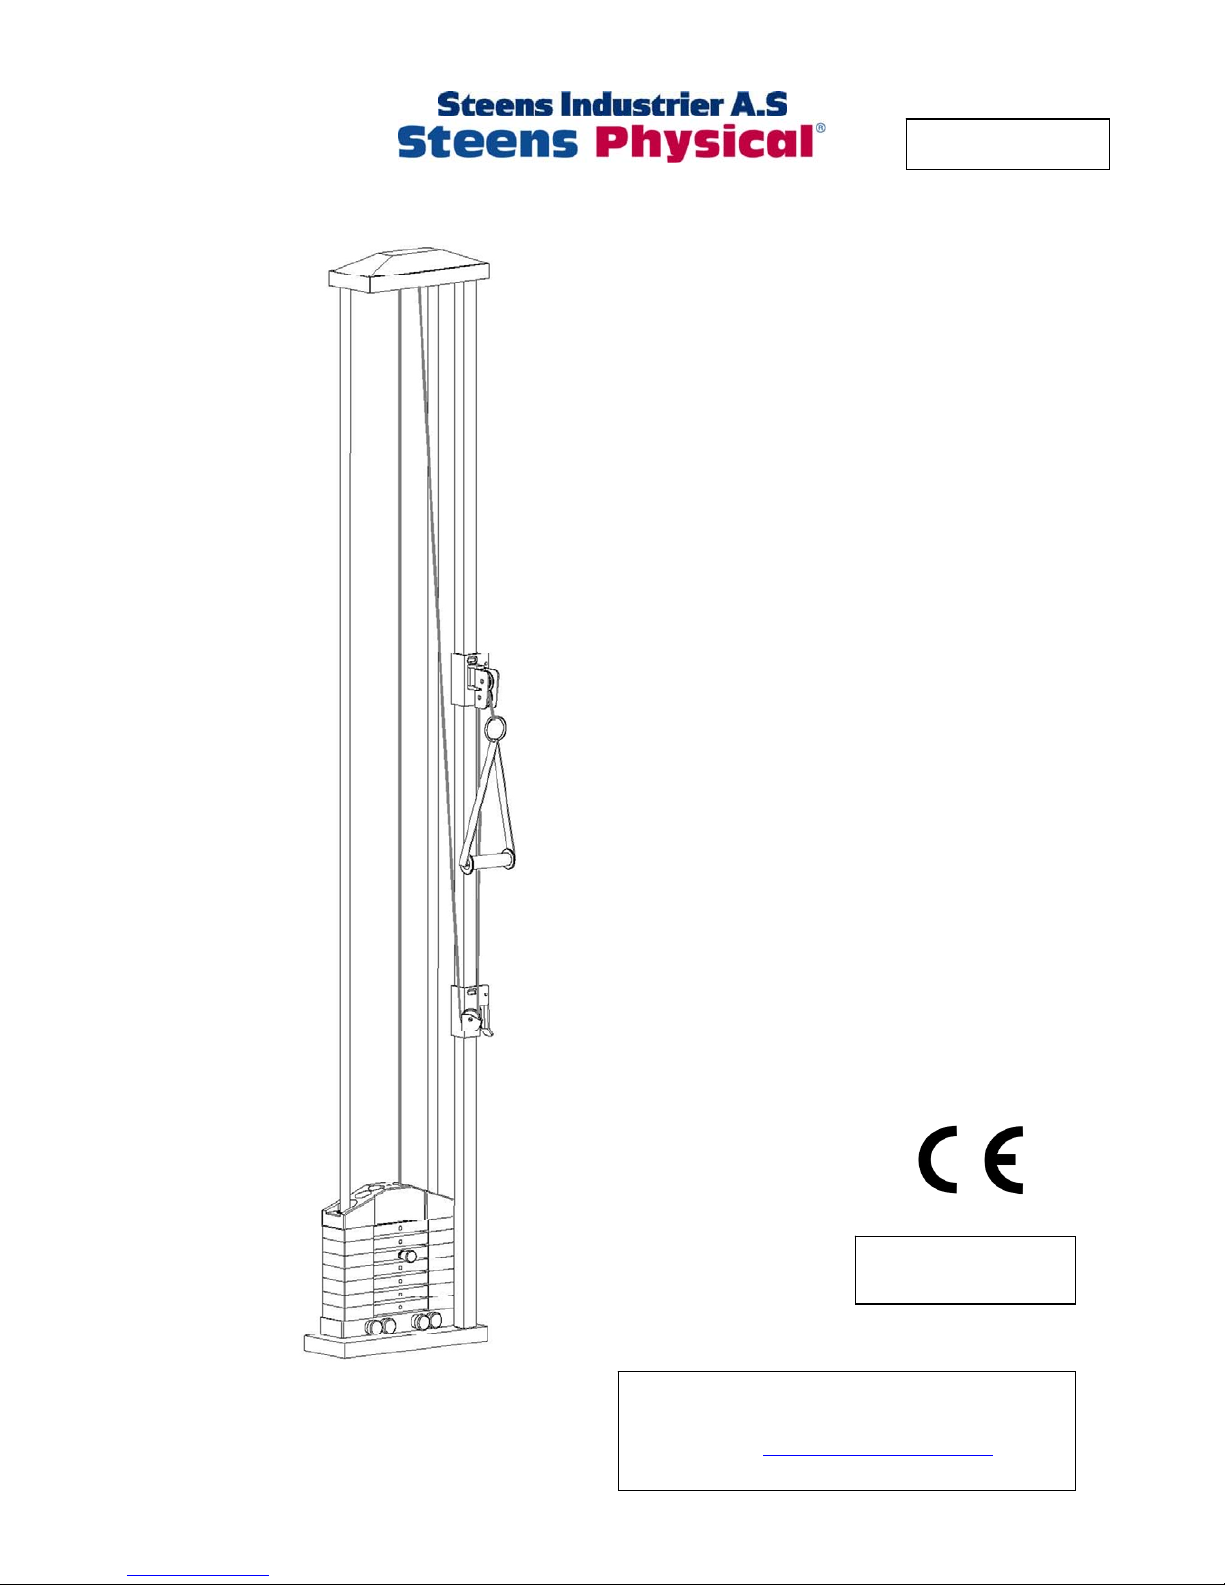
Pulley apparatus
14 kg, weight pin Art.no: T14-2
22 kg, weight pin Art.no: T22-2
22 kg, weight pin, double Art.no: T23-2
File: Txx BM 2000 ENG 03.---
Date: 14.06.2010
Rev.: V 3a
Manufacturer:
Steens Industrier AS
Phone: +47 64 91 47 00 - Fax: +47 64 87 65 47
e-mail: post@steens-industrer.com
web address: www.steens-industrier.com
NS-EN ISO 9001:2008
Approved
INSTRUCTION MANUAL
File: Txx BM 2000 ENG 03.doc Date: 14.06.2010 Page 2 of 21
Content:
TEXT PAGE
Receiving and mounting 3
Areas of use - precautions and limitations 4
Adjustment and settings 5
Maintenance and service 6
Problem solving - help 7
Guaranties 8
Technical specifications 8
Declaration of conformity 9
Mounting to wall 10
Apparatus with weight pin, part drawing 11
Apparatus with weight pin - double pull, part drawing 12
Additional equipment and accessories 13
Exercises, some examples 14-20
Pulley apparatus
Art. no.:
T14-2, T22-2, T23-2
INSTRUCTION MANUAL
File: Txx BM 2000 ENG 03.doc Date: 14.06.2010 Page 3 of 21
Receiving and Mounting Relevant for
T14-2
T22-2
T23-2
Relevant for
T14-1
T22-1
T23-1
HELP
Installation and unpacking: Inspect the wrapping carefully when receiving the
apparatus. If there are any signs of damage, you must contact your transporter
and make the remark to them. X X
Read this instruction manual carefully before using the apparatus. Make sure
you understand the content completely. Follow all the instructions. X X
NOTE! You must not carry the apparatus by the gliding rods on the pulley;
this can cause malfunction and additional friction in the weight stack. X X
S1
page 7
NOTE! Do not remove straps that hold the weight unit, until the pulley is
placed where it is going to be. X X
Mounting of pulley to wall:
a) Place pulley where it will be used, remove straps around weight unit
b) Fasten two wall attachments on bottom plate, choose position A or B and
two on the top part. See drawing page 10.
c) If you choose position A, you must lift the weight unit and put one of the
styrofoam boxes between the weight unit and the bottom piece. This to
ensure that you will be able to attach the wall attachments to the wall.
d) Hold pulley perpendicular against the wall to make marks for holes in
wall.
e) Drill holes Ø10mm for plugs and screws found in the mounting package.
When attachment is done against a solid wooden wall, only use screws for
wood. Make sure to use smaller bore Ø4mm.
NOTE! When mounting to a weak wall, use additional appropriate materials
for attachment, so that the equipment is properly secured.
X X
Test all functions on the apparatus. Is it something that does not work as it
should, check the problem solving - help on page 7. If further help is needed
please make contact with your dealer. X X
page 7
The apparatus is for indoor use only. X X
The apparatus must not be placed in rooms with high humidity, in rooms that
are connected with swimming pools, saunas, etc. This can cause corrosion and
rust. X X
INSTRUCTION MANUAL
File: Txx BM 2000 ENG 03.doc Date: 14.06.2010 Page 4 of 21
Area of use - precautions and limitations Relevant for
T14-2
T22-2
T23-2
HELP
The apparatus is constructed for treatment and training in different areas such
as rehabilitation, MET - Medical Exercise Therapy. X
Do not use the pulley apparatus for any thing else than what it is constructed
and meant for. X
Always keep children or other people away from playing with the apparatus. X
Always be aware of persons and environments so that nobody get injures or
any thing gets damage. X
The apparatus must only be used under carefully follow up by therapist /
qualified instructor. X
Training an exercise should be arranged in cooperation with therapist /
instructor. X
Before training, check carefully and be sure that the apparatus is in good order
and that all adjustment is properly carried out. X
The apparatus is meant for one person at a time during use. X
Be sure to always place the user in a stable position before and under training. X
Do not use more weight units than what comes with in the package. This
could cause harm on both user and pulley. X
You must not pull or push on the rods on the pulley, this can cause
malfunction and additional friction in the weight stack. X
S1
page 7
It is the user together with his instructor who is responsible for the use of the
apparatus and equipment at all time in conjunction with the user manual,
precautions and limitations. X
Follow instructions in this manual to ensure proper training and an apparatus
without malfunctions. X
The apparatus must only be used with original parts (screws, rope etc.) X
This apparatus must only be used together with specified, adjusted and tested
equipment and accessories. Se page 13 for review.
NOTE! Any other equipment will be used on own responsibility and all our
guaranties will be withdrawn.
X
This apparatus can be used with additional products/equipment from the
Steens-Physical series. Se page 13 for review.
For further information contact your dealer.
NOTE! Any other foreign equipment or redesign of apparatus is done on your
own risk and all guaranties are withdrawn.
X
INSTRUCTION MANUAL
File: Txx BM 2000 ENG 03.doc Date: 14.06.2010 Page 5 of 21
Adjustment and settings: Relevant for
T14-2
T22-2
T23-2
HELP
All adjustments and settings are possible without using excessive force. X
The Apparatus do have 3 adjustments who has to be carried out before
training:
1. Weight units: 0.5, 0.75, 1.0, 1.25, 1.5, 1.75, 2.0 to 14 (22)
2. Height fore the pulling line,
3. Line tighter / line shortner
In addition there can be mounted different equipment and belongings and also
other pulling devices.
X
Adjustment of standard use of pulley apparatus with weight pin and ordinary
pulling handle:
1. Loosen the line tightner / line shortner (the lower glider), now all
the weight should be at the bottom and the rope loose.
2. Put the pin in the desired weight.
NOTE! Ensure that the pin is inserted to its head.
3. Put, if wanted, the small weights in holes at the top of the weight
stack.
4. Adjust the height of the pulling line (the upper glider) Read the
figure in the scale window and lock the glider properly.
5. Adjust at last the line tightner / line shortner so that the working
weight does not touch the rest of the weight stack during training.
Do the instructed training with calm movements so that the weight does not
jump at the top or smash into the bottom, making noises.
X
After training put the apparatus back to 0-position.
1. Loosen the line tightner / line shortner.
2. Insert the pin in the upper weight hole.
3. Put the small weight back to the storing holes in the base plate.
X
INSTRUCTION MANUAL
File: Txx BM 2000 ENG 03.doc Date: 14.06.2010 Page 6 of 21
Maintenance and service : Relevant for
T14-2
T22-2
T23-2
HELP
Check always - at least ones a month - that the apparatus functions normally.
•Check the rope for tear and wear.
•Check the lock handles on the gliders
•Check the hooks for pulling handle
•Check rope pulleys
X
Check regular - at least ones a month - that the weight pin works properly X
Check daily all locking mechanisms for malfunctions to avoid injuries on
persons and damages to environments. X
Clean the apparatus when necessarily or at least ever half year. Use mild soap
water. Stains on cushions can be cleaned with spirits and has to be washed
with soap liquid immediately afterwards. This will secure the condition of the
apparatus for a longer time.
X
If the apparatus have defected parts, it prompt has to be taken out of use. Be
quite sure to keep the apparatus out of use used until it is properly repaired.
NOTE! It relies on the institute and owner at any time to ensure that the
apparatus is in good order. Injury that occurs to persons or damage to
environments, due to lack of service or checking out, would be the institute
employers and owner's responsibility entirely.
X
Defect parts shall always be replaced with original spare part. Refer to
apparatus type and description - year of production and item no (se explosion
drawing page 11 - 12) X
Do you have special questions concerning services and maintenance, more
than you find in problem solving - help on page 7, please take contact with
your dealer. X
page 7
Apparatus mounted to the wall should regularly be check out. Any signs of
coming lose have to be corrected immediately. X
Do not wash the apparatus in any kind of washing machine or by use of high
pressure washing. The construction is not adapted. X
Service and maintenance has to be carried out by qualified personel. X
It is a recommendation that you make a logbook for making notice of
maintenance and service. You then will have god documentations if any thing
comes up. X
INSTRUCTION MANUAL
File: Txx BM 2000 ENG 03.doc Date: 14.06.2010 Page 7 of 21
Problem solving - HELP Relevant for
T14-2
T22-2
T23-2
Relevant for
T14-1
T22-1
T23-1
S1 Problem:
Too much friction against the gliding rods when moving only the 0,5 kg
weight all the way up and down.
Origin:
Rough handling during transport, too early removing straps around weight
unit during mounting the pulley, leaning against the gliding rods of a
mounted pulley apparatus, … …
Solution:
Slight bending of one or both rods can be corrected easily.
Move the weight of 0,5 kg slowly all the way up and down and watch at
which level the weight make a different (more close) contact with the
gliding rods. At the same time you feel more resistance of the gliding rods.
Note also on which side the contact with the gliding rods is rough.
-Watch first if no dust sticks to the gliding rod locally at the less
gliding spot. Remove the dust if necessary.
-If a slight bending of the gliding rod(s) is the cause, you must
push or pull the gliding rod in the correcting direction. You need
too push or pull more or less firmly depending on the amount of
bending. Control the improvement of the gliding of the rods after
each correcting pull or push like you did before with the 0,5 kg.
X X
INSTRUCTION MANUAL
File: Txx BM 2000 ENG 03.doc Date: 14.06.2010 Page 8 of 21
Guaranties Relevant for
T14-2
T22-2
T23-2
The Pulley Apparatus do have 2 years guarantee on complaints (claims). X
The Pulley Apparatus do have 2 years guarantee on production faults. X
Guaranties and responsibility are withdrawn when instructions of this manual
is not completely followed. X
It is the institute employers and the owners responsibility to follow the
instructions in this manual, to avoid injury of persons and damage to
equipment an environments. X
Guaranties are withdrawn when misused. So also when apparatus is used with
unoriginal spear parts.
Like vice if non approved equipments are being used together with the
apparatus.
X
Training and exercises should always be instructed and followed by therapist/
instructor. X
Service and maintenance should be carried out by qualified personal. X
Technical specifications:
Relevant for
T14-2
T22-2
T23-2
Height: 220 cm X
With: 30 cm X
Depth: 13 cm X
Weight: weight stack (T14-2) 14 kg
Weight: weight stack (T22-2) 22 kg
Weight: weight stack (T23-2) 22 kg
Tot. weight: weight stack (T14-2) 21,5 kg
Tot. weight: weight stack (T22-2) 29,5 kg
Tot. weight: weight stack (T23-2) 30,5 kg
Rope: Roblon art. no.: T00-21 5mm nylon with core of
kevlar. 5,0 m X
Weight pin with magnet X
Color: Sort/chrome X
INSTRUCTION MANUAL
File: Txx BM 2000 ENG 03.doc Date: 14.06.2010 Page 9 of 21
_________________________________________________________________________________________
EC DECLARATION OF CONFORMITY FOR
MACHINERY
_________________________________________________________________________________________
Manufacturer: Steens Industrier a/s
Address: Verkstedveien 25, 1400 SKI, NORWAY
Herewith declares that:
Pulley Apparatus, art. no. T14-2, T22-2, T23-2 is in conformity with the provisions of the Machinery Directive
(directive 89/392/EEC), as amended, and with national implementing legislation.
Ski, Norway 14. July 2010
Tommy Steen
Tommy Steen
Managing director

INSTRUCTION MANUAL
File: Txx BM 2000 ENG 03.doc Date: 14.06.2010 Page 10 of 21
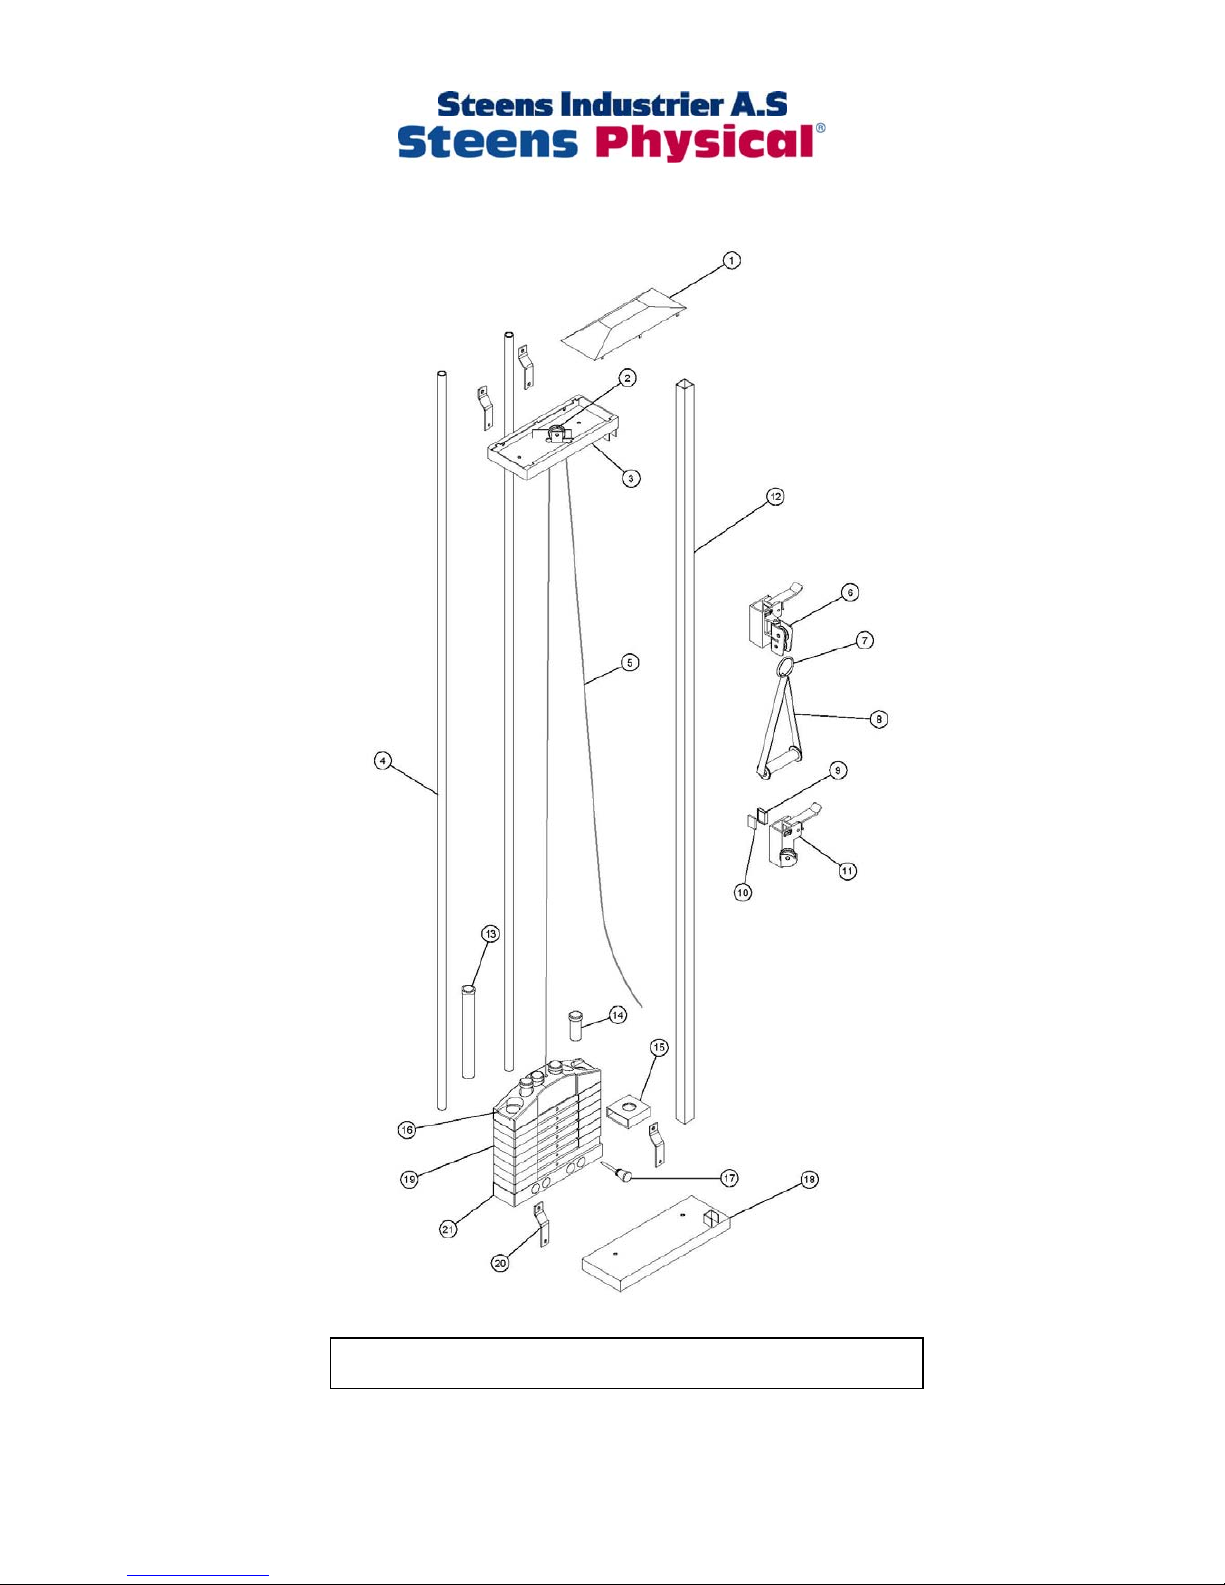
WALL BRACKET
PINH DANGER SIGN
SMALL WEIGHTS CE-MARK
ART. NO.
LINE TIGHTENER / LINE
SHORTENER,
LOWER GLIDER
HAND GRIP, standard
PULL OUT,
UPPER GLIDER
WEIGHT PIN
POSITION A
POSITION B
INSTRUCTION MANUAL
File: Txx BM 2000 ENG 03.doc Date: 14.06.2010 Page 11 of 21
Apparatus with weight pin

INSTRUCTION MANUAL
File: Txx BM 2000 ENG 03.doc Date: 14.06.2010 Page 12 of 21
Apparatus with double pull handles and weight pin
INSTRUCTION MANUAL
File: Txx BM 2000 ENG 03.doc Date: 14.06.2010 Page 13 of 21
Accessories
For further more information concerning accessories please take contact with your
dealer. When you make an order, always notice the apparatus art. no. and year of
production for the accessories to be used with.
Description Art. no.
1 Friction pulley for eccentric deloading T00-05
2 Set of counterweight for Pulley apparatus 180 142
3 Triceps handle, 35 cm rotating T00-09
4 Triceps handle 35 cm strait 180888
5 Triceps handle, angled 180888-10
6 Handle pronation - supination 180121-10
7 Row handle 180875-10
8 Back-\ hand support with padding T00-03
9 Head strap 180887-10
10 Under arm bow, bended 180115-50
11 Under arm bow, strait 180115-60
12 Strap 150 cm x 8cm 180139
13 Strap 100 cm x 8cm 180138
14 Ankle strap 65 cm x 5cm 180135
15 Wrist strap 35 x 5cm 180136
16 Schuler strap 180137
17 Banana loop 62011
18 Grip glove 10050
19 Handle T00-050
20 Wall suspension for application accessories 180134-10

INSTRUCTION MANUAL
File: Txx BM 2000 ENG 03.doc Date: 14.06.2010 Page 14 of 21
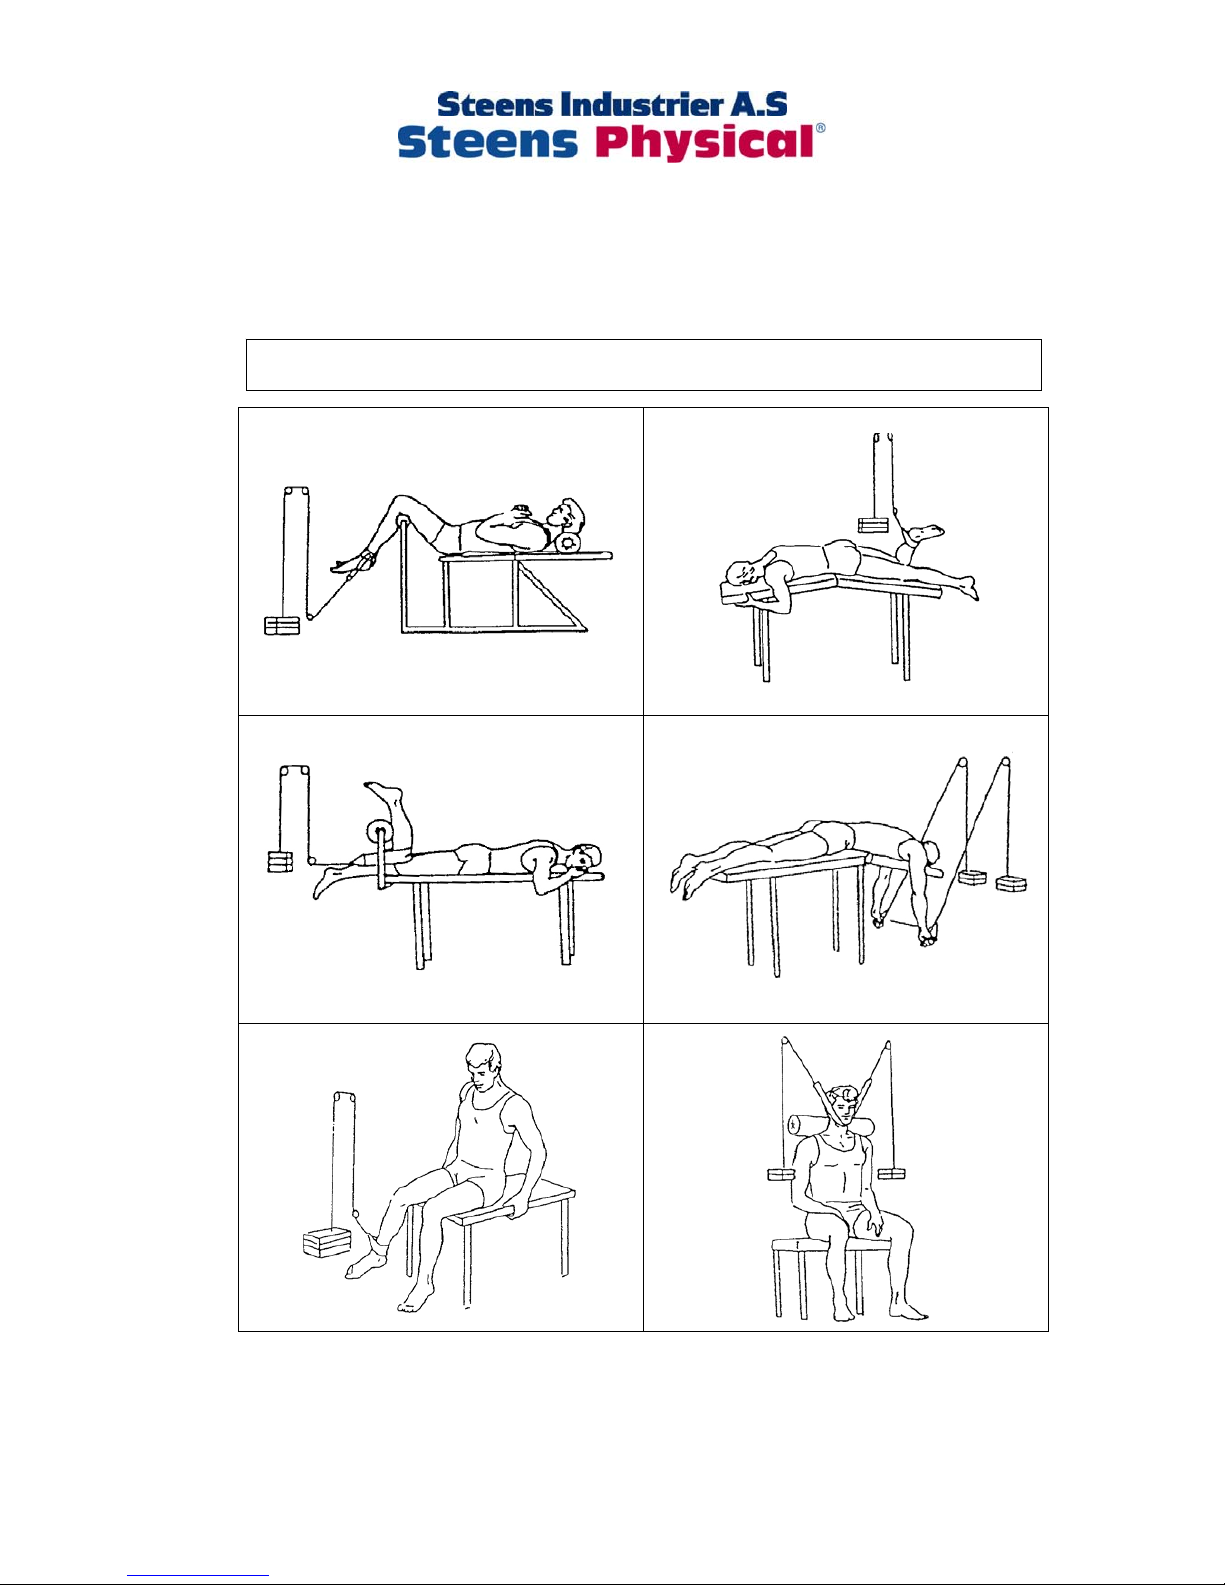
EXERCISING POSSIBILITIES
On the following pages you will find illustrations of some exercising possibilities you may
use with the pulley apparatus. It is of importance to strongly tell that it is always in the
therapists / instructors interest to set up the training situations.
All the time it rely on the therapists / instructors and the user to take care and responsibility so
that the apparatus will be used in a proper way. That means nobody gets hurt or injured, or the
apparatus itself or the environment gets damage.
It is of great importance and a condition that the training is shown in detail and followed up
by the therapists / instructors. Only in that way the exercising is carried out efficiently and the
goals are achieved.
The easiest way of achieve the goals of the training is to follow these steps:
•choice of training activity for the specific aim
•adjustment for the correct load
•setup of the correct number of repetitions
•establish of a stable position
•speed and movement
•start point for the movement
•end point for the movement
•control of correct fulfillment of the training
•following up during the execution of the exercise, with corrections
PROSPER TRAINING SHIFT!

INSTRUCTION MANUAL
File: Txx BM 2000 ENG 03.doc Date: 14.06.2010 Page 15 of 21
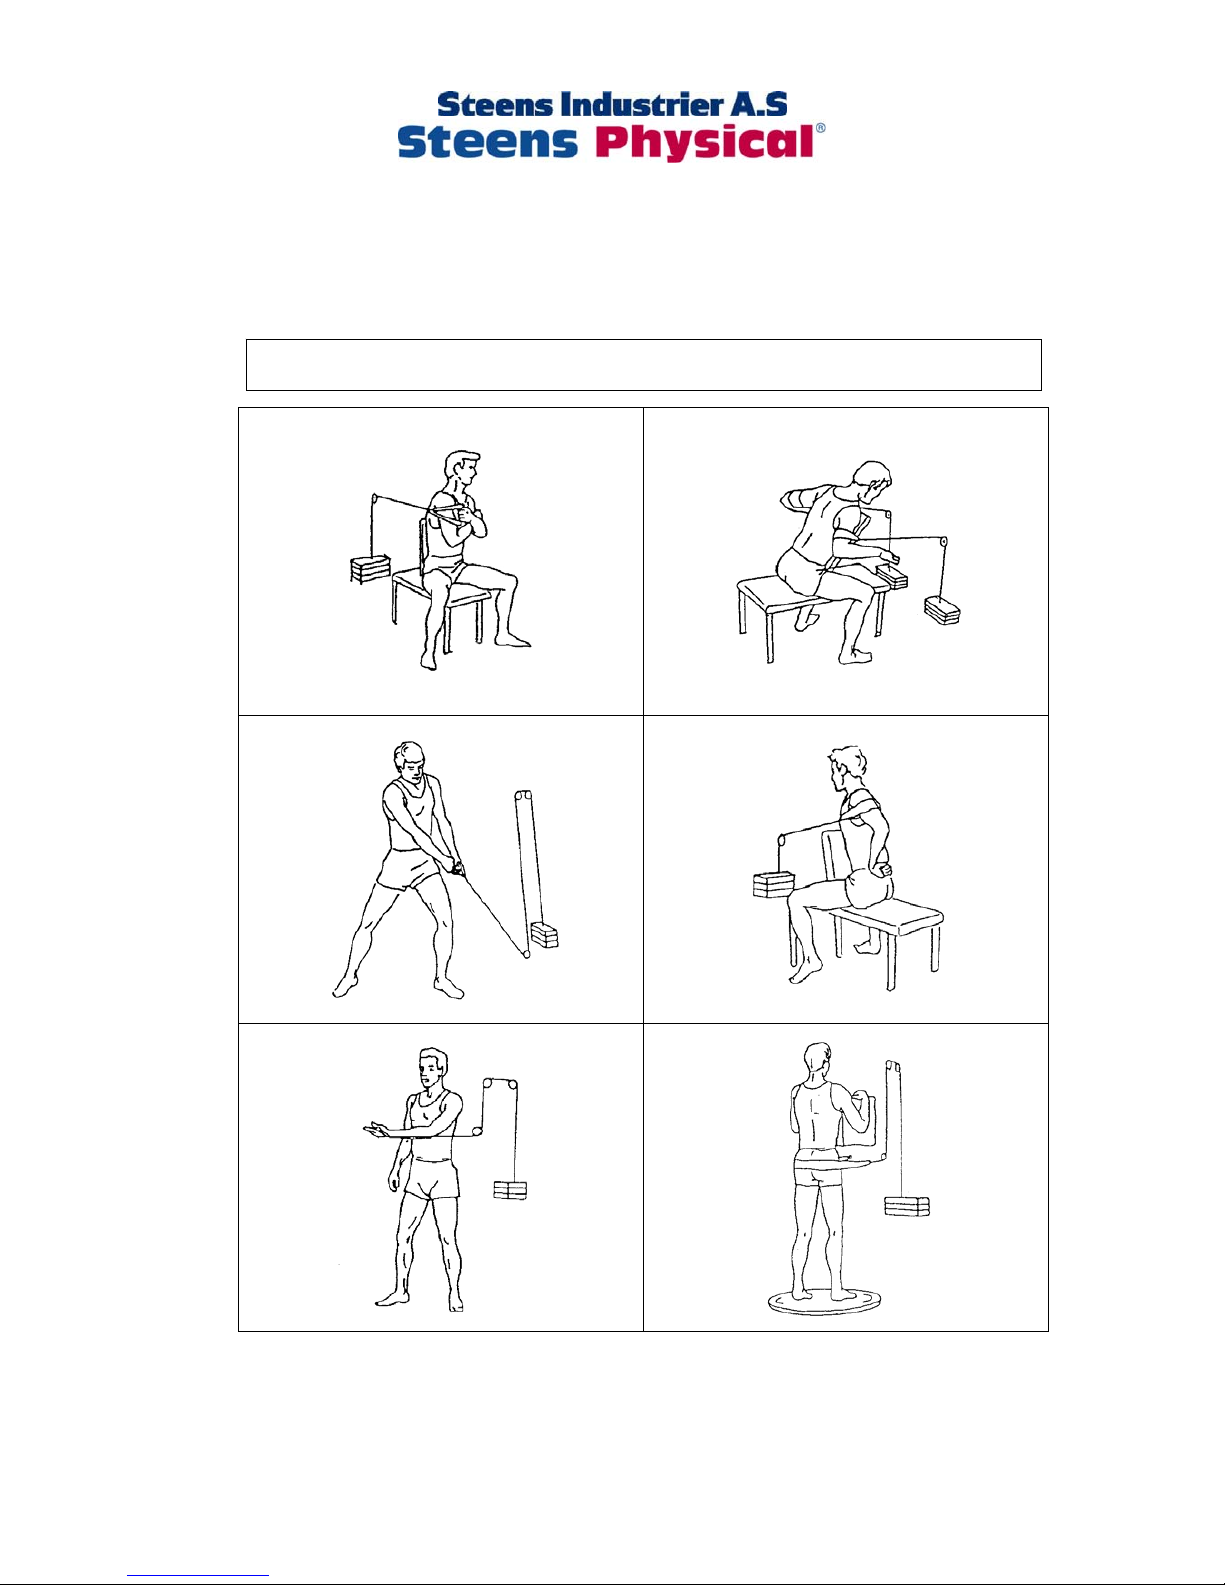
Exercising carried out on closer instructions and a follow up by your therapist/instructor
1 2
3 4
5 6
INSTRUCTION MANUAL
File: Txx BM 2000 ENG 03.doc Date: 14.06.2010 Page 16 of 21
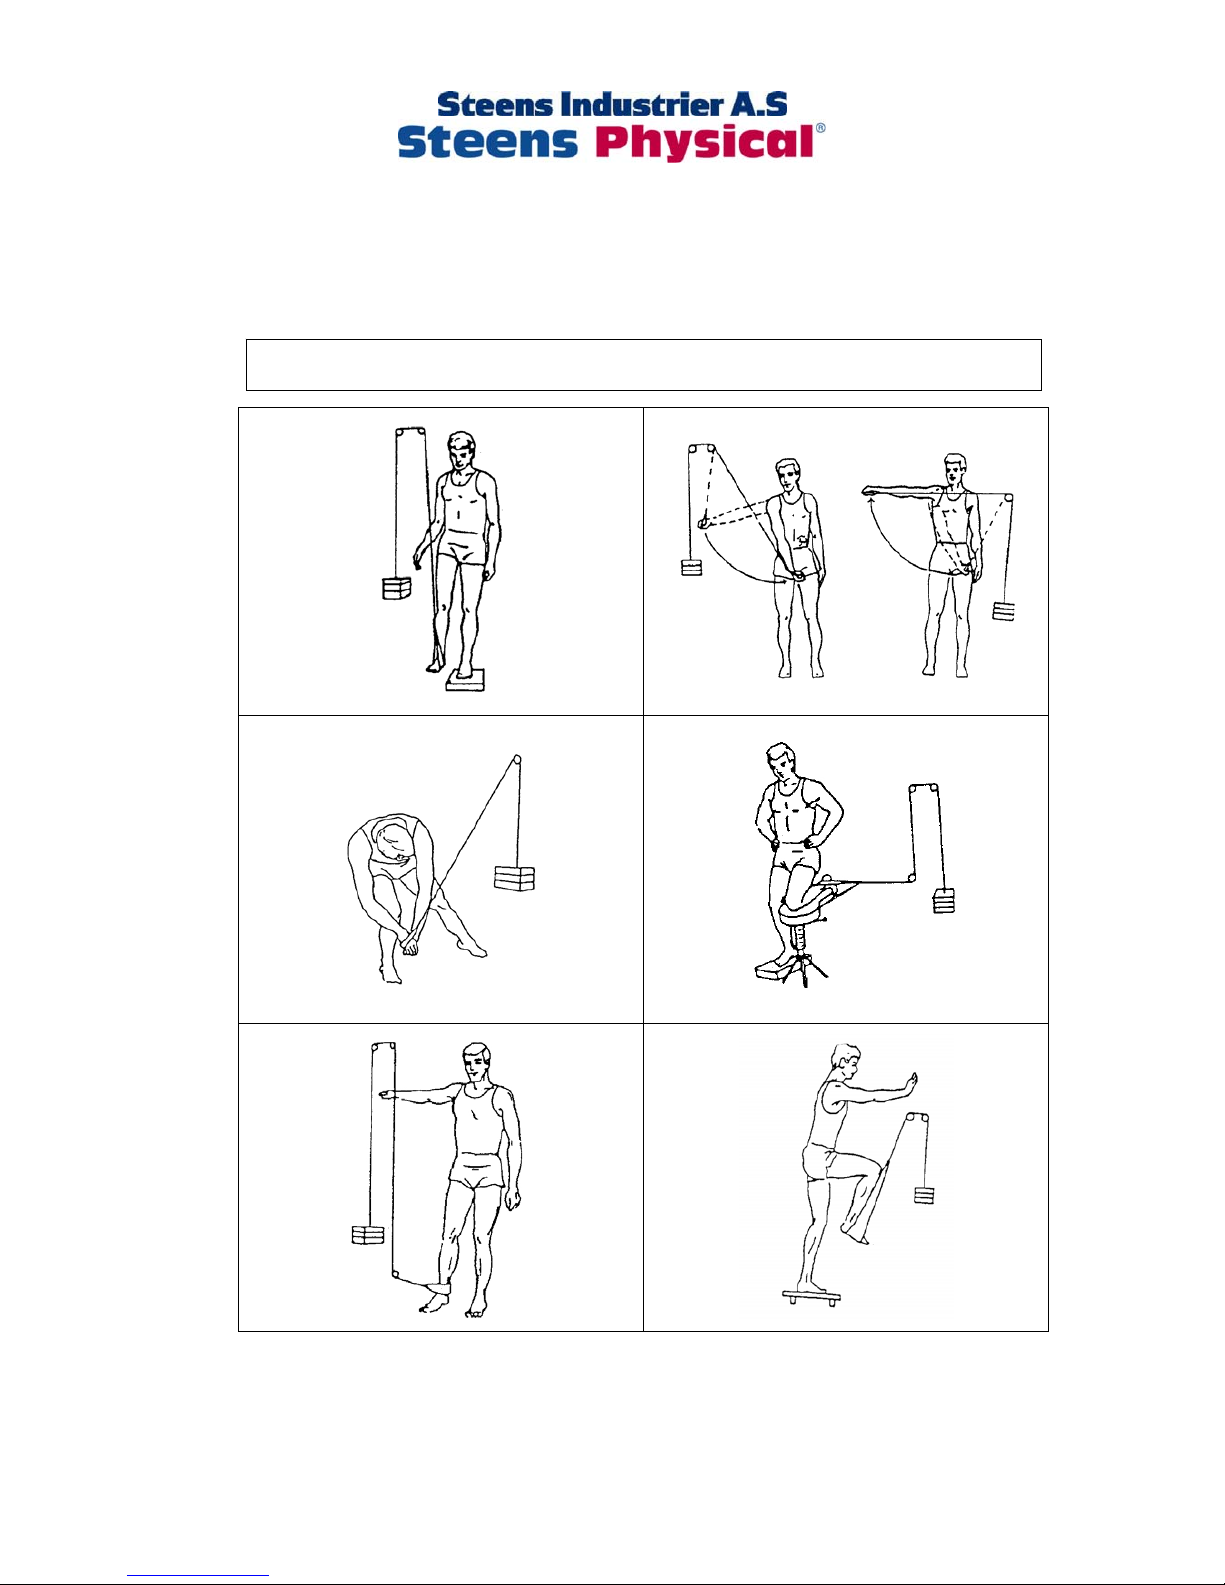
Exercising carried out on closer instructions and a follow up by your therapist/instructor
7 8
9 10
11 12
INSTRUCTION MANUAL
File: Txx BM 2000 ENG 03.doc Date: 14.06.2010 Page 17 of 21
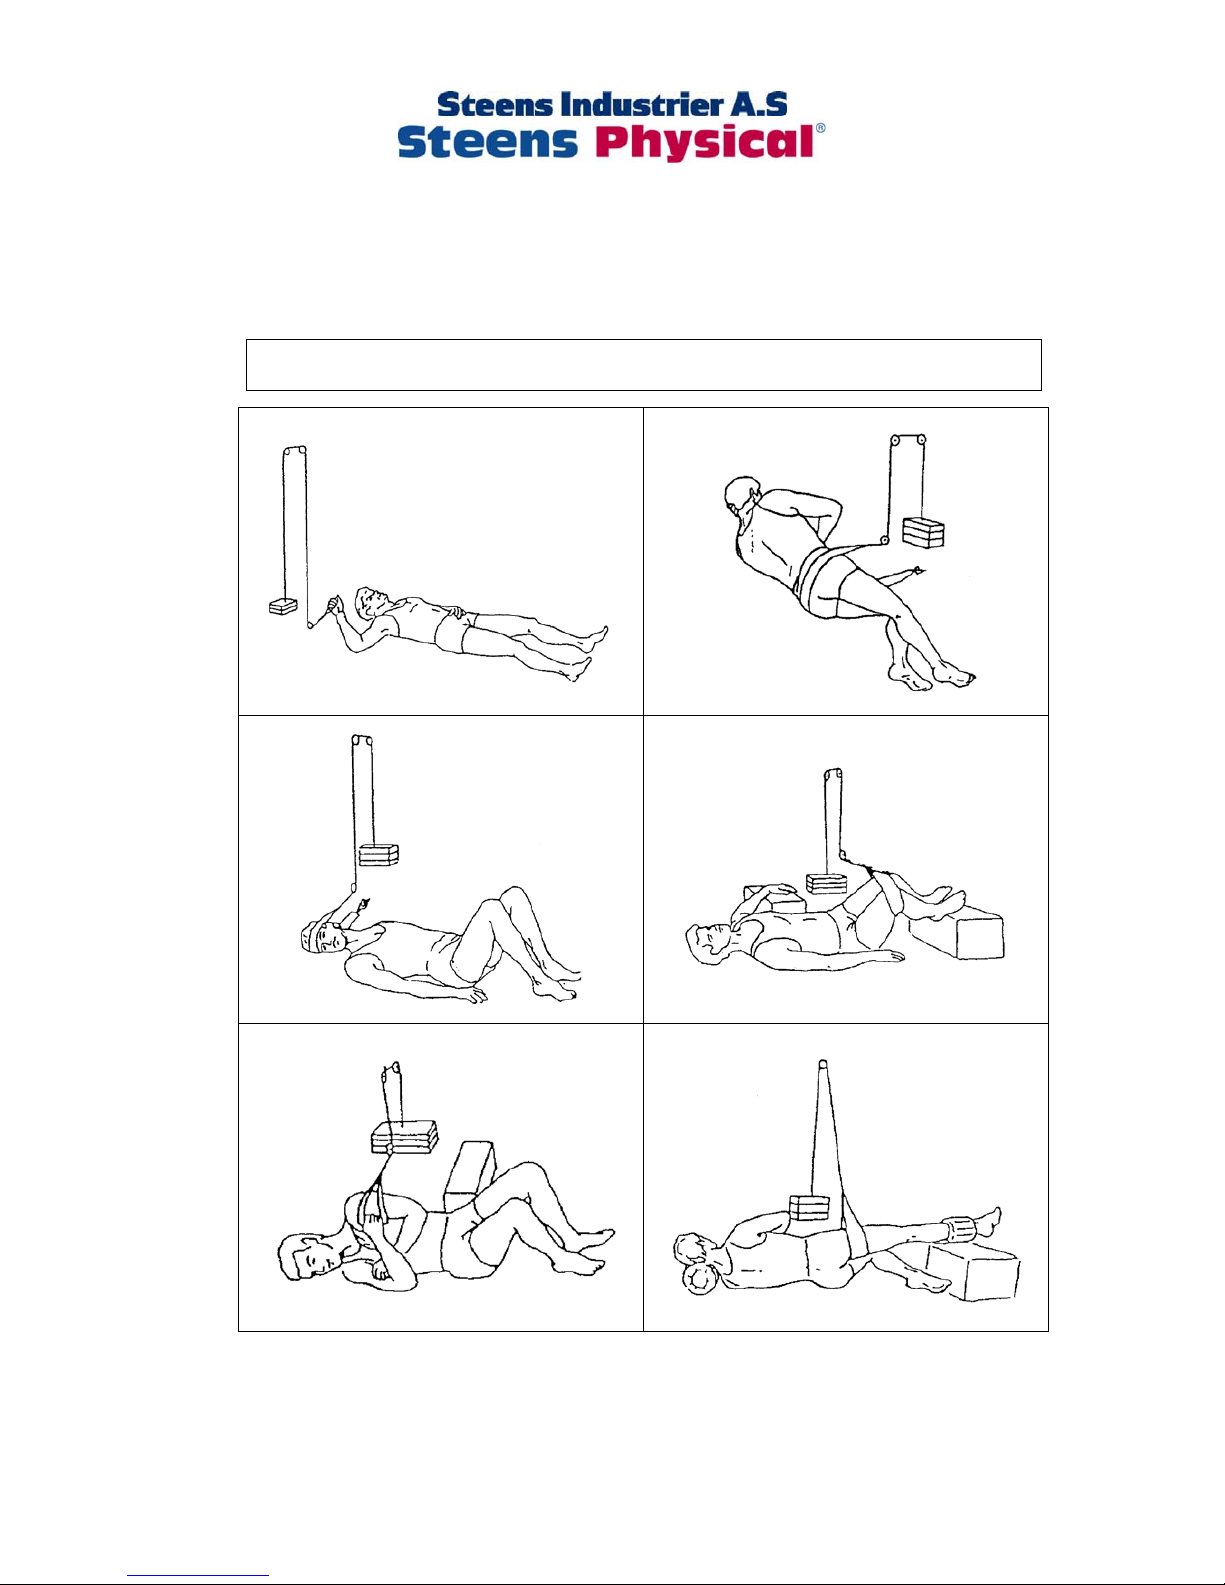
Exercising carried out on closer instructions and a follow up by your therapist/instructor
13 14
15 16
17 18
INSTRUCTION MANUAL
File: Txx BM 2000 ENG 03.doc Date: 14.06.2010 Page 18 of 21
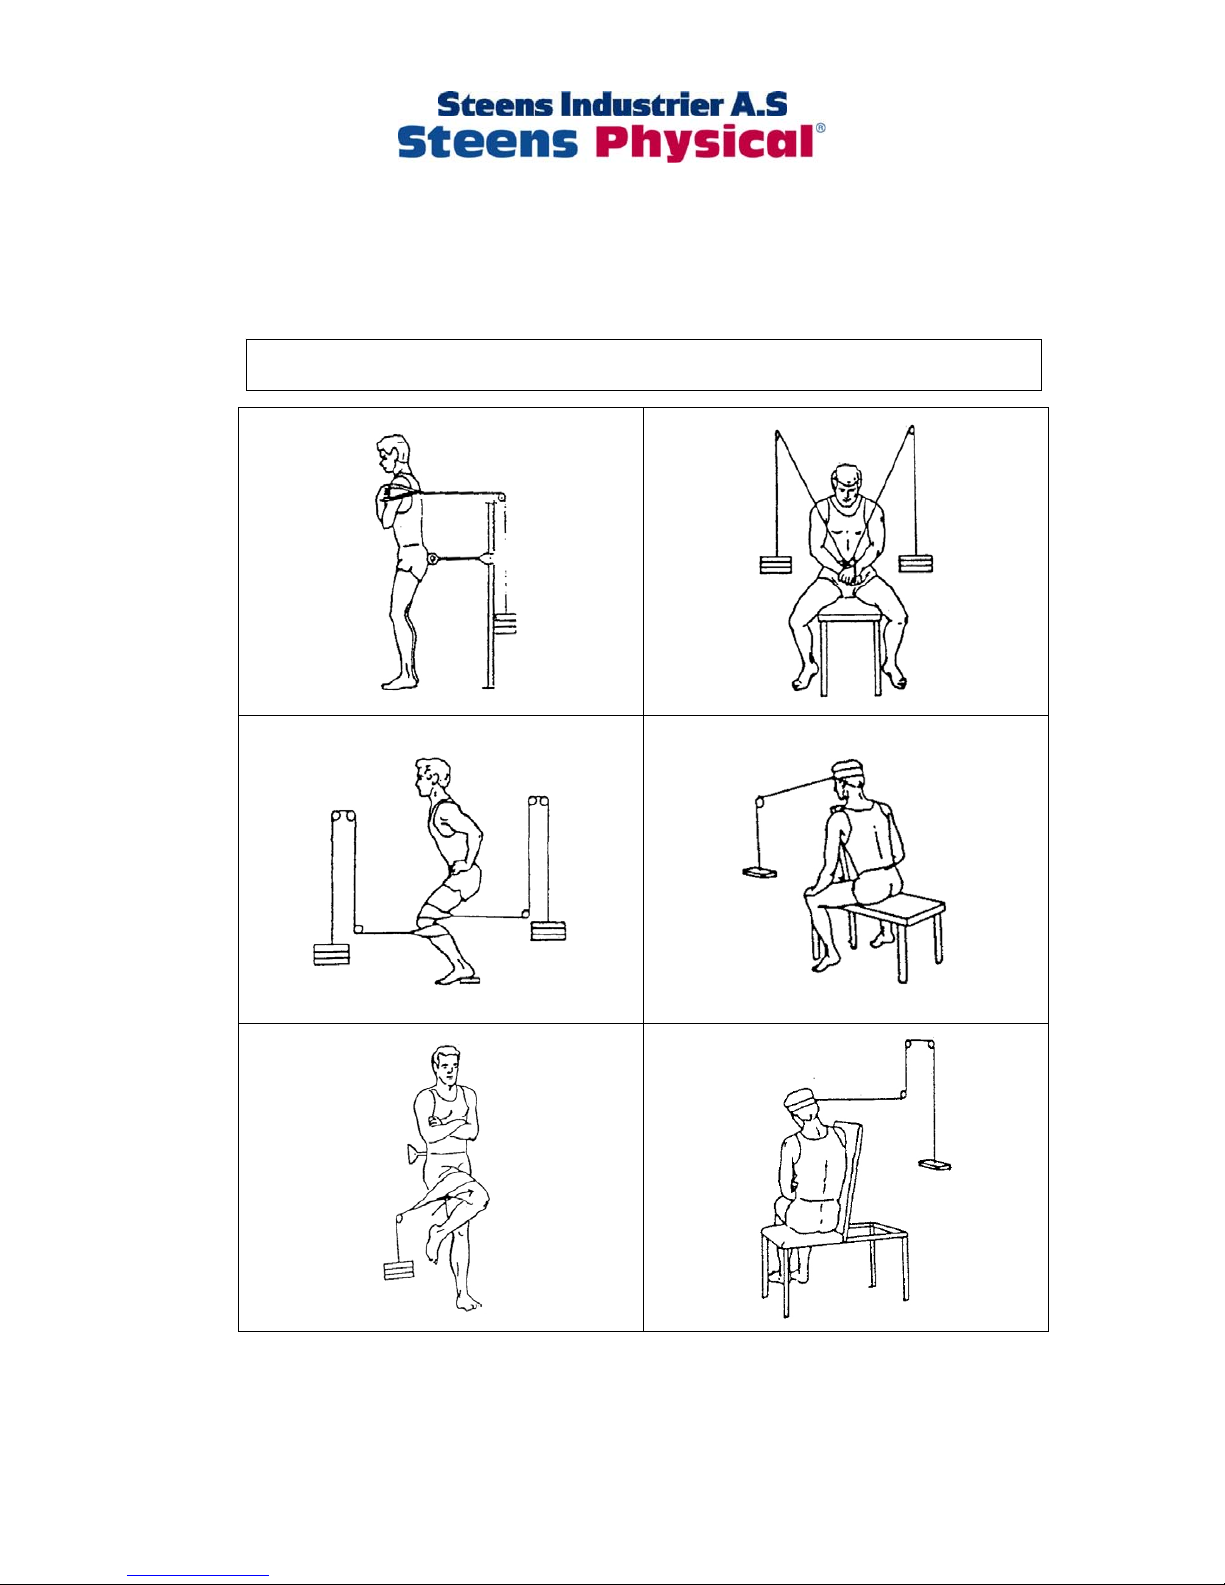
Exercising carried out on closer instructions and a follow up by your therapist/instructor
19 20
21 22
23 24
INSTRUCTION MANUAL
File: Txx BM 2000 ENG 03.doc Date: 14.06.2010 Page 19 of 21
Exercising carried out on closer instructions and a follow up by your therapist/instructor
25
27
29
26
28
30
INSTRUCTION MANUAL
File: Txx BM 2000 ENG 03.doc Date: 14.06.2010 Page 20 of 21
Exercising carried out on closer instructions and a follow up by your therapist/instructor
3635
3433
3231
Table of contents
Other Steens Industrier AS Fitness Equipment manuals

Popular Fitness Equipment manuals by other brands


G-FITNESS
G-FITNESS AIR ROWER user manual

CAPITAL SPORTS
CAPITAL SPORTS Dominate Edition 10028796 manual

Martin System
Martin System TT4FK user guide

CIRCLE FITNESS
CIRCLE FITNESS E7 owner's manual

G-FITNESS
G-FITNESS TZ-6017 user manual

Accelerated Care Plus
Accelerated Care Plus OMNISTIM FX2 CYCLE/WALK user manual


