Echelon GT User manual

INSTRUCTION MANUAL
ECHELON GT

2

3
Hello,
I am Lou Lentine, President of Echelon, and I would like to welcome you to the Echelon community. You’ve
made a great decision for yourself and your family. The Echelon Experience is an innovative combination
of fitness products integrated with our state-of-the-art Echelon Fit App. This brand-new, fitness lifestyle
connects your family, friends, the Echelon community, and Echelon instructors together to help you with
your fitness goals. With thousands of live and on-demand classes, no matter your schedule or experience,
there is always a new and exciting class for you to join.
We embrace your decision to join our Echelon family in the pursuit of living a healthier lifestyle. We are
committed to continue engineering cutting edge, world-class fitness products to improve quality of life
through workout experiences that make an active lifestyle more accessible and sustainable.
Thank you again for choosing Echelon and I look forward to seeing you in the next live class!
Best personal regards,
Lou Lentine
CEO, Echelon Fitness Multimedia, LLC

4
3
1
11
8
12 13 14
9
5
10
7
6
15
16
18
17
19
22
20
23
21
25 26
4
2
24
INCLUDES
1. Handlebar height
adjustment lever
2. Handlebar post frame
3. Resistance knob/brake lever
4. Crank arms
5. Seat height adjustment lever
6. Insert (Remove it before riding)
7. Front bracket
8. Rear bracket
9. Wheel chock (not visible)
10. Handlebars
11. Tablet mount arm
12. Front foot
13. Rear foot
14. Handlebar post
15. Seat
16. Water bottle holder
17. Pedals
18. Seat post
19. Seat slide adjustment knob
20. Power adapter
21. Handlebar bottom bracket
22. Water bottle holder screws (x2)
23. Handlebar post screw
24. Foot bolts (x4)
25. Wrench
26. Double-sided wrench
27. Hex key with Phillips
screwdriver head
PARTS LIST
4
27

5
ACCOUNT CREATION
If this product was purchased on the echelonfit.uk website, you should have received
an activation email.
Go to member.echelonfit.com and follow the on-screen instructions to choose a plan and setup
your account. This info will be needed to login to your account on the Echelon FitTM App.
All account info and plans are managed at member.echelonfit.com and use the same login. After creating your account
login on member.echelonfit.com, write down your login info. This will be the same login for the App.
1. Choose "sign up now"
2. Select Purchase location
3. Choose your plan
Monthly / 1 Year / 2 Year
Select purchase location and follow the
on-screen instructions.
4. Set up payment method
5. ENTER PERSONAL ACCOUNT INFO Once assembly is complete, you will be required to sign
into your account, choose a class, and connect your
bike.
If this product was purchased on the echelont.com
website, you should have received an activation email.
Click the link in the activation email and follow the
on-screen instructions. Enter your information to verify
payment information. You will not be charged until
the next month.
ACCOUNT ACTIVATION
6. View YOUR ACCOUNT
Where you can edit your billing info, add family
members, manage subscriptions, and (if on your
mobile device) download the app and sign in.
QUICK START GUIDE
5
6
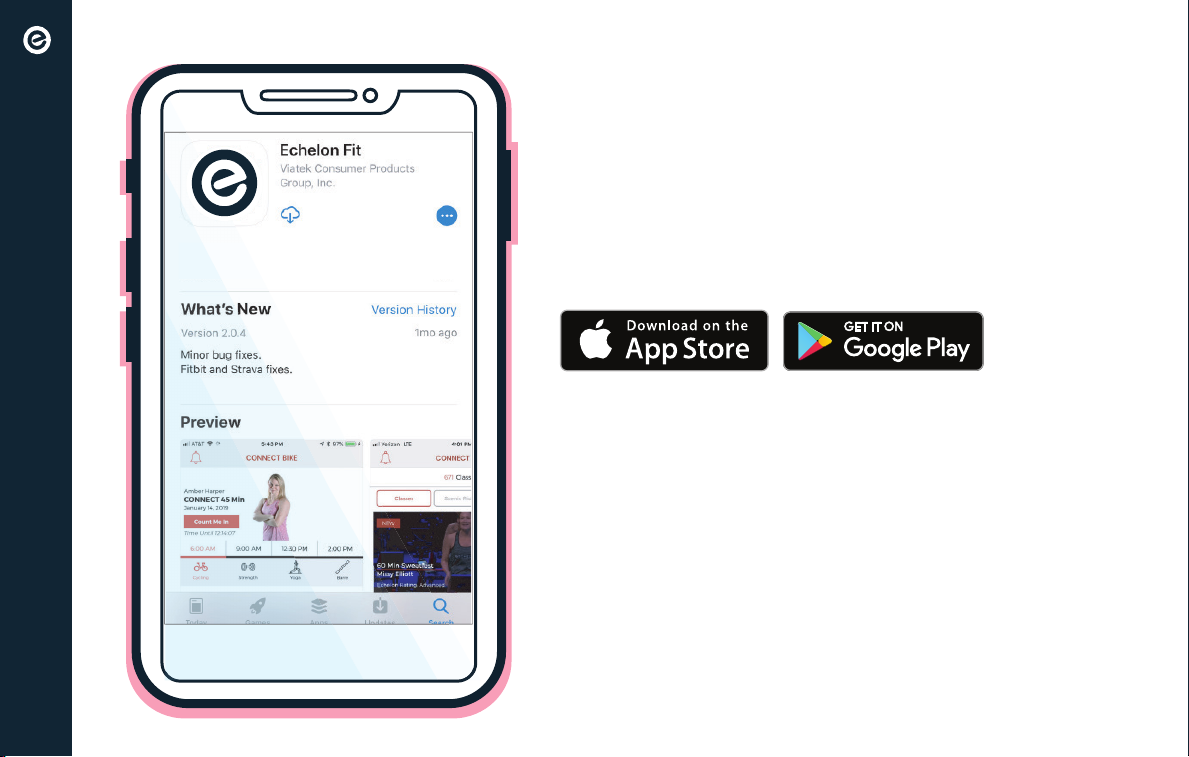
DOWNLOAD THE ECHELON FIT APP
Ensure latest version of the Echelon Fit™ App is
installed from the Google Play Store or the App Store.
OPERATIONAL INSTRUCTIONS
Connect to the Echelon FitTM App to access tutorials
and operation instructions.
QUICK START GUIDE
6

7
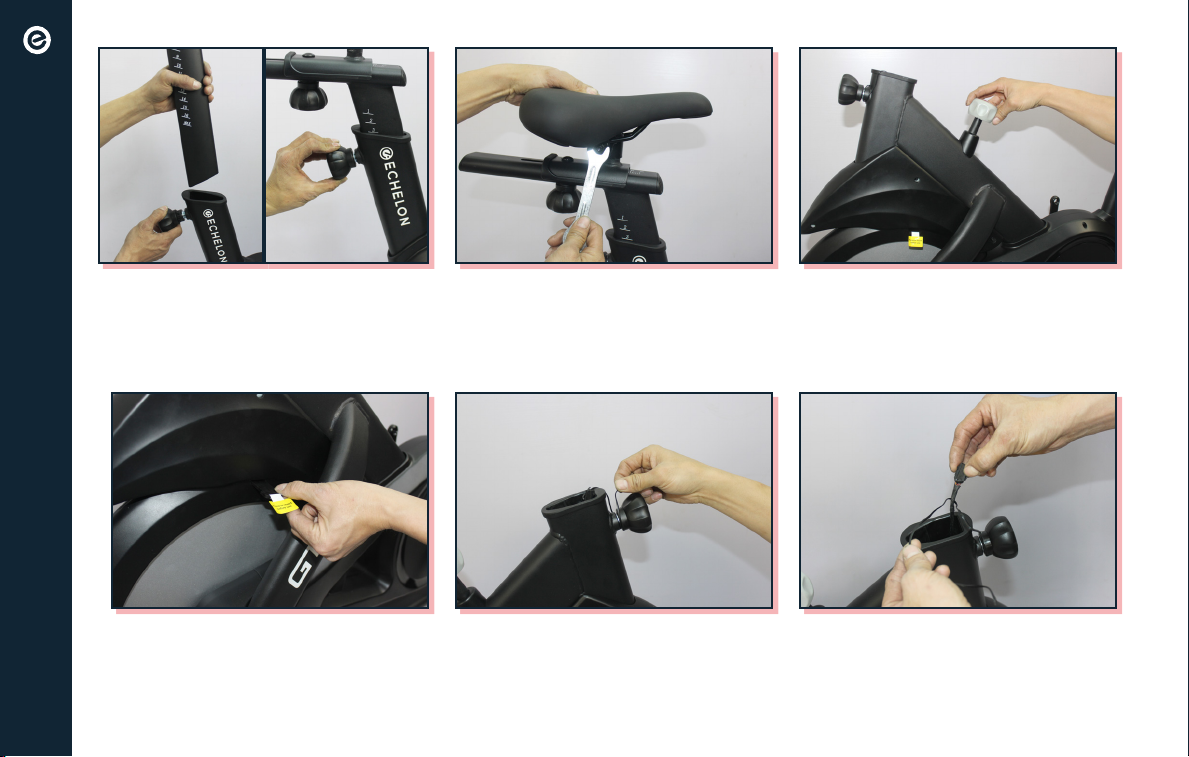
Lay the Echelon GT on its side and
remove wheel chock bolts.
Place the rear foot under the
rear bracket.
Place the front foot under the
front bracket.
Using your wrench or fingers, pull
wheel chock out and set aside.
Insert foot bolts into rear foot and
tighten down with hex key.
Insert foot bolts into front foot and
tighten down with hex key.
assembly
7
8
Unscrew handlebar height
adjustment lever, but do not remove.
Pull lever out and fully insert
handlebar post into frame. Release
lever and post is secure.
Loosen the Resistance Knob by
turning counterclockwise.
Place seat onto seat post and secure
with included wrench on both sides.
Untie the twist tie at the handlebar
adjustment knob.
Remove the insert from the flywheel
cover.
Pull out the wire, ensuring not to
allow the wire to fall inside frame.
ASSEMBLY
8
9
ASSEMBLY
Place the handlebar bottom bracket,
screw in the handlebar post screw
and tighten with hex key.
Pull out the connect wire from the
handlebar post.
Pull out the connect wire and
untwist the twist tie from tablet
mount.
Connect the wire from frame and
handlebar post together.
Unscrew handlebar post adjustment
knob but do not remove. Fully insert
the handlebar post into frame.
Release the knob and ensure post is
secure.
Place the handlebar on the
handlebar post.
9
10
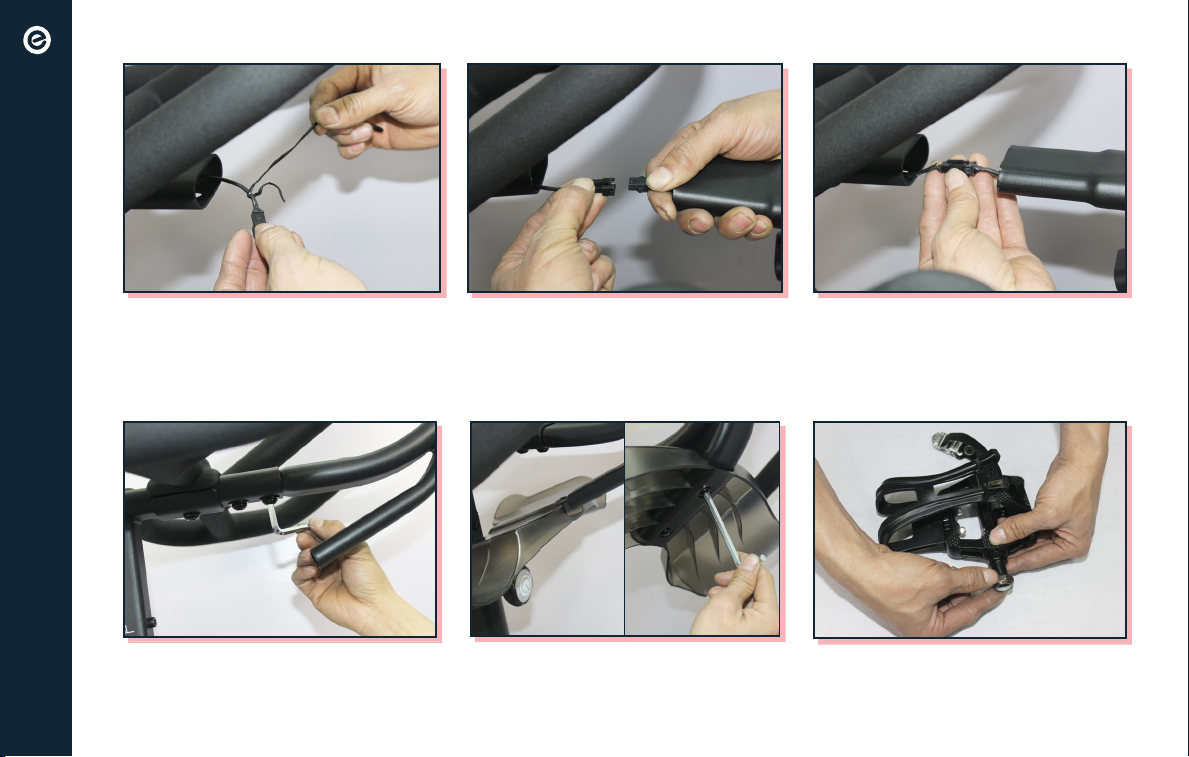
ASSEMBLY
Place flat washers to table mount
bolts, place table mount bolts with
washers, finger tighten, then secure
bolts with washers with hex key.
Untie the twist tie from handlebar
post, do not allow the wire to fall
inside the handlebar post.
After connecting wires, feed excess
wire into handlebar post and slide
tablet mount into handlebar post.
Remove nut from the right pedal by
turning counterclockwise.
Connect the wire from the handlebar
post to the wire at the bottom of the
tablet mount.
Slide water bottle holder onto post,
secure both sides with screws and
hex key.
10
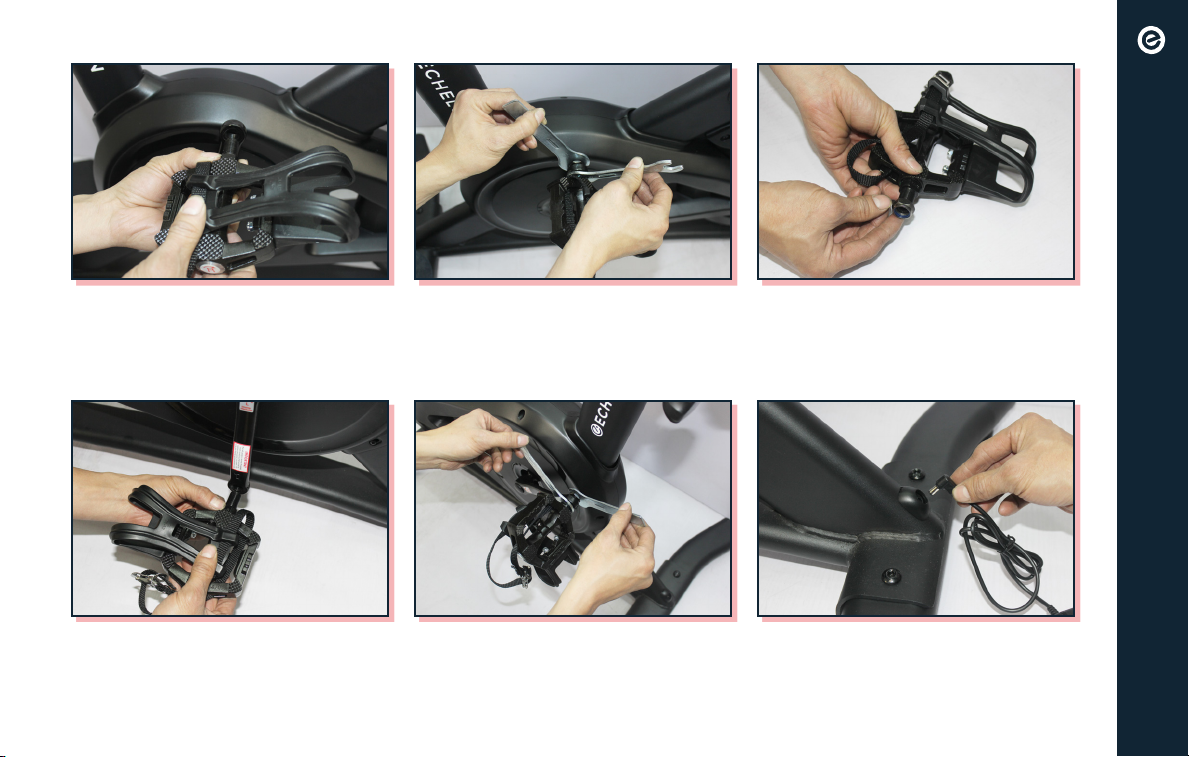
11
The threads are reversed on
LEFT pedal and nut.
Ensure pedal and crank arm are both
marked with the L Label.Screw left
pedal onto left crank arm clockwise.
Finger tighten nut counterclockwise
back onto pedal bolt.
Hold pedal with double-sided
wrench and use single-sided wrench
to tighten nut counterclockwise.
Plug power adapter into port
located on the rear foot bracket.
Ensure pedal and crank arm are
both marked with the R Label.
Screw right pedal onto right crank
arm clockwise. Finger tighten nut
clockwise back onto pedal bolt.
Hold pedal with double-sided
wrench and use single-sided wrench
to tighten nut clockwise. Remove nut from the left pedal by
turning clockwise.
ASSEMBLY
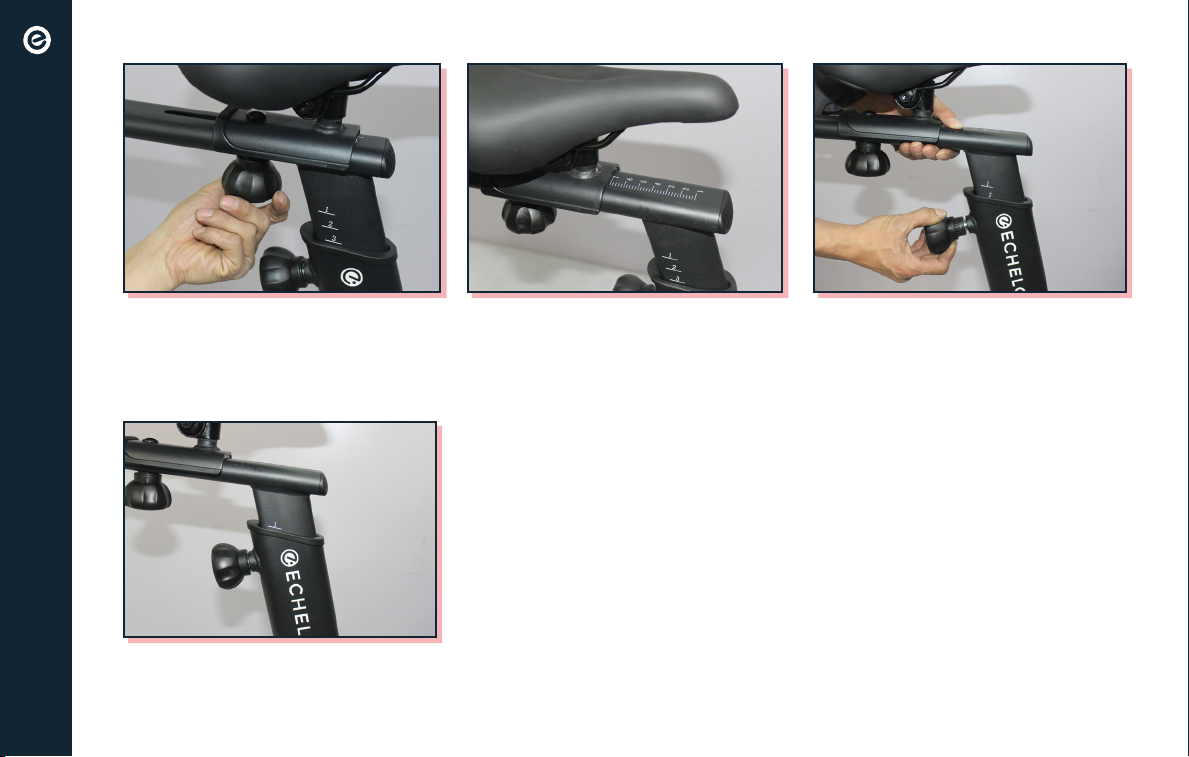
12
Ensure knob engages one of the
adjustment holes. Turn the seat
height adjustment knob clockwise
until secure.
Turn seat slide adjustment knob
counterclockwise to loosen and
move seat along track to desired
location.
Turn seat height adjustment knob
counterclockwise until you are able
to pull out the knob halway, raise or
lower the seat to desired location.
Turn the seat slide adjustment knob
clockwise to secure and tighten in
place.
seat adjustment

13
TROUBLE CONNECTING?
If your bike does not connect using the process above, navigate to the Settings app on the tablet and
select Apps (on older versions of Android you will select ’Application’ and then ‘Application manger’).
At the top right select the icon (on older versions, select ‘MORE’) and then select ‘Show system’ or
‘Show system apps’. Select ‘Bluetooth Share’, then ‘Storage’, and then either ‘Clear Data’ or ‘Clear
Cache,’ depending which button is highlighted. Restart the Echelon Fit™ App and attempt connection
again. If you have any issues after completing this process, please contact us at
appsupport@echelonfit.com.
handlebar ADJUSTMENT
11
Turn handlebar adjustment knob
counterclockwise until you are
able to pull out the knob halfway,
raise or lower the handlebars to
the desired location.
Ensure knob engages with one of
the adjustment holes.

14
OPERATION
To adjust the resistance while using
the Echelon®GT, turn the resistance
adjustment knob to the left or right.
To stop the bike press down on the
resistance adjustment knob.
14

15
SAFETY INFO AND WARNINGS
SPECS
INPUT: 100-240V~ 50/60HZ 0.8A
OUTPUT: 9V 3A
QDID: 124882
FCC ID: 2AMDBBLE003
CAN ICES-3 (B)/NMB-3(B) HVIN: BLE003
IC: 22882-BLE003
DIMENSIONS: 121cm L X 63cm W X 114cm H
Changes or modifications not expressly approved by the party responsible for compliance could void the user's
authority to operate this device.
FEDERAL COMMUNICATIONS COMMISSION (FCC) STATEMENT
15.21
YOU ARE CAUTIONED THAT CHANGES OR MODIFICATIONS NOT EXPRESSLY APPROVED BY THE PARTY RESPONSIBLE FOR
COMPLIANCE COULD VOID THE USER’S AUTHORITY TO OPERATE THE EQUIPMENT.
15.105(B)
THIS EQUIPMENT HAS BEEN TESTED AND FOUND TO COMPLY WITH THE LIMITS FOR A CLASS B DIGITAL DEVICE,
PURSUANT TO PART 15 OF THE FCC RULES. THESE LIMITS ARE DESIGNED TO PROVIDE REASONABLE PROTECTION AGAINST
HARMFUL INTERFERENCE IN A RESIDENTIAL INSTALLATION. THIS EQUIPMENT GENERATES, USES AND CAN RADIATE
RADIO FREQUENCY ENERGY AND, IF NOT INSTALLED AND USED IN ACCORDANCE WITH THE INSTRUCTIONS, MAY CAUSE
HARMFUL INTERFERENCE TO RADIO COMMUNICATIONS. HOWEVER, THERE IS NO GUARANTEE THAT INTERFERENCE
WILL NOT OCCUR IN A PARTICULAR INSTALLATION. IF THIS EQUIPMENT DOES CAUSE HARMFUL INTERFERENCE TO RADIO
OR TELEVISION RECEPTION, WHICH CAN BE DETERMINED BY TURNING THE EQUIPMENT OFF AND ON, THE USER IS
ENCOURAGED TO TRY TO CORRECT THE INTERFERENCE BY ONE OR MORE OF THE FOLLOWING MEASURES:
-REORIENT OR RELOCATE THE RECEIVING ANTENNA.
-INCREASE THE SEPARATION BETWEEN THE EQUIPMENT AND RECEIVER.
-CONNECT THE EQUIPMENT INTO AN OUTLET ON A CIRCUIT DIFFERENT FROM THAT TO WHICH THE RECEIVER IS
CONNECTED.
-CONSULT THE DEALER OR AN EXPERIENCED RADIO/TV TECHNICIAN FOR HELP.
15

16
FCC RF RADIATION EXPOSURE STATEMENT:
1. THIS TRANSMITTER MUST NOT BE CO-LOCATED OR OPERATING IN CONJUNCTION WITH ANY OTHER ANTENNA OR
TRANSMITTER.
2. THIS EQUIPMENT COMPLIES WITH RF RADIATION EXPOSURE LIMITS SET FORTH FOR AN UNCONTROLLED ENVIRONMENT.
THIS EQUIPMENT SHOULD BE INSTALLED AND OPERATED WITH A MINIMUM DISTANCE OF 20 CM BETWEEN THE
RADIATOR AND YOUR BODY.
THIS DEVICE COMPLIES WITH PART 15 OF THE FCC RULES. OPERATION IS SUBJECT TO THE FOLLOWING TWO CONDITIONS:
1) THIS DEVICE MAY NOT CAUSE HARMFUL INTERFERENCE AND
2) THIS DEVICE MUST ACCEPT ANY INTERFERENCE RECEIVED, INCLUDING INTERFERENCE THAT MAY CAUSE
UNDESIRED OPERATION.
INNOVATION, SCIENCE AND ECONOMIC DEVELOPMENT CANADA (ISED)
INNOVATION, SCIENCE ET DÉVELOPPEMENT ÉCONOMIQUE CANADA (ISED)
THIS CLASS B DIGITAL APPARATUS COMPLIES WITH CANADIAN ICES-003
CET APPAREIL NUMÉRIQUE DE CLASSE B EST CONFORME À LA NORME NMB-003.
CANADIAN NOTICE
THIS DEVICE COMPLIES WITH ISED LICENSE-EXEMPT RSS STANDARD(S). OPERATION IS SUBJECT TO
THE FOLLOWING TWO CONDITIONS:
(1) THIS DEVICE MAY NOT CAUSE INTERFERENCE, AND
(2) THIS DEVICE MUST ACCEPT ANY INTERFERENCE, INCLUDING INTERFERENCE THAT MAY CAUSE UNDESIRED OPERATION
OF THE DEVICE.
AVIS CANADIEN
LE PRÉSENT APPAREIL EST CONFORME AUX CNR D’ISED APPLICABLES AUX APPAREILS RADIO EXEMPTS DE LICENCE.
L’EXPLOITATION EST AUTORISÉE AUX DEUX CONDITIONS SUIVANTES :
(1) L’APPAREIL NE DOIT PAS PRODUIRE DE BROUILLAGE, ET
(2) L’UTILISATEUR DE L’APPAREIL DOIT ACCEPTER TOUT BROUILLAGE RADIOÉLECTRIQUE SUBI, MÊME SI LE BROUILLAGE
EST SUSCEPTIBLE D’EN COMPROMETTRE LE FONCTIONNEMENT.
CAUTION: EXPOSURE TO RADIO FREQUENCY RADIATION.
1. TO COMPLY WITH THE CANADIAN RF EXPOSURE COMPLIANCE REQUIREMENTS, THIS DEVICE AND ITS ANTENNA MUST
NOT BE CO-LOCATED OR OPERATING IN CONJUNCTION WITH ANY OTHER ANTENNA OR TRANSMITTER.
SAFETY INFO AND WARNINGS
16

17
2. TO COMPLY WITH RSS 102 RF EXPOSURE COMPLIANCE REQUIREMENTS, A SEPARATION DISTANCE OF AT LEAST 20 CM
MUST BE MAINTAINED BETWEEN THE ANTENNA OF THIS DEVICE AND ALL PERSONS.
ATTENTION: EXPOSITION AU RAYONNEMENT RADIOFRÉQUENCE.
1. POUR SE CONFORMER AUX EXIGENCES DE CONFORMITÉ RF CANADIENNE L’EXPOSITION, CET APPAREIL ET SON
ANTENNE NE DOIVENT PAS ÊTRE CO-LOCALISÉS OU FONCTIONNANT EN CONJONCTION AVEC UNE AUTRE ANTENNE OU
TRANSMETTEUR.
2. POUR SE CONFORMER AUX EXIGENCES DE CONFORMITÉ CNR 102 RF EXPOSITION, UNE DISTANCE DE SÉPARATION D’AU
MOINS 20 CM DOIT ÊTRE MAINTENUE ENTRE L’ANTENNE DE CET APPAREIL ET TOUTES LES PERSONNES
NOTE: CARE SHOULD BE TAKEN IN MOUNTING AND DISMOUNTING THE STATIONARY EXERCISE BIKE. BEFORE
MOUNTING OR DISMOUNTING MOVE THE PEDAL ON THE MOUNTING OR DISMOUNTING SIDE TO ITS LOWEST
POSITION AND BRING THE MACHINE TO A COMPLETE STOP.
THE MANUFACTURER RECOMMENDS TO PLACE THE ECHELON®GT BIKE IN A SPACE WHERE YOU HAVE TWO FEET
OF CLEARANCE ON ALL SIDES OF THE BIKE FOR SAFE MOUNTING AND DISMOUNTING OF THE EXERCISE BIKE.
THE MINIMUM DIMENSIONS ARE: 0.5 M (19.7 IN.) ON AT LEAST ONE SIDE, AND 0.5 M (19.7 IN.) EITHER BEHIND OR
IN FRONT OF THE EXERCISE BIKE.
WHILE CLEANING YOUR ECHELON®GT BIKE, PLEASE USE A SOFT RAG WITH MILD DETERGENT OR WATER TO
WIPE DOWN THE MACHINE. DO NOT USE CORROSIVE CHEMICAL LIQUIDS WHICH MAY DAMAGE THE COVER.
IMPORTANT SAFETY INSTRUCTIONS
When using an electrical appliance, basic precautions should always be followed, including the
following:
Read all instructions before using THE ECHELON®GT.
SAFETY INFO AND WARNINGS
17

18
SAFETY INFO AND WARNINGS
DANGER -
To reduce the risk of electric shock:
1. Always unplug this appliance from the electrical outlet immediately after using and
before cleaning.
WARNING - To reduce the risk of burns, fire, electric shock, or injury
to persons:
1. An appliance should never be left unattended when plugged in. Unplug from outlet when not in
use, and before putting on or taking off parts.
2. Do not operate under blanket or pillow. Excessive heating can occur and cause fire, electric shock,
or injury to persons.
18
IMPORTANT
The left pedal is reverse threaded.
Insert carefully and turn left to
tighten the pedal into place. Use
only your hands and provided tools.
Loremipsum
IMPORTANT
Make sure cord is away from
fly wheel while using.
IMPORTANT
Make sure cord is away from
fly wheel while using.
IMPORTANT
Make sure cord is away from
fly wheel while using.
YYWW
Month Year
Manufacture Date
0000
This device complies with Part 15 of the FCC Rules. Operation is
subject to the following two conditions: (1) this device may not cause
harmful interference, and (2) this device must accept any interference
received, including interference that may cause undesired operation
of the device. For use only with Ninghai Yingjiao Electrical Co., Ltd.,
Model YS25-0903000 Adapter.
Serial Number
ECH-GT-XXXXXX
Format
Serial Number
WARNING
RISK OF PERSONAL INJURY
KEEP CHILDREN UNDER THE AGE
OF 13 AWAY FROM MACHINE.
•Please keep away from moving parts at
all times. Contact with moving parts
may result in serious injury.
• Visit support.echelonfit.com for
more information.
•Set up and operate stationary exercise
bike on a solid level surface.
•Care should be taken in mounting and
dismounting the stationary exercise
bike. Before mounting or dismounting
move the pedal on the mounting or
dismounting side to its lowest position
and bring the machine to a
complete stop.
•Keep the top surface of the pedal clean
and dry.
Model: ECH-GT
Made In China
Max user weight: 136KGS Class: H
Input: 9V 0.5AFCC ID:
FOR CONSUMER USE ONLY
CAN ICES-3 (B)/NMB-3(B) HVIN: IC:
E498210
Echelon Fitness, LLC
605 Chestnut St. Suite 700, Chattanooga, TN 37450 USA
1-833-937-2453 / 1-423-402-9010
Read Instructions
Before Operating
IMPORTANT
The left pedal is reverse threaded.
Insert carefully and turn left to
tighten the pedal into place. Use
only your hands and provided tools.
Loremipsum
IMPORTANT
Make sure cord is away from
fly wheel while using.
IMPORTANT
Make sure cord is away from
fly wheel while using.
IMPORTANT
Make sure cord is away from
fly wheel while using.
YYWW
Month Year
Manufacture Date
0000
This device complies with Part 15 of the FCC Rules. Operation is
subject to the following two conditions: (1) this device may not cause
harmful interference, and (2) this device must accept any interference
received, including interference that may cause undesired operation
of the device. For use only with Ninghai Yingjiao Electrical Co., Ltd.,
Model YS25-0903000 Adapter.
Serial Number
ECH-GT-XXXXXX
Format
Serial Number
WARNING
RISK OF PERSONAL INJURY
KEEP CHILDREN UNDER THE AGE
OF 13 AWAY FROM MACHINE.
•Please keep away from moving parts at
all times. Contact with moving parts
may result in serious injury.
• Visit support.echelonfit.com for
more information.
•Set up and operate stationary exercise
bike on a solid level surface.
•Care should be taken in mounting and
dismounting the stationary exercise
bike. Before mounting or dismounting
move the pedal on the mounting or
dismounting side to its lowest position
and bring the machine to a
complete stop.
•Keep the top surface of the pedal clean
and dry.
Model: ECH-GT
Made In China
Max user weight: 136KGS Class: H
Input: 9V 0.5AFCC ID:
FOR CONSUMER USE ONLY
CAN ICES-3 (B)/NMB-3(B) HVIN: IC:
E498210
Echelon Fitness, LLC
605 Chestnut St. Suite 700, Chattanooga, TN 37450 USA
1-833-937-2453 / 1-423-402-9010
Read Instructions
Before Operating

19
3. This appliance is not intended for use by persons with reduced physical, sensory or mental
capabilities, or lack of experience and knowledge, unless they have been given supervision
or instruction concerning use of the appliance by a person responsible for their safety. Keep
children under the age of 13 away from this machine.
4. Use this appliance only for its intended use as described in this manual. Do not use
attachments not recommended by the manufacturer.
5. Never operate this appliance if it has a damaged cord or plug, if it is not working properly, if
it has been dropped or damaged, or dropped into water. Return the appliance to a service
center for examination and repair.
6. Do not carry this appliance by supply cord or use cord as a handle.
7. Keep the cord away from heated surfaces.8. Never operate the appliance with the air openings
blocked. Keep the air openings free of lint, hair,
and the like.
9. Never drop or insert any object into any opening.
10. Do not use outdoors.
11. Do not operate where aerosol (spray) products are being used or where oxygen is being
administered.
12. To disconnect, turn all controls to the off position, then remove plug from outlet.
BEFORE starting any fitness or strength program, consult with your physician or health
official. This will ensure that you engage in the proper strength or fitness program for your age
and physical condition.
SAFETY INFO AND WARNINGS
19

20
Before using the Echelon®GT, answer these questions:
· Have you been sick recently?
· Have you had prolonged dizziness recently?
· Have you been out of breath for no reason recently?
· Have you had chest pain recently?
· Do you currently have any injuries preventing you from exercise?
· Are you pregnant?
· Do you have any conditions or reasons you should NOT exercise?
· Are you over 35 years old and physically inactive?
· Have you been told by a doctor that you should NOT exercise?
IF YOU ANSWER “YES” TO ANY OF THE ABOVE QUESTIONS, YOU SHOULD SEEK FURTHER ADVICE
FROM YOUR DOCTOR PRIOR TO USING THE ECHELON®GT.
Read the user manual fully and follow all instructions. This ensures your safety.
WARNINGS
• ALWAYS use the Echelon®GT on solid, level ground and in a well lit and ventilated area.
• ALWAYS check that the seat and handlebars are securely fastened before use.
• NEVER allow children to play on or around the bike. This helps protect them from injury from moving parts.
• ALWAYS set the bike up properly for your specific body type. The Echelon®GT offers up/down and fore/aft
adjustments that are clearly marked to ensure a quick and easy customization for each workout.
• ALWAYS check the bike before use.
• NEVER use the bike if it is not properly/completely assembled or is damaged in any way.
• NEVER exceed the weight limit for this bike. The weight limit for this bike is 300 lbs (136 kg). Do not use the
Echelon®GTt if your body weight is in excess of 300 lbs (136 kg).
SAFETY INFO AND WARNINGS
20
Table of contents
Other Echelon Exercise Bike manuals


