Echo Fix TAPE ECHO EF-X2 User manual
USER MANUAL

Congratulations on your purchase of the EF-X2 MKII Tape Echo!
If you have not owned a tape echo unit before, it is strongly recommended
that you review this document prior to use.
PAGE 2 OF 12
USER MANUAL
THANK YOU
FOR CHOOSING
THE EF-X2 MKII
TAPE ECHO

USER MANUAL
PAGE 3 OF 12
1. Start here
2. Understanding the EF-X2 MKII Front Panel
3. Understanding the EF-X2 MKII Rear Panel
4. Remote Inputs
5. Upkeep and troubleshooting
TABLE OF
CONTENTS

USER MANUAL
PAGE 4 OF 12
For over a decade, the Echo Fix team have serviced and repaired virtually
every model of tape echo unit ever brought to market. When it came time to
design and release our own, we endeavoured to avoid the faults and issues most
commonly observed in these other products. We humbly believe ours to be the
best-sounding and most reliable tape echo ever produced.
We have designed this manual to assist in getting the best possible result from
your EF-X2 MKII. Please note the following and keep them in mind as you get to
know your unit:
• The EF-X2 MKII is an electromechanical, analog tape echo device. While
every conceivable measure has been taken to limit noise, the echo is
produced by a tape loop engaging with multiple read and write heads. In
consideration of this, tape hiss and minor noise artefacts will be present,
particularly when pushing the preamp and running at slow delay speeds
with multiple read heads in use. These technical imperfections are inherent
to “the tape echo sound”, and eliminating them would be impractical and
defeat the point of building this unit in the first place.
Important: To minimise this noise, it is best to run enough signal into the
EF-X2 MKII so that the VU meter is constantly hitting on or over the “0” and
illuminating the red mode light with the loudest audio level peaks. This will
provide the best signal to noise ratio and give you the best echo sound quality.
• The EF-X2 MKII has a real spring reverb tank that works alongside the DSP
(digital) reverb and chorus. The DSP reverb / chorus is modelled on our
favourite examples of these sounds.
• When it comes to maintaining your unit, please use only genuine Echo Fix
parts and tape loops. Using anything other than Echo Fix tape loops will void
your warranty and could damage your EF-X2 MKII.
• We are excited to offer CV control with the unit. Please do not use voltages
outside of the 0-5v range. Doing so will void your warranty and may cause
damage to the unit.
START HERE
1

USER MANUAL
PAGE 5 OF 12
A. Direct ON/OFF Switch - Switches the direct signal
off or on. For traditional echo operation (wet + dry
signal), set to “ON”. For wet-only, set to “OFF”.
B. Motor ON/OFF Switch - Allows you to turn the
tape drive motor on or off. This is useful for achieving
slow down/tape stop effects, or to increase tape life
when using the EF-X2 MKII as a preamp or for reverb/
chorus effect only.
C. Sound On Sound ON/OFF Switch - Activates an
additional playback head, positioned at the unit’s
longest possible delay time.
D. Echo ON/OFF Switch - Bypasses the echo record
circuit, allowing you to use the unit as a preamp and
reverb/chorus effect only. It is also recommended to
turn “Echo Volume” (R) all the way down when using
the unit in this way.
E. DSP Reverb/Chorus Switch - Toggles between
digital reverb or digital chorus.
F. Spring/DSP Blend Switch - Selects between spring
reverb, digital reverb/chorus, or a fixed blend of spring
reverb and digital reverb/chorus effects (determined
by the DSP Reverb/Chorus switch (E)).
A B C D E F G H I J K L M
U
TSR
W X Y
QPO
N
V
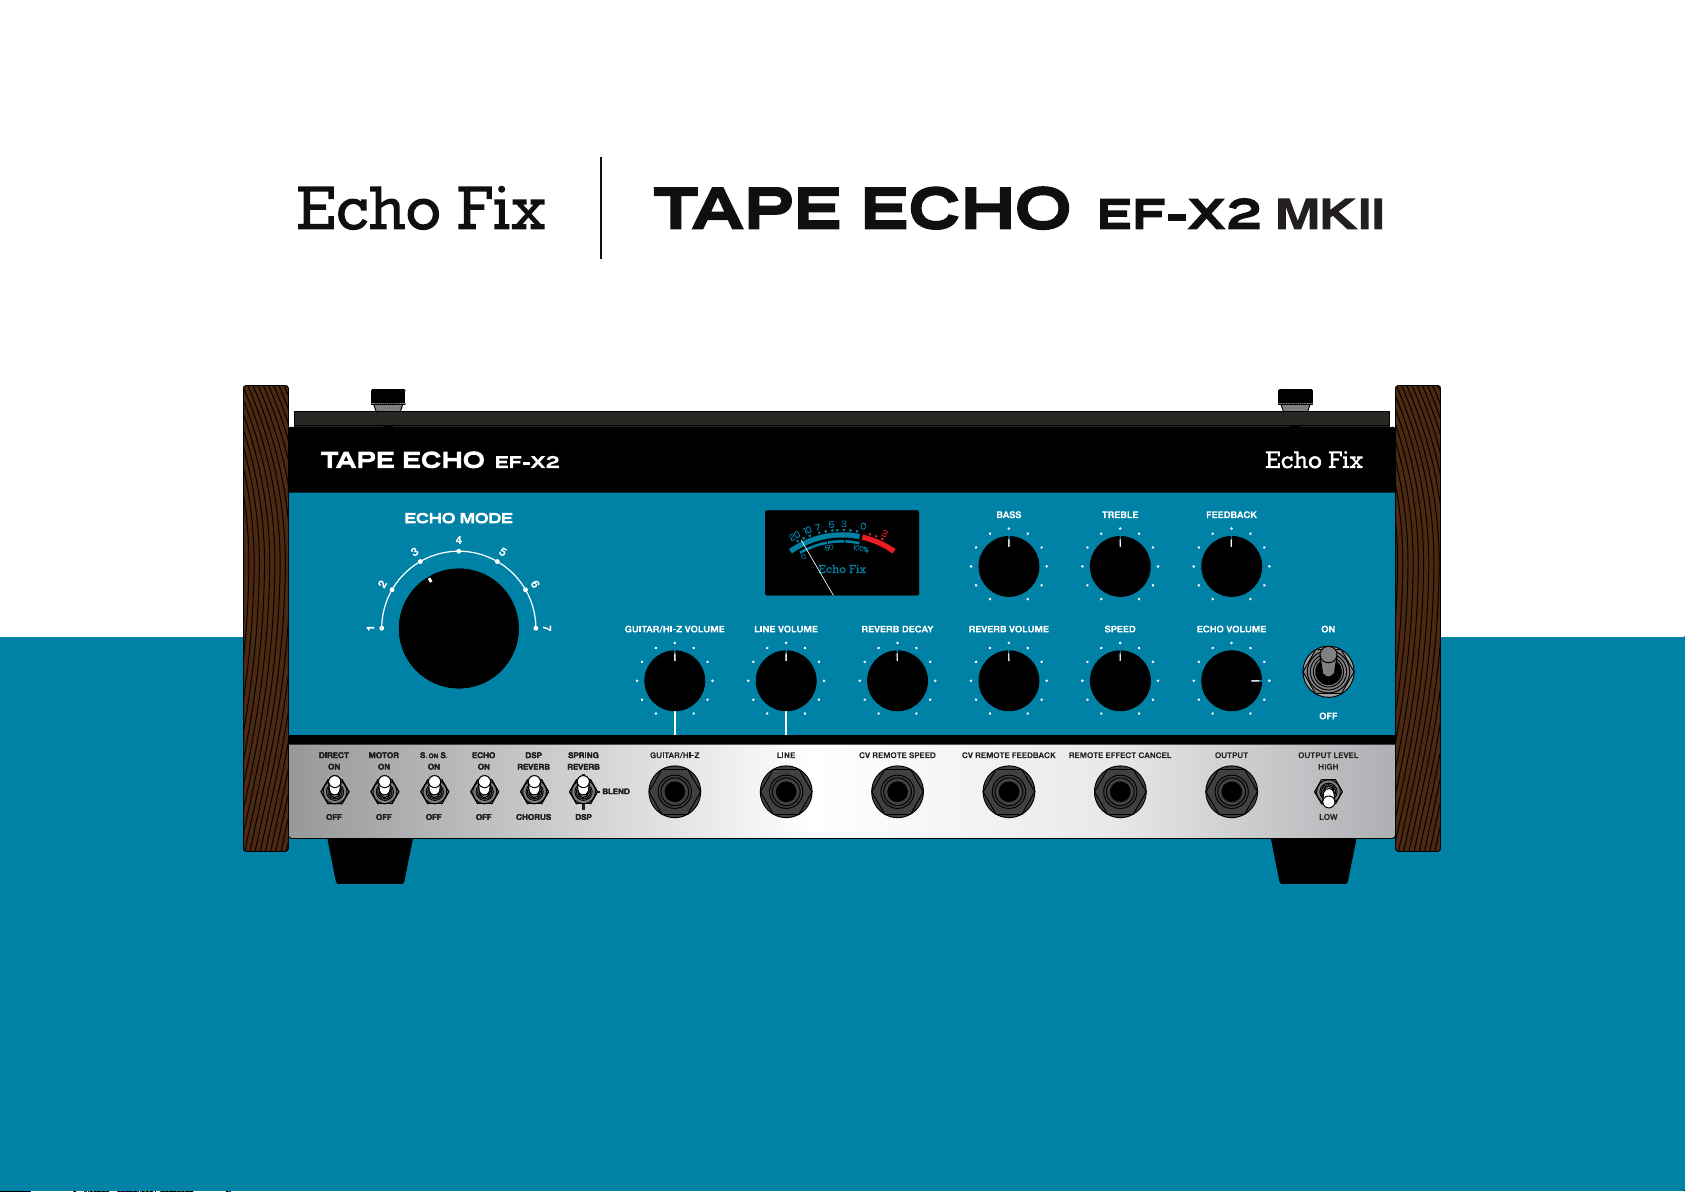
UNDERSTANDING THE EF-X2 MKII
FRONT PANEL
2

USER MANUAL
PAGE 6 OF 12
G. Guitar/HI-Z Input - A dedicated instrument-level
input with a vintage FET EP style preamp circuit with
1MΩinput impedance. Input gain is
controlled by (O).
H. Line Input - Dedicated mono line-level FET preamp
with 1MΩinput impedance that can be used for guitar,
synths or any other line-level instrument. Input gain is
controlled by (P).
Please note that inputs (G) and (H) can be used
simultaneously if required. With the use of an ABY
pedal (not included) you can switch between both
preamp inputs for different tonal options. Front input
controls do not affect rear balanced XLR input.
I. CV Remote Speed - Allows for control of the unit
“speed” function using control voltages. See page 9
for more details.
J. CV Remote Feedback -Allows for control of the
unit “feedback” function using control voltages. See
page 9 for more details.
K. Remote Effect Cancel - Allows for bypassing of
unit functions with an external footswitch. Connect a
one-button TS footswitch to bypass the echo only, or a
two-button TRS footswitch (latching type) for bypass
of the echo (tip) and reverb/chorus (ring).
2UNDERSTANDING THE EF-X2 MKII
FRONT PANEL
A B C D E F G H I J K L M
U
TSR
W X Y
QPO
N
V

USER MANUAL
L. Output - Connect to an amplifier, audio interface or
additional effects processors.
M. Output Level - Sets the output level of the front
output Jack (L). Note this does not set the output level
of the XLR output at the rear of the unit, this is fixed at
high output.
N. Echo Mode - 7-position selection of the unit’s “read”
heads. Please consult the following table for a guide to
these settings:
Mode 1 - Head 1 (“short”) [56 - 221ms]
Mode 2 - Head 2 (“medium”) [121 - 477 ms]
Mode 3 - Head 3 (“long”) [187 - 800 ms]
Mode 4 - Head 1 + 2 (“short” + “medium”)
Mode 5 - Head 2 + 3 (“medium” + “long”)
Mode 6 - Head 1 + 3 (“short” + “long”)
Mode 7 - Head 1 + 2 + 3 (“short”, “medium” and
“long”)
The Sound On Sound playback head can be engaged
over all the above settings.
O. Guitar/Hi-Z Volume - Sets the input gain for (G).
P. Line Volume - Sets the input gain for (H).
Q. Reverb Decay - Controls the digital reverb decay
time or the chorus depth. When (F) is set to Spring
Reverb, these changes cannot be heard.
R. Reverb Volume - Controls the volume of the spring
reverb, DSP, or blend, depending on the settings of (E)
and (F).
S. Speed - Adjusts the echo rate, corresponding to the
heads selected with control (N). Turn counterclockwise
for longer echo times, or clockwise for shorter. Please
note: This is controlling the physical motion of a motor
and echo times will ramp up or down gradually when
adjusted, with the pitch of any repeated sound being
raised or lowered accordingly.
T. Echo Volume - Adjusts the volume of the echoes
mixed into the overall output signal. Turned all the way
to maximum, the echo volume is significantly louder
than the dry signal.
U. ON/OFF - Supplies power to the unit.
V. VU Meter - Indicates the input signal volume. Keep
the signal within the blue range for clean sounds and
push into the red for saturation and distortion.
W. Bass - Cuts or boosts the bass frequencies of the
overall output. 12 o’clock is “flat”.
X. Treble - Cuts or boosts the treble frequencies of the
overall output. 12 o’clock is “flat”.
Y. Feedback - Adjusts the echo repeat level.
Please note: Setting this control past 3 o’clock will
likely result in self-oscillation. Additionally, using multi-
head echo modes at higher feedback settings will
increase the likelihood of self-oscillation.
PAGE 7 OF 12

USER MANUAL
UNDERSTANDING THE EF-X2 MKII
REAR PANEL
3
A B
C
FG
E
D
PAGE 8 OF 12
A. XLR Balanced Input - Fixed line level input. This
input can be used in addition to the input on the front.
The Guitar/Hi-Z and Line Volume knobs on the front
panel do not affect this level.
Please note: this is NOT a microphone level input.
B. XLR Balanced Output -Fixed line level output.
Please note: The signal levels for the rear
XLR I/O is not affected by the front panel volume
knobs or output level switch (M, O and P). Levels can
be trimmed via a mixer or DAW.
C. Echo Only - Provides access to the echo only signal
without direct signal or additional effects (Spring
reverb and DSP). Echo mode and feedback settings are
determined by the front panel controls.
D. Effect Only - Provides access to the Spring reverb
and DSP. The output of this jack is determined by the
front panel controls. Please note: When using chorus,
only the wet chorus signal (vibrato) will be heard.
E. Direct Only -Provides access to a duplicate direct
signal after the chosen input preamp (Guitar/Hi-Z or
Line).
F. Auto Tape Stop - If set to ON, the motor and roller
arm will disengage after 4-5mins of not receiving
signal. This increases tape life and reduces wear on the
motor and tape heads. You can disable this feature by
switching it to OFF.
G. Earth Point -For optional alternative grounding.

USER MANUAL
REMOTE
INPUTS
4
We have designed the EF-X2 MKII to accommodate CV or
expression pedal control of the tape speed and feedback
functions. The control voltage range is 0 - 5v for CV control.
The expression pedal needs to be a TRS output and is
recommended to be 100KΩimpedance.
Both the echo and reverb (spring reverb, DSP reverb/
chorus) effects can be disabled via a dual TRS latching
footswitch.
PAGE 9 OF 12
1 2
EXPRESSION
EXPRESSION

USER MANUAL
PAGE 10 OF 12
UPKEEP AND
TROUBLE SHOOTING
5
If you have questions or concerns, you are welcome to contact us at any time, and
we’ll do whatever we can to help: support@echox.com
Your EF-X2 MKII has been designed to last - whether in a studio environment or
regularly used in a live environment, we’ve done everything we possibly can to
ensure that your unit will be up to the task. On your end, however, there are a few
simple measures you can take to ensure reliable and consistent performance.
• Tape echoes rely on the use of tape and parts that are designed for the task. We
have been fitting premium parts and tape to other units for years - it hopefully
goes without saying, but only use genuine Echo Fix parts for the upkeep of your
unit. The fitting of inferior tape or parts will void your warranty, will adversely affect
performance, and will likely damage the unit.
• Regularly clean the heads on your unit with isopropyl alcohol and cotton tips
(cotton tips supplied). Please refer to our “how-to” guide on YouTube if you aren’t
sure how to do this.
• If you are not getting expected results from the unit, please ensure that switches
(A), (B), (C) and (D) are positioned as follows: Direct ON, Motor ON, S on S OFF,
Echo ON. This may seem very simple, but it’s surprisingly easy to miss - even for
those of us who’ve designed the unit. Similarly, make sure that the corresponding
input volume control for your desired input (O) or (P) is set to 12 o’clock, the Echo
Volume (T) is turned up, and the Feedback Control (Y) is set around 11 o’clock.
• Your unit ships with a universal-voltage switch-mode power supply. This is safe to
connect to any worldwide mains voltage supply, using the correct IEC-C7 (“Figure
8”) cable for your region. If your power supply is damaged or lost, replacement
power supplies are available at www.echox.com.
• If you experience excessive wow and flutter (pitch instability), this usually
indicates it is time to replace the tape loop in your EF-X2 MKII. A tape loop can
last anywhere from 50 - 300 hours, depending on humidity and other atmospheric
conditions. We have discounted tape loops available at www.echox.com for
EF-X2 MKII owners.
• Your EF-X2 MKII is covered by a limited warranty which covers manufacturing
defects for the first 2 years after purchase. This warranty does not cover general
wear or consumables (including tape, felt, rollers and bearings). Any damage
caused by the use of non-Echo Fix branded parts (including tape and power
supply) will void your warranty.
USER MANUAL
PAGE 11 OF 12
web echox.com
email support@echox.com
facebook echoxaustralia
instagram echoxaustralia
youtube echox
CONNECT

USER MANUAL
www.echofix.com
Other manuals for TAPE ECHO EF-X2
2
Table of contents
Other Echo Fix Recording Equipment manuals


