ECOWAY KOMFY200 User manual

Table of Contents
PART 1: BEFORE PUTTING INTO OPERATION............................................................................................1
Important safety instructions ...............................................................................................................1
General safety instructions...................................................................................................................1
Recommendations................................................................................................................................1
Important safety measures...................................................................................................................2
Part –2: INSTALLATION ............................................................................................................................5
Installation space ..................................................................................................................................5
Installing base-plate..............................................................................................................................6
Installation and Removal of Device ......................................................................................................6
Installation of water supply pipe ..........................................................................................................7
Checklist and trial run ...........................................................................................................................7
Part –3: DESCRIPTION OF THE APPLIANCE & CONTROL PANEL...............................................................9
Description of the appliance.................................................................................................................9
Buttons and Functions ........................................................................................................................10
Part –4: MAINTENANCE & CLEANING....................................................................................................12
Part –5: PACKING LIST............................................................................................................................13
Part –6: TECHNICAL SPECIFICATIONS.....................................................................................................14

PART 1: BEFORE PUTTING INTO OPERATION
Important safety instructions
•Read thoroughly and retain for future use.
•The power source requiredby the appliance must be installed by an authorized electrician. Otherwise,
there exists a risk of an accident, injury or damage to the appliance.
•The safety of this appliance complies with industry norms and meets legal appliance safety
requirements. However, as manufacturers, we consider it our duty to provide you with the following
safety instructions.
•It is essential that you store this user's manual in a safe place so that you can use it in the future.
•Before installation or operation of the appliance you MUST carefully read all the safety instructions
and the user's manual.
•Before putting the appliance into operation for the first time, check that it has not been damaged
during transport. Never install a damaged appliance. If some parts are damaged, contact the supplier.
•The warranty does not cover damages arising from external factors (foods, fire, rodents, etc.), for
details please refer to the warranty card.
General safety instructions
•Changing the technical parameters or making any other modifications to the appliance is dangerous.
•Do not use any power supply other than the one specified. AC 110-120V, 60Hz. Doing so may cause
fire, malfunction or excessive heat.
•Never disassemble, repair or alter the unit. Doing so may void product warranty and may cause fire,
electric shock, over-heating or short circuiting.
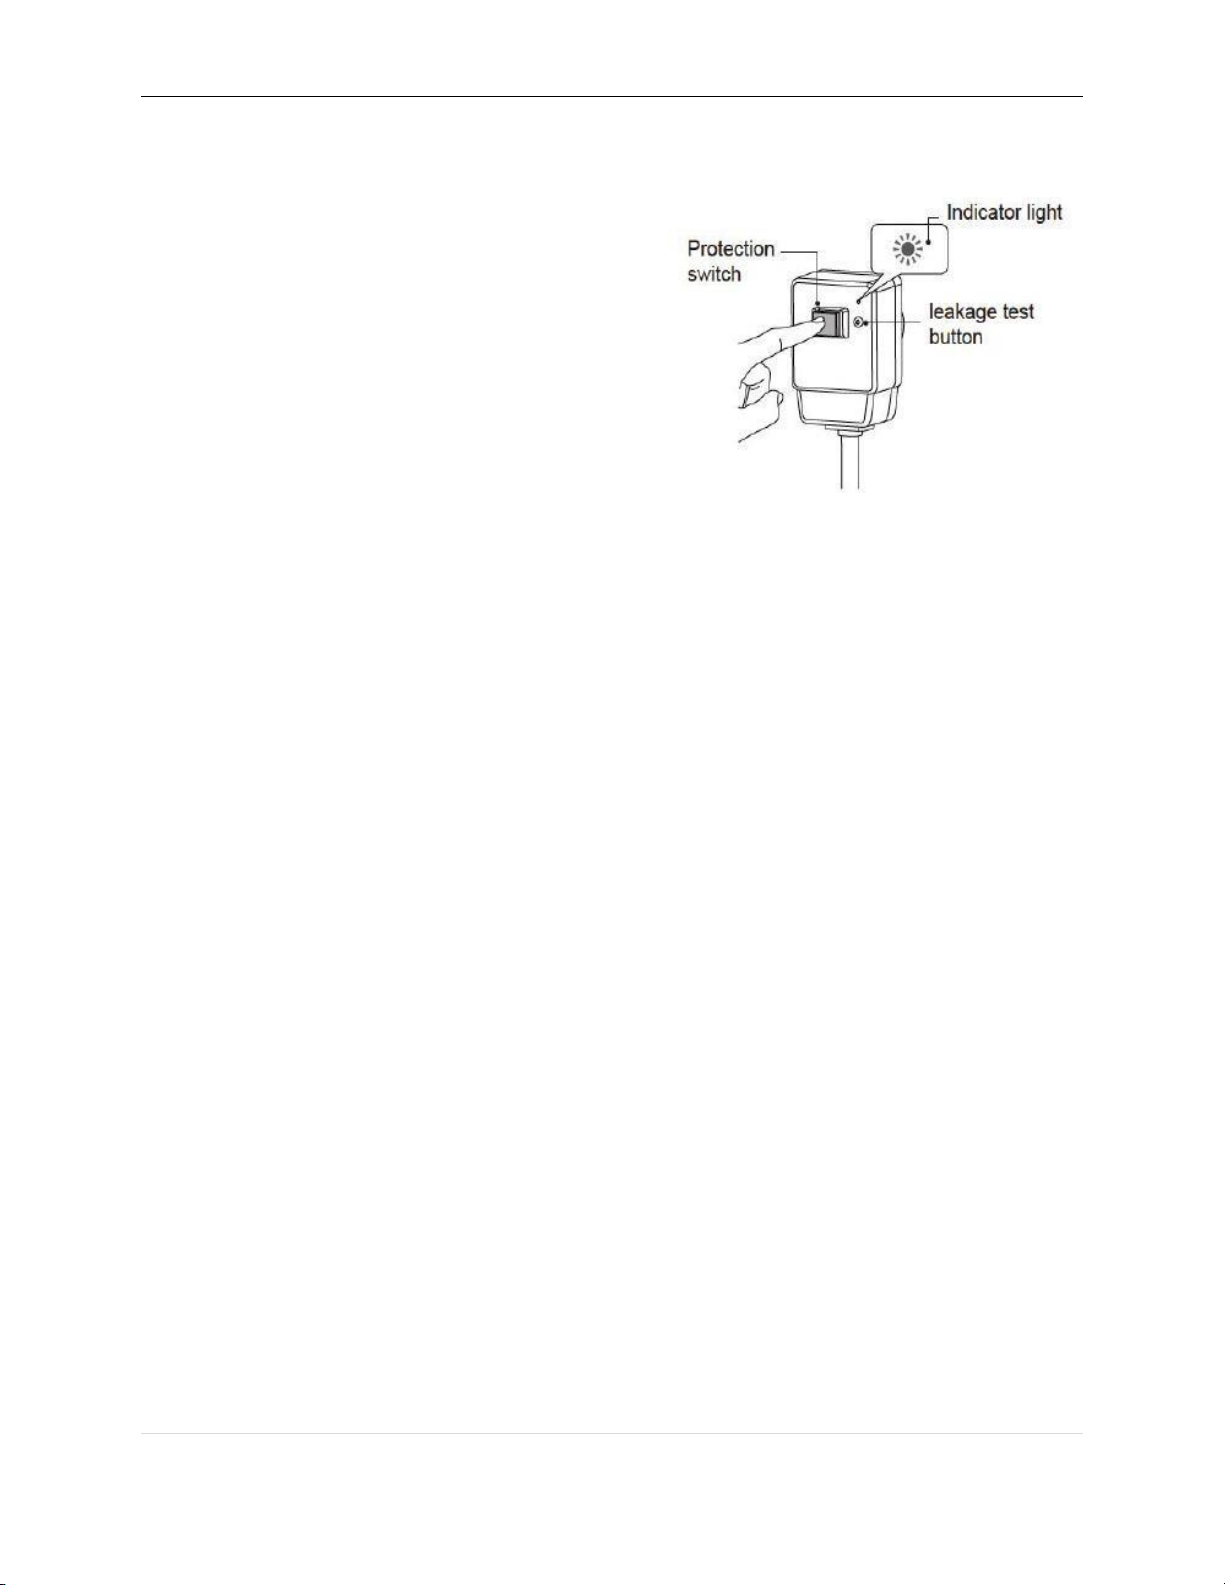
•This product is classified as Class 1 Equipment and must be grounded.
•Install this equipment where a GFI (Ground Fault Circuit Interrupter) electrical outlet is accessible.
•Do not install the product on moving vehicles such as trailers or boats. Doing so may cause fire, electric
shock, over-heating, short circuiting or malfunction. Moving parts of the unit may come loose and fall
off, resulting in injury.
•Do not touch the power plug during thunderstorms. Doing so may cause fire or electric shock.
•Do not strike, yank, twist, excessively bend, damage, alter, or heat the power cords.
•Do not place anything heavy on, bind or pinch the power cords.
•Do not place anything on the warm air outlet or drape clothes over it.
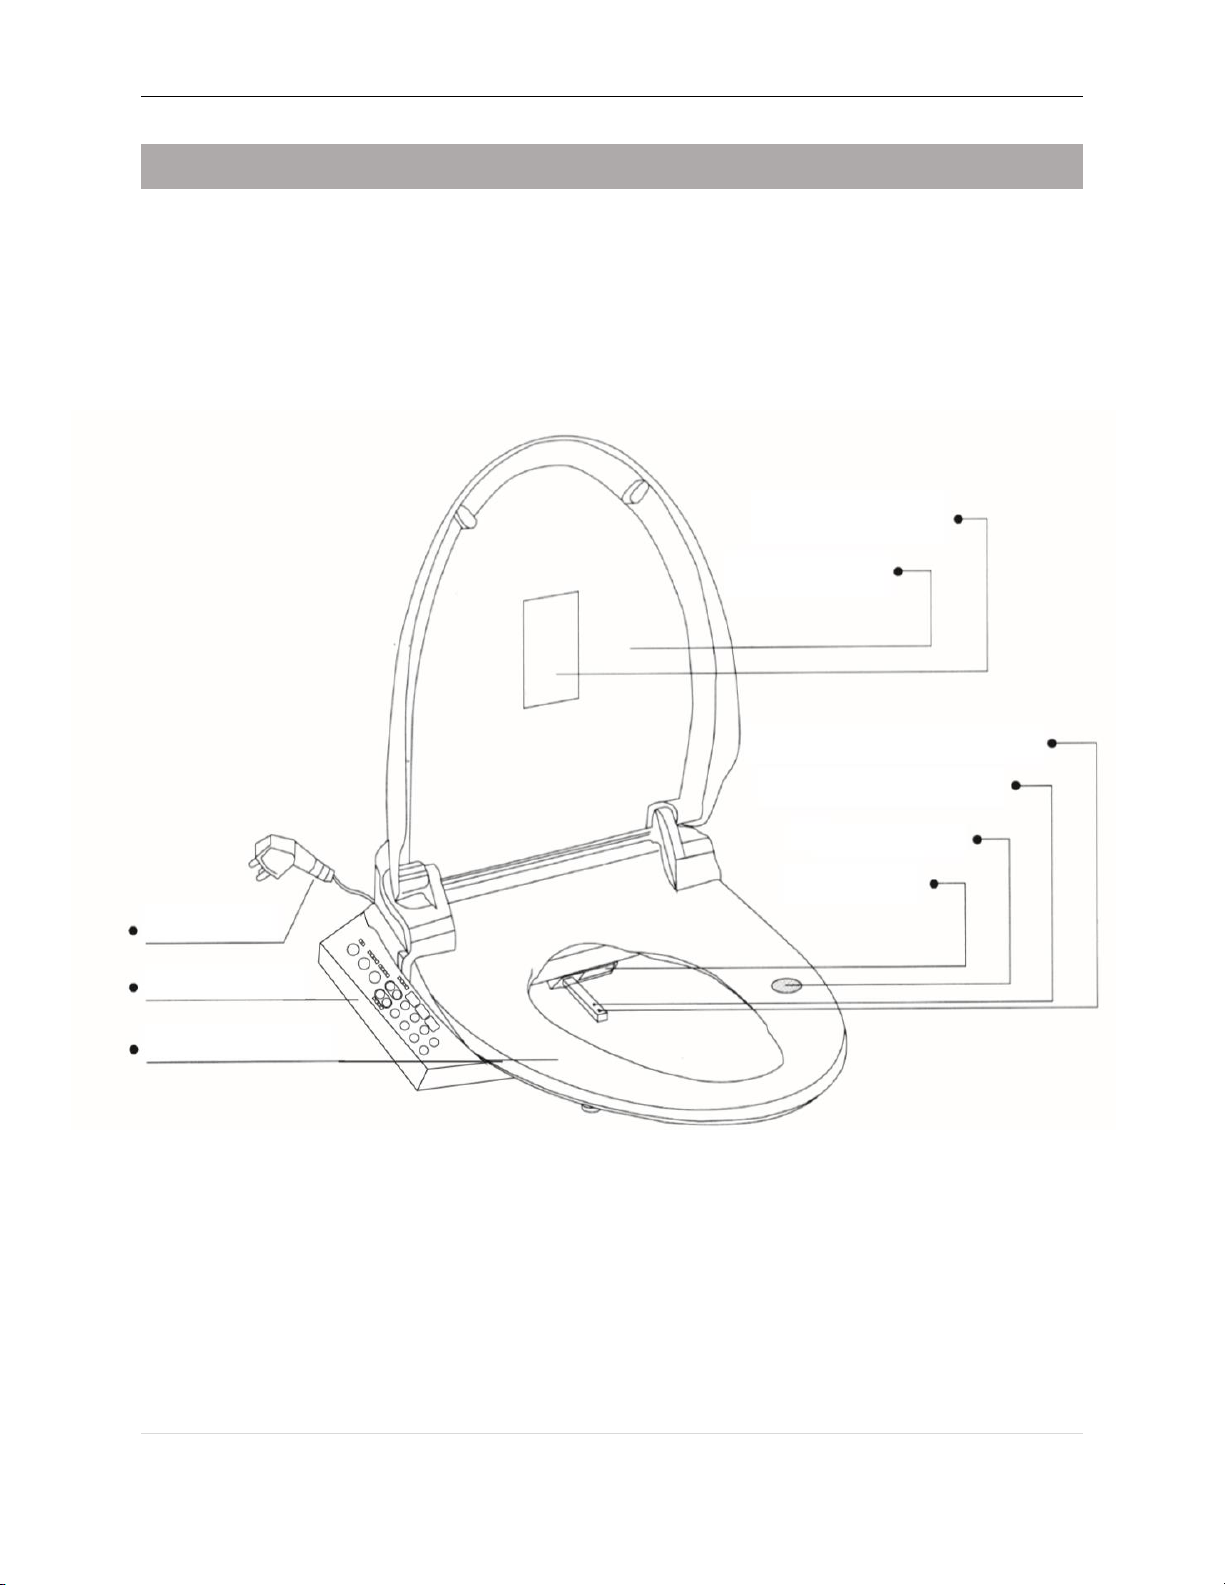
•Do not lift up this product by the lid.
Recommendations
•This appliance must not be used by persons (including children) with physical, sensory or
psychological impairments or by inexperienced persons, unless properly trained or schooled in the
safe use of the appliance, or unless they have been properly supervised by a person who will be

2 | P a g e
responsible for their safety. Children should be supervised so as not to play or tamper with the
appliance.
•Only connect the bidet to cold tap water. Do not use seawater. Doing so may cause irritation to the
skin and malfunction.
•When using the product in a bathroom, install a fan or ventilation port and ensure good air flow
through the bathroom.
•Make sure that a 3-pronged, properly grounded outlet has been installed.
•Insert the power plug securely into the outlet.
•To unplug, always hold the power plug, not the power cord. Never unplug by pulling the power cord.
Pulling on the power cord may cause damage and result in fire or over-heating.
•When not using the unit over an extended period of time, drain the water the water supply hose
after closing the water shutoff valve, and pull the power plug from the outlet.
•Periodically remove dust and dirt from the power plug.
Important safety measures
Carefully read all the important safety instructions. Otherwise, there exists a risk of an accident
or a fatal injury.
Risk of Burns
•Improper use of the toilet seat may cause irritation or burn.
•When sitting for a long timeon the toilet seat, switch the toilet seat temperature adjustment to "OFF".
•Young children, aged users, physically or psychologically disabled, users with impaired movements,
heavily drunk, severely fatigued, ill, or anyone liable to fall asleep or other users, unable to set the
temperature appropriately themselves; should not use heated seat or warm air drying or switch the
toilet seat temperature adjustment to "OFF".
•Always connect the Komfy-200 to the cold-water supply. Connecting to hot water supply may result
in burns and equipment damage.
•Do not stick a finger or anything else into the warm air outlet. There is a risk of irritation or burns.

3 | P a g e
Risk of death/injury by electrical shock
This is an electrical product. Do not install it where water is likely to get on the product or where with
humidity high enough that water is likely to form on the surface of this product.
•Do not plug or unplug the power plug with wet hands. Doing so may cause electrical shock.
•If the product is damaged, do not touch the damaged section.
•Do not use while bathing.
•Do not place or store the product where it can fall or be pulled into a tub or sink.
•Do not place in or drop into water or other liquid.
•Do not reach for the product when it has fallen into water. Unplug it immediately.
•Do not get any water or cleaning solution on the top of unit or power plug.
•Doing so may cause the product to crack resulting in injury or water damage.
•Do not use multi-sockets or extension cords. There is a risk of electric shock or malfunction.
•Do not use a loose or faulty electrical outlet. Doing so may cause fire or short circuit.
•Do no use any outlet or wiring equipment beyond its specified rating.
•Plugging too many plugs into the same outlet, for example using outlet splitters, can cause fire due to
heat.
•Never pull on the power cord when disconnecting the appliance from a power socket.
•Never touch the appliance with wet hands or feet.
•Do not allow the water supply hose to touch the power plug or outlet. Doing so may cause
condensation resulting in a fire, electrical shock, overheating or a short circuit.
•Never use a damaged power cord as it may result in a fire, electrical shock, overheating or short
circuiting.
•Always disconnect the power plug from the outlet before cleaning, maintenance or inspection.
Risk of fire
•Do not store or place & flammable substances near the appliance.
•Keep cigarettes and other open flames away from the product. There is a danger of a fire hazard.
•Young children, aged users, physically or psychologically disabled, users with impaired movements,
heavily drunk, severely fatigued, ill, or anyone liable to fall asleep or other users, unable to set the
temperature appropriately themselves.
Child safety
•Do not allow children to play with the appliance. The appliance has electric components inside.
•Do not leave children near the appliance without supervision.
•Keep packaging materials out of the reach of children!

4 | P a g e
Health concerns
•Preliminary studies in females suggest that overuse of continuous spraying can increase the possibility
of vaginal mucosa drying and potential reduction in desirable microbial organisms.
•Although these studies have not been validated, please consult your healthcare provider for concerns
regarding whether these circumstances may apply to you.
•More importantly, if you are an individual suffering from any immune deficiency as a result of disease,
chemotherapy, or other medical condition compromising the immune system you should consult your
healthcare provider before use of this product.
Risk of accident or injury
•Do not apply strong force, mechanical shock, step on or stand on the toilet seat, toilet lid or top unit.
This may cause cracking or cause the top unit to come loose and fall, resulting in injury.
•Do not place any heavy object on the toilet seat, toilet lid or top unit.
•Do not raise the toilet seat or lid while objects are resting on top of the toilet. This may cause the top
unit to come loose and fall, resulting in injury.
•Do not use the product if the top unit is unstable.
Risk of flooding
•To prevent a sudden water leak, do not remove the water filter drain valve when the shutoff valve is
open.
•Do not fold or crush the water supply hose; do not damage by cutting with a sharp object.
•Do not flush anything other than bodily waste and toilet paper. Also, do not flush too much toilet
paper. Clogging can result in water overflow and damage.
•When the ambient temperature is likely to drop to 0°C (32°F) or lower, prevent damage to the pipes
and hoses due to freezing. Frozen water pipes could cause the top unit and the pipes to break,
resulting in a water leak.
•If a water leak should occur, always close the shutoff valve.
Risk of damage to appliance
•Never use Toilet cleaner, household cleaner, benzene, paint thinner, powdered cleanser or nylon
scrubbing pads to clean the appliance. These items may damage or crack the plastic and cause injury
or malfunction. Only use a kitchen cleaner diluted with water.
•Do not pour hot water into the toilet. This may result in damage to the toilet, injury or water damage.

5 | P a g e
Part –2: INSTALLATION
Carefully read the entire user's manual before putting your bidet seat into operation and store it in a
safe place for future reference.
The power source must be installed by an authorized electrician.
Installation space
Before proceeding with the installation, carefully measure and make sure that the unit measurements
match the user’s toilet.

6 | P a g e
Installing base-plate
1. Install the Expansion Screws
into the installation holes in the
toilet.
2. Then install the Base Plate,
Pressing Plate, Gasket and
Screw as per the drawing and
tighten the Screws.
Installation and Removal of Device
Installation:
Push the device back onto the base plate. Press
until you hear the “Click” sound. Check if the
device is stable and fixed properly.
Removal:
Gently lift the device upwards with both hands,
slowly pull the unit out of the base plate as shown.
Screws
Expansion Screws
Base plate
Pressing plate
Gasket
The black pin frontward
and groove upwards

7 | P a g e
Installation of water supply pipe
Step-1: Left side connecter
Install the 3-way connecter onto the angle valve, and
then connect the large hole of water supply pipe and
water pipe of toilet pipe to the 3-way connecter.
After that, connect the short hole of water supply
pipe to the water input connecter.
Step-2: Bottom side connecter
If the toilet has two holes; for power line and
water supply, let two supplies across the hole to
plug in device’s connector which is under the
main unit, then insert the main unit to the base
plate.
Note: when you are installing the water supply pipe, please do not bend or break the pipe which may
cause pipe to leak.
Checklist and trial run
Water-supply verification
•Install the 3-way connecter onto the angle valve, and then
connect the large hole of water supply pipe and water
pipe of toilet pipe to the 3-way connecter.
•After that, connect the short hole of water supply pipe to
the water input connecter.

8 | P a g e
Power plug verification
•Insert the power plug into power socket, and
press protection button. When indicator light
is on, the device is powered on.
•Press the leakage test button if first time use
the device. Protection switch bumps to show
that protection function works normally
Self-inspection
•Once you turn the power ON, lights on the side panel will turn on, the device will perform a self-
inspection.
•When the buzzer rings “Beep”, self-inspection function has finished.

9 | P a g e
Part –3: DESCRIPTION OF THE APPLIANCE & CONTROL PANEL
Description of the appliance
WARNING LABEL
LID
WARM AIR DRYER
SEAT SENSOR
FRONT WASH SPRAY
REAR WASH SPRAY
POWER PLUG
CONTROL PANEL
SEAT

10 | P a g e
Buttons and Functions
Press once to stop function which is
running
1. When user is seated on the unit, press
“Front cleaning button” and start front
cleaning; press twice to turn on the
massage function.
2. When front cleansing is finished, and the
use is still seated on the unit, the device
will turn on the drying function.
1. When user is seated on the unit, press
“Rear cleaning” button: and start rear
cleaning; press twice to turn on the
massage function.
2. When rear cleansing finishes and the user
is still seated on the unit, the device will
turn on the drying function.
Press to switch between water pressure
settings.
○○○: No light on - 0.15L/min or 0.04 gal/min
●●●: 3 light on - 0.75 L/min or 0.20 gal/min
1. Works during front or rear cleansing
schedule.
2. Press once to bring the nozzle forward or
backward.
1. Works when user seating on the unit.
2. Press once to initiate warm air drying,
corresponding light indicator will display
current temperature setting.
3. Press within a drying schedule to switch
between temperature settings.
○○○: No light on – wind temperature is at
room temperature
●●●: 3 lights on – approx. 53°C 127°F

11 | P a g e
1. Press to switch between seat
temperature settings.
○○○: No light on – room temperature
●○○: 1 light on – approx. 28°C or 82°F
●●○: 2 light on – approx. 30°C or 86°F
●●●: 3 light on – approx. 33°C or 91°F
Press once to turn on turbo wash function.
Turbo wash function can help user stimulate
muscles to help defecate.
Press once to initiate automatic function.
Automatic mode: Automatically start to run
rear cleansing function for 2 mins, then warn
air drying will work for 3 mins.
1. Press to switch between water
temperature settings.
○○○: No light on – room temperature
●○○: 1 light on – approx. 32°C or 89°F
●●○: 2 light on – approx. 34°C or 93°F
●●●: 3 light on – approx. 36°C or 96°F
Press once to turn the unit ON / OFF
Press once to turn the unit to ECO Mode.
Press once to turn the night light ON/OFF.
1. When the unit is not in use and
deodorizing mode is automatically
turned-on.
2. The deodorize function executes for 30s.
Note:
•When the device switches to function mode, the power indicator will light up and the eco mode
indicator will turn off.
•When the device switches to eco mode, the power indicator light will turn off and the eco mode
indicator will light up.
•When the device switches to sleep mode, both indicators lights will turn off.
•When the device is just turned on, all the functions will reset.

12 | P a g e
Part –4: MAINTENANCE & CLEANING
Cleaning the unit
1. Turn off the power before cleaning the unit.
2. Gently wipe dirt and stains with a dry soft cloth or sponge.
3. Do not apply any chemical solutions to the unit.
4. Turn on the power after clean the unit.
Cleaning the filter
1. Power off the unit.
2. Unplug power cord with dry hands.
3. Unscrew the filter as shown in the picture.
4. Rinse with clean water, use a brush if
necessary.
5. Install the filter back to its original position.
6. Check for leakage.

13 | P a g e
Part –5: PACKING LIST
BASE PLATE
PARTS
1.Base Plate
2.Screw (2 pcs)
3.Gasket (2 pcs)
4.Pressing plate (2 pcs)
5.Expansion Screw (2 pcs)
WATER SUPPLY
PATRS
Water Pipe (1 pcs)
3-way Connector (1 pcs)
DOCUMENTS
USER MANUAL
WARRANTY CARD
MAIN UNIT
KOMFY-200
User
Manual
Warranty
Card

14 | P a g e
Part –6: TECHNICAL SPECIFICATIONS
Item
Komfy-200 5102
Rated power supply
AC110-220V ~ 50/60Hz
Maximum power consumption
1600 W
Power cord length
1.8 m (5.9ft)
Water Pressure
Minimum Water Pressure is 0.07 MPa (20L/min flush),
Maximum Water Pressure is 0.8 MPa (Static).
Cleansing
Water Tank capacity
600ml
Heater capacity
1600w
Water temperature
3 Levels
Cleansing flow
3 Levels
Cleansing mode
Rear Cleaning/Rear Massage, Front Wash
(Feminine wash)
Adjustable Nozzle
5 Levels
Water Pressure Protect
Reduced Pressure Device
Safety device
Temperature fuse, water temperature sensor
Anti- fouling device
Self-Cleaning Nozzles, Nozzle Sterilization, filter device,
Anti-backflow device
Warm air
dryer
Warm air temperature
4 Levels
Warm air Speed
Approx. 4 m³/min (Approx. 5.8ft³/min)
Heater capacity
250 W
Safety device
Temperature fuse
Heated
seat
Surface temperature
4 Levels
Heater capacity
45 W
Lid
Gentle-Closing Seat and Lid
Other
Settings
Illuminating Cool Blue
Nightlight
Soft Light, Auto Energy Saver
Table of contents
Other ECOWAY Toilet manuals
Popular Toilet manuals by other brands

Toto
Toto CT447CFG01 installation manual

Scarabeo
Scarabeo Moai 8606 manual

American Standard
American Standard Champion PRO 211BA Series INSTALLATION INSTRUCTIONS CARE AND MAINTENANCE

Crosswater
Crosswater MPRO SENSE US-US-PRO6005CW manual

Kohler
Kohler K-29777-PA-0 Homeowner's guide

BIOLAN
BIOLAN Simplett Plus 70570250 Instructions for use

Glacier bay
Glacier bay BECK installation manual

Swiss Madison
Swiss Madison SM-2T120 installation instructions

OVE
OVE E323 installation manual

Sanela
Sanela SLWN 13 Mounting instructions

Swiss Madison
Swiss Madison Nadar SM-2T141 installation instructions

Dometic
Dometic SANIPOTTIE 960 Series instruction manual