ECOWAY KOMFY300 User manual


Table of Contents
PART 1: BEFORE PUTTING INTO OPERATION............................................................................................1
Important safety instructions ...............................................................................................................1
General safety instructions...................................................................................................................1
Recommendations................................................................................................................................1
Important safety measures...................................................................................................................2
Part –2: INSTALLATION ............................................................................................................................5
Installation space ..................................................................................................................................5
Installing base-plate..............................................................................................................................6
Installation and Removal of Device ......................................................................................................6
Installation of water supply pipe ..........................................................................................................7
Checklist and trial run ...........................................................................................................................7
Part –3: DESCRIPTION OF THE APPLIANCE & CONTROL PANEL...............................................................9
Description of the appliance.................................................................................................................9
Side Buttons and Functions ................................................................................................................10
Part –4: REMOTE CONTROL OPERATION...............................................................................................11
1: INSTALLING THE REMOTE-CONTROL UNIT.....................................................................................11
2: DESCRIPTION OF THE REMOTE CONTROL ......................................................................................12
3: OPERATIONS AND INSTRUCTIONS..................................................................................................13
4: OPERATION MODES........................................................................................................................17
Part –5: MAINTENANCE & CLEANING....................................................................................................18
Part –5: PACKING LIST............................................................................................................................19
Part –6: TECHNICAL SPECIFICATIONS.....................................................................................................20
Dear customer,
Thank you for buying an ECOWAY brand product. So that your appliance serves you well, please read all
the instructions in this user's manual.

1 | P a g e
PART 1: BEFORE PUTTING INTO OPERATION
Important safety instructions
•Read thoroughly and retain for future use.
•The power source requiredby the appliance must be installed by an authorized electrician. Otherwise,
there exists a risk of an accident, injury or damage to the appliance.
•The safety of this appliance complies with industry norms and meets legal appliance safety
requirements. However, as manufacturers, we consider it our duty to provide you with the following
safety instructions.
•It is essential that you store this user's manual in a safe place so that you can use it in the future.
•Before installation or operation of the appliance you MUST carefully read all the safety instructions
and the user's manual.
•Before putting the appliance into operation for the first time, check that it has not been damaged
during transport. Never install a damaged appliance. If some parts are damaged, contact the supplier.
•The warranty does not cover damages arising from external factors (foods, fire, rodents, etc.)
General safety instructions
•Changing the technical parameters or making any other modifications to the appliance is dangerous.
•Do not use any power supply other than the one specified. AC 110V, 60Hz. Doing so may cause fire,
malfunction or excessive heat.
•Never disassemble, repair or alter the unit. Doing so may void product warranty and may cause fire,
electric shock, over-heating or short circuiting.
•This product is classified as Class 1 Equipment and must be grounded.
•Install this equipment where a GFI (Ground Fault Circuit Interrupter) electrical outlet is accessible.
•Do not install the product on moving vehicles such as trailers or boats. Doing so may cause fire, electric
shock, over-heating, short circuiting or malfunction. Moving parts of the unit may come loose and fall
off, resulting in injury.
•Do not touch the power plug during thunderstorms. Doing so may cause fire or electric shock.
•Do not strike, yank, twist, excessively bend, damage, alter, or heat the power cords.
•Do not place anything heavy on, bind or pinch the power cords.
•Do not place anything on the warm air outlet or drape clothes over it.
•Do not lift up this product by the lid.
Recommendations
•This appliance must not be used by persons (including children) with physical, sensory or psychological
impairments or by inexperienced persons, unless properly trained or schooled in the safe use of the
appliance, or unless they have been properly supervised by a person who will be responsible for their
safety. Children should be supervised so as not to play or tamper with the appliance.

2 | P a g e
•Only use tap water or potable well water/underground water. Do not use seawater. Doing so may
cause irritation to the skin and malfunction.
•When using the product in a bathroom, install a fan or ventilation port and ensure good air flow
through the bathroom.
•Make sure that a 3-pronged, properly grounded outlet has been installed.
•Insert the power plug securely into the outlet.
•To unplug, always hold the power plug, not the power cord. Never unplug by pulling the power cord.
Pulling on the power cord may cause damage and result in fire or over-heating.
•When not using the unit over an extended period of time, drain the water out the water supply hose
after closing the water shutoff valve, and pull the power plug from the outlet.
•Periodically remove dust and dirt from the power plug.
Important safety measures
Carefully read all the important safety instructions. Otherwise, there exists a risk of an accident
or a fatal injury.
Risk of Burns
•Improper use of the toilet seat may cause irritation or burn.
•When sitting for a long timeon the toilet seat, switch the toilet seat temperature adjustment to "OFF".
•Young children, aged users, physically or psychologically disabled, users with impaired movements,
heavily drunk, severely fatigued, ill, or anyone liable to fall asleep or other users, unable to set the
temperature appropriately themselves; should not use heated seat or warm air drying or switch the
toilet seat temperature adjustment to "OFF".
•Always connect the Komfy-300 to the cold-water supply. Connecting to hot water supply may result
in burns and equipment damage.
•Do not stick a finger or anything else into the warm air outlet. There is a risk of irritation or burns.

3 | P a g e
Risk of death/injury by electrical shock
This is an electrical product. Do not install it where water is likely to get on the product or where with
humidity high enough that water is likely to form on the surface of this product.
•Do not plug or unplug the power plug with wet hands. Doing so may cause electrical shock.
•If the product is damaged, do not touch the damaged section.
•Do not use while bathing.
•Do not place or store the product where it can fall or be pulled into a tub or sink.
•Do not place in or drop into water or other liquid.
•Do not reach for the product when it has fallen into water. Unplug it immediately.
•Do not get any water or cleaning solution on the top of unit or power plug.
•Doing so may cause the product to crack resulting in injury or water damage.
•Do not use multi-sockets or extension cords. There is a risk of electric shock or malfunction.
•Do not use a loose or faulty electrical outlet. Doing so may cause fire or short circuit.
•Do no use any outlet or wiring equipment beyond its specified rating.
•Plugging too many plugs into the same outlet, for example using outlet splitters, can cause fire due to
heat.
•Never pull on the power cord when disconnecting the appliance from a power socket.
•Never touch the appliance with wet hands or feet.
•Do not allow the water supply hose to touch the power plug or outlet. Doing so may cause
condensation resulting in a fire, electrical shock, overheating or a short circuit.
•Never use a damaged power cord as it may result in a fire, electrical shock, overheating or short
circuiting.
•Always disconnect the power plug from the outlet before cleaning, maintenance or inspection.
Risk of fire
•Do not store or place & flammable substances near the appliance.
•Keep cigarettes and other open flames away from the product. There is a danger of a fire hazard.
•Young children, aged users, physically or psychologically disabled, users with impaired movements,
heavily drunk, severely fatigued, ill, or anyone liable to fall asleep or other users, unable to set the
temperature appropriately themselves.
Child safety
•Do not allow children to play with the appliance. The appliance has electric components inside.
•Do not leave children near the appliance without supervision.
•Keep packaging materials out of the reach of children!

4 | P a g e
Health concerns
•Preliminary studies in females suggest that overuse of continuous spraying can increase the possibility
of vaginal mucosa drying and potential reduction in desirable microbial organisms.
•Although these studies have not been validated, please consult your healthcare provider for concerns
regarding whether these circumstances may apply to you.
•More importantly, if you are an individual suffering from any immune deficiency as a result of disease,
chemotherapy, or other medical condition compromising the immune system you should consult your
healthcare provider before use of this product.
Risk of accident or injury
•Do not apply strong force, mechanical shock, step on or stand on the toilet seat, toilet lid or top unit.
This may cause cracking or cause the top unit to come loose and fall, resulting in injury.
•Do not place any heavy object on the toilet seat, toilet lid or top unit.
•Do not raise the toilet seat or lid while objects are resting on top of the toilet. This may cause the top
unit to come loose and fall, resulting in injury.
•Do not use the product if the top unit is unstable.
Risk of flooding
•To prevent a sudden water leak, do not remove the water filter drain valve when the shutoff valve is
open.
•Do not fold or crush the water supply hose; do not damage by cutting with a sharp object.
•Do not flush anything other than bodily waste and toilet paper. Also, do not flush too much toilet
paper. Clogging can result in water overflow and damage.
•When the ambient temperature is likely to drop to 0°C (32°F) or lower, prevent damage to the pipes
and hoses due to freezing. Frozen water pipes could cause the top unit and the pipes to break,
resulting in a water leak.
•If a water leak should occur, always close the shutoff valve.
Risk of damage to appliance
•Never use Toilet cleaner, household cleaner, benzene, paint thinner, powdered cleanser or nylon
scrubbing pads to clean the appliance. These items may damage or crack the plastic and cause injury
or malfunction. Only use a kitchen cleaner diluted with water.
•Do not pour hot water into the toilet. This may result in damage to the toilet, injury or water damage.
5 | P a g e
Part –2: INSTALLATION
Carefully read the entire user's manual before putting your bidet seat into operation and store it in a
safe place for future reference.
The appliance must be installed by an authorized service technician or another responsible person.
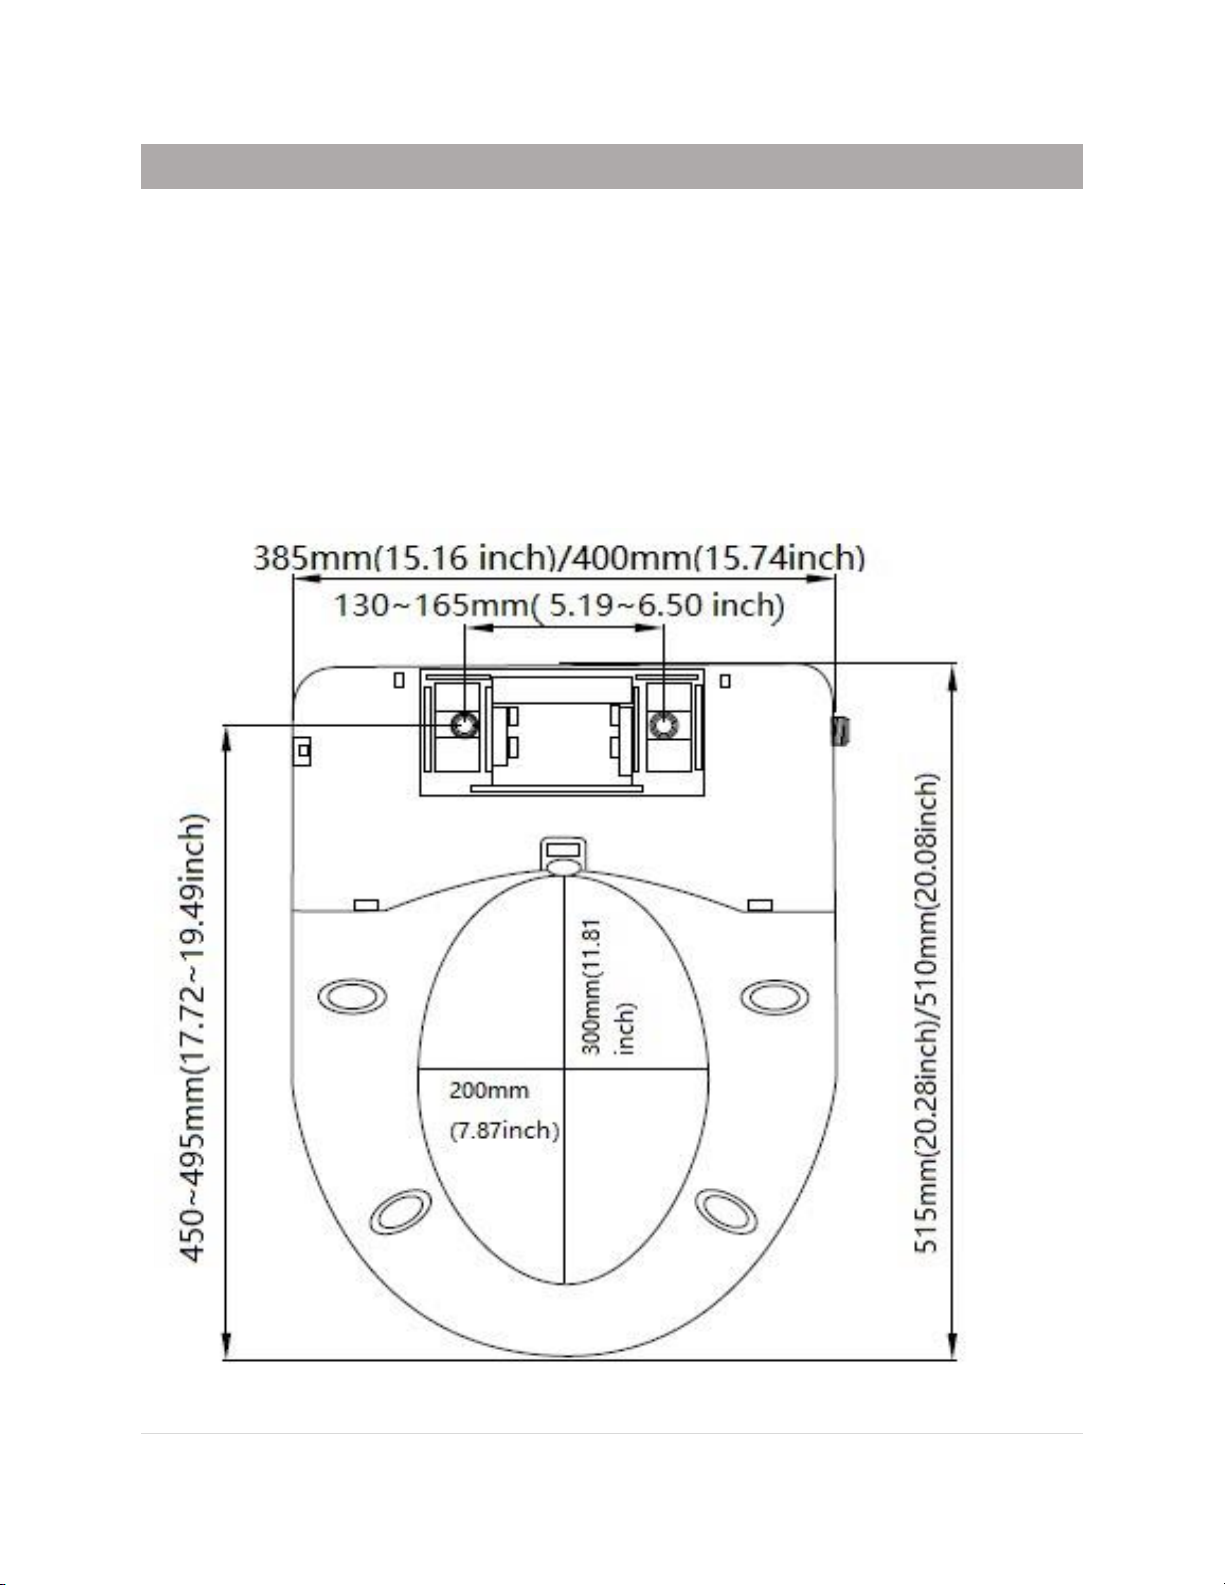
Installation space
Before proceeding with the installation, carefully measure and make sure that the unit measurements
match the user’s toilet.

6 | P a g e
Installing base-plate
1. Install the Expansion Screws
into the installation holes in
the toilet.
2. Then install the Base Plate,
Pressing Plate, Gasket and
Screw as per the drawing and
tighten the Screws.
Note: Unfold the installation paperboard, place the paperboard over the toilet bowl from the tip, and
then insert the base plate to the paperboard breach to make sure base plate align with paperboard
breach.
Installation and Removal of Device
Installation:
Push the device back onto the base plate. Press until
you hear the “Click” sound. Check if the device is
stable and fixed properly.
Removal:
Press the Remove Button on the right side
until you hear the “Click” button. Now, pull
out the device.
Note: Release hand from “remove button”
before pulling out the device.

7 | P a g e
Installation of water supply pipe
Step-1: Left side connecter
Install the 3-way connecter onto the angle valve, and
then connect the large hole of water supply pipe and
water pipe of toilet pipe to the 3-way connecter.
After that, connect the short hole of water supply
pipe to the water input connecter.
Step-2: Bottom side connecter
If the toilet has two holes; for power line and
water supply, let two supplies across the hole to
plug in device’s connector which is under the
main unit, then insert the main unit to the base
plate.
Note: when you are installing the water supply pipe, please do not bend or break the pipe which may
cause pipe to leak.
Checklist and trial run
Water-supply verification
•Install the 3-way connecter onto the angle valve, and then
connect the large hole of water supply pipe and water
pipe of toilet pipe to the 3-way connecter.
•After that, connect the short hole of water supply pipe to
the water input connecter.

8 | P a g e
Power plug verification
•Insert the power plug into power socket, and
press protection button. When indicator light
is on, the device is powered on.
•Press the leakage test button if first time use
the device. Protection switch bumps to show
that protection function works normally
Self-inspection
•Once you turn the power ON, the buzzer of
device rings “Beep”, and the power indicator and
eco mode indicator will flash.
•When power indicator lights on and eco mode
indicator lights off, the device will perform a self-
inspection.
•When the buzzer rings “Beep” again, it means
the self-inspection function is finished.
9 | P a g e
Part –3: DESCRIPTION OF THE APPLIANCE & CONTROL PANEL
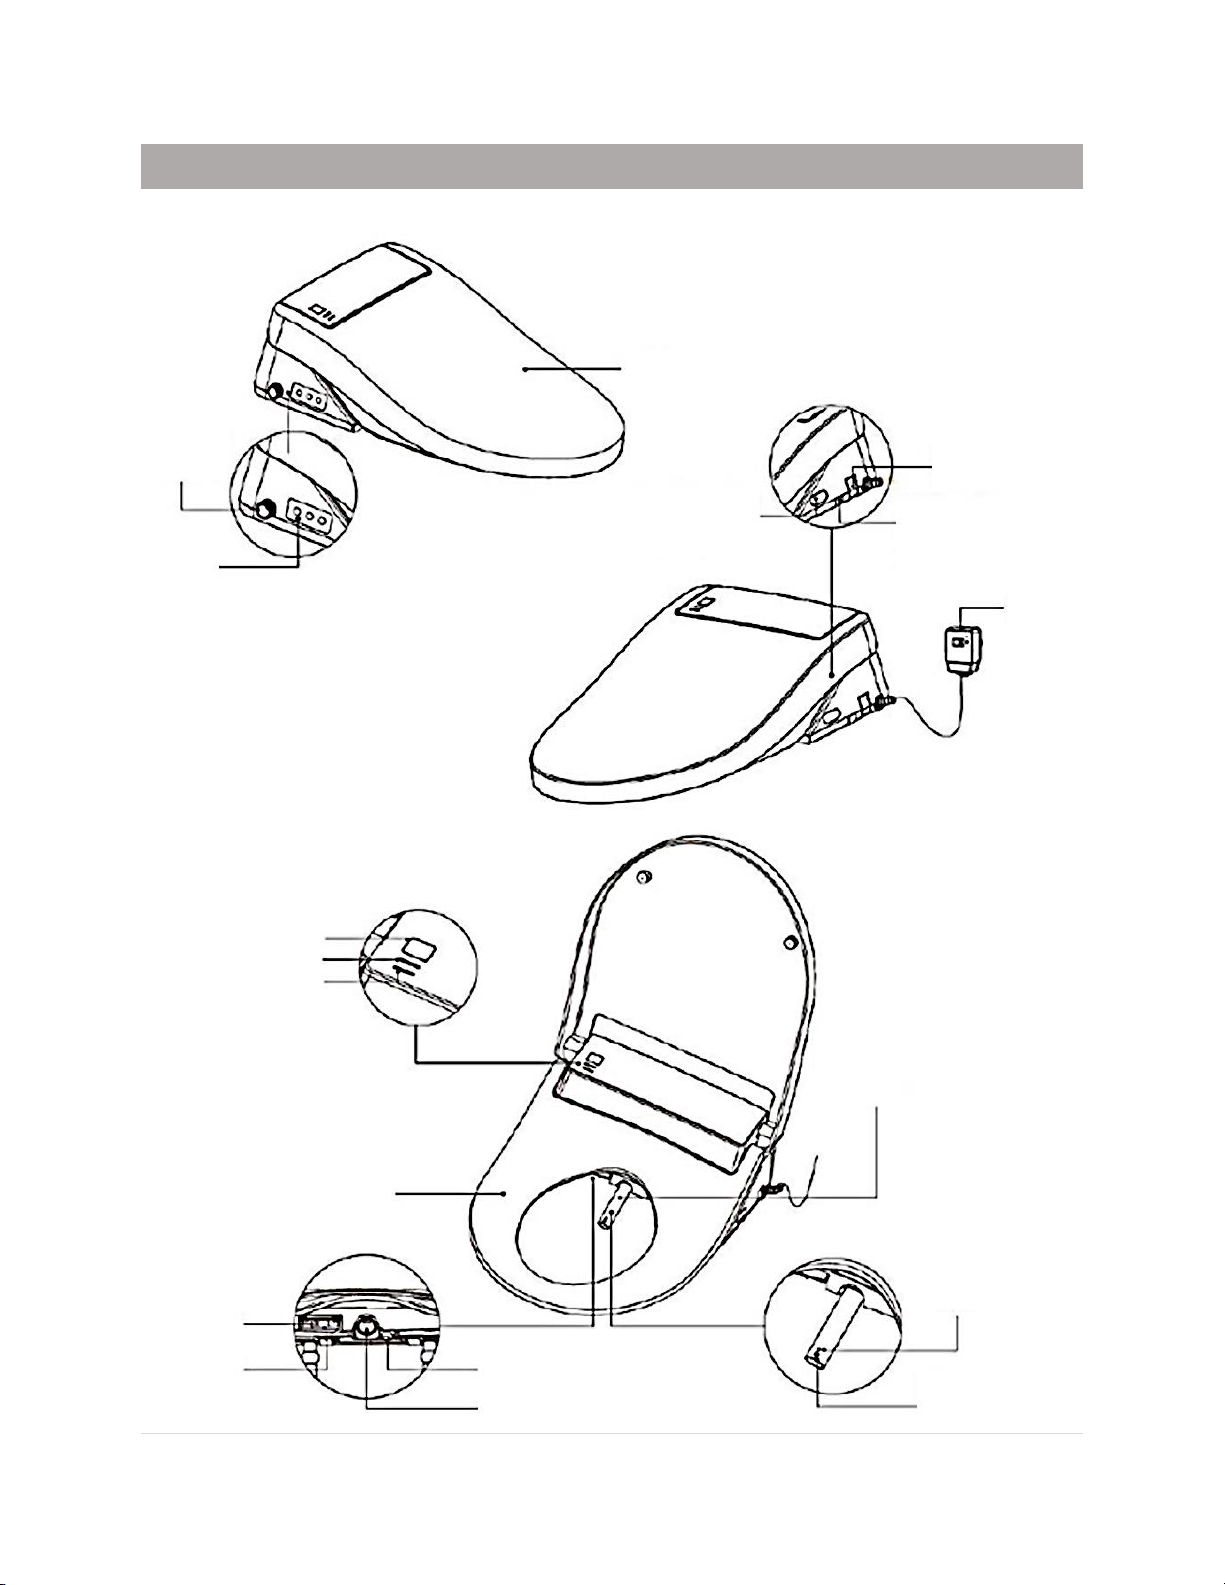
Description of the appliance
LID
WATER INTAKE
SIDE BUTTONS
WATER RELEASE
BUTTON
REMOVE BUTTON
POWER CORD
REMOTE CONTROL
RECEPTION
POWER INDICATOR
ECO-MODE INDICATOR
SEAT SENSOR
AIR DRYER
BASE PLATE
AUTOMATIC NIGHT LIGHT
NOZZLE
FRONT WASH SPRAY
REAR WASH SPRAY
NOZZLE
10 | P a g e
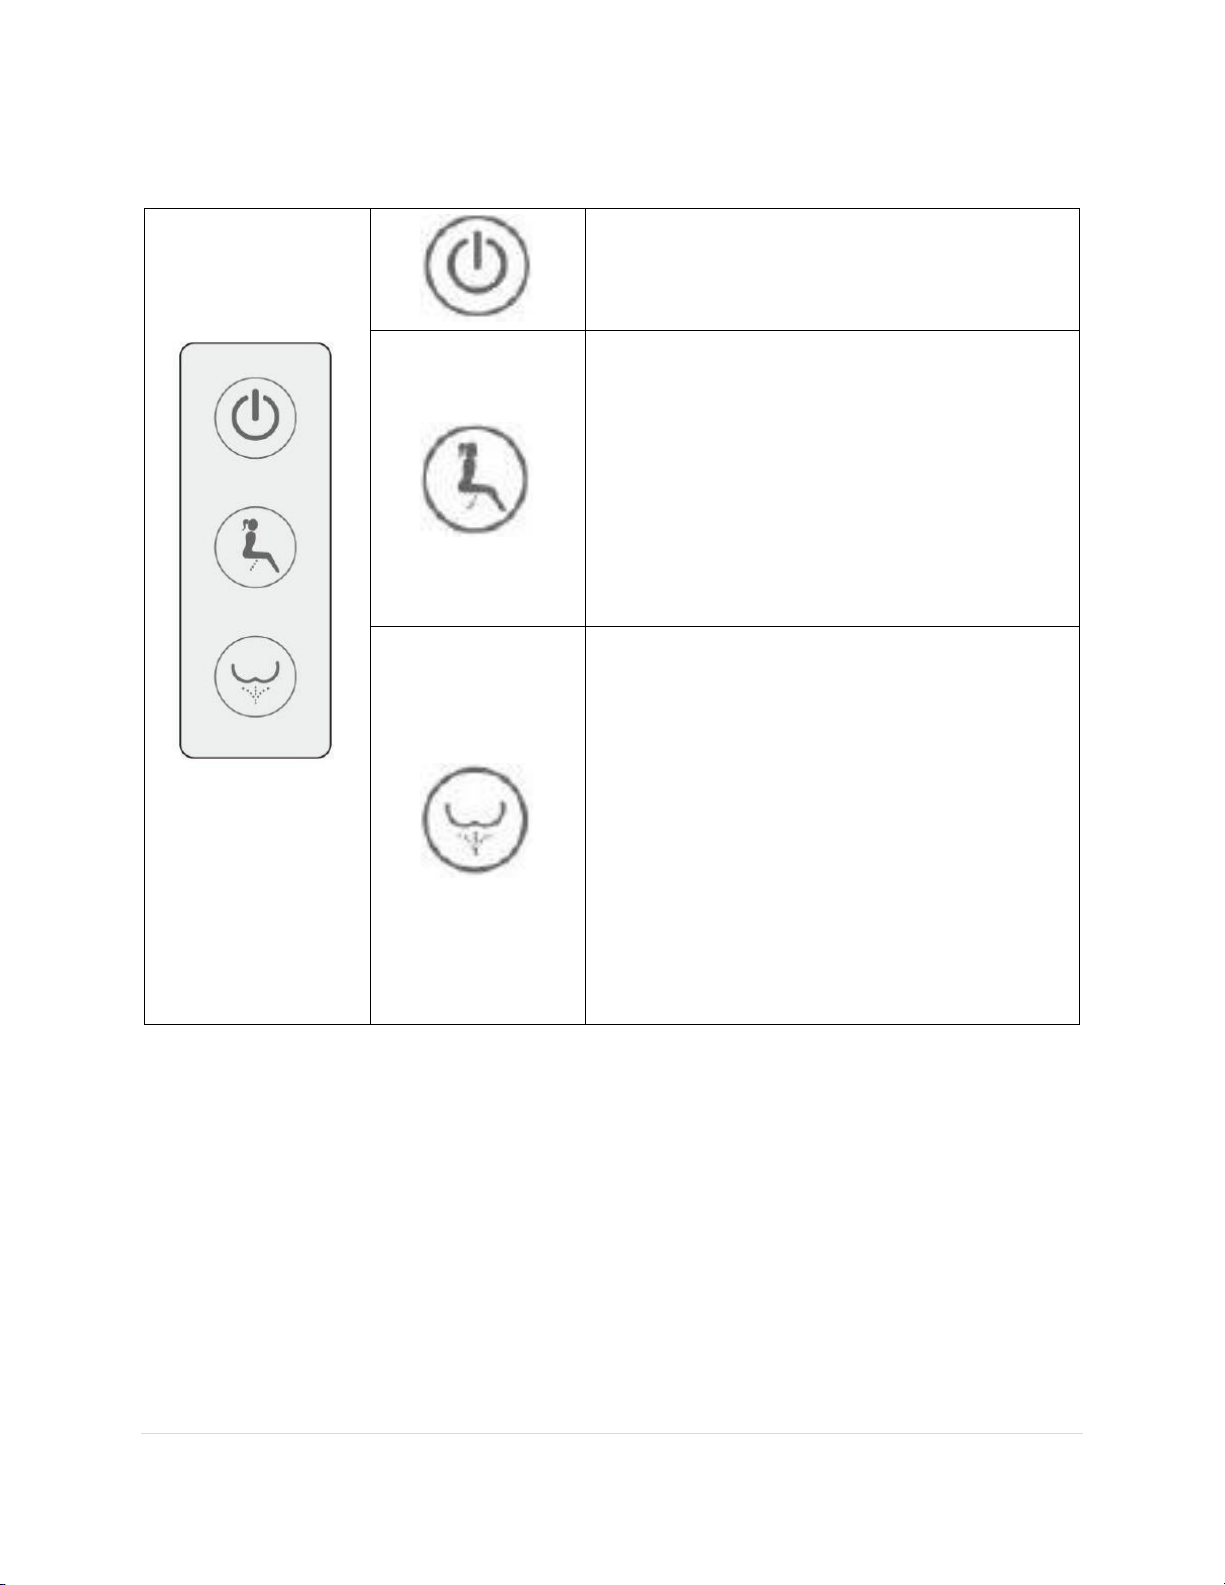
Side Buttons and Functions
1. Press and hold Power button to switch the unit
between ON and OFF mode.
2. When the unit is ON, press the Power button
once to switch between Function and ECO mode.
1. When user is seated on the unit, press “Front
cleansing button” to initiate front cleansing,
regular cleansing schedule is 150 seconds.
2. Press “Power” button to stop front cleansing
anytime during the process.
3. With front cleansing completed and user still
seated on the unit, the device will turn on drying
function automatically.
(Side button only, drying function does not turn
on automatically by initiating cleansing functions
on the remote control)
1. When user is seated on the unit, press “Rear
cleansing button” to initiate rear cleansing,
regular cleansing schedule is 150 seconds.
2. Press “Power” button to stop rear cleansing
anytime during the process.
3. With rear cleansing completed and user still
seated on the unit, the device will turn on drying
function automatically.
(Side button only, drying function does not turn
on automatically by initiating cleansing functions
on the remote control)
4. When user is not seated on the unit, press “Rear
cleansing” button to stretch out the wand to
clean the nozzle.
Note:
•When the device switches to Function mode, the power indicator will light up and the ECO mode
indicator will turn off.
•When the device switches to ECO mode, the power indicator light will turn off and the ECO mode
indicator will light up.
•When the device switches to off mode, both indicators lights will turn off.
•When the device is just turned on, all the functions will reset; when the user uses the remote
controller, it will show the function level on the remote control.
•When the device is not used for 72 hours, the water will be expelled and replaced to quell the build-
up of bacteria
11 | P a g e
Part –4: REMOTE CONTROL OPERATION
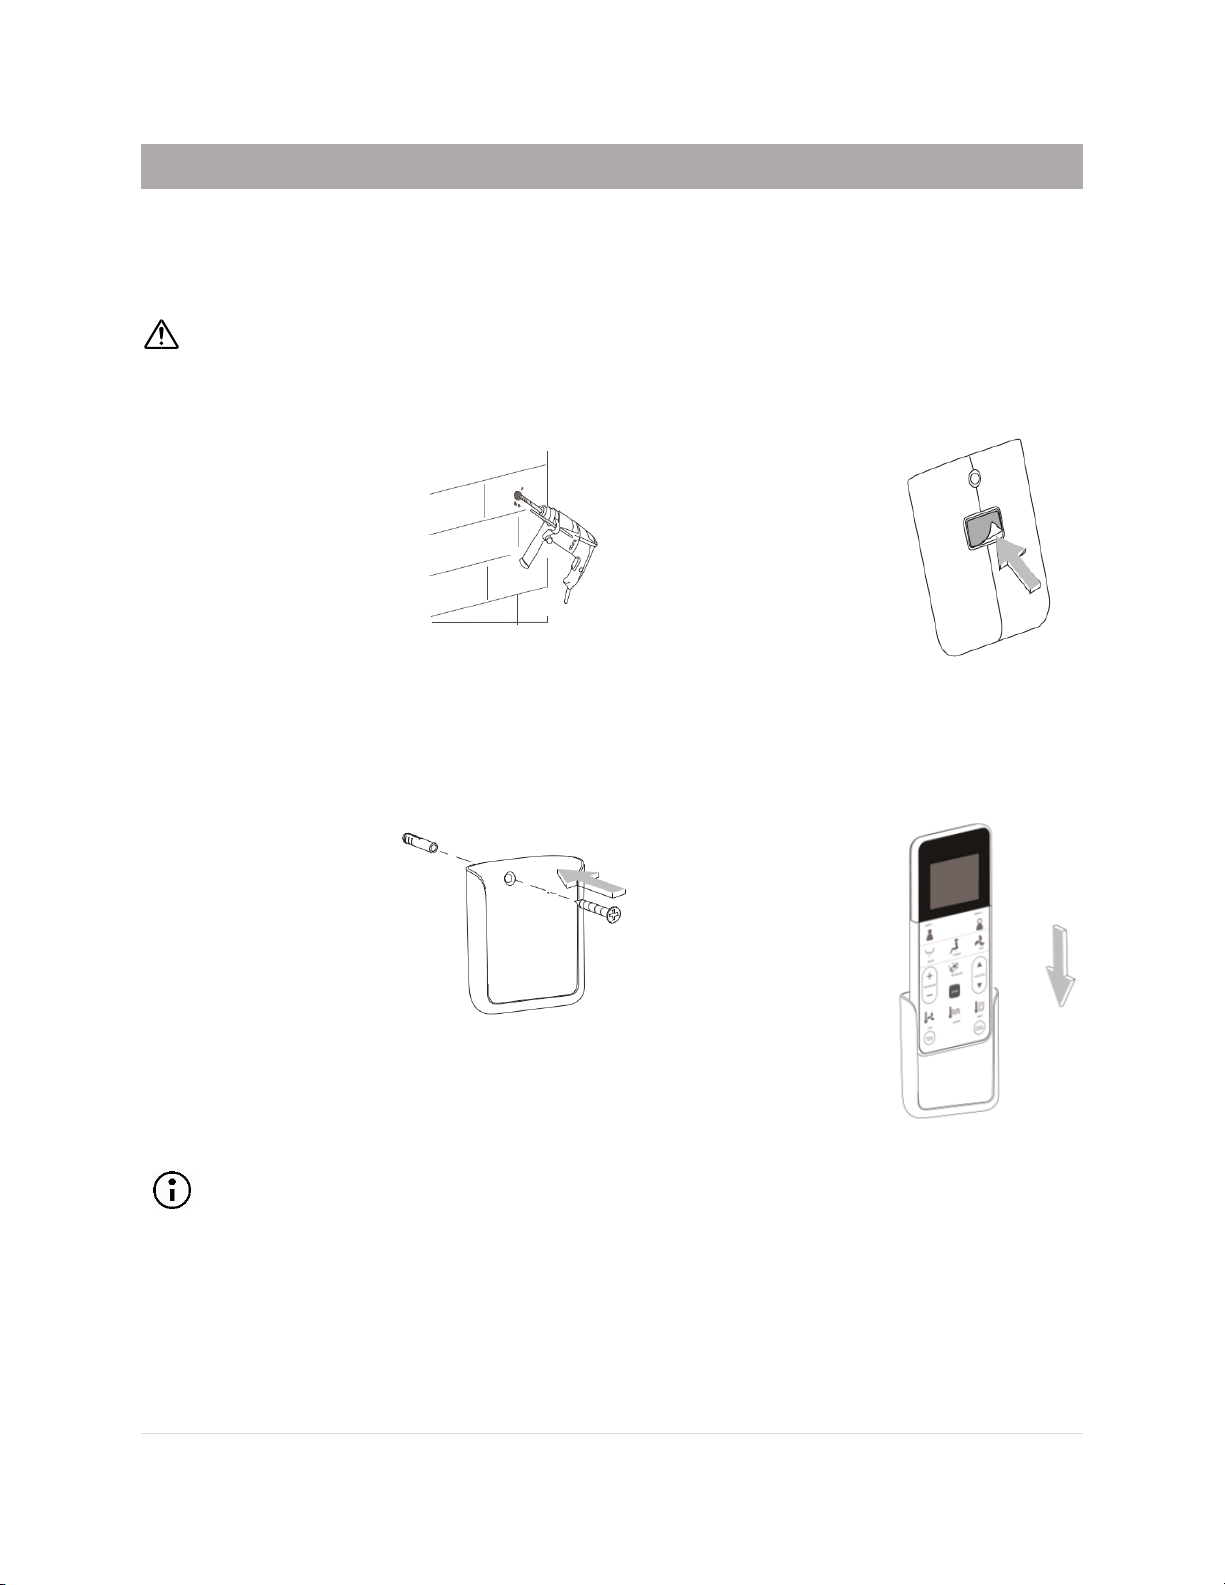
1: INSTALLING THE REMOTE-CONTROL UNIT
Please do not install and use the product in moist places such as a steam room, or in a place where
it can easily get wet.
1. Drill a 6 mm
diameter hole on
the wall with a
depth of 35mm
2. Remove the
adhesive’s
protective film
from the back of
the hanger
3. Insert wall anchor
into the hole in
the wall. Place
the Install hanger
to the wall and
tighten the screw.
4. Install the
batteries in the
remote and place
the remote
control in the
hanger.
Install the remote control where it can be easily reached from the toilet seat.
12 | P a g e
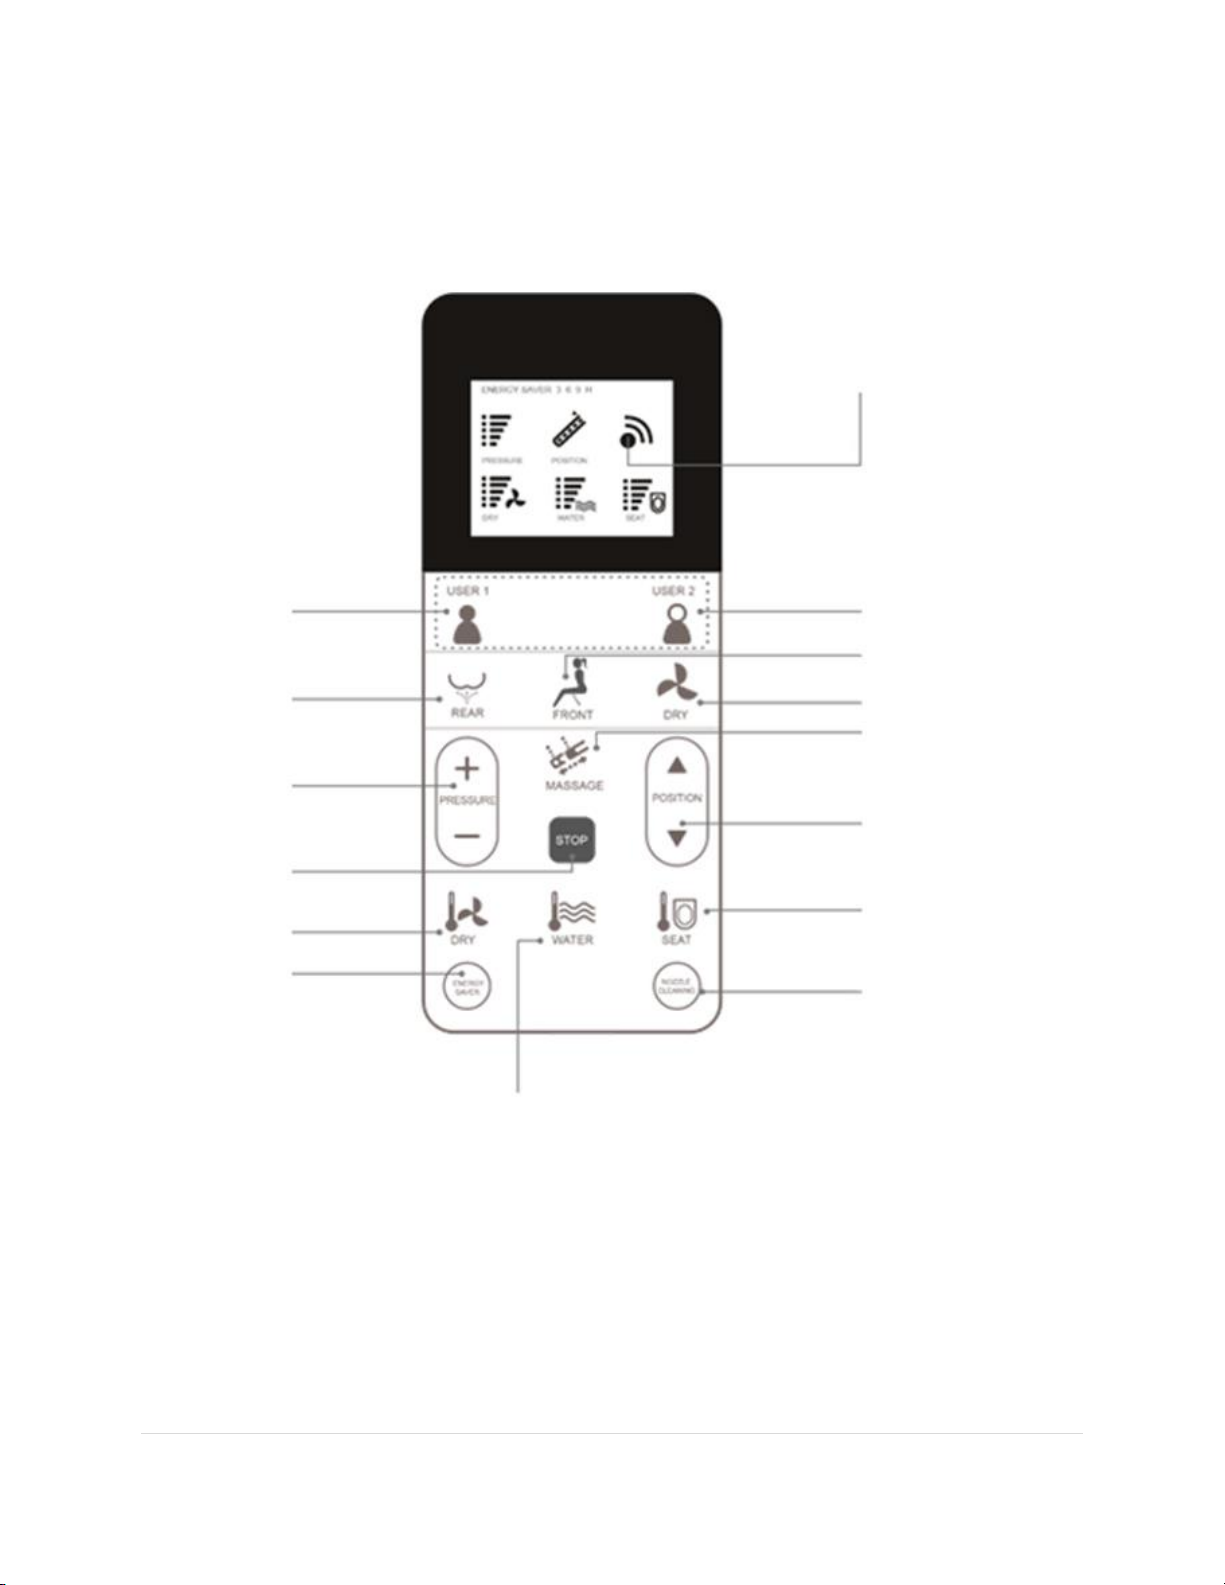
2: DESCRIPTION OF THE REMOTE CONTROL
SIGNAL INDICATOR
USER CODE
MASSAGE
NOZZLE POSITION
SEAT TEMPERATURE
NOZZLE CLEANSING
FRONT WASH
WARM AIR DRY
USER CODE
REAR WASH
WATER PRESSURE
STOP BUTTON
AIR TEMPERATURE
ENERGY SAVE MODE
WATER TEMPERATURE
13 | P a g e
3: OPERATIONS AND INSTRUCTIONS
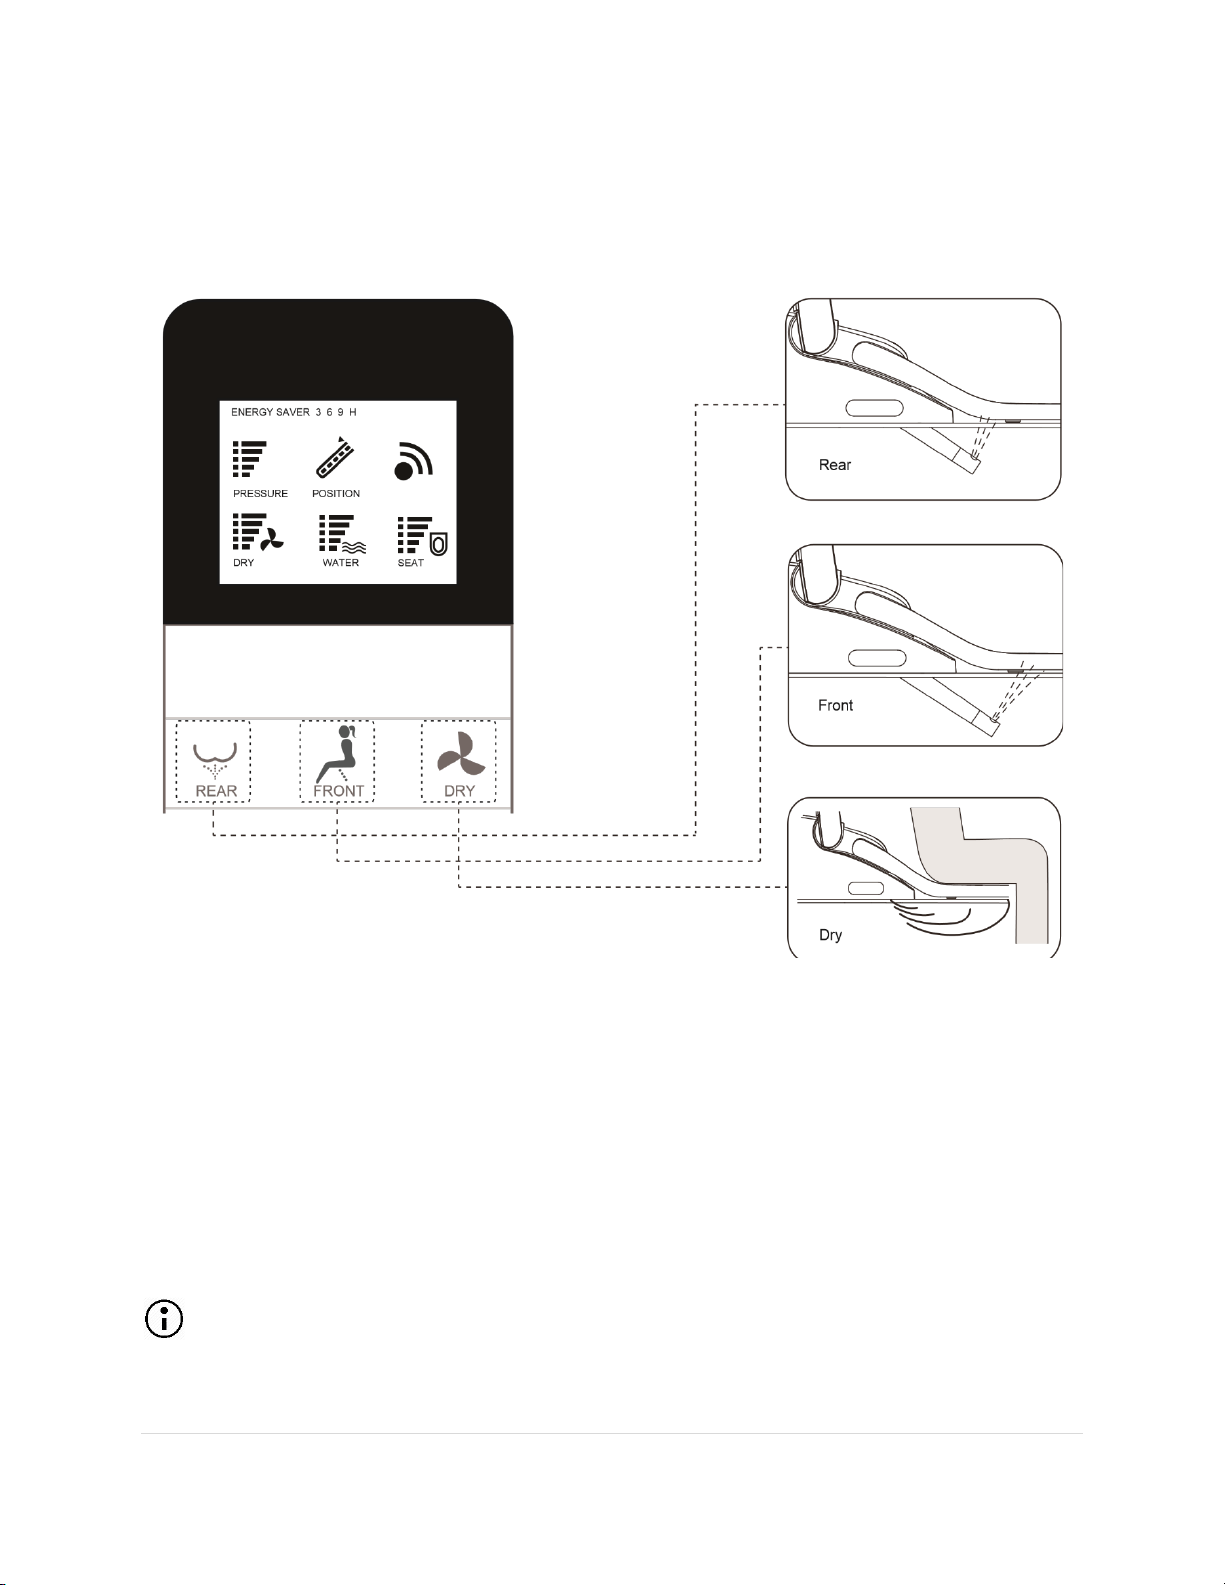
Rear/Front Cleansing and Drying
Rear / Front Cleansing
1. When user is seated on the unit, press “REAR/FRONT” button.
2. Water comes out of the wand to clean the rear/front portion of body.
3. After cycle of cleaning completes, the process will stop automatically.
Drying
1. Press “DRY” button, warm wind comes out of the air dryer.
2. After a cycle, or if the user leaves the seat, the process stops automatically.
To stop immediately, press “STOP” button.

14 | P a g e
Massage; Nozzle Position; Water Pressure Adjustment
Massage
1. Press “MASSAGE” button to initiate massage function.
2. The nozzle moves back and forth to extend the cleaning scope.
3. Press “MASSAGE” button again to stop the function.
Nozzle Position Adjustment
1. To position the spray nozzle forward press
2. To position the spray nozzle backward press
Water Pressure Adjustment
3. Press +button to increase water pressure
4. Press –button to decrease water pressure.

15 | P a g e
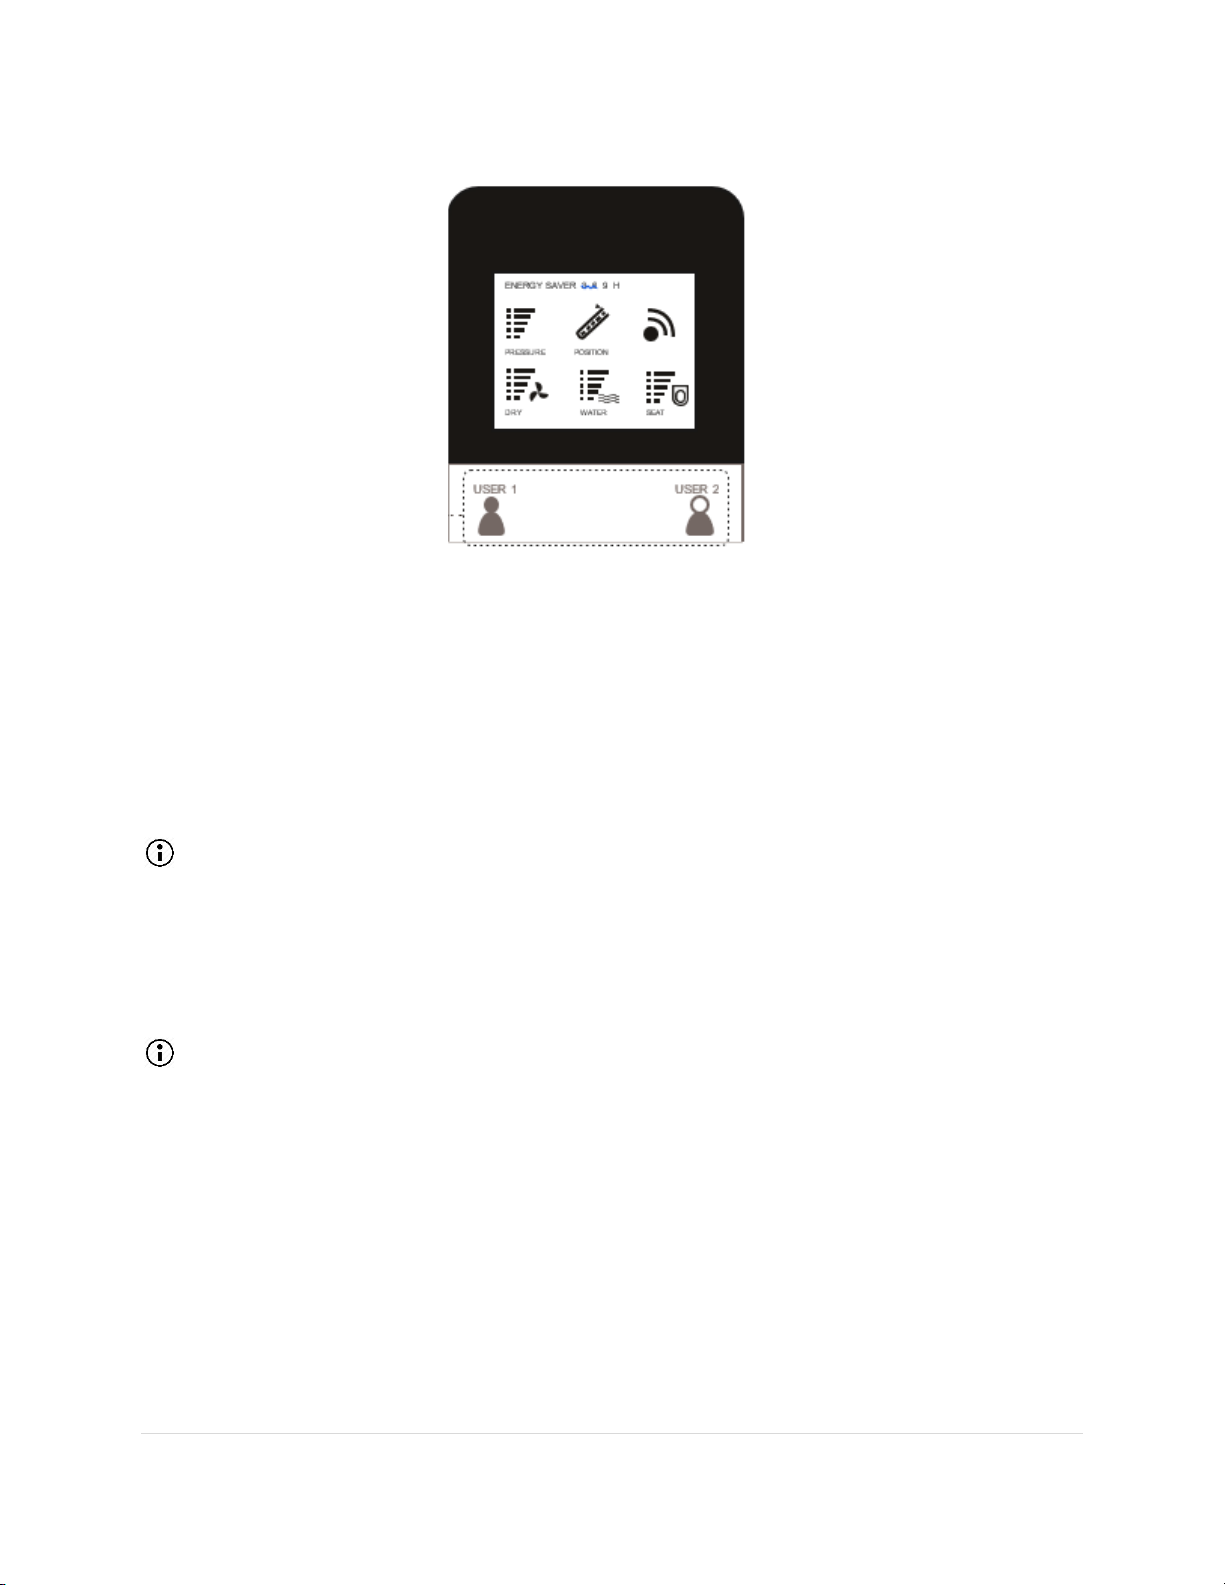
ECO Mode
1. Press ENERGY SAVER button, LCD screen shows ENERGY SAVER icon.
2. Users can select from these presets “OFF”, “3”, “6”, “9”
*If user select 6 then the system will stay in ECO mode for 6 hours then goes back to Function mode.
3. In ECO mode, the power indicator is off, and the ECO indicator is on.
4. As user sits on the seat, ECO mode is paused and enters into Function mode, the seat starts to heat
up immediately (if seat temperature is turned on). ECO mode will resume after user leaves. When the
energy saver mode is set, the icon on remote control disappears automatically.
During the Energy Saver, seat temperature is lowered to achieve power saving.
To turn Energy Saver mode off, press POWER button on the side of the unit.
16 | P a g e
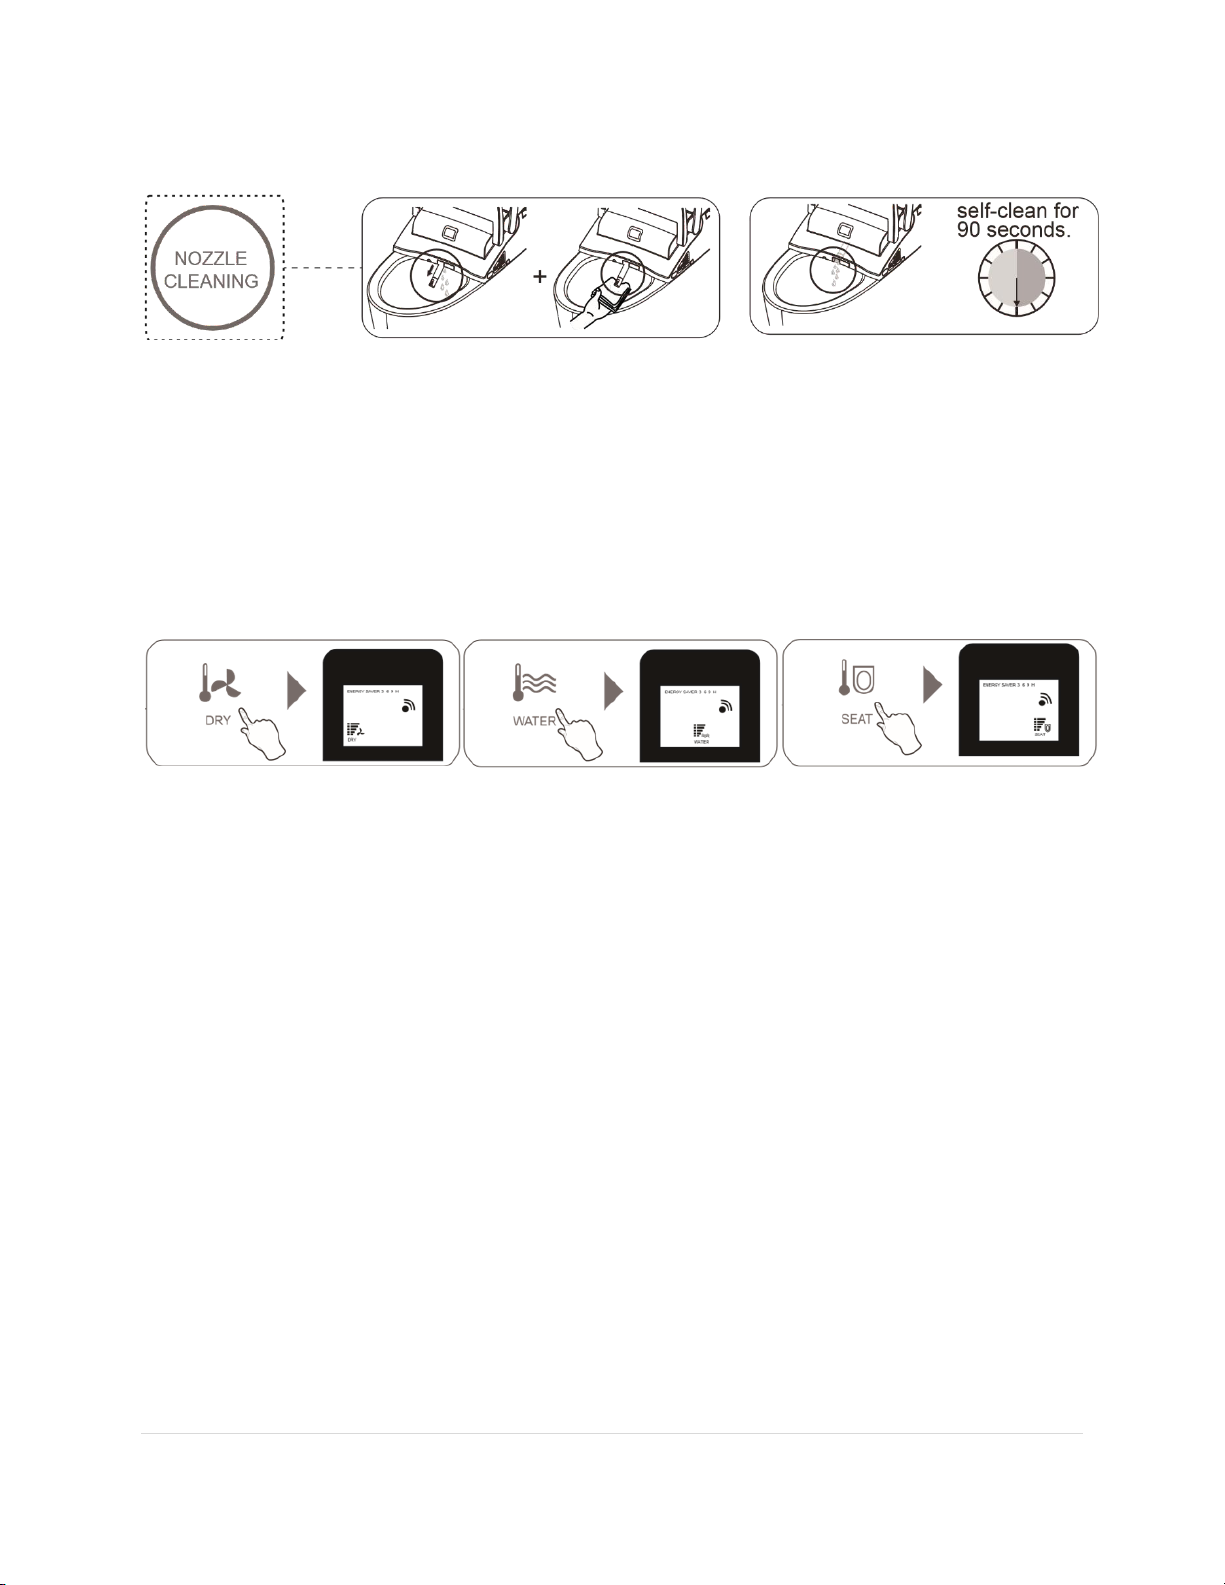
Nozzle Cleaning
Nozzle Manual-Cleaning
Press “NOZZLE CLEANING” button once, the wand will stretch out, user can wipe it down with a soft
cloth.
Nozzle Self-Cleaning
Press and hold “NOZZLE CLEANING” button for three seconds, the nozzle starts self-rinsing for 90
seconds.
Temperature Adjustment Settings
Dry Temperature Adjustment
1. Press “DRY” button to adjust temperature for drying.
2. The LCD display of 1 to 5 lines means level 1 to 5.
3. No display means room temperature.
Water Temperature Adjustment
1. Press “WATER” button to adjust temperature for rear and front cleaning.
2. The LCD display of 1 to 5 lines means level 1 to 5.
3. No display means room temperature.
Seat Temperature Adjustment
1. Press “SEAT” button to adjust temperature of the seat.
2. The LCD display of 1 to 5 lines means level 1 to 5.
3. No display means room temperature.
17 | P a g e
User Setting Memory
User settings
1. Press and hold “USER 1” or “USER 2” button to save the parameters including current water pressure,
nozzle position, air dry temperature, water temperature and seat temperature.
2. Press “USER 1” or “USER 2” button to apply saved parameters.
4: OPERATION MODES
Night Light
Provides visibility in a subtle manner.
•Press and hold “STOP” button and press “DRY” button, to switch night light between OFF and AUTO
mode.
•In AUTO mode, night light will automatically turn on when surrounding environment gets dark.
Quiet Mode
Turns off the Buzzer.
•Press and hold “STOP” button and press “MASSAGE” button to turn on/off buzzer.

18 | P a g e
Part –5: MAINTENANCE & CLEANING
Cleaning the unit
1. Turn off the power before cleaning the unit.
2. Gently wipe dirt and stains with a dry soft cloth
or sponge.
3. Do not apply any chemical solutions to the
unit.
4. Turn on the power after clean the unit.
Cleaning the nozzle
1. Press the NOZZLE CLEANING button on the
remote control, or REAR CLEANSING button
on the side of the unit. The wand will
stretch out.
2. Clean the nozzle with a dry soft cloth or
sponge.
3. Press and hold NOZZLE CLEANING button on
the remote control, or REAR CLEANSING
button on the side of the unit, nozzle will
start self-rinsing.
4. Press again to stop self-cleaning.
Warning:Do not apply force by pulling, pushing or
attempt to bend the nozzle, this will result in damage
or electrical shock.
Cleaning the filter
1. Power off the unit.
2. Unplug power cord with dry hands.
3. Unscrew the filter as shown in the picture.
4. Rinse with clean water, use a brush if
necessary.
5. Install the filter back to its original position.
6. Check for leakage.
Replace the water from tank
When room temperature is below 0°C/32°F or
electricity is disconnected for a long time, the
water in the tank has to be discharged.
1. Turn off the power and open the tank cover,
press push the discharge button in to discharge
water.
2. When finished, press down the round button
inside the discharge button to turn off the
discharge valve then close the tank cover.
Note: The power must be turned off before
discharging the tank
Table of contents
Other ECOWAY Toilet manuals


Popular Toilet manuals by other brands

Toto
Toto CT447CFG01 installation manual

Scarabeo
Scarabeo Moai 8606 manual

American Standard
American Standard Champion PRO 211BA Series INSTALLATION INSTRUCTIONS CARE AND MAINTENANCE

Crosswater
Crosswater MPRO SENSE US-US-PRO6005CW manual

Kohler
Kohler K-29777-PA-0 Homeowner's guide

BIOLAN
BIOLAN Simplett Plus 70570250 Instructions for use


Glacier bay
Glacier bay BECK installation manual

Swiss Madison
Swiss Madison SM-2T120 installation instructions

OVE
OVE E323 installation manual

Sanela
Sanela SLWN 13 Mounting instructions

Swiss Madison
Swiss Madison Nadar SM-2T141 installation instructions

Dometic
Dometic SANIPOTTIE 960 Series instruction manual