ECS H41IA1 User manual

i

i
Preface
Copyright 2010
All Rights Reserved.
The information in this document is subject to change without prior
notice in order to improve reliability, design and function and does
not represent a commitment on the part of the manufacturer.
In no event will the manufacturer be liable for direct, indirect,
special, incidental, or consequential damages arising out of the
use or inability to use the product or documentation, even if
advised of the possibility of such damages.
This document contains proprietary information protected by
copyright. All rights are reserved. No part of this manual may be
reproduced by any mechanical, electronic, or other means in any
form without prior written permission of the manufacturer.
Limitation of Liability
While reasonable efforts have been made to ensure the accuracy
of this manual, the manufacturer and distributor assume no liability
resulting from errors or omissions in this manual, or from the use of
the information contained herein.
Notice:
Changes or modifications not expressly approved by the party
responsible for compliance could void the user’s authority to
operate the equipment. Shielded interface cables and a non-
shielded AC power cord must be used in order to comply with
emission limits.
This equipment is to be used with power supply:
90W
There is no internal power supply.

ii
Table of Content
BEFORE YOU START ...............................................................................2
LET YOUR COMPUTER ACCLIMATE ITSELF ..............................................6
HEAT,COLD,HUMIDITY,AND GLARE ....................................................6
SUITABLE PLACE TO WORK ...................................................................6
INTRODUCTION........................................................................................9
LEFT VIEWS ......................................................................................12
RIGHT VIEW ......................................................................................13
GETTING STARTED ...............................................................................16
CONNECTING THE AC ADAPTER .........................................................16
TO INSTALL THE BATTERY PACK:........................................................18
TO REMOVE THE BATTERY PACK: ......................................................19
USING THE NOTEBOOK COMPUTER.......................................................21
LCD CARE........................................................................................21
EXTERNAL CRT DISPLAY...................................................................21
TOUCHPAD PRECAUTIONS .................................................................23
DATA STORAGE AND RETRIEVAL ........................................................23
THE BATTERY POWER SYSTEM ..........................................................23
PREPARING THE BATTERY PACK FOR USE (BATTERY CALIBRATION) ....24
AUTOMATIC BATTERY PACK CHARGING FUNCTION..............................25
BATTERY STATUS..............................................................................25
BATTERY LOW WARNING ...................................................................25
HELP WINDOWS ................................................................................27
DESKTOP ..........................................................................................27
INTERNET CONNECTION ........................................................................32
RUNNING BIOS SETUP .........................................................................35
MAIN SETUP .....................................................................................37
INFO SETUP ......................................................................................37
ADVANCED........................................................................................38
INTEL SETUP .....................................................................................38
SECURITY SETUP ..............................................................................39
POWER SETUP ..................................................................................39
BOOT SETUP.....................................................................................40
EXIT SETUP ......................................................................................40
VGA UTILITIES.....................................................................................42
ADJUST RESOLUTION ........................................................................43
CALIBRATE COLOR ............................................................................44
ADJUST DISPLAY SETTING .................................................................44
CONNECT TO A PROJECTOR...............................................................45
ADJUST CLEAR TYPE TEXT ................................................................45

iii
TROUBLESHOOTING ..............................................................................47
NO SPEAKER OUTPUT ........................................................................48
SOUND CANNOT BE RECORDED ..........................................................48
THE HARD DISK DRIVE DOES NOT WORK OR IS NOT RECOGNIZABLE .......49
THE HARD DRIVE IS MAKING ABNORMAL WHINING NOISES .....................49
THE HARD DISK DRIVE HAS REACHED ITS CAPACITY .............................49
THE HARD DISK TAKES LONGER TO READ A FILE...................................51
THE FILES ARE CORRUPTED ...............................................................51
THE DISPLAY PANEL IS BLANK WHEN THE SYSTEM IS TURNED ON ..........51
THE SCREEN IS DIFFICULT TO READ ....................................................51
THE SCREEN FLICKERS ......................................................................52
THE BUILT-IN TOUCH PAD PERFORMS ERRATICALLY .............................52
THE BUILT-IN KEYBOARD ACCEPTS NO INPUT .......................................52
THE CHARACTERS ON THE SCREEN REPEAT WHILE ITYPE ....................52
AMESSAGE “CMOS CHECKSUM FAILURE”DISPLAYS DURING THE
BOOTING PROCESS OR THE TIME (CLOCK)RESETS WHEN BOOTING .......52
THE POST DOES NOT SHOW AN INCREASED MEMORY CAPACITY WHEN
YOU HAVE ALREADY INSTALLED ADDITIONAL MEMORY ..........................53
THE O/S ISSUES AN INSUFFICIENT MEMORY ERROR MESSAGE DURING
OPERATION .......................................................................................53
PC CARDS DO NOT FUNCTION ............................................................53
THE PC CARD CANNOT BE RECOGNIZED .............................................53
WINDOWS CRASHES OR FREEZES WHEN YOU REMOVE THE PC CARD ...54
THE COMPUTER BECOMES HOT ..........................................................54
THE PROGRAM APPEARS STOPPED OR RUNS VERY SLOWLY .................54
THE USB DEVICE DOES NOT WORK ....................................................55
UNABLE TO USE THE EXTERNAL USB DEVICE .....................................55
UNABLE TO RECOGNIZE THE EXTERNAL USB DEVICE .........................55
SPECIFICATION.....................................................................................57

1

2
B
Be
ef
fo
or
re
e
y
yo
ou
u
S
St
ta
ar
rt
t
C
Co
on
nv
ve
en
nt
ti
io
on
ns
s
o
of
f
T
Th
hi
is
s
M
Ma
an
nu
ua
al
l
Use this manual will help you get the most from your notebook
computer.
If you are an experienced user of computers and/or
Microsoft’s Windows operating systems, you might find it
useful to read the Quick Start Guide that comes along with
your accessories.
If you are a less experienced user, you should get through
the manual carefully before using your system.
Whether or not you are an experienced user, you should consult
on the Troubleshooting Chapter if you encounter any problems
with your notebook.
S
Sa
af
fe
et
ty
y
P
Pr
re
ec
ca
au
ut
ti
io
on
ns
s
This section is designed to assist you in identifying potentially
unsafe conditions while working with this product. Required safety
features have been installed in the computer to protect you from
injury. However, you should use good judgment to identify potential
safety hazards:
1. Please read these safety instructions carefully.
2. Please keep this User's Manual for later reference.
3. Please disconnect this equipment from AC outlet before
cleaning. Don't use liquid or sprayed detergent for cleaning.
Use moisture sheet or cloth for cleaning.
4. For pluggable equipment, that the socket-outlet shall be
installed near the equipment and shall be easily accessible.
5. Please keep this equipment from humidity.
6. Lay this equipment on a reliable surface when installed. A
drop or fall could cause injury.

3
7. Make sure to use the right voltage for the power source when
connecting the equipment to the power outlet.
8. Place the power cord in such a way that people can not step
on it. Do not place anything on top of the power cord.
9. All cautions and warnings on the equipment should be noted.
10. If the equipment is not used for a long time, disconnect the
equipment from the main power outlet to avoid being damaged
by transient overvoltage.
11. Never pour any liquid into the opening, this could cause fire or
electrical shock.
12. Never open the equipment. For safety reason, the equipment
should only be opened by a qualified service personnel.
13. If on the following situations arises, get the equipment
checked by a service personnel:
a. The Power cord or plug is damaged.
b. Liquid has penetrated into the equipment.
c. The equipment has been exposed to moisture.
d. The equipment has not worked well or you cannot get it
work according to the user's manual.
e. The equipment has dropped and damaged.
f. If the equipment has obvious sign of breakage.
14. Do not leave this equipment in an environment unconditioned,
storage temperature above 60C (140f), it may damage the
equipment.
15. The unit can be operated at an ambient temperature of max.
5C to 35C.
16. The sound pressure level at the operators position according
to IEC 704-1: 1982 is equal or less than 70 dB(A).
17. Power Cord Requirements
The power cord set used with the AC adaptor must meet the
requirements of the country where you use the AC adaptor,
whether it is 100-240 Vac. The following information explains
the requirements for power cord set selection.
The cord set must be approved for the country in
which it is used.
The appliance coupler must have a configuration for
mating with a CEE7/EN60320/IEC 320/NEMA/ JIS C
8303 appliance inlet.
A. For U.S. and Canada:
The cord set must be UL Listed and CSA Certified.

4
The minimum specifications for the flexible cord are
No. 18 AWG, (2) Type SPT-2, and (3) 2-conductor.
B. For Japan:
All components of the cord set must bear a “PSE”
mark and in accordance with the Japanese Dentori
Law.
The minimum specifications for the flexible cord
are .75m ㎡conductors, (2) Type VCTR or VCTFK,
and (3) 2-conductor.
The cord set must have minimum rated current
capacity of 7 A.
The attachment plug must be a two-pole, grounded
type with a Japanese Industrial Standard C8303 (15
A, 125 VAC) configuration.
C. For Other Countries:
The cord set fittings must bear the certification mark
of the agency responsible for evaluation in a specific
country.
The flexible cord must be of a HAR (harmonized)
type H03VVH2-F.
The cord set must have a current capacity of a least
2.5 Amperes and voltage rating of 125 or 250 Vac.
C
CA
AU
UT
TI
IO
ON
N:
:
M
MO
OD
DE
EL
L
H
H4
41
1I
IA
Ax
x
(
(x
x=
=0
0~
~9
9)
)
I
IS
S
D
DE
ES
SI
IG
GN
NE
ED
D
T
TO
O
U
US
SE
E
W
WI
IT
TH
H
T
TH
HE
E
F
FL
LL
LO
OW
WI
IN
NG
G
A
AC
C
A
AD
DA
AP
PT
TE
ER
R
M
MO
OD
DE
EL
L
O
ON
NL
LY
Y
D
De
el
lt
ta
a
A
AD
DP
P-
-9
90
0S
SB
B-
-A
AB
B
D
De
el
lt
ta
a
A
AD
DP
P-
-9
90
0S
SB
B-
-A
AD
D
H
Hu
un
nt
tk
ke
ey
y
H
HK
K0
09
90
01
19
90
04
47
7-
-8
8D
D
18. When using your telephone equipment, basic safety
precautions should always be followed to reduce the risk of
fire, electric shock and injury to persons. These precautions
include the following:
Do not use this product near water, for example, near a
bathtub, washbowl, kitchen sink or laundry tub, in a wet
basement or near a swimming pool.
Avoid using a telephone (other than a cordless type)
during an electrical storm. There may be a remote risk
of electric shock from lightning.
Do not use the telephone to report a gas leak in the
vicinity of the leak.
Use only the power cord and batteries indicated in this

5
manual. Do not dispose of batteries in a fire. They may
explode. Check with local codes for possible special
instructions.
19. Do not use the AC adapter near open water or other liquids.
Never spill liquid into the AC adapter.
20. Danger of explosion if battery is incorrectly replaced. Replace
only with the same or equivalent type recommended by the
manufacturer. Dispose of used batteries according to the
manufacturer's instructions. Never remove the battery pack
while the power is on as this may result in data loss when the
system loses power.
21. The input receptacle is used as the main disconnecting device.
T
Th
hi
is
s
p
pa
ar
rt
t
i
is
s
h
ho
ot
t.
.
B
Be
e
c
ca
ar
re
ef
fu
ul
l.
.
W
Wh
he
en
n
y
yo
ou
u
s
se
ee
e
t
th
hi
is
s
s
sy
ym
mb
bo
ol
l,
,
b
be
e
c
ca
ar
re
ef
fu
ul
l
a
as
s
t
th
hi
is
s
s
sp
po
ot
t
m
ma
ay
y
b
be
e
v
ve
er
ry
y
h
ho
ot
t.
.
22. Laser Warning: Laser Class I Product Caution - Invisible laser
radiation when open avoid exposure to beam.
The optical drive used with this computer is certified as a
Class1 laser device according to the U.S. Department of
Health and Human Services (DHHS) Radiation Performance
Standard and International Standards IEC 60825-1
(EN60825-1). The device is not considered harmful, but the
following precautions are recommended:
Do not open the unit.
Avoid direct exposure to the laser beam.
If the unit requires service, contact an authorized
service center.
Ensure proper use by reading and following the
instructions carefully.
Do not attempt to make any adjustment of the unit.
C
Cl
la
as
ss
s
1
1
L
La
as
se
er
r
P
Pr
ro
od
du
uc
ct
t
D
Do
o
n
no
ot
t
a
at
tt
te
em
mp
pt
t
t
to
o
d
di
is
sa
as
ss
se
em
mb
bl
le
e
t
th
he
e
c
ca
ab
bi
in
ne
et
t
c
co
on
nt
ta
ai
in
ni
in
ng
g
t
th
he
e
l
la
as
se
er
r.
.
T
Th
he
e
l
la
as
se
er
r
b
be
ea
am
m
u
us
se
ed
d
i
in
n
t
th
hi
is
s
p
pr
ro
od
du
uc
ct
t
i
is
s
h
ha
ar
rm
mf
fu
ul
l
t
to
o
t
th
he
e
e
ey
ye
es
s.
.
T
Th
he
e
u
us
se
e
o
of
f
o
op
pt
ti
ic
ca
al
l
i
in
ns
st
tr
ru
um
me
en
nt
ts
s,
,
s
su
uc
ch
h
a
as
s
m
ma
ag
gn
ni
if
fy
yi
in
ng
g
l
le
en
ns
se
es
s,
,
w
wi
it
th
h
t
th
hi
is
s
p
pr
ro
od
du
uc
ct
t
i
in
nc
cr
re
ea
as
se
e
t
th
he
e
p
po
ot
te
en
nt
ti
ia
al
l
h
ha
az
za
ar
rd
d
t
to
o
y
yo
ou
ur
r
e
ey
ye
es
s.
.
F
Fo
or
r
y
yo
ou
ur
r
s
sa
af
fe
et
ty
y,
,
h
ha
av
ve
e
t
th
hi
is
s
e
eq
qu
ui
ip
pm
me
en
nt
t
s
se
er
rv
vi
ic
ce
ed
d
o
on
nl
ly
y
b
by
y
a
an
n
a
au
ut
th
ho
or
ri
iz
ze
ed
d
s
se
er
rv
vi
ic
ce
e
p
pr
ro
ov
vi
id
de
er
r.
.

6
T
Th
hi
in
ng
gs
s
y
yo
ou
u
m
mu
us
st
t
r
re
em
me
em
mb
be
er
r
b
be
ef
fo
or
re
e
w
wo
or
rk
ki
in
ng
g
o
on
n
y
yo
ou
ur
r
c
co
om
mp
pu
ut
te
er
r
L
Le
et
t
y
yo
ou
ur
r
c
co
om
mp
pu
ut
te
er
r
a
ac
cc
cl
li
im
ma
at
te
e
i
it
ts
se
el
lf
f
Your notebook can easily stand temperature extremes but it
doesn’t like rapid changes in temperature, like going from the cold
outdoors to a warm office. Rapid changes in temperature can
cause water droplets to condense inside your case, threatening to
damage the electronic parts inside.
After receiving your notebook when it’s hot or cold outside, try not
to power up the computer immediately, let the computer adjust to
the room temperature gradually at least for three to four hours.
I
If
f
y
yo
ou
ur
r
s
sy
ys
st
te
em
m
a
ar
rr
ri
iv
ve
es
s
i
in
n
c
co
ol
ld
d
w
we
ea
at
th
he
er
r,
,
d
do
o
n
no
ot
t
a
ap
pp
pl
ly
y
p
po
ow
we
er
r
t
to
o
t
th
he
e
c
co
om
mp
pu
ut
te
er
r
o
or
r
m
mo
on
ni
it
to
or
r
u
un
nt
ti
il
l
t
th
he
ey
y
h
ha
av
ve
e
b
be
ee
en
n
a
al
ll
lo
ow
we
ed
d
t
to
o
c
co
om
me
e
t
to
o
r
ro
oo
om
m
t
te
em
mp
pe
er
ra
at
tu
ur
re
e.
.
H
He
ea
at
t,
,
C
Co
ol
ld
d,
,
H
Hu
um
mi
id
di
it
ty
y,
,
a
an
nd
d
G
Gl
la
ar
re
e
Find a suitable place for your computer that’s not too hot, too cold,
too dark, or too bright. Glare can make it hard to read the screen.
Try to avoid the computer components from being destroyed
if it is overheated, so try to allow plenty of room for air to
circulate around the case.
Do not block the ventilation opening.
Do not place your computer in direct sunlight.
S
Su
ui
it
ta
ab
bl
le
e
p
pl
la
ac
ce
e
t
to
o
w
wo
or
rk
k
Your computer will run well wherever you’re comfortable but
extremes of temperature and humidity can be challenging to your
system’s parts.
There are some things you can tolerate that the computer can’t –
things like static electricity, dust, water, steam and oil. In case you
decide to pull over for roadside computing, try to choose a clean,
comfortable work area for your system.

7
A lithium-ion battery pack will be available when you are traveling.
If you are running your system for the first time on battery power,
remove the battery from the package, install it into the system and
recharge the battery to fully prepare for service.

8

9
I
In
nt
tr
ro
od
du
uc
ct
ti
io
on
n
P
Pl
le
ea
as
se
e
u
us
se
e
t
th
he
e
a
ad
da
ap
pt
te
er
r
r
re
ec
co
om
mm
me
en
nd
de
ed
d
i
in
n
t
th
hi
is
s
m
ma
an
nu
ua
al
l.
.
P
Pr
re
ep
pa
ar
ri
in
ng
g
y
yo
ou
ur
r
C
Co
om
mp
pu
ut
te
er
r
Install the battery pack
Connecting the AC adapter
Opening the display panel
Turning on your computer
10
K
Kn
no
ow
wi
in
ng
g
y
yo
ou
ur
r
C
Co
om
mp
pu
ut
te
er
r
With the LCD screen open, you will see several features important
for operating your notebook computer.
T
To
o
a
av
vo
oi
id
d
d
da
am
ma
ag
ge
e
t
to
o
t
th
he
e
d
di
is
sp
pl
la
ay
y
p
pa
an
ne
el
l:
:
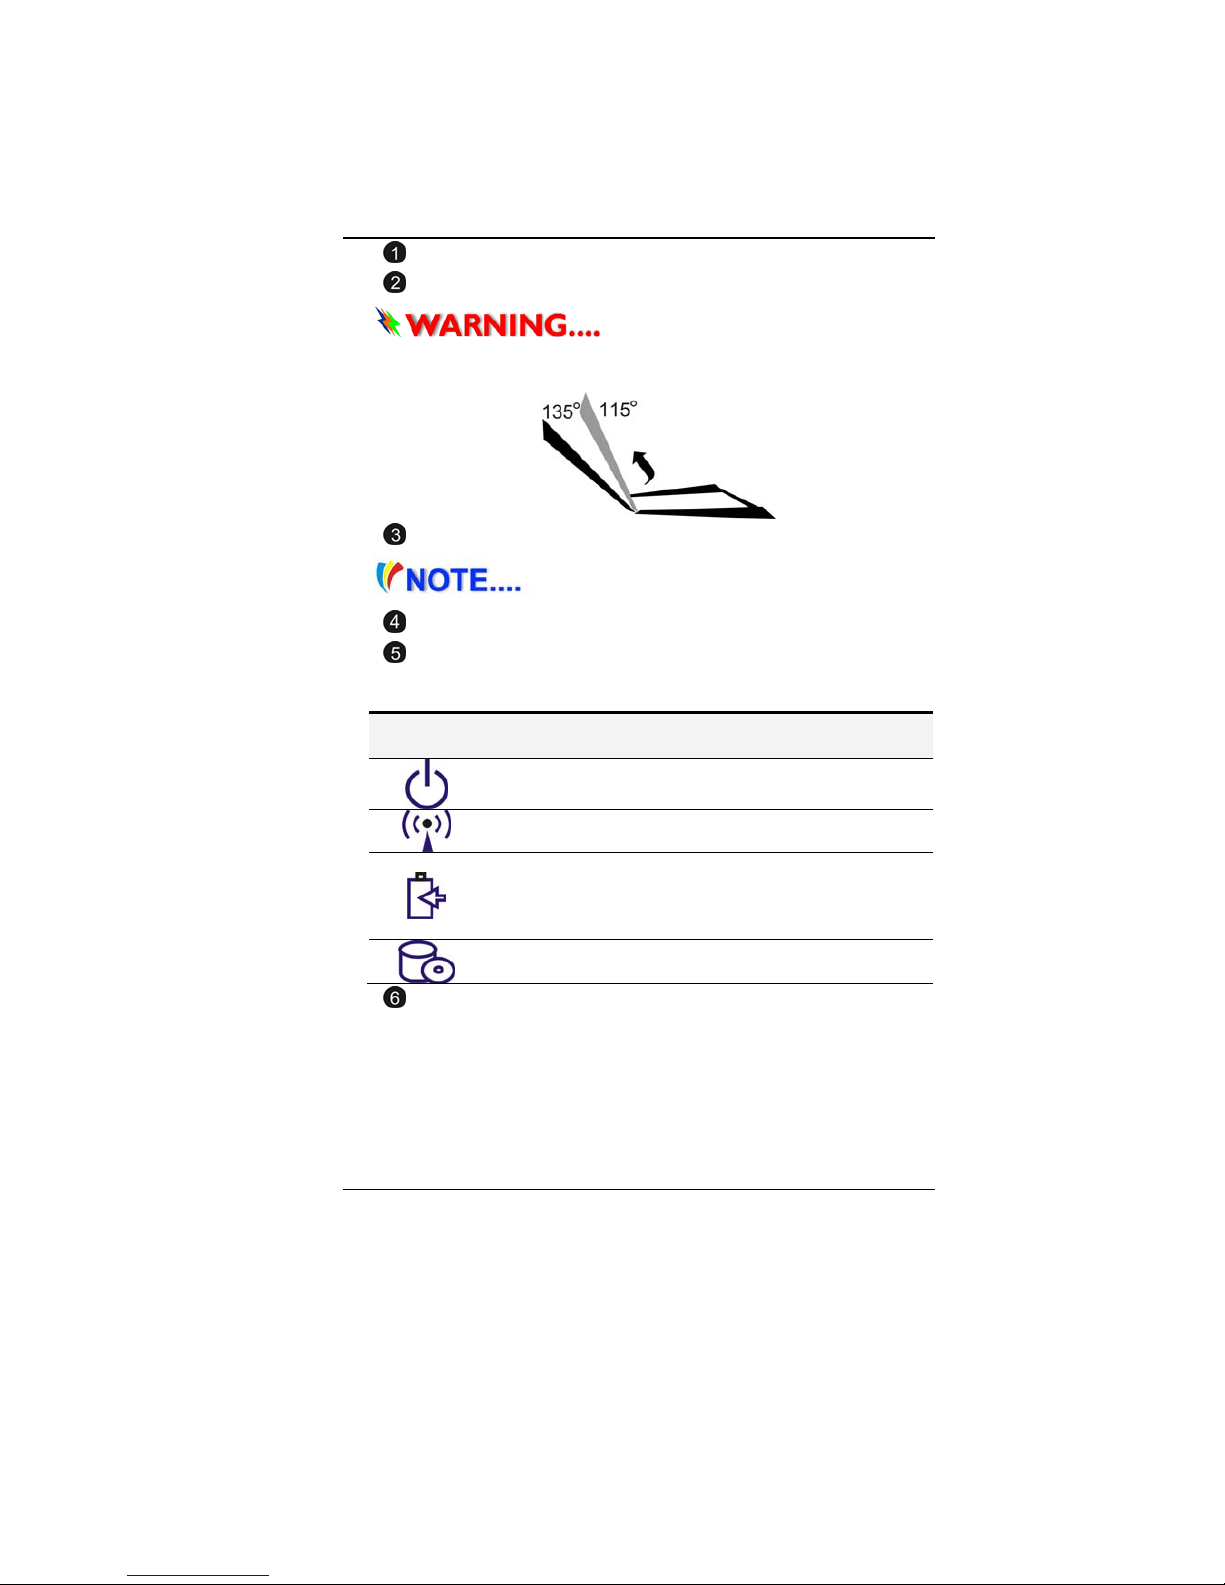
1
1.
.
T
Tr
ry
y
n
no
ot
t
t
to
o
s
sl
la
am
m
t
th
he
e
d
di
is
sp
pl
la
ay
y
u
up
po
on
n
c
cl
lo
os
si
in
ng
g
i
it
t.
.
2
2.
.
T
Tr
ry
y
n
no
ot
t
t
to
o
p
pl
la
ac
ce
e
a
an
ny
y
o
ob
bj
je
ec
ct
t
o
on
n
t
to
op
p
w
wh
he
en
n
i
it
t
i
is
s
c
cl
lo
os
se
ed
d
o
or
r
o
op
pe
en
n.
.
3
3.
.
B
Be
e
s
su
ur
re
e
t
th
he
e
s
sy
ys
st
te
em
m
i
is
s
t
tu
ur
rn
ne
ed
d
o
of
ff
f
o
or
r
i
in
n
s
su
us
sp
pe
en
nd
d
m
mo
od
de
e
b
be
ef
fo
or
re
e
y
yo
ou
u
c
cl
lo
os
se
e
t
th
he
e
d
di
is
sp
pl
la
ay
y
p
pa
an
ne
el
l.
.
F
Fr
ro
on
nt
t
V
Vi
ie
ew
w
P
Pi
ic
ct
tu
ur
re
e
i
is
s
o
on
nl
ly
y
f
fo
or
r
r
re
ef
fe
er
re
en
nc
ce
e
11
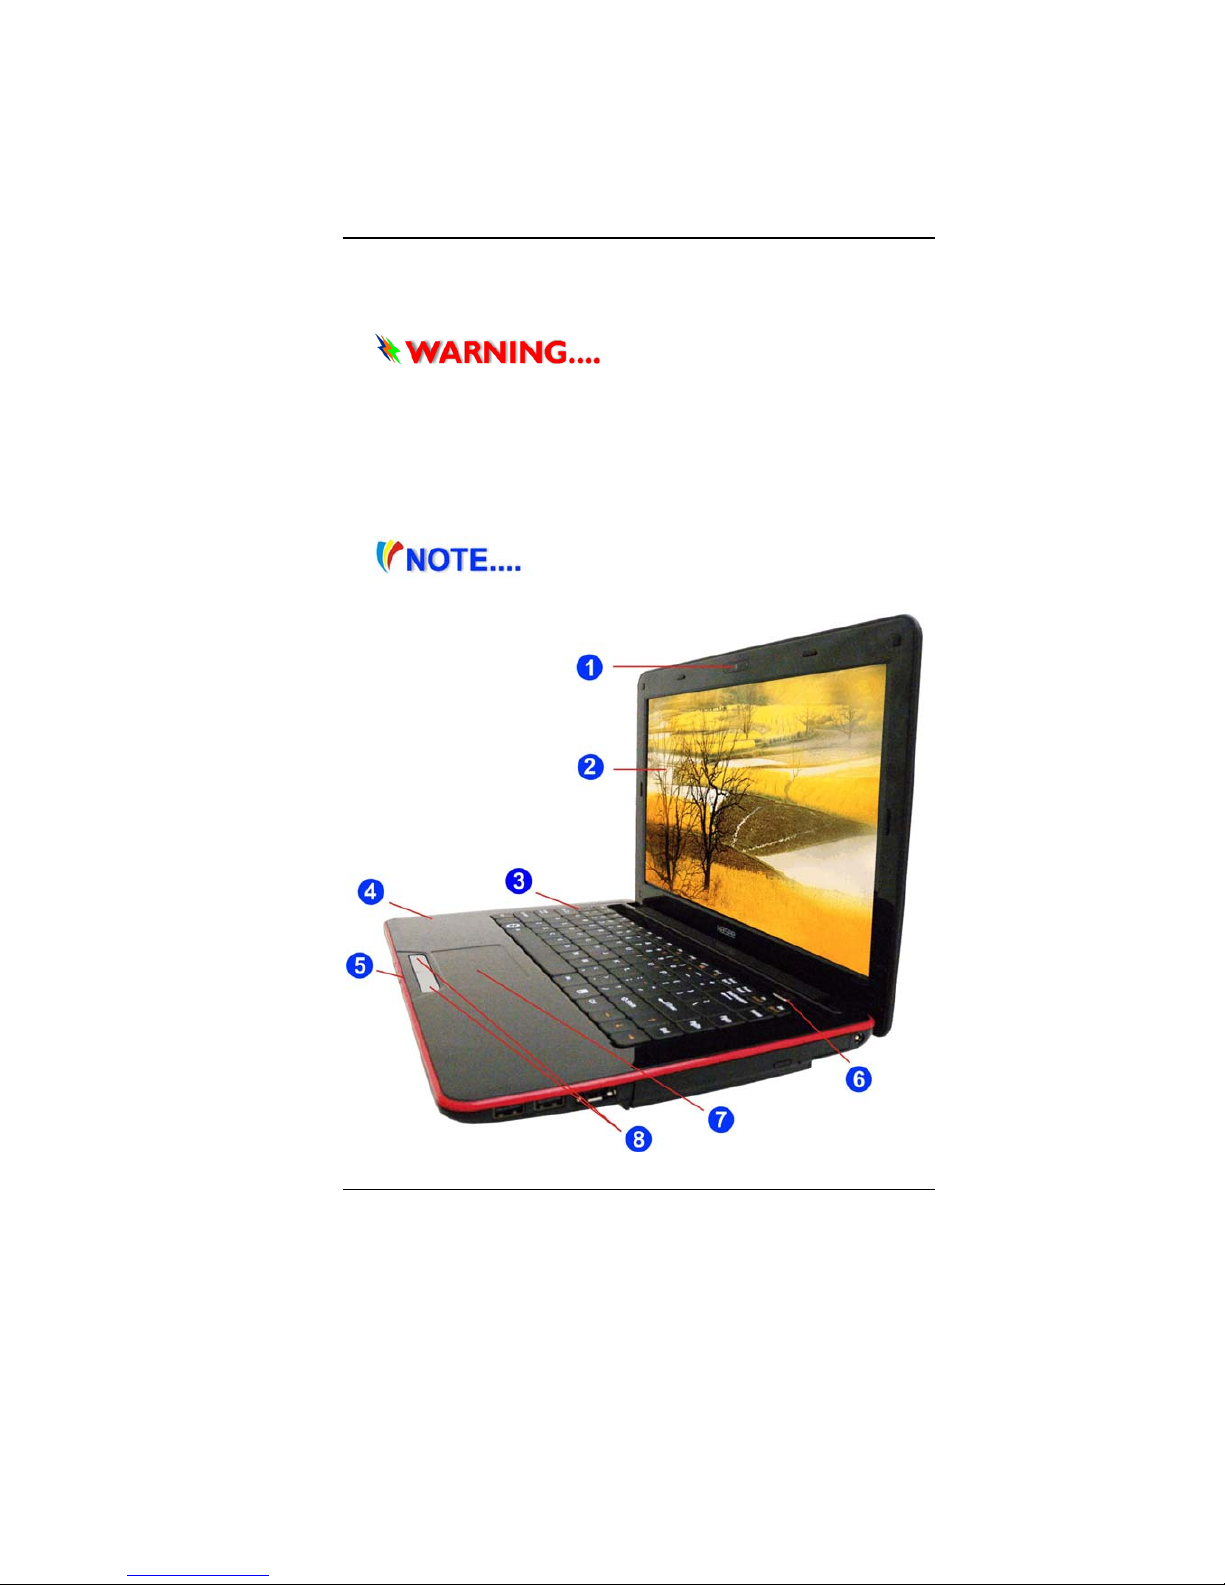
Camera
LCD Display
T
Th
hi
is
s
L
LC
CD
D
p
pa
an
ne
el
l
c
ca
an
n
o
on
nl
ly
y
s
su
up
pp
po
or
rt
t
u
up
p
t
to
o
a
a
m
ma
ax
xi
im
mu
um
m
o
op
pe
en
ni
in
ng
g
o
of
f
1
11
15
5-
-1
13
35
5
d
de
eg
gr
re
ee
es
s,
,
p
pl
le
ea
as
se
e
d
do
o
n
no
ot
t
p
pu
us
sh
h
i
it
t
f
fo
or
rc
ci
ib
bl
ly
y.
.
Keyboard
T
Th
he
e
k
ke
ey
yb
bo
oa
ar
rd
d
d
di
if
ff
fe
er
rs
s
f
fo
or
r
e
ea
ac
ch
h
t
te
er
rr
ri
it
to
or
ry
y
Microphone
LED Status Indicator
System & Power Status Indicators
LED Graphic
Symbol Indication
Blue light indicates the system is ON. Blinking blue
light indicates the notebook is in suspend mode.
Blue light indicates the LAN/Bluetooth is active.
Battery status
Charging – Blue light flashing
Full – Blue
Low – Red light flashing
Blue light indicates the hard drive and/or optical drive
is being accessed.
Power/Suspend Button
Press for 1~1.5 seconds to turn on the system.
Press and hold for at least 4 seconds to turn off the
system.
Press the power / suspend button again to return from
the suspend mode.
12
Touchpad
Touchpad Buttons
L
Le
ef
ft
t
V
Vi
ie
ew
ws
s
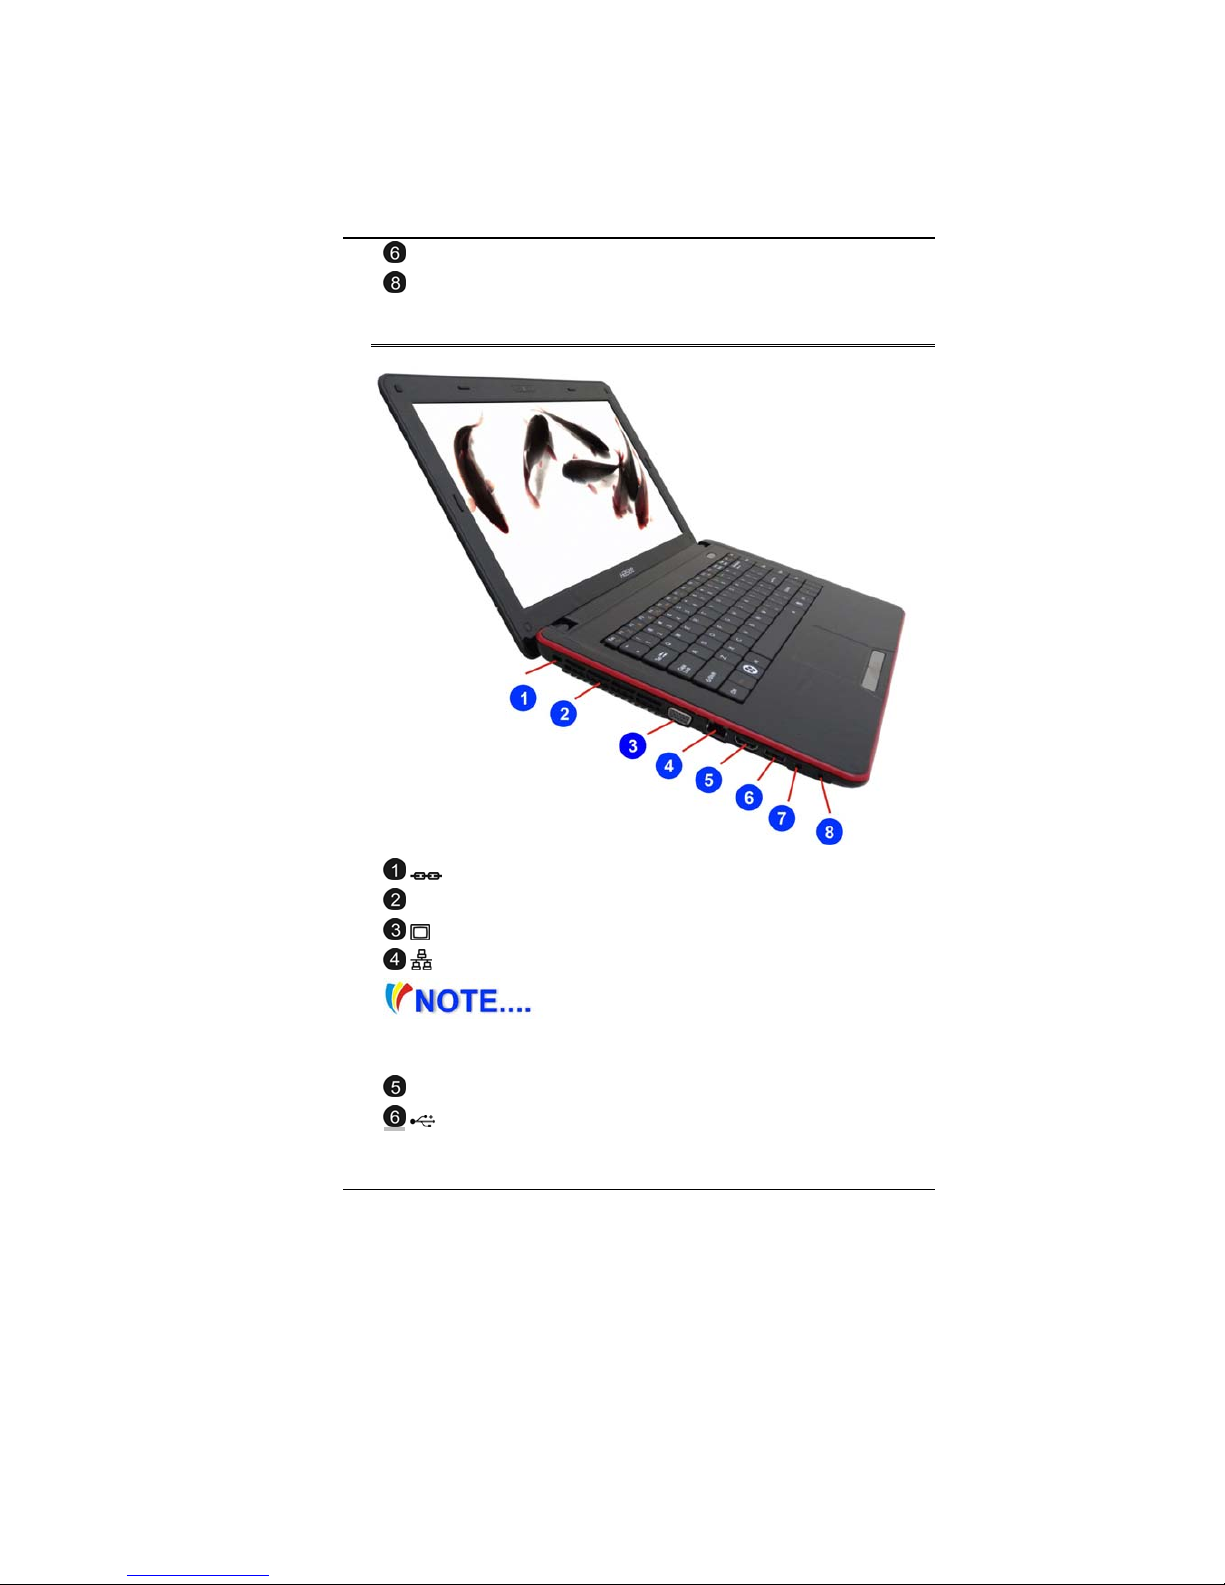
Kensington Lock
Ventilation Opening
CRT Port
Ethernet / LAN Port
When using a LAN, please use an
EMI Shielding Cable to minimize interference when
transmitting
HDMI Port
USB 2.0 Port
13
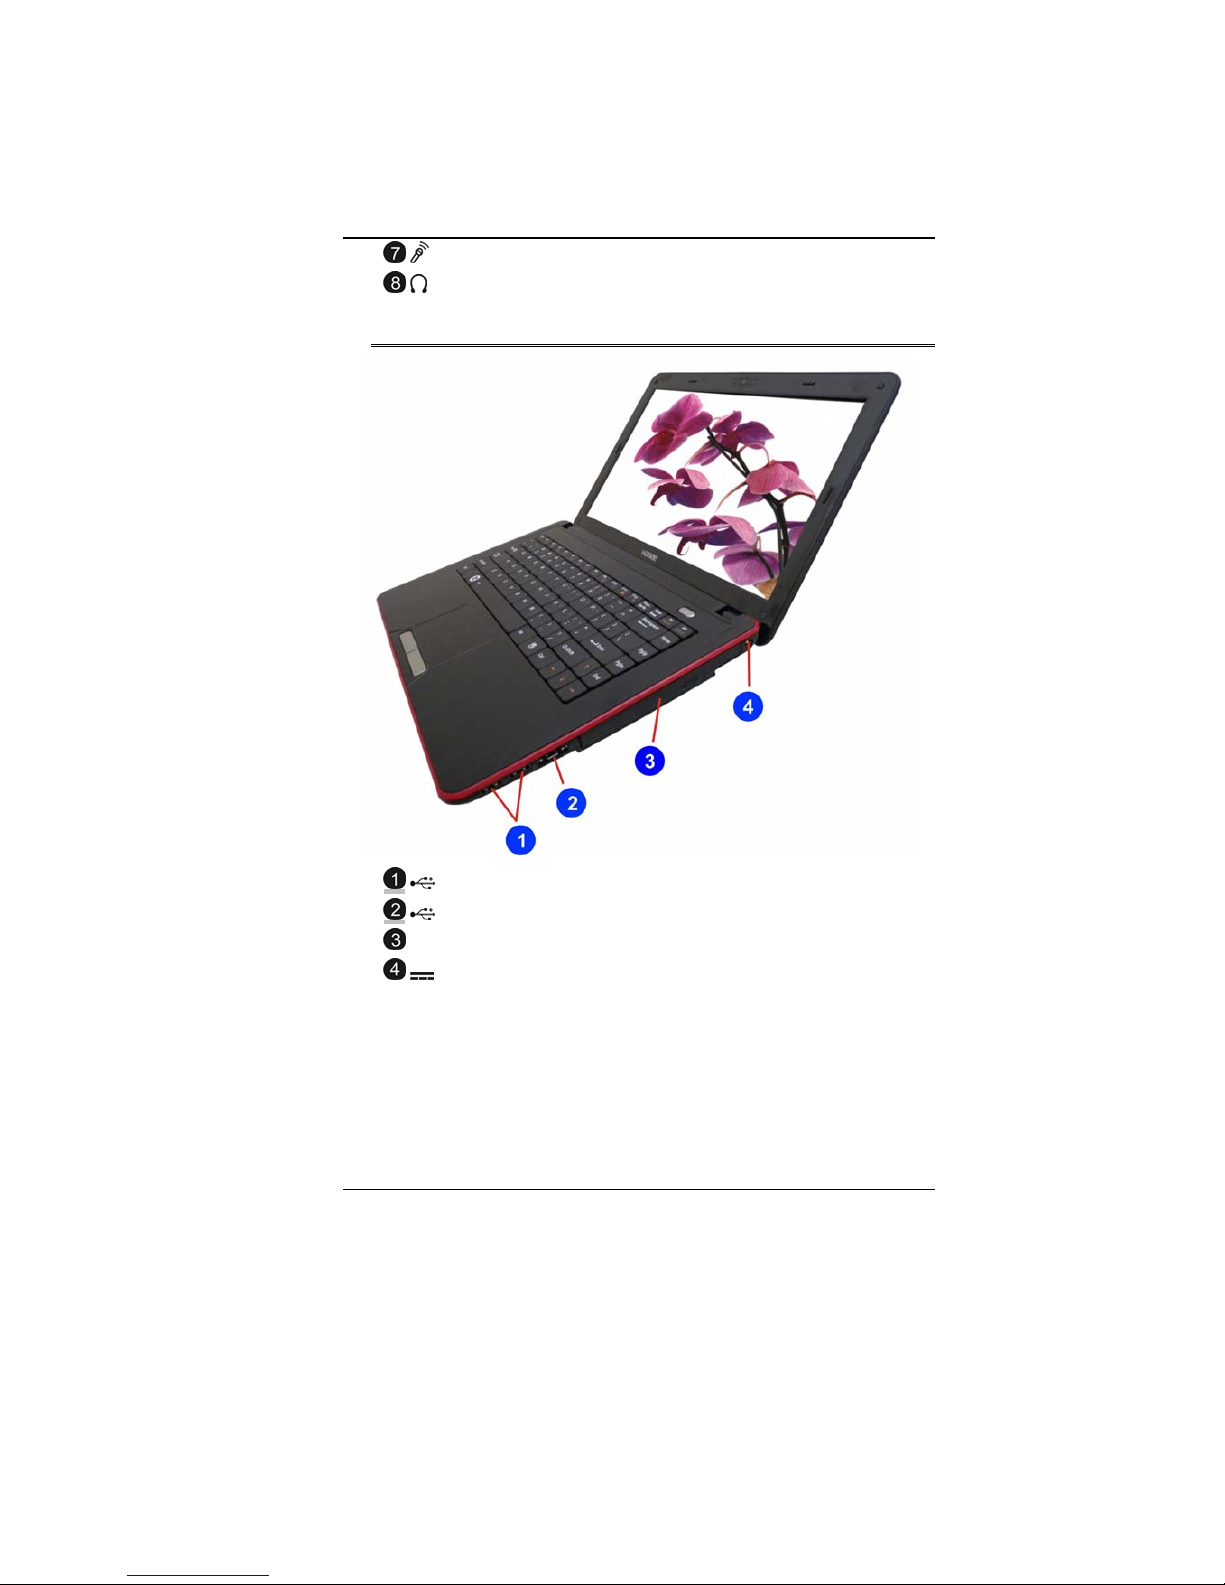
Microphone/Audio Line-in Jack
Stereo Headphone Jack
R
Ri
ig
gh
ht
t
V
Vi
ie
ew
w
USB 2.0 Port
Combo USB (with USB 2.0 and e-SATA)
Optical Drive
DC In
14
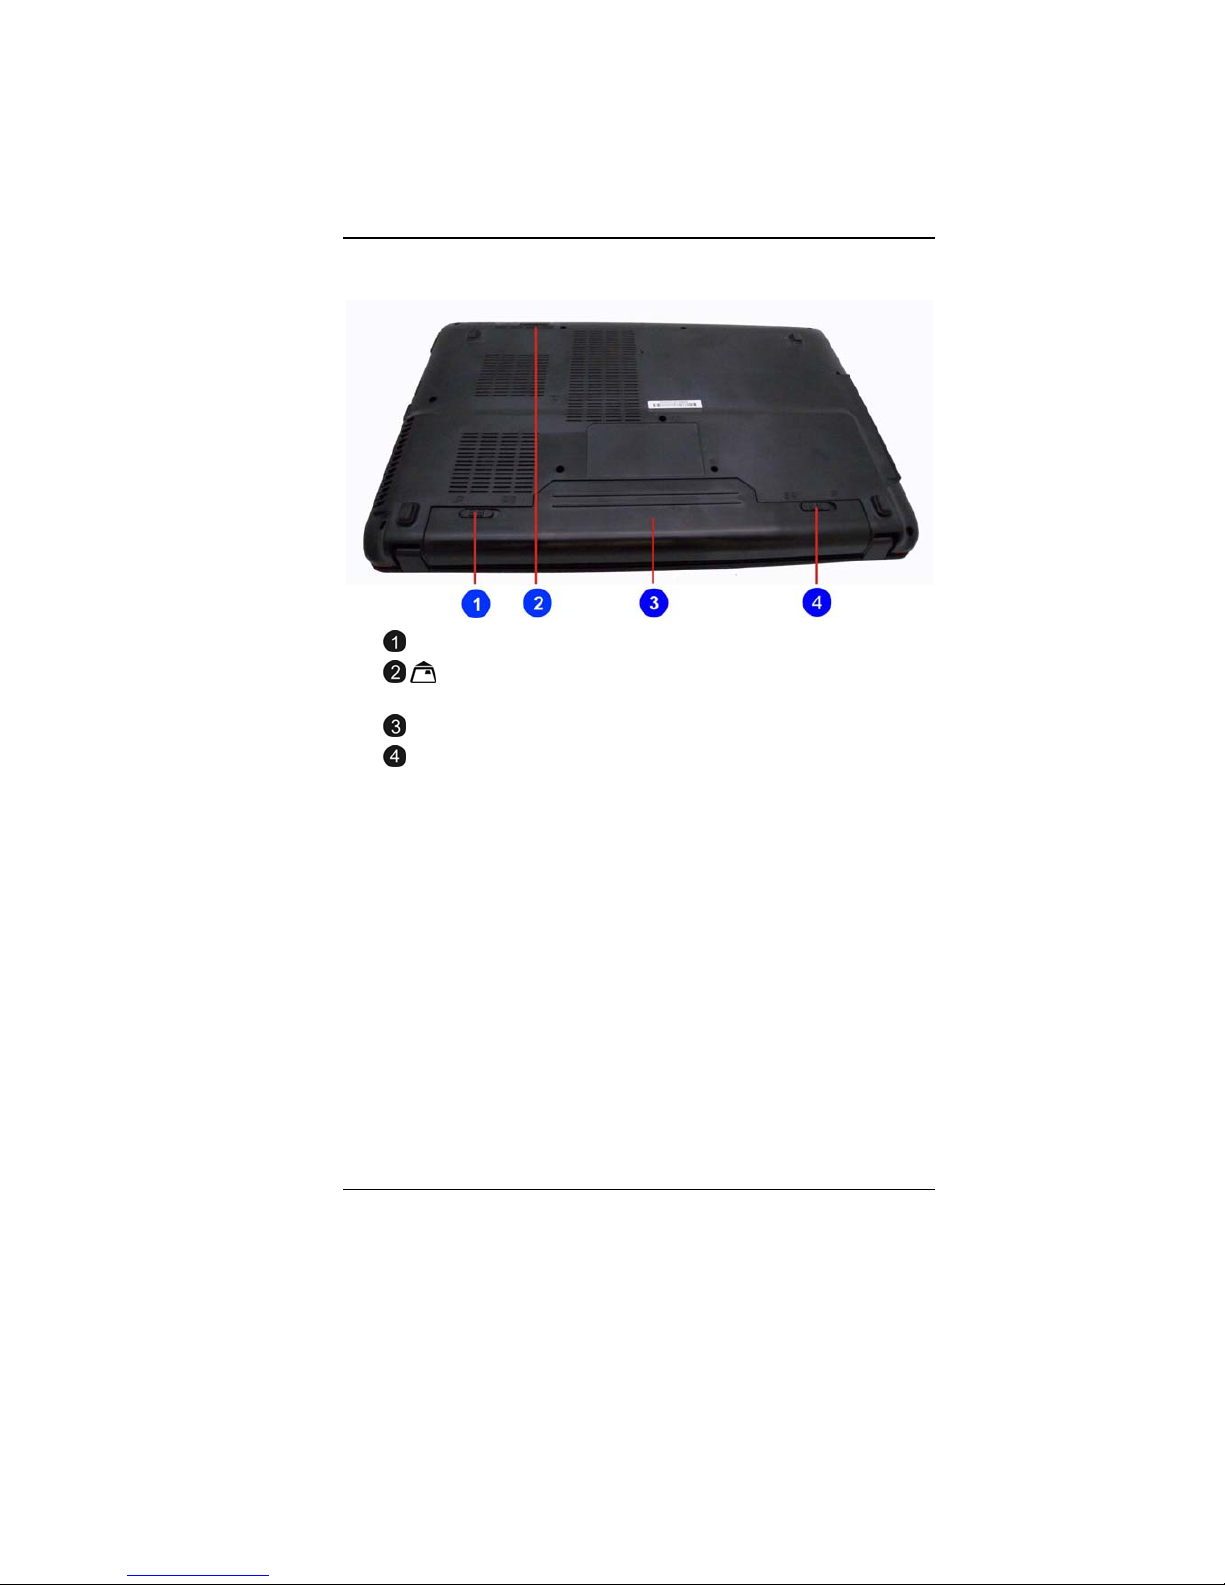
B
Bo
ot
tt
to
om
m
V
Vi
ie
ew
w
Battery Lock
4-in-1 Card Reader (SDHC/MMC/MS/MS pro)
Memory Card)
Battery Compartment
Battery Release Latch

15

16
G
Ge
et
tt
ti
in
ng
g
S
St
ta
ar
rt
te
ed
d
C
Co
on
nn
ne
ec
ct
ti
in
ng
g
t
to
o
a
a
P
Po
ow
we
er
r
S
So
ou
ur
rc
ce
e
C
Co
on
nn
ne
ec
ct
ti
in
ng
g
t
th
he
e
A
AC
C
A
Ad
da
ap
pt
te
er
r
A universal AC adapter is provided to supply your computer with
power and also charge the computer’s battery pack. The adapter’s
AC input voltage can range anywhere from 100 to 240 volts,
covering the standard voltages available in almost every country.
To connect the computer to an external power source:
D
Do
o
n
no
ot
t
u
us
se
e
i
in
nf
fe
er
ri
io
or
r
e
ex
xt
te
en
ns
si
io
on
n
c
co
or
rd
ds
s
a
as
s
t
th
hi
is
s
m
ma
ay
y
r
re
es
su
ul
lt
t
i
in
n
d
da
am
ma
ag
ge
e
t
to
o
y
yo
ou
ur
r
n
no
ot
te
eb
bo
oo
ok
k.
.
T
Th
he
e
Table of contents
Other ECS Laptop manuals

ECS
ECS Notebook computer User manual

ECS
ECS Intel-powered Convertible Classmate PC User manual

ECS
ECS I36IA1 User manual

ECS
ECS GQ Notebook User manual

ECS
ECS TL10IE2 User manual

ECS
ECS TL10IE2 User manual

ECS
ECS ED20PA2 User manual

ECS
ECS R40II User manual

ECS
ECS EG20BAX User manual

ECS
ECS T20IL1 User manual


