Ecube Labs CleanCUBE 2 User manual

CleanCUBE
User Manual V2.10
This user manual is for CleanCUBE 2 manufactured in May 2020 or later.
The product’s serial number consists of 10 alphanumeric characters with the first six
showing the manufacture date.
Example: 201101AA00 (Nov 1, 2020)
Please read through this manual carefully before installing and using the product to prevent
any injury or damage. Copyright © 2020 Ecube Labs Co., Ltd.

CleanCUBE User Manual
2
Legal Notice
Copyright
© 2020 Ecube Labs Co., Ltd. All rights reserved.
Notices
This user manual is provided for informational purposes only. All information included herein
is subject to change without notice. Ecube Labs makes no warranty of any kind with regard
to this user manual, either expressed or implied, except as provided herein, including
without limitation, thereof, warranties as to marketability, merchantability, fitness for a
particular purpose of use or against infringement of any patent. Ecube Labs shall not be
responsible for any direct, incidental, or consequential damages of any nature, or losses or
expenses resulting from the use of this user manual. The contents of this user manual are
subject to change without notice.

CleanCUBE User Manual
3
Table of Contents
1. Introduction 4
2. General Safety Information 5
2.1 Safety Information 5
2.2 Precautionary Safety Information 5
3. Product Information 6
3.1 Product Components 6
3.2 Safety and Protection Features 7
3.3 Product Status Indicator 7
4. Transportation and Selection of Installation Site 8
4.1 Initial Inspection 8
4.2 Transportation 8
4.3 Selection of Installation Site 10
5. Installation and Initial Operational Inspection 11
5.1 Levelling 11
5.2 Connecting the Battery 12
5.3 Turning the Power On 13
5.4 Initial Operational Inspection 14
6. Product Use and Maintenance 14
6.1 Inner Bin Use 15
6.2 Waste Collection 16
6.3 Visual Inspection and Cleaning 16
6.4 Quarterly and Annual Maintenance 17
7.Regulatory Notices 17

CleanCUBE User Manual
4
1. Introduction
Thank you for purchasing our CleanCUBE!
Ecube Labs is a startup committed to develop tech-based solutions to improve efficiency
and sustainability in the waste management industry. Our company is constantly striving to
develop solutions and products that possess innovative designs and features that meet the
requirements of our users all around the world.
CleanCUBE is designed to deliver years of reliable operations. In order to assure
performance and safety for both CleanCUBE and its users, everyone involved in the
installation, operation, and maintenance of CleanCUBE should review the instructions and
warnings in this manual. This user manual provides general safety information, product
information, installation and operation instructions, and troubleshooting.

CleanCUBE User Manual
5
2. General Safety Information
2.1 Safety Information
Please learn the following safety symbols used throughout this manual.
2.2 Precautionary Safety Information
To ensure user safety when using the product, you must follow the following safety rules:
• Consult Ecube Labs before making any modifications to CleanCUBE or its operating environment.
Sudden or careless modifications could result in death or serious injury and in malfunction or
operational failure of CleanCUBE.
• Never perform any service on CleanCUBE until both electrical and mechanical power have been shut
off so that they cannot be restored without the consent and knowledge of the person who turned
the power off. Do not perform any service without professional knowledge.
• When performing any type of service on this product, follow the appropriate instructions listed in this
manual and utilize the required tools and hardware.
Symbol Explanation
Indicates a detail regarding operations or an additional explanation/instruction.
Reading these is highly recommended
Indicates a detail regarding operations that may lead to injury or damage if not
performed correctly. Pay close attention to these cautions.
Indicates a detail regarding operations that may lead to injury or death if not
performed correctly. Always pay strict attention to these warnings.

CleanCUBE User Manual
6
3. Product Information
CleanCUBE is a solar-powered waste bin that uses an automatic on-site compactor to
increase its waste capacity by up to 500%. By utilizing intelligent sensors, CleanCUBE
monitors waste fill-level and operational status and provides this information to the user
through CleanCityNetworks (CCN).
3.1 Product Components
Please check the key components of the product by referring to figure 1 below. The
appearance and additional installed parts may differ according to the different product
options.
1. Front door 7. Mainboard 13. Communication antenna
2. Front door lock 8. Power and manual operation button 14. GPS module
3. Aperture and chute 9. Aperture safety sensor 15. Inner bin or wheelie bin
4. Top cover 10. Smoke detector sensor 16. Inner bin holder
5. Top cover lock 11. Fill-level measuring sensor 17. Compaction module
6. Status indicator light 12. Door sensor 18. Product serial number

CleanCUBE User Manual
7
3.2 Safety and Protection Features
CleanCUBE is designed with several safety features to protect the user and service personnel
while using the product. These safety features are:
• Safety sensors on both sides of the aperture: these sensors detect objects or hands passing
through the bin’s aperture and immediately halt the compaction to prevent injury.
• Smoke detection sensor: this sensor detects smoke inside the product. When in action, a compaction
is automatically performed to suppress the fire and a notification is sent out via CCN.
• Door sensor: this sensor detects whether the front door is open or closed. To prevent injury, the
compaction is stopped immediately if the door is opened during a compaction cycle. If it detects that
the door is open for longer than a set time, the compactor retracts to its original position.
• Door and top cover locking device: there are locking devices on the door and top cover, which only
authorized personnel can access. We provide a locking device with a key or bolt depending on the
product.
• GPS module: The GPS module can track the location of the unit and provide the unit’s GPS
coordinates with a certain degree of precision. The user can then identify the unit’s location through
CCN.
3.3 Product Status Indicator
The indicator shows the product’s approximate fill-level and operational status.
The indicator light reflects the fill-level measured right after a compaction.
Depending on the type of waste and how it rebounds upward after being
compressed, there may be a discrepancy between the visual fill-level and the fill-
level indicated by the flashing light.
Indicator Light Fill-level (slow flashing) Operational status
(fast flashing)
Green Low fill-level Communicating
Orange Medium fill-level Door open
Red High fill-level Smoke detected
3 alternating colors Compacting

CleanCUBE User Manual
8
4. Transportation and Selection of Installation Site
4.1 Initial Inspection
Upon receiving your CleanCUBE, perform a visual inspection of the packaging before
accepting the delivery from the shipping company. If the packaging appears to be damaged
or in poor condition, unpack the unit and inspect it for possible damages in front of a
representative from the shipping company.
If there is any visible damage, mark “damaged” on the freight receipt and save an image or
a video of the damage. After inspecting the unit, check to see if all parts and components
have been delivered with the unit.
4.2 Transportation
You can use a forklift (if the unit is on a pallet) or a hand truck to move the CleanCUBE to
its required installation location. If the CleanCUBE is delivered on a pallet, use a forklift to
move it to the installation location. When using a forklift, make sure to adjust the forks so
that they are as wide as possible while on the pallet. To ensure the safety of the unit during
delivery, refer to the following directions:
The product must be carried by at least 2 people. Due to the nature of the
product – center of mass is relatively high – a small tilt can lead to a tipping-over
incident. Please pay close attention.

CleanCUBE User Manual
9
• Ensure that the forks are placed fully through the pallet before lifting.
• After lifting the unit, do not make any sudden movements that may cause the unit to fall off the
forklift.
• After transporting the unit to the designated location, gradually lower the unit to the ground.
If the CleanCUBE is not on a pallet, it is recommended to transport the unit using a hand
truck. Given the weight of the CleanCUBE, make sure that only hand trucks with load
capacities of at least 330 kilograms (or 728 lbs) and equipped with safety straps are used in
the transportation of the unit. To ensure the safety of the unit during delivery, refer to the
following directions:
• If the original protective shell has been removed from the unit, cover the unit with protective padding
or material before transporting it. This will prevent any scratches or other physical damages that may
occur while transporting the unit.
• Make sure that the load plate of the hand truck is entirely placed under the base of the unit before
lifting.
• Place the hand truck’s safety straps around the circumference of the unit. The straps should be
around the bin aperture.
• Tighten the safety straps until the unit is properly secured onto the hand truck.
• Use wheel chocks to prevent accidental movements of the hand truck.
• After transporting the unit to the designated location, gradually lower the unit to the ground.

CleanCUBE User Manual
10
4.3 Selection of Installation Site
To facilitate installation and minimize installation time, we recommended selecting a site for
the unit before its installation. When selecting a site, consider the following factors for the
unit’s optimal performance:
• Select an open site such that sunlight can hit directly above the unit. There should be no obstructions
that would prevent the unit from receiving sunlight.
• The unit should be installed on solid ground such as concrete, cement, wood, etc.
• Adjust the unit’s adjustable feet so that the unit is perpendicular to the ground.
• The front of the unit should have adequate space of at least one meter so that both waste collection
and unit maintenance can be performed.
• Do not select an indoor installation site unless the unit is a hybrid or AC model.
• The battery may discharge and die if the product does not receive adequate sunlight.

CleanCUBE User Manual
11
5. Installation and Initial Operational Inspection
5.1 Levelling
CleanCUBE has four adjustable feet that can be used to level itself on slightly uneven or
sloped installation sites. After installation, if the unit is tilted or slightly leaning to one side,
use the adjustable feet to stabilize the unit in an upright position.
A minimum of two people is required to perform this procedure.
Perform the following to adjust the adjustable feet of the unit.
* (1) Adjustable feet
1. Determine which of the four adjustable feet requires adjustment.
2. To adjust the adjustable feet located on the front/back half of the unit, have one person tilt the unit
towards the front/back and have another person support this tilted position.
3. Turn the adjustable feet clockwise or counter-clockwise to level the unit.
4. Gradually lower the tilted unit to the ground.

CleanCUBE User Manual
12
Using excessive force to tilt the unit may make it difficult to support the tilted
position and cause it to tip over.
Failure to level the CleanCUBE may result in an unstable unit, which may
potentially lead the unit to tip over and cause injury or damage.
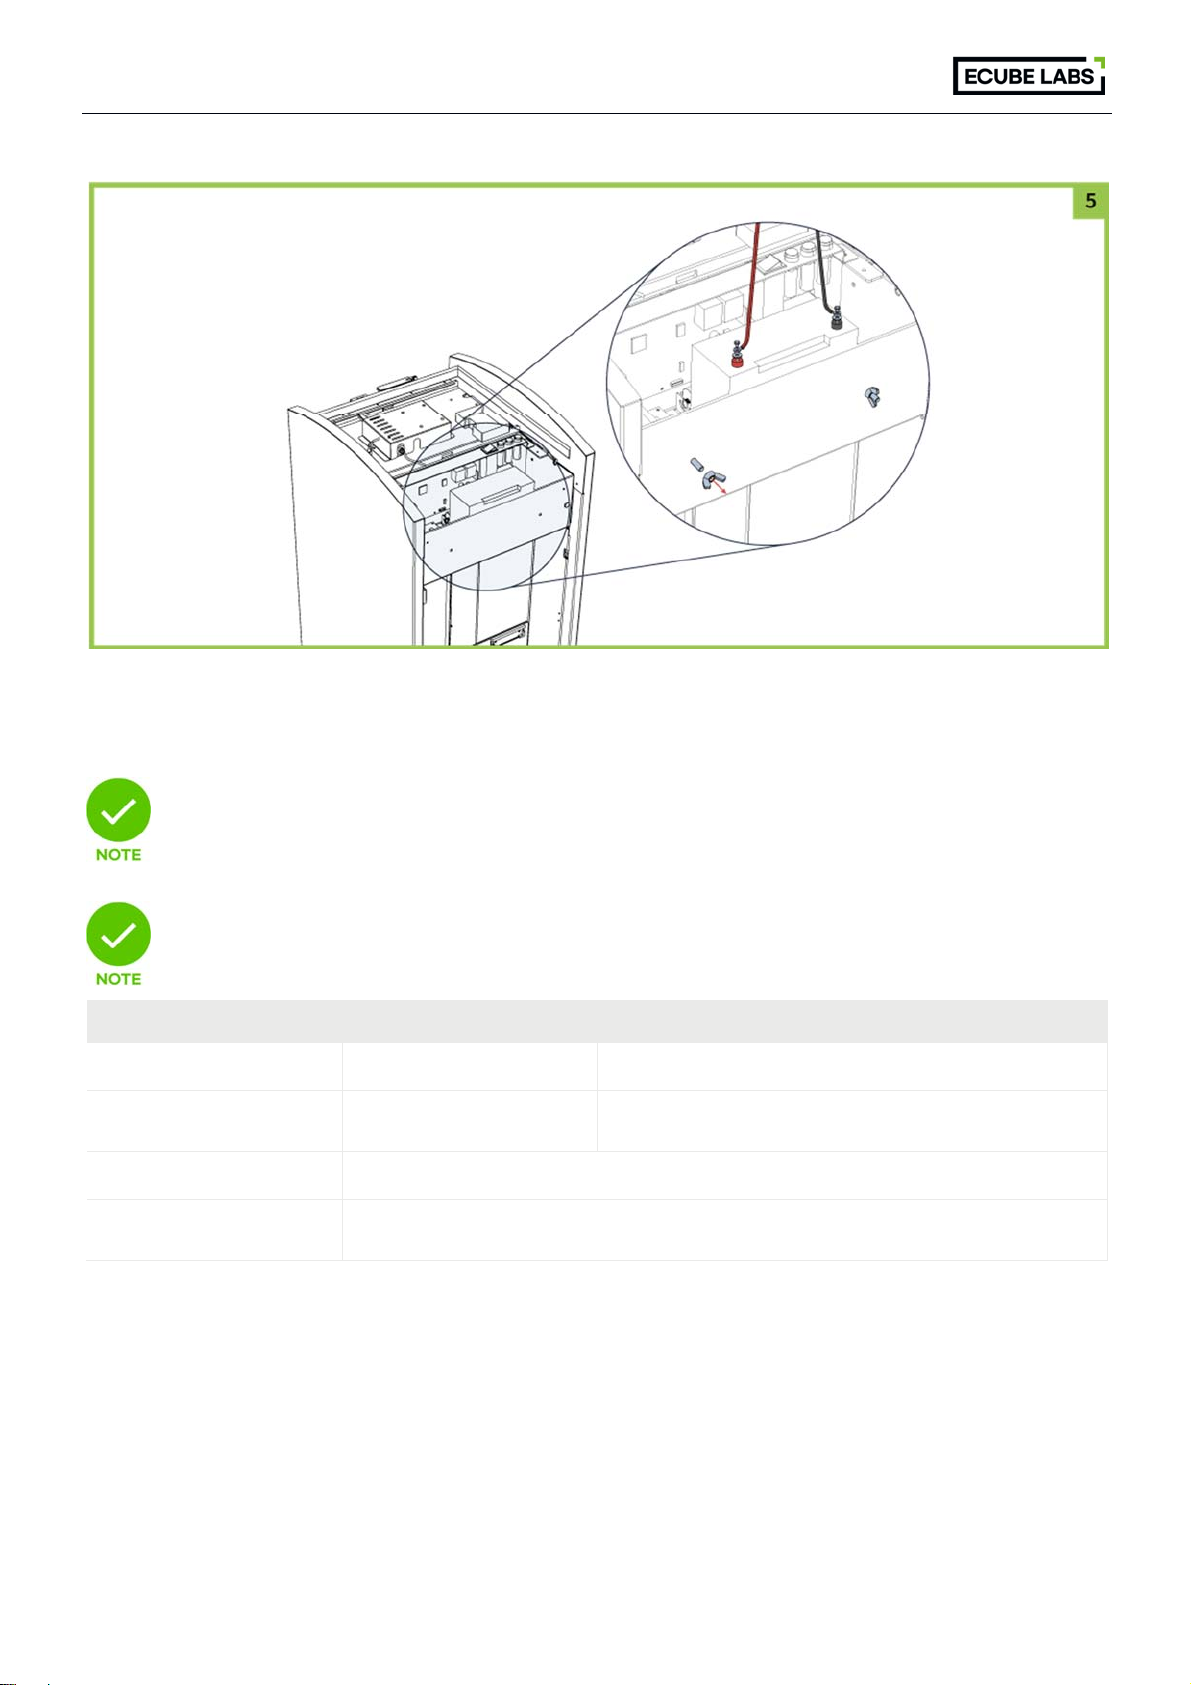
5.2 Connecting the Battery
The CleanCUBE is typically shipped with its battery installed and connected. In certain
exceptions, it is shipped with the battery disconnected. If so, you will need to connect the
battery terminals to turn the power on:
1. Use your key to unlock and open the front door of the unit.
2. Open the top cover.
3. Once you have visually confirmed that the battery is disconnected, loosen the bolts on the battery’s
terminals.
4. Connect the positive (red) cable to the positive (red) battery terminal and the negative (black) cable to
the negative (black) terminal. Tighten the bolts to fix the cables.
If you mix up the positive and negative cables when connecting the battery
terminals, the product may be damaged. Please also make sure that there is no
water on the battery and on your hand before performing this task.
5. Use the power switch and check that the product’s power comes on.
6. Close the top cover and front door.
CleanCUBE User Manual
13
After receiving the product, please make sure to charge the battery (via solar or
AC). Long-term storage of the product without use may discharge and kill the
battery. If necessary, please contact the manufacturer for assistance.
When it is time to replace the battery, get assistance from the manufacturer.
Inappropriate battery use may affect the product’s performance.
Product Capacity 100L 120L 240L
Battery Capacity 18Ah or more 35Ah ore more
Maximum Battery Size
(W x L x H)
120 x 350 x160 mm 135 x 400 x 160 mm
Battery Type Sealed lead-acid deep cycle battery 12V
Maximum Size of the
Terminal Socket 6 mm
5.3 Turning the Power On

CleanCUBE User Manual
14
After installing the battery please follow the instructions below to turn on the product.
1. Open the front door and then open the top cover.
2. Locate the ON/OFF switch and turn the unit ON.
3. Wait 1~2 minutes for the status indicator light to turn on (system is booting).
4. When the status indicator light flashes green quickly, wait another 1~2 minutes (communicating).
5. After communication is complete, the status indicator light will change to a slow flash. The color will
reflect the fill-level status.
5.4 Initial Operational Inspection
After turning the product on, check that the product is operating properly. Please follow the
instructions below and perform the following operations:
1. Open the front door and check that the status indicator light shows “door open”.
2. Close the front door and check that the indicator shows the appropriate fill-level.
The product measures the fill-level after the front door is opened and closed. It
shows different colors on the indicator according to the measured fill-level.
Follow the instructions below to perform a manual compaction:
1. Open the front door and then open the top cover.
2. Press the Down (green) button. This triggers the compactor to move down. The compactor
automatically stops once it is fully extended.
3. Press the Up (blue) button. This triggers the compactor to move up. The compactor automatically
stops once it returns to its original resting position.
4. Once the compactor is in its original resting position, press the Down (green) button again to trigger
the compactor to move down.
5. Instead of letting the compactor stop automatically, press the Stop (red) button when the compactor
is halfway down.
6. Press the Up (blue) button to move the compactor back up to its original resting position.
7. Close the top cover and front door.
Release the Up or Down buttons after pressing it. Do not hold the buttons down
for an extended period of time.
6. Product Use and Maintenance

CleanCUBE User Manual
15
6.1 Inner Bin Use
The inner bin must be placed inside the CleanCUBE and the bag must fit appropriately for
the product to operate normally and measure the bin’s fill-level accurately.
If you are using an inner bin (wheelie bin) that was not provided by the manufacturer,
obtain the manufacturer’s assistance when placing the inner bin inside the CleanCUBE.
Inappropriate inner bin use may affect the unit’s performance and even damage
the product.
The trash bag must be pushed out to all four sides. If the trash bag is crumpled
toward the center, the fill-level information may not be accurate. Please push in the inner
bin (including a wheelie bin) so that the handle points toward the front.

CleanCUBE User Manual
16
6.2 Waste Collection
Please follow the instructions below to collect waste from the product:
1. Use your key to unlock and open the front door (be sure that the unit is not performing a compaction
when opening the door).
2. Pull out the product’s inner bin (or wheelie bin) and empty it.
The waste bin (inner bin) containing compacted waste may be 3~6 times heavier
than non-compacted waste. Please be cautious of injuries if collections are
performed manually and without machineries.
3. After collection, push the inner bin inside the unit it reaches to the edge.
The inner bin must be positioned in the designated location and if there is an
object obstructing this, it must be removed. If the inner bin is not in the
appropriate location, frictions and shocks might happen during compaction and might
severely damage the product.
4. Close the front door completely and check that the door is properly closed through the status
indicator light.
6.3 Visual Inspection and Cleaning
We recommend performing a visual inspection to check the product’s status and clean the
product regularly. Please refer to the instructions below:
• Remove dust or objects from the top cover for efficient solar charging.
• Check that the fill-level measuring sensor and aperture safety sensor are not blocked by waste or
foreign objects. Remove if found.
• Check that there is no waste or any object near the compaction module that may obstruct
compaction. Remove if necessary.
• Use water-based detergent or organic solvents to clean the product exterior. Do not use ammonia-
containing detergent or solvent. It can damage the product’s polycarbonate cover and coated
ironware.
• When cleaning the polycarbonate cover for protecting the solar panel, use a soft cloth or sponge to
minimize scratches or abrasion.
• When cleaning the product interior, spray water downwards, away from the product’s electronics.

CleanCUBE User Manual
17
If you clean the product interior with high water pressure, the water may reach
the product’s electronics and cause a malfunction.
6.4 Quarterly and Annual Maintenance
After installing CleanCUBE, quarterly maintenance checks are recommended. Here is a
checklist:
1. Check that the locking device on the front door is operating appropriately.
2. Check the levelling of the unit and change the adjustable feet as necessary.
3. Check the polycarbonate top cover for any scratches, fractures, or damages.
4. Check that there are no obstructions to the solar panel.
5. Perform a manual compaction to confirm that the unit is operating properly.
6. Check the product’s status through remote inspection with the manufacturer’s assistance.
7.Regulatory Notices
This equipment has been tested and found to comply with the limits for a class B digital
device, pursuant to Part 15 of the FCC Rules. These limits are designed to provide
reasonable protection against harmful interference in a residential installation.
This equipment generates uses and can radiate radio frequency energy and, if not installed
and used in accordance with the instructions, may cause harmful interference to radio
communications. However, there is no guarantee that interference will not occur in a
particular installation. If this equipment does cause harmful interference or television
reception, which can be determined by turning the equipment off and on, the user is
encouraged to try to correct the interference by one or more of the following measures:
• Reorient or relocate the receiving antenna.
• Increase the separation between the equipment
and receiver.
• Connect the equipment into an outlet on a circuit diff erent from that to which the
receiver is connected.

CleanCUBE User Manual
18
• Consult the dealer or an experienced radio/TV technician for help.
Part15.21 statement
Changes or modifications not expressly approved by the manufacturer (or party responsible)
for compliance could void the userʼs authority to operate the equipment
This device complies with Industry Canada license-exempt RSS standard(s).
Operation is subject to the following two conditions:
(1)this device may not cause interference,
and (2) this device must accept any interference, including interference that may cause
undesired operation of the device.
Le présent appareil est conforme aux CNR d'Industrie Canada applicables aux appareils
radio exempts de licence.
L'exploitation est autorisée aux deux conditions suivantes :
(1)l'appareil ne doit pas produire de brouillage, et (2) l'utilisateur de l'appareil doit accepter
tout brouillage radioélectrique subi, même si le brouillage est susceptible d'en
compromettre le fonctionnement.
The antenna should be installed and operated with minimum distance of 20 cm between the
radiator and your body.
L'antenne doit etre installee et exploitee a une distance minimale de 20 cm entre le
radiateur et votre corps.
Table of contents


