Edbak WUSC-PWM500 User manual

WUSC-PWM500
08.08.2022 PWM500 PL-EN 1.0
1
INSTRUCTION MANUAL
INSTRUKCJA MONTAŻU
WUSC-PWM500
Stały chwyt ścienny z regulacją poziomu
Level-adjustable fixed wall bracket

WUSC-PWM500
08.08.2022 PWM500 PL-EN 1.0
2
INSTRUCTION MANUAL
INSTRUKCJA MONTAŻU
Ostrzeżenie
Przed rozpoczęciem montażu należy uważnie zapoznać się z instrukcją obsługi w celu
zapewnienia prawidłowego montażu. Prace montażowe powinny wykonywać co
najmniej dwie osoby posiadające kwalifikacje w zakresie montażu zgodnie z niniejszą
instrukcją. Firma EDBAK nie bierze odpowiedzialności za straty materialne oraz
uszkodzenia mienia lub ciała, wynikające z nieprawidłowego montażu. Dlatego należy
zawsze przestrzegać:
-w trakcie montażu dokładnie przestrzegać załączonej do produktu instrukcji
montażowej, w przeciwnym razie może to prowadzić do zniszczenia sprzętu, a
nawet uszkodzeń ciała,
-koniecznie przed montażem upewnić się, że pod powierzchnią, na której będzie
mocowane urządzenie nie ma kabli elektrycznych, rur wodnokanalizacyjnych lub
instalacji gazowych,
-w miejscach wskazanych w instrukcji, w których są ruchome elementy uchwytu
zachować szczególną ostrożność w celu uniknięcia przyciśnięcia, dłoni i palców.
Niniejszy sprzęt może być użytkowany przez dzieci w wieku co najmniej 8 lat i przez
osoby o obniżonych możliwościach fizycznych, umysłowych i osoby o braku
doświadczenia i znajomości sprzętu, jeżeli zapewniony zostaje nadzór lub instruktaż
odnośnie do użytkowania sprzętu w bezpieczny sposób, tak aby związane z tym
zagrożenia były zrozumiałe. Dzieci nie powinny bawić się sprzętem. Dzieci bez nadzoru
nie powinny wykonywać czyszczenia i konserwacji sprzętu.
Warning Please read this manual before starting the installation to ensure
correct assembly. The assembly should be carried out in accordance with this manual
by at least two fully qualified people. The EDBAK Company shall not be liable for any
injuries or damage to material or property caused by incorrect assembly. Hence please
ensure that:
-during the assembly all the instructions are followed carefully. Failure to do so may
result in damage to the product or property, or even personal injury;
-before assembly you must ensure that there are no power cables, or water, sewage
or gas pipes in the area of the ceiling where the mount is to be fixed;
-extra caution should be taken with movable parts in order to avoid crushing or
pinching your hands or fingers. The movable parts are identified in this manual.
This equipment may be used by children aged 8 years and over and by persons with
reduced physical and mental capabilities and lack of experience and knowledge of
the equipment if supervision or instruction is provided on how to use the equipment
in a safe way so that the associated risks are understood. Children should not play
with the equipment. Children without supervision should not perform cleaning and
maintenance of the equipment.

WUSC-PWM500
08.08.2022 PWM500 PL-EN 1.0
3
INSTRUCTION MANUAL
INSTRUKCJA MONTAŻU
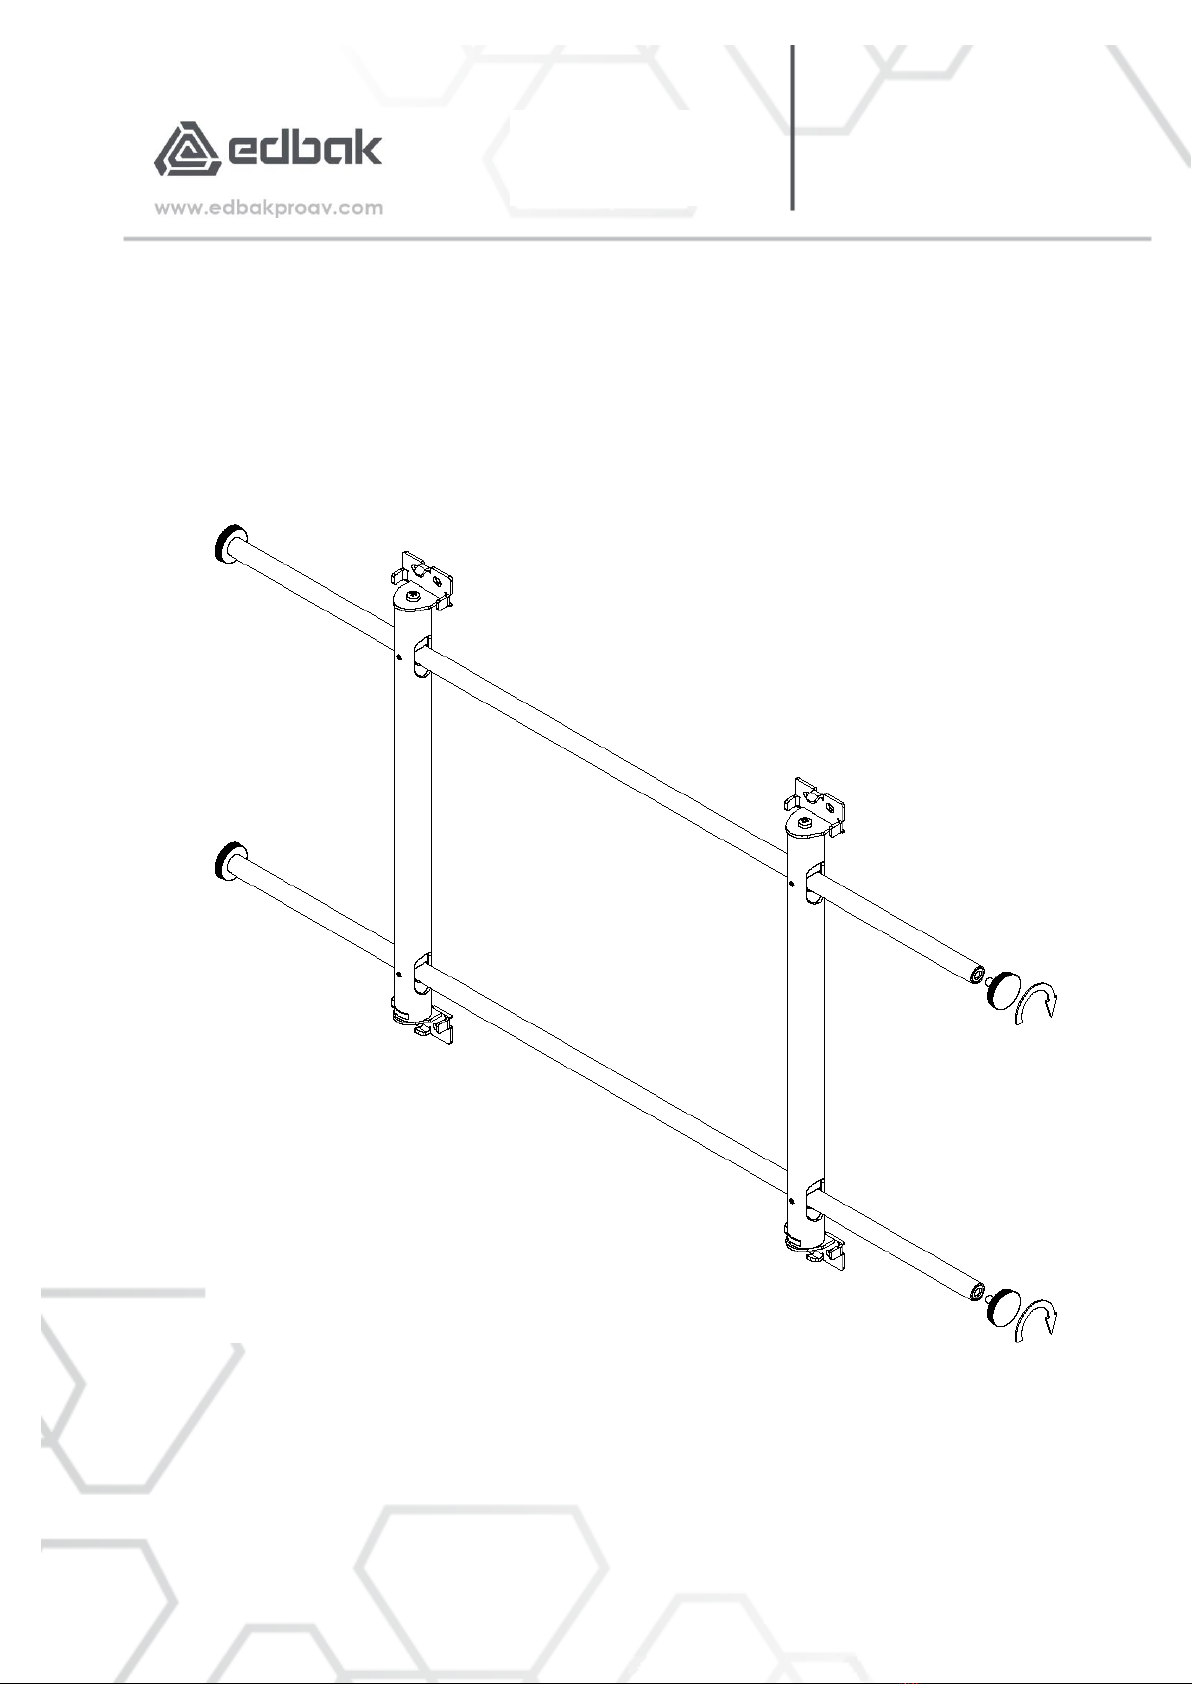
BUDOWA UCHWYTU/ EQUIPMENT STRUCTURE
WUSC-PWM500
08.08.2022 PWM500 PL-EN 1.0
4
INSTRUCTION MANUAL
INSTRUKCJA MONTAŻU
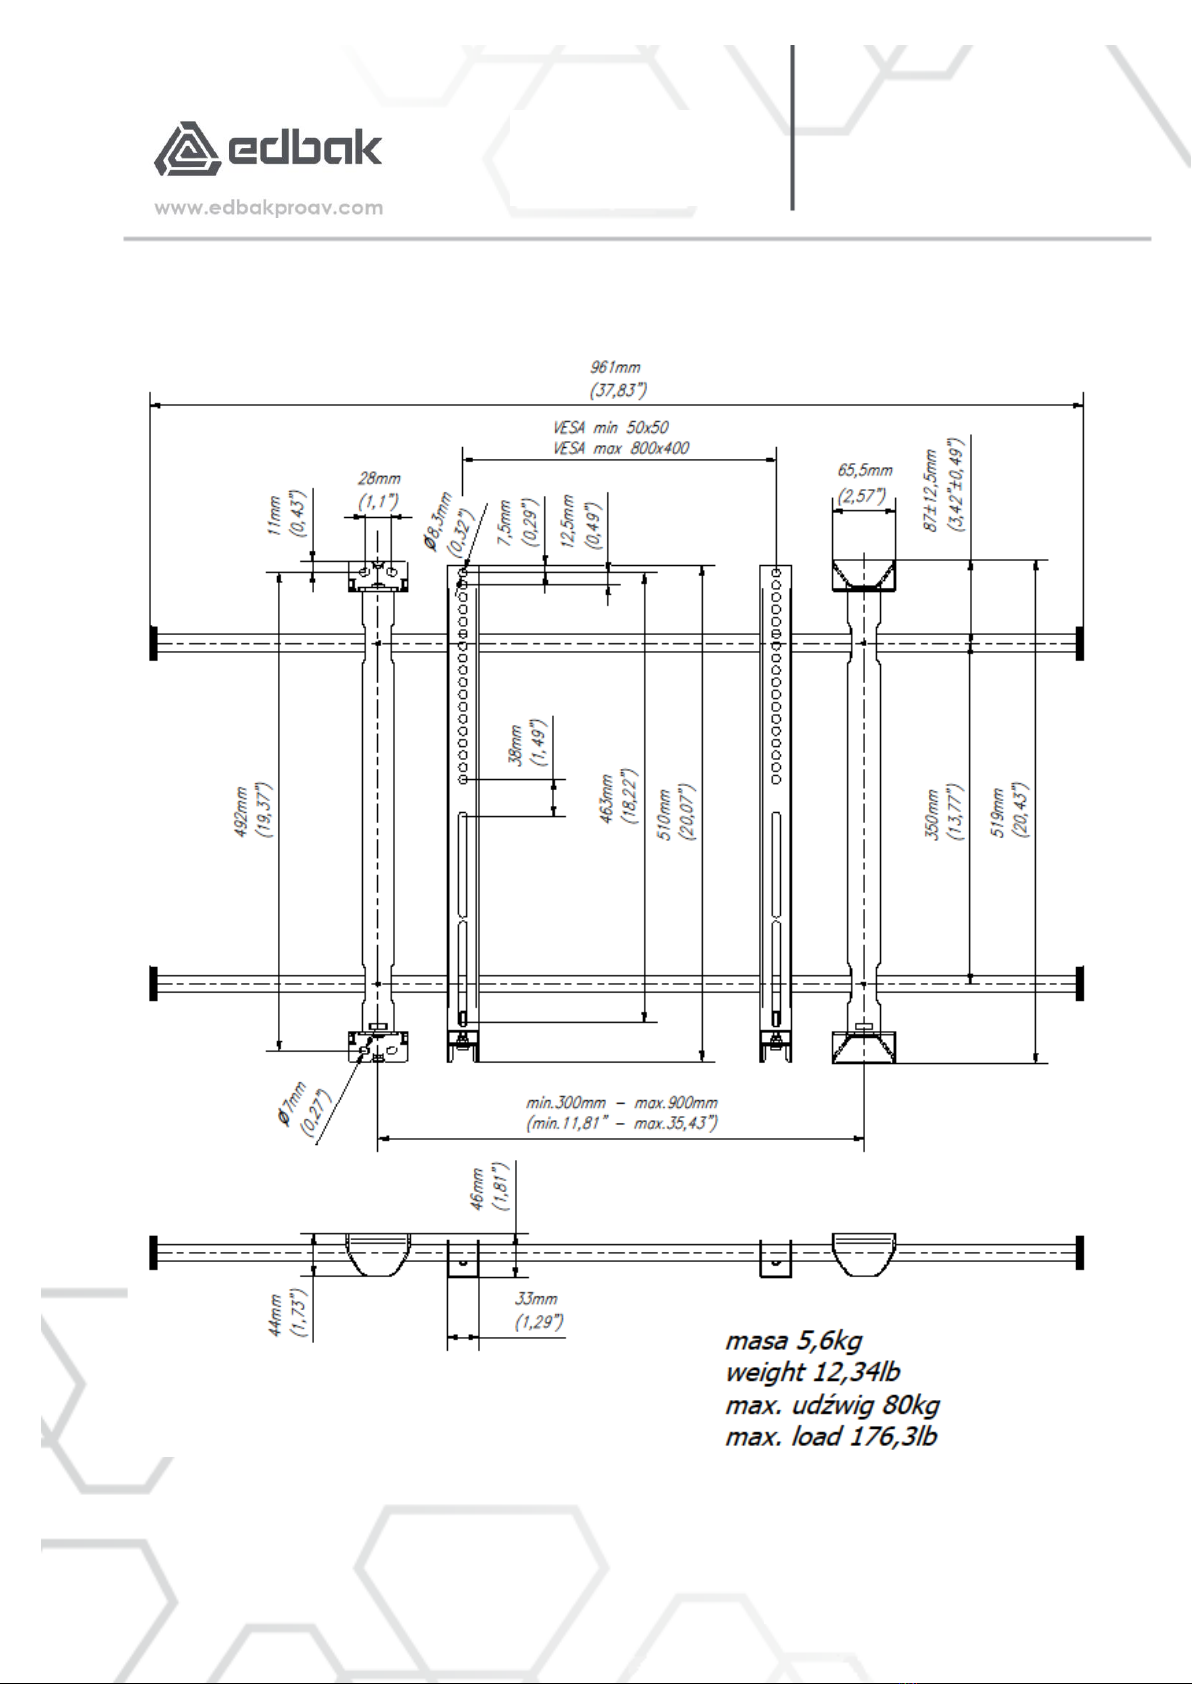
WYMIARY UCHWYTU/ EQUIPMENT DIMENSIONS
WUSC-PWM500
08.08.2022 PWM500 PL-EN 1.0
5
INSTRUCTION MANUAL
INSTRUKCJA MONTAŻU
INSTRUKCJA OBSŁUGI/ INSTRUCTION MANUAL
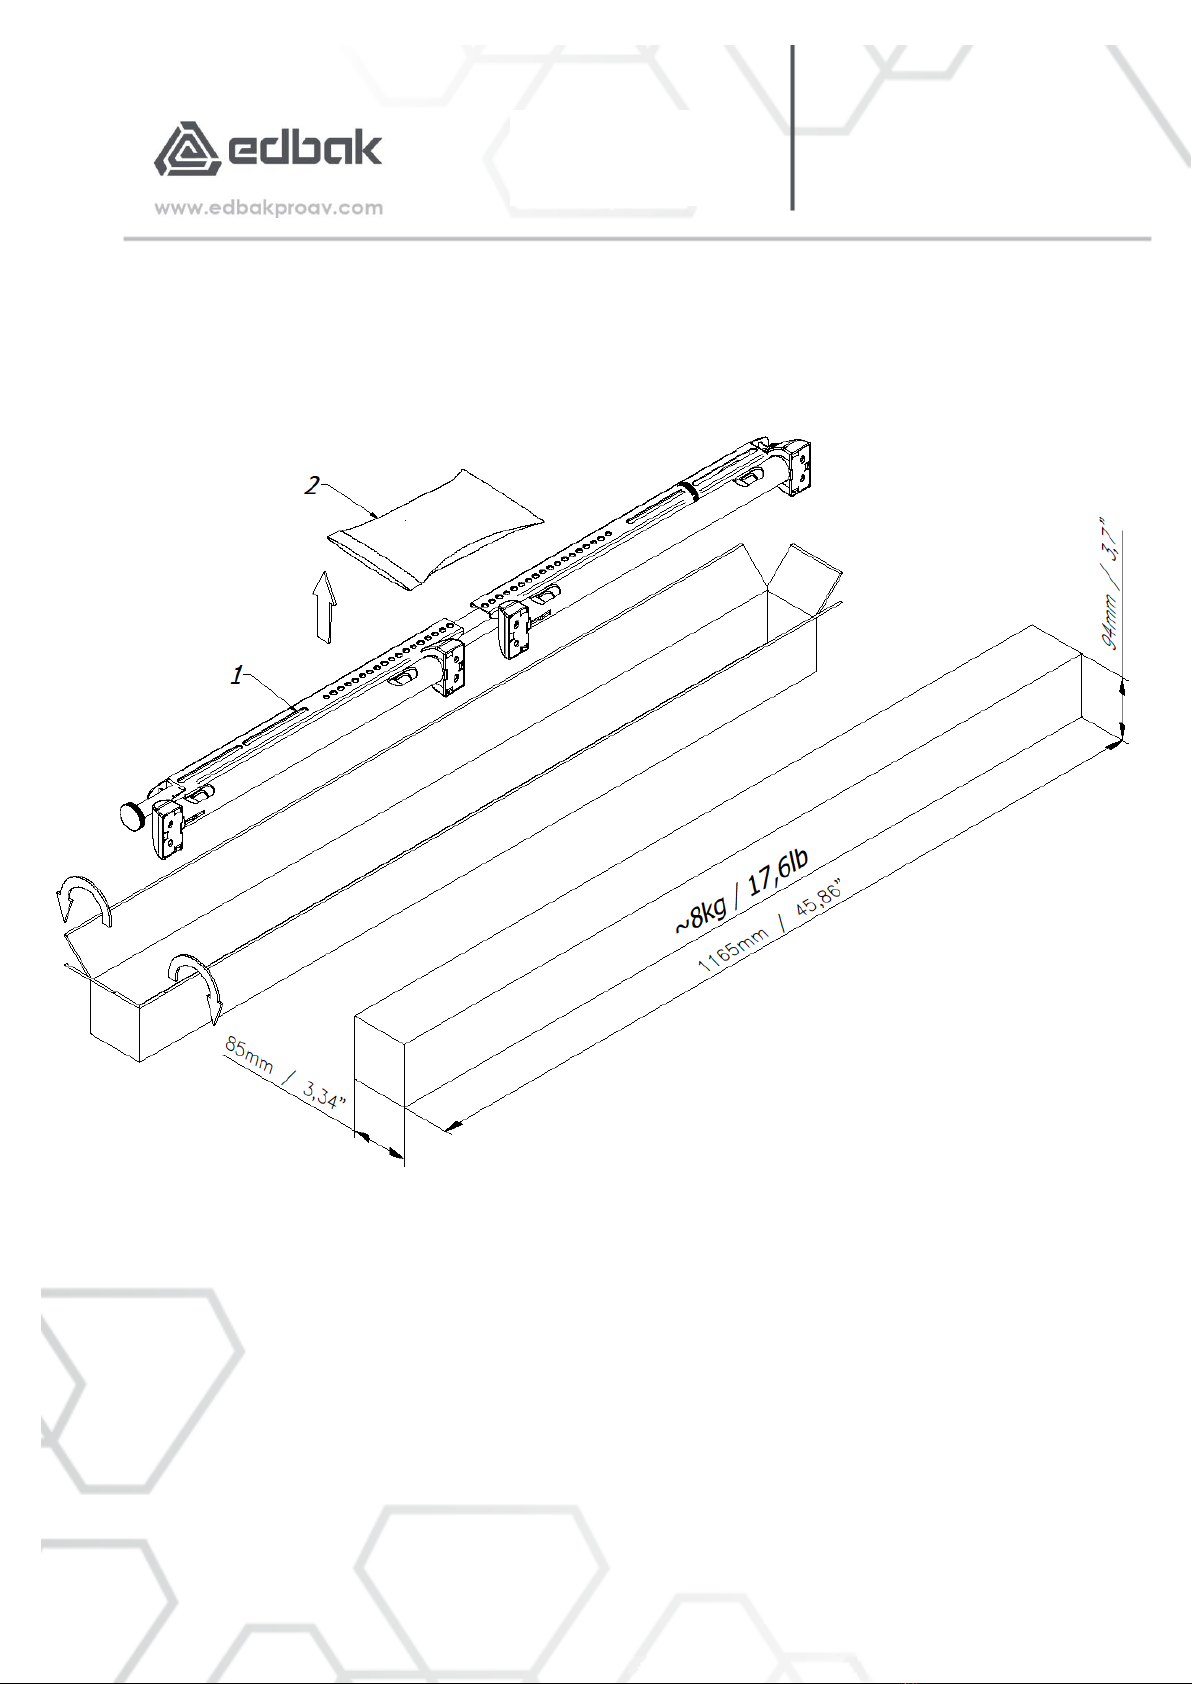
1. ROZPAKOWANIE/ UNBOXING
Po dostawie, należy sprawdzić zawartość opakowania:
oczy dostarczony uchwyt dotarł w stanie nieuszkodzonym, czy nie zawiera widocznych wgnieceń
ani zadrapań.
oczy dostarczone są: Elementy uchwytu (1) oraz woreczek z osprzętem montażowym (2).
After delivery, check the contents of the package:
omake sure that the delivered bracket is undamaged and that there are no visible dents or
scratches.
owhether the following are provided: Elements of the bracket (1) and bag with mounting
accessories (2).

WUSC-PWM500
08.08.2022 PWM500 PL-EN 1.0
6
INSTRUCTION MANUAL
INSTRUKCJA MONTAŻU
2. DEMONTAŻ ZAŚLEPEK / REMOVAL OF PLUGS
Pierwszym krokiem przy montażu uchwytu jest zdjęcie zaślepek maskujących ze wsporników
teleskopowych. Zaślepki wystarczy mocniej pociągnąć i zsunąć z zaczepów.
The first step in installing the monitor mount is to remove the masking plugs from the telescopic
brackets. Simply pull the plugs harder and slide them off the attachment pins.

WUSC-PWM500
08.08.2022 PWM500 PL-EN 1.0
7
INSTRUCTION MANUAL
INSTRUKCJA MONTAŻU
3. ROZMIESZCZENIE PUNKTÓW KOTWIĄCYCH / ARRANGEMENT OF ANCHORING POINTS
Pozbawione zaślepek wsporniki teleskopowe
przyłożyć do ściany i odznaczyć miejsca na otwory
kotwiące.
Put the telescopic supports without plugs on the
wall and mark the places for anchoring holes.
1. Zwrócić uwagę, aby rozstaw osi
wsporników teleskopowych
zawierał się w zakresie 300 –
900mm. PRODUCENT ZALECA, ABY
ROZSTAW OSI WSPORNIKÓW
TELESKOPOWYCH WYLICZAĆ NA
PODSTAWIE WZORU:
VESA monitora ±100mm
2. Miejsce na ścianie, gdzie uchwyt
będzie przykotwiony, powinno
charakteryzować się odpowiednią
sztywnością i wytrzymałością.
Uchwyt może być montowany do
ścian wykonanych z litego betonu,
cegły, belitu, karton-gipsu o
grubości 2x12,5mm i drewna.
3. W miejscu, gdzie uchwyt będzie
zamontowany nie powinny
znajdować się trasy kablowe, lub
rury hydrauliczne
1. Make sure that the axis distance of
the telescopic supports is in the
range of 300 - 900mm.
THE MANUFACTURER
RECOMMENDS TO CALCULATE THE
AXIS SPACING OF THE TELESCOPIC
SUPPORTS ON THE BASIS OF THE
FORMULA:
VESA of the monitor ±3,93”
2. The place on the wall, where the
monitor bracket will be attached,
should be of adequate stiffness and
strength. The monitor bracket can be
mounted on walls made of solid
concrete, brick, belite, 2x12.5 mm thick
plasterboard and wood.
3. There should be no cable trays or
hydraulic pipes in the place where the
bracket is to be installed
WUSC-PWM500
08.08.2022 PWM500 PL-EN 1.0
8
INSTRUCTION MANUAL
INSTRUKCJA MONTAŻU
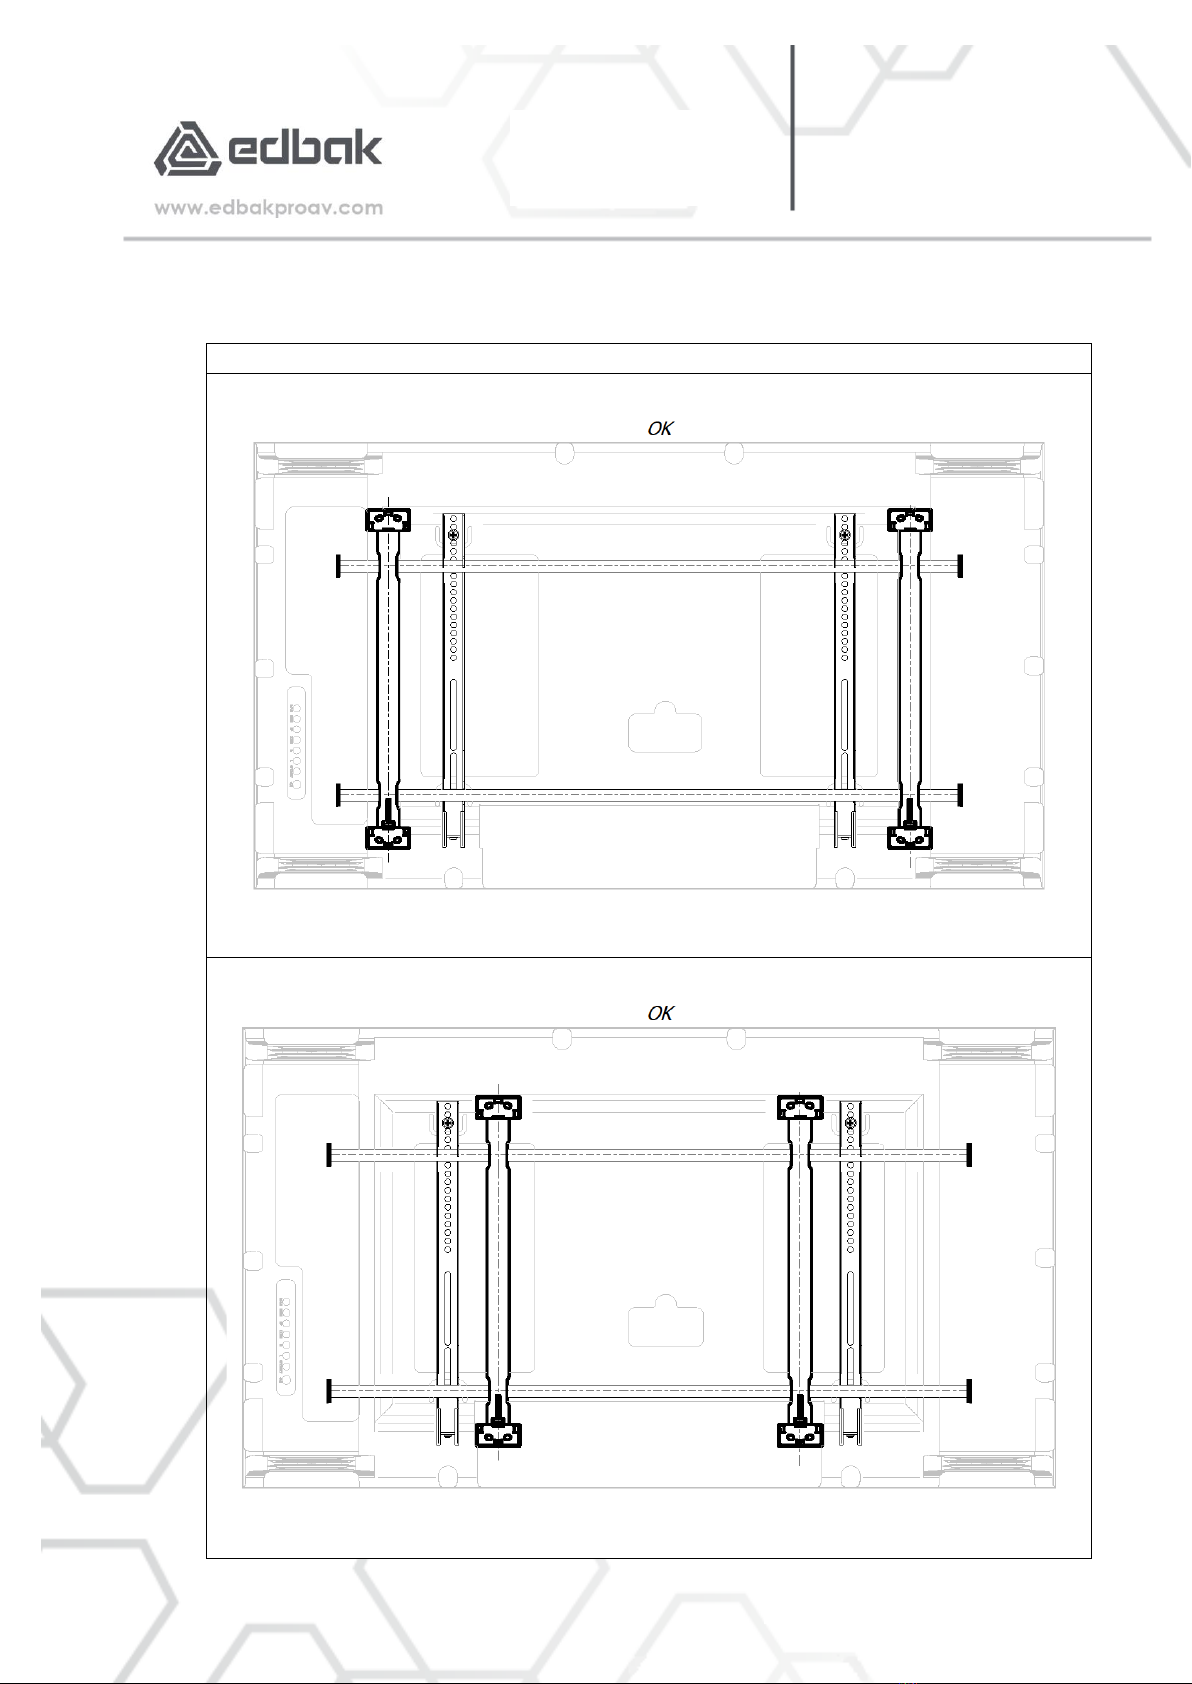
Poniższe szkice przedstawiają możliwe i niedopuszczalne opcje montażu monitora na uchwycie:
The following sketches show possible and unacceptable options for mounting the monitor on the
bracket:
Montaż poprawny / Correct assembly

WUSC-PWM500
08.08.2022 PWM500 PL-EN 1.0
9
INSTRUCTION MANUAL
INSTRUKCJA MONTAŻU
Montaż niedopuszczalny /Installation not allowed

WUSC-PWM500
08.08.2022 PWM500 PL-EN 1.0
10
INSTRUCTION MANUAL
INSTRUKCJA MONTAŻU
4. ODWIERCANIE OTWORÓW KOTWIĄCYCH / DRILLING ANCHOR HOLES
W odznaczonych 8 punktach:
- dla betonu, cegły, belitu - wywiercić otwory o średnicy 10mm, na głębokość min 40mm.
Osadzić w nich kołki rozporowe o rozmiarze fi10x40 i przykręcić śrubami 6x40.
- dla drewna –przykręcić wsporniki wkrętami do drewna typu SPAX 6x40
- dla płyt karton gips – przykręcić wkrętami do karton gips, zwracając uwagę by wkręty obejmowały
swoim zasięgiem metalowe ceowniki wsporcze ściany.
In 8 marked points:
- for concrete, brick, belite - drill holes 10mm in diameter, to a minimum depth of 40mm. Put in them
expansion plugs of fi10x40 size and screw them with 6x40 screws.
- for wood - screw the brackets with the SPAX 6x40 wood screws
- for plasterboard - screw to the plasterboard with the screws, making sure that the screws cover the
metal beams on the wall.
Przykręcając wsporniki teleskopowe
do ściany należy zwrócić uwagę aby
śruba na śrubokręt krzyżakowy
znajdowała się na górze, a śruba z
łbem ampulowym była na dole.
When screwing the telescopic
brackets to the wall, make sure that
the Phillips screwdriver screw is on
the top and the Allen screw is on the
bottom.

WUSC-PWM500
08.08.2022 PWM500 PL-EN 1.0
11
INSTRUCTION MANUAL
INSTRUKCJA MONTAŻU
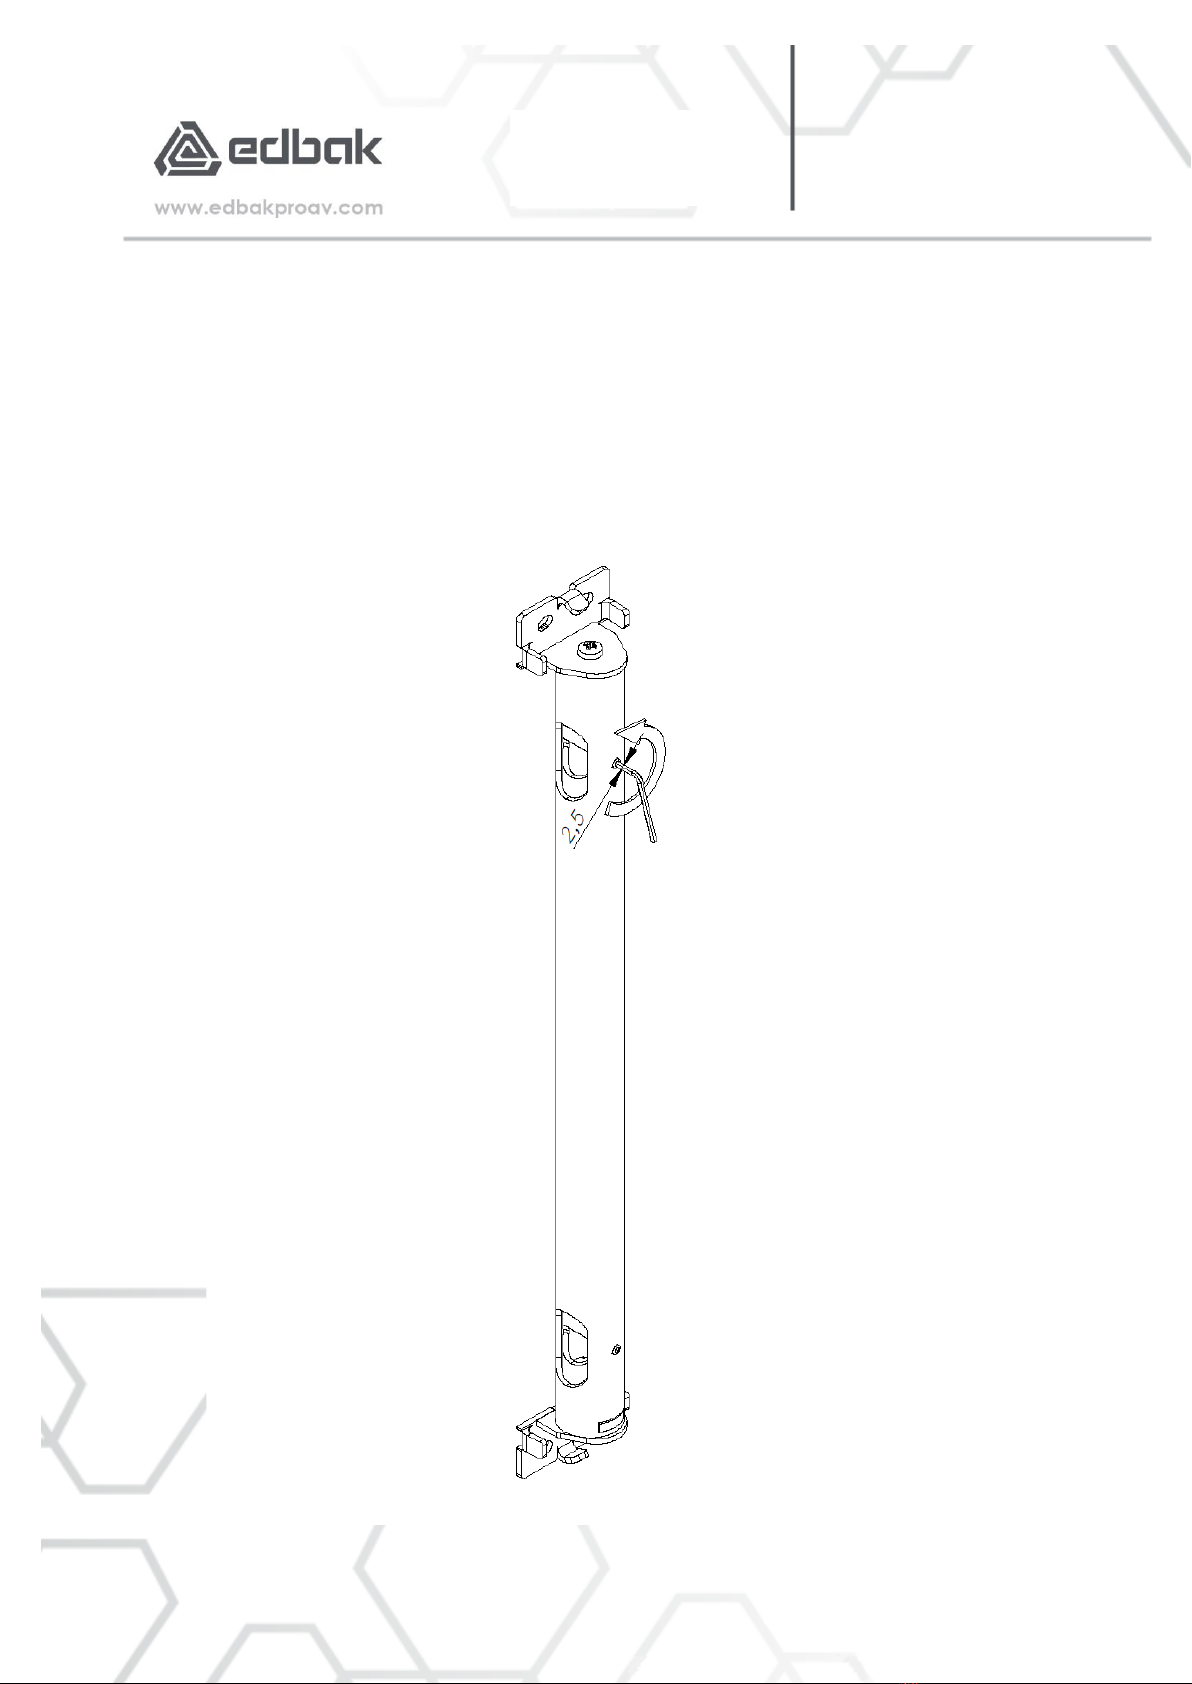
5. DEMONTAŻ ZAŚLEPEK BLOKUJĄCYCH / REMOVAL OF THE LOCKING PLUGS
Pokręcając odwrotnie do ruchu wskazówek zegara, z jednej strony belek poprzecznych, wykręcić
zaślepki blokujące.
Turning anti-clockwise,on one side of the crossbeams, unscrew the locking plugs.
WUSC-PWM500
08.08.2022 PWM500 PL-EN 1.0
12
INSTRUCTION MANUAL
INSTRUKCJA MONTAŻU
6. LUZOWANIE WKRĘTÓW DOCISKOWYCH / LOOSING THE GRUB SCREWS
Korzystając z klucza ampulowego o rozmiarze 2,5mm poluzować (bez wykręcania) 4 wkręty
dociskowe umieszczone we wspornikach teleskopowych.
Using a 2.5mm Allen key, loosen (without removing) the 4 grub screws located in the telescopic
brackets.

WUSC-PWM500
08.08.2022 PWM500 PL-EN 1.0
13
INSTRUCTION MANUAL
INSTRUKCJA MONTAŻU
7. MONTAŻ BELEK POPRZECZNYCH / CROSSBEAMS ASSEMBLY
W otwory wykonane we wspornikach teleskopowych wsunąć belki poprzeczne. Belki można
montować asymetrycznie do monitora jednak zaleca się równomierne rozłożenie ich względem
wsporników teleskopowych.
Insert the cross beams into the holes made in the telescopic supports. The beams can be installed
asymmetrically to the monitor, but it is recommended to distribute them evenly in relation to the
telescopic supports.
WUSC-PWM500
08.08.2022 PWM500 PL-EN 1.0
14
INSTRUCTION MANUAL
INSTRUKCJA MONTAŻU
8. PRZYMOCOWANIE ZAŚLEPEK BLOKUJĄCYCH / ATTACHMENT OF THE LOCKING PLUGS
Gdy belki poprzeczne są wsunięte we wsporniki teleskopowe, należy przykręcić zdemontowane
wcześniej zaślepki blokujące.
When the crossbeams are inserted into the telescopic supports, screw on the previously
disassembled locking plugs.
WUSC-PWM500
08.08.2022 PWM500 PL-EN 1.0
15
INSTRUCTION MANUAL
INSTRUKCJA MONTAŻU
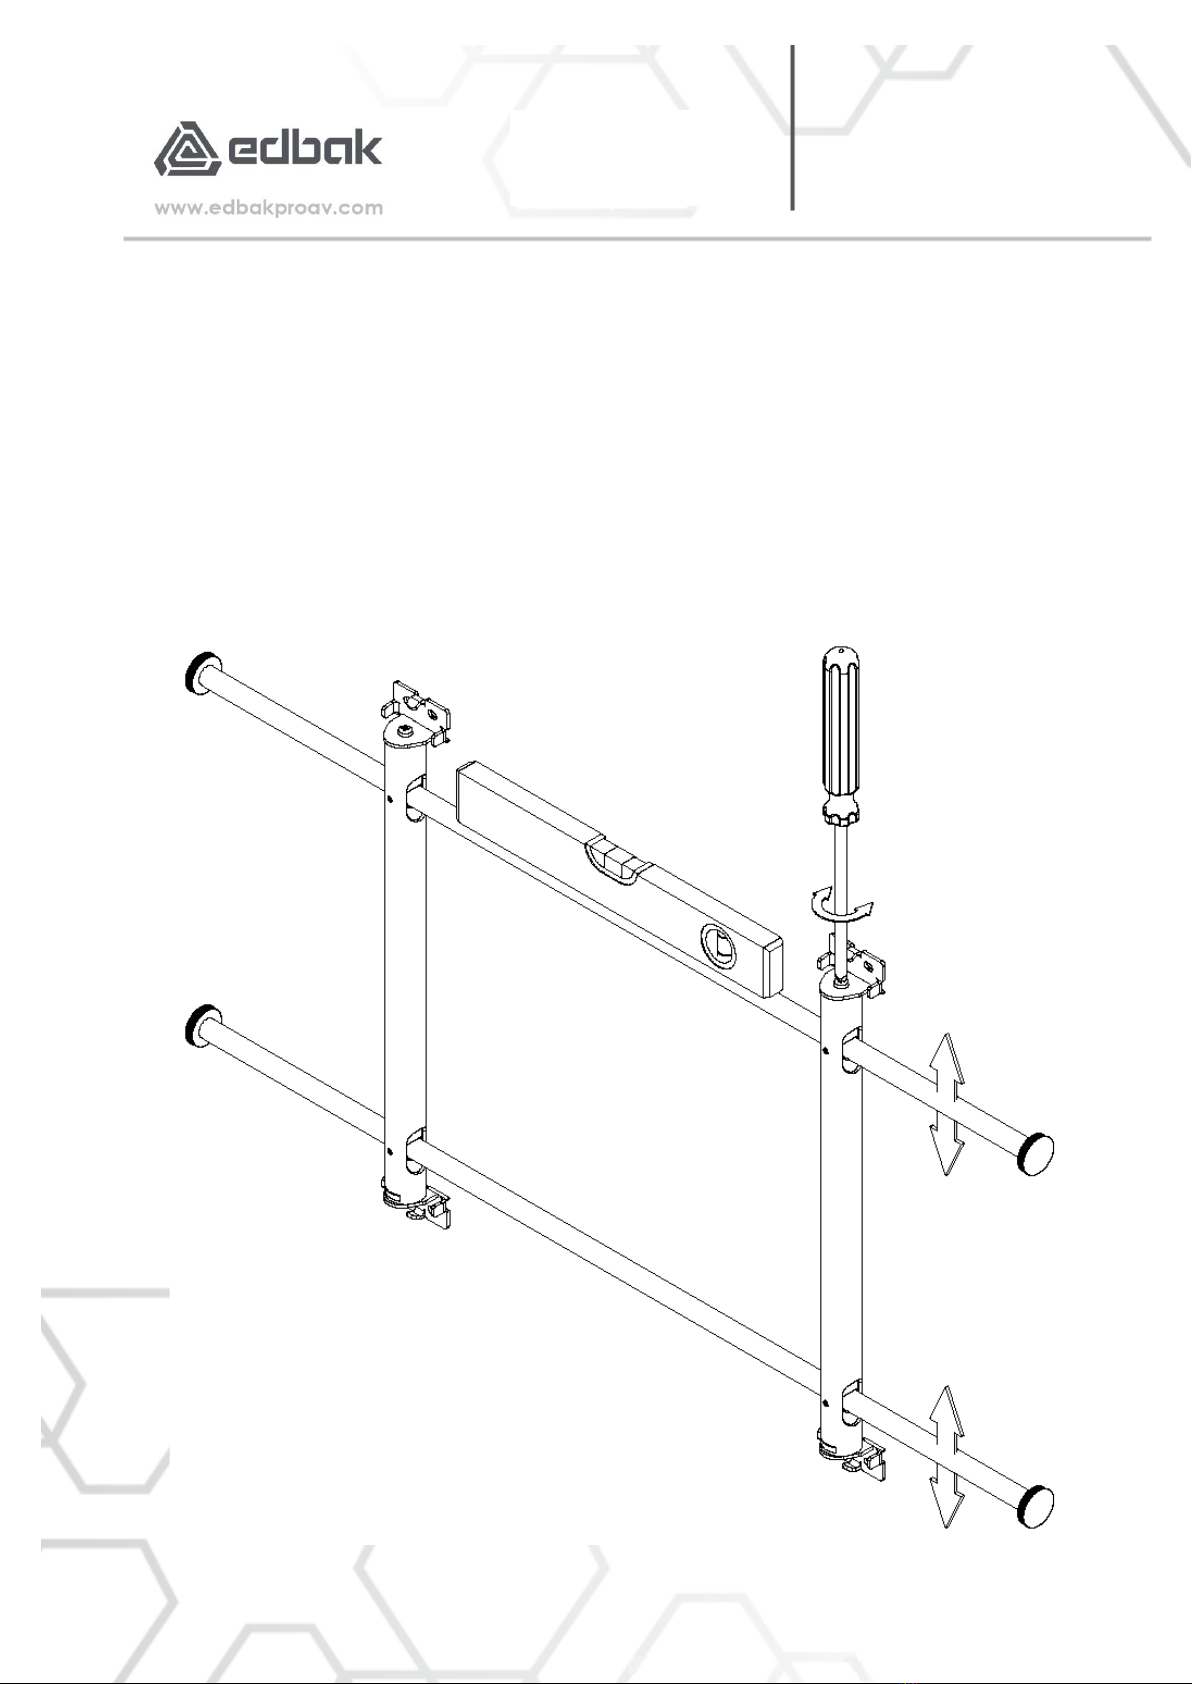
9. POZIOMOWANIE BELEK POPRZECZNYCH / CROSSBEAMS LEVELING
W tym momencie należy wypoziomować zamontowane belki poprzeczne.
Korzystając z poziomicy oraz śrubokręta krzyżakowego dokonujemy mikro-regulacji położenia belek.
Pokręcając śrubokrętem zgodnie z ruchem wskazówek zegara unosimy belki, natomiast gdy kręcimy
śrubokrętem w odwrotną stronę, belki obniżają swoje położenie. Belka górna oraz dolna poruszają się
jednocześnie.
At this point, the installed crossbeams should be leveled. Using a spirit level and a Phillips screwdriver,
we micro-adjust the position of the beams. By turning the screwdriver clockwise, we raise the beams,
while by turning the screwdriver in the opposite direction, the beams lower their position. The top and
bottom beams move simultaneously.
WUSC-PWM500
08.08.2022 PWM500 PL-EN 1.0
16
INSTRUCTION MANUAL
INSTRUKCJA MONTAŻU
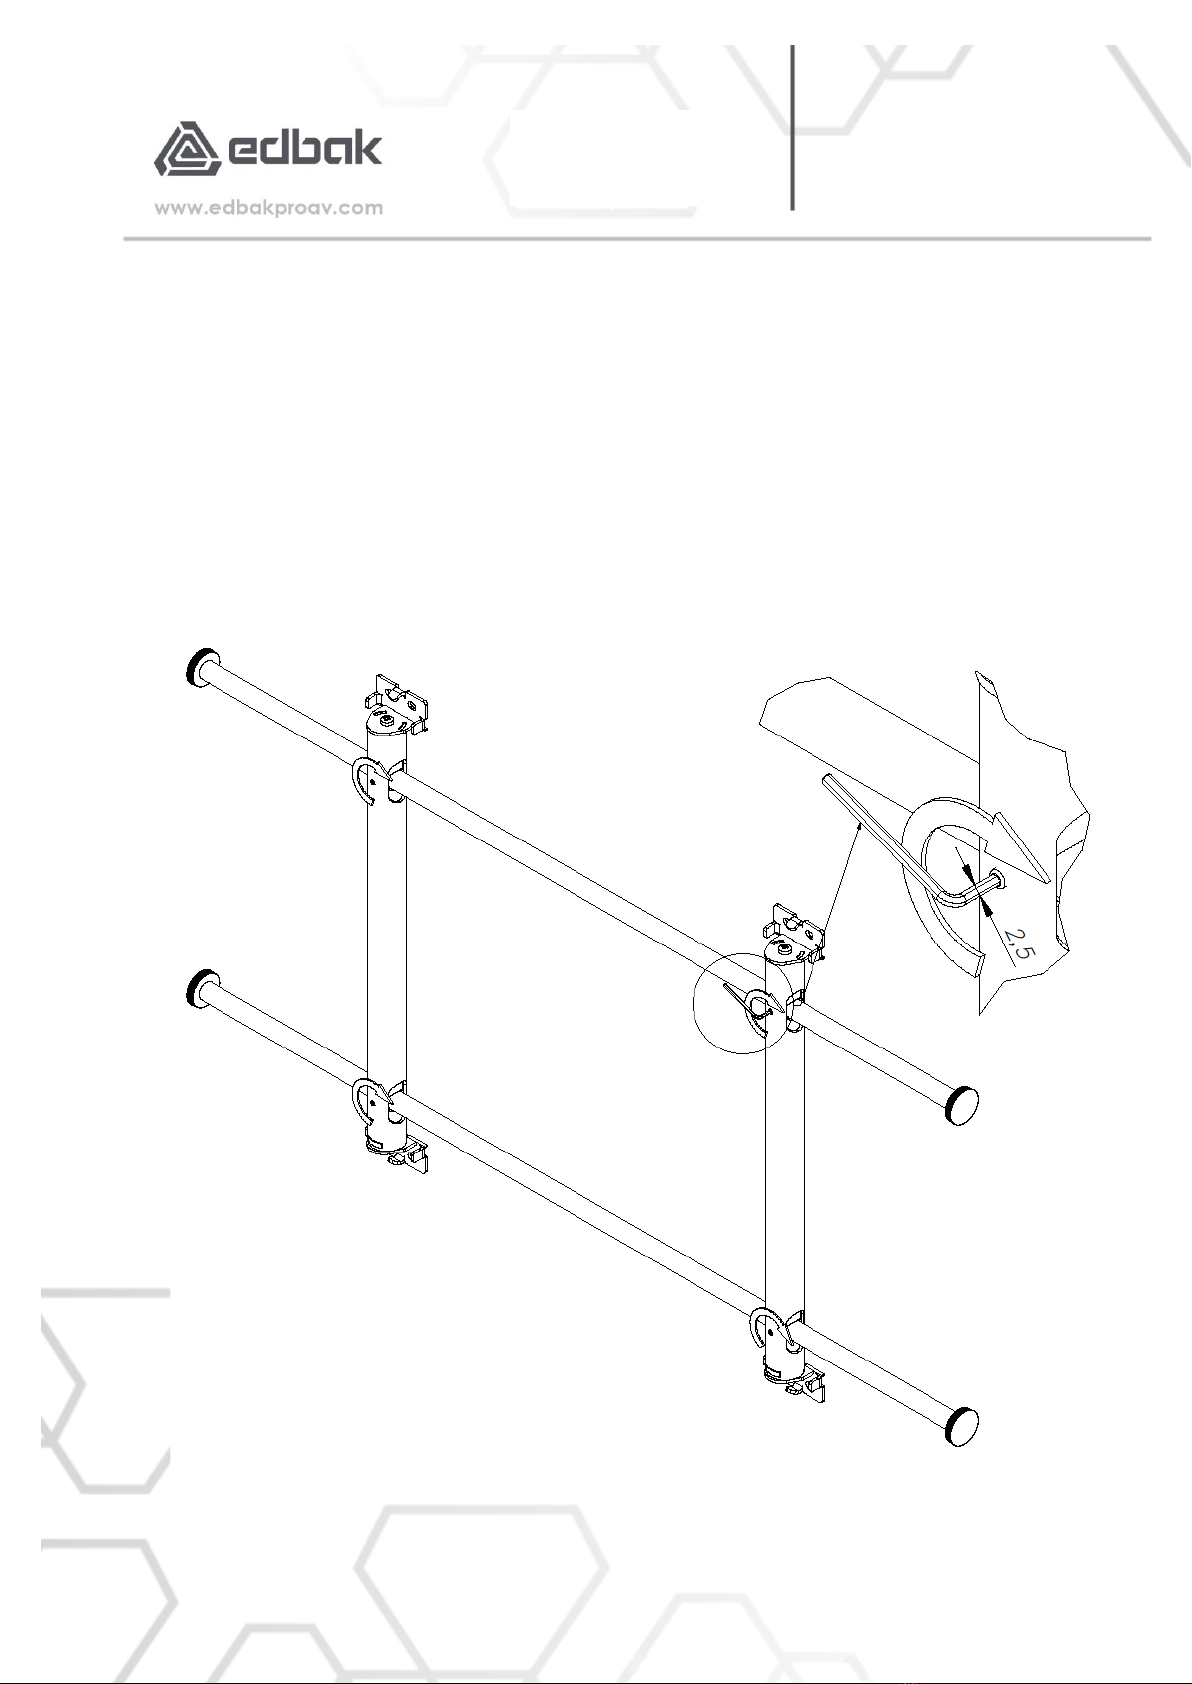
10. ZABLOKOWANIE POŁOŻENIA BELEK POPRZECZNYCH / LOCKING THE LOCATION OF CROSS-
BEAMS
W momencie gdy belki poprzeczne są wypoziomowane, należy zblokować możliwość ich
przesuwania się. Dokonujemy tego poprzez wkręcenie kluczem ampulowym o rozmiarze 2,5mm
czterech wkrętów dociskowych, które wcześniej zostały poluzowane.
When the crossbeams are level, block their sliding. We do this by screwing in four grub screws that
were previously loosened with a 2.5 mm Allen key.

WUSC-PWM500
08.08.2022 PWM500 PL-EN 1.0
17
INSTRUCTION MANUAL
INSTRUKCJA MONTAŻU
11. ZAMOCOWANIE ZAŚLEPEK MASKUJĄCYCH / ATTACHING MASKING PLUGS
W miejscach mocowania wsporników teleskopowych do ściany, można zamocować zaślepki maskujące.
In the places where the telescopic brackets are attached to the wall, you can attach masking plugs.
WUSC-PWM500
08.08.2022 PWM500 PL-EN 1.0
18
INSTRUCTION MANUAL
INSTRUKCJA MONTAŻU
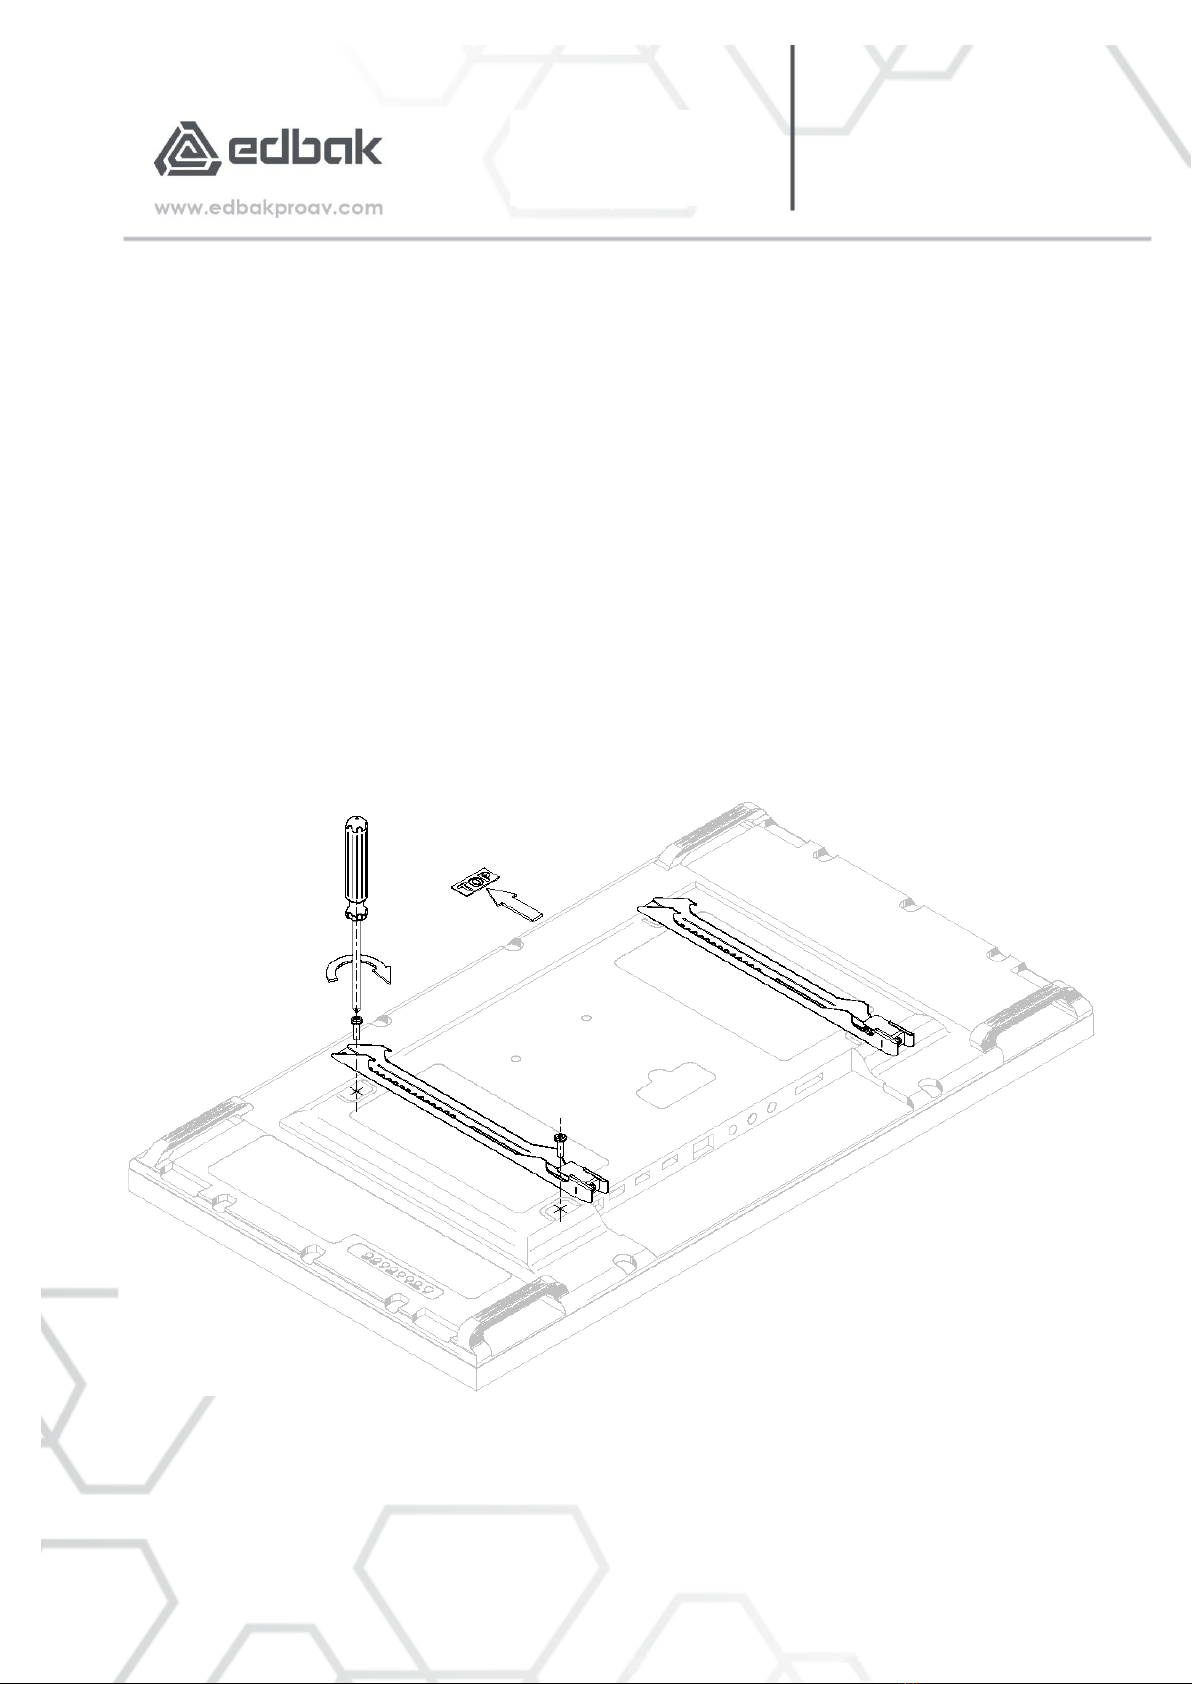
12. MONTAŻ RAMION DO MONITORA / MOUNTING THE ARMS TO THE MONITOR
Monitor położyć na miękkim i równym podłożu, ekranem skierowanym w dół. Do otworów VESA w
monitorze przykręcić dwa ramiona. W szczególnych przypadkach należy skorzystać z dołączonych do
zestawu plastikowych tulejek dystansowych. Przykręcając ramiona należy zwrócić uwagę, aby zaczep
hakowy ramionka znajdował się na górze monitora, natomiast śruba dociskowa znajdowała się w
dolnej części telewizora. Należy zwrócić uwagę że uchwyt przeznaczony jest do monitorów w
zakresie 43”–85”, w których otwory VESA posiadają standard od 50x50 do 800x400, a masa
monitora nie przekracza 80kg.
Place the monitor on a soft and even surface with the screen facing down. Screw two arms to the
VESA holes in the monitor. In special cases, use the plastic distance sleeves included in the set. When
screwing the arms, make sure that the arm hook is at the top of the monitor, and the clamping screw
is at the bottom of the TV. It should be noted that the holder is designed for monitors in the 43 "- 85"
range, in which VESA holes have a standard from 50x50 to 800x400, and the weight of the monitor
does not exceed 176,3 lb.
WUSC-PWM500
08.08.2022 PWM500 PL-EN 1.0
19
INSTRUCTION MANUAL
INSTRUKCJA MONTAŻU
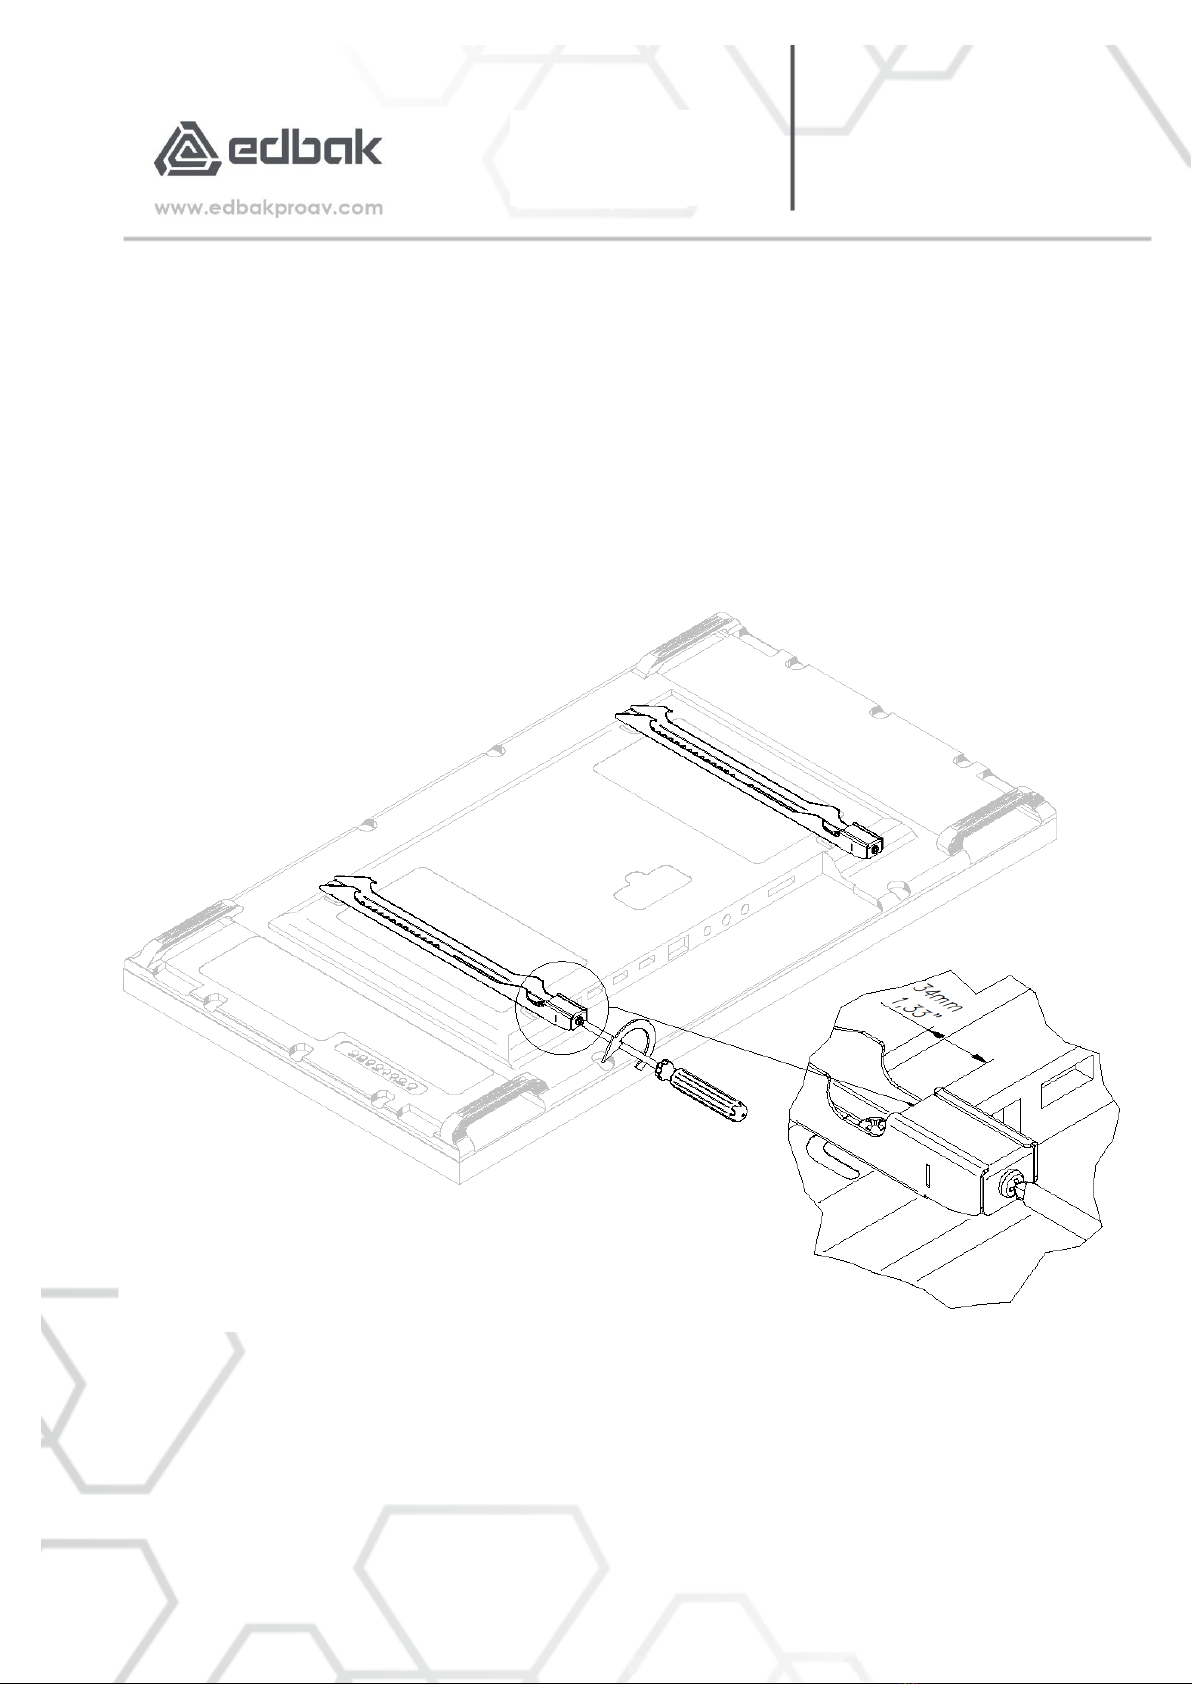
13. LUZOWANIE BLOKADY RAMIONKA / RELEASING THE ARM LOCK
Aby możliwe było zamocowanie monitora z ramionkami na uchwycie, należy poluzować języki
blokujące ramionka. Śrubokrętem pokręcać odwrotnie do ruchu wskazówek zegara tak długo, aż
język blokady schowa się w ramionku.
To install the monitor with the arms on the holder, loosen the arm locking tongues. Turn the
screwdriver counterclockwise until the locking tongue hides inside the arm.
WUSC-PWM500
08.08.2022 PWM500 PL-EN 1.0
20
INSTRUCTION MANUAL
INSTRUKCJA MONTAŻU
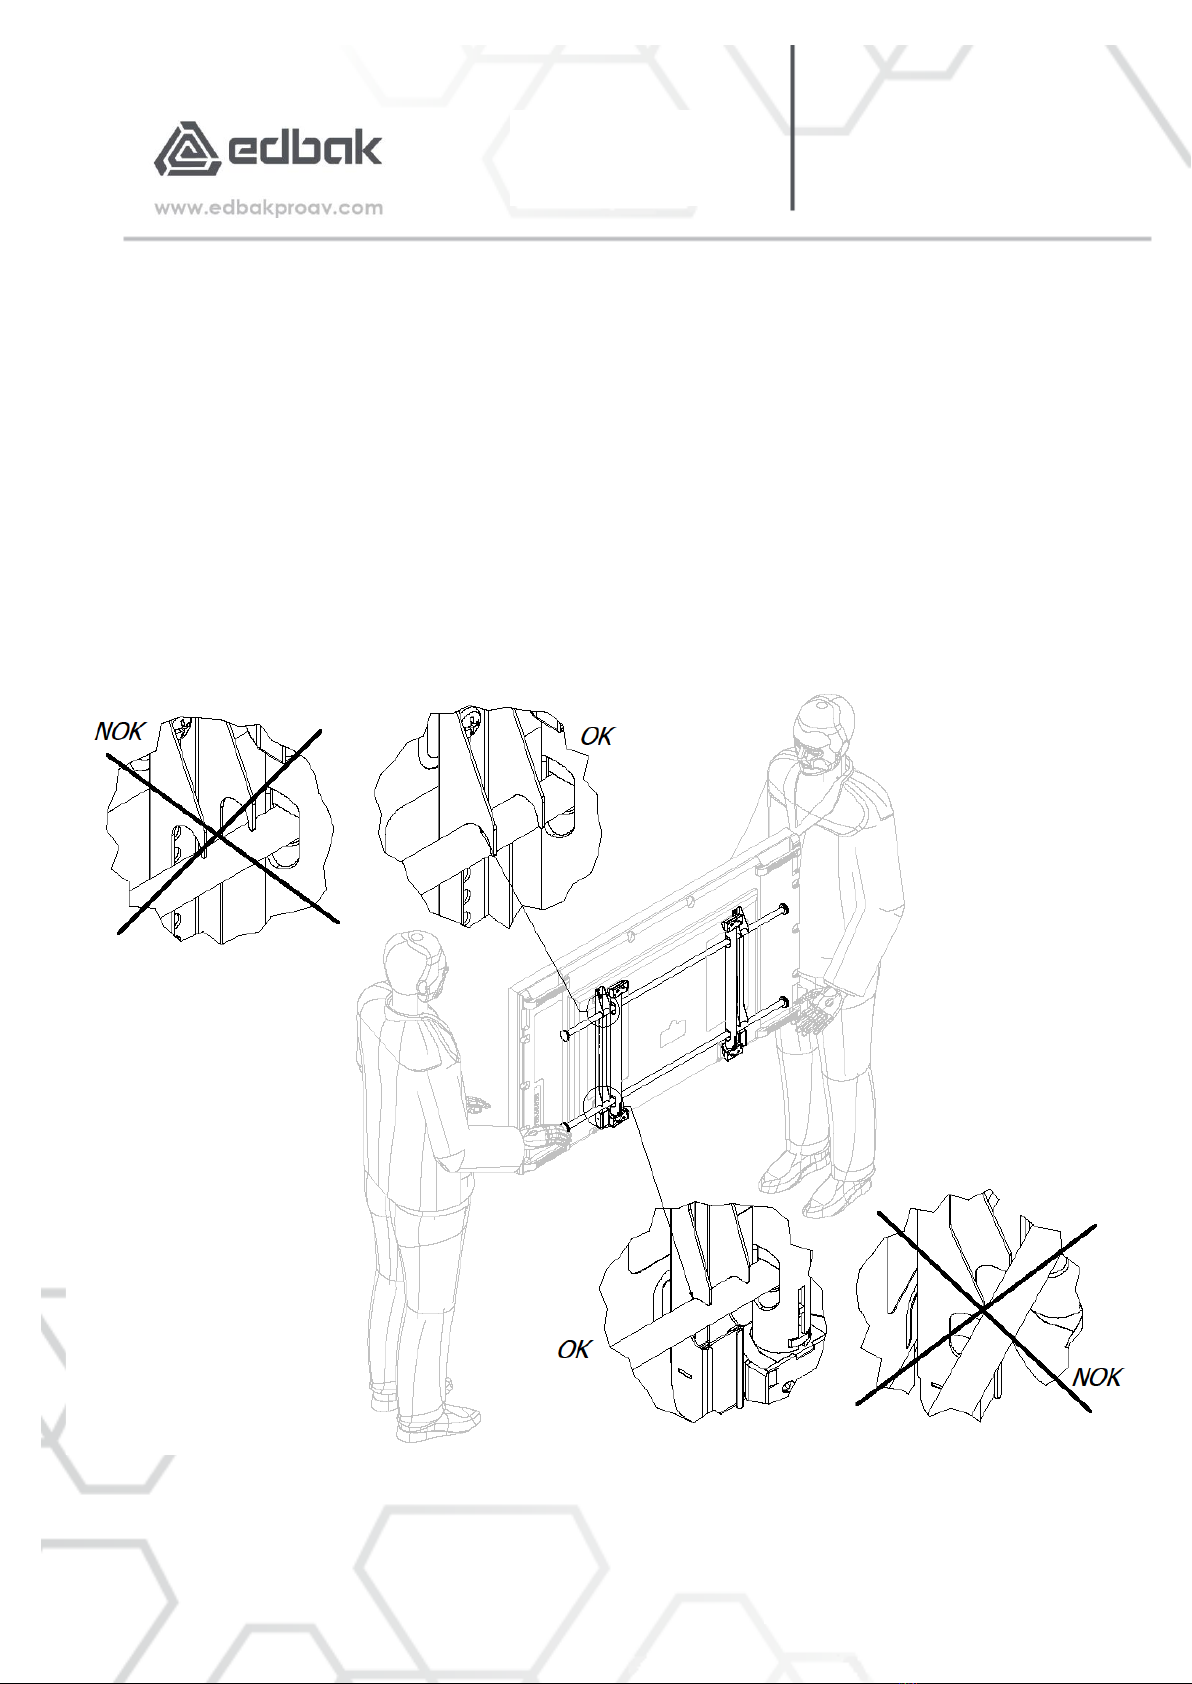
14. OSADZENIE MONITORA NA UCHWYCIE / FITTING THE MONITOR ON THE BRACKET
Monitor z przykręconymi ramionami zawiesić na belkach poprzecznych uchwytu. Ze względu na
delikatność montowanego sprzętu, producent zaleca aby podczas tej operacji uczestniczyły dwie
silne osoby.
Przed pozostawieniem monitora na uchwycie należy upewnić się, że haki zaczepowe oparły się na
górnej belce, a dolna wnęka ramionka „wkliknęła się” na dolną belkę.
Hang the monitor with bolted arms on the handle's crossbars. Due to the delicacy of the mounted
equipment, the manufacturer recommends that two strong people participate in this operation.
Before leaving the monitor on the bracket, make sure that the hooks rest on the upper beam, and
the lower arm recess “clicked” on the lower beam.
Other Edbak TV Mount manuals


