Edic COMET Owner's manual

wCOMET 419TR
3 GALLON
SELF-CONTAINED EXTRACTOR
OWNER’S/OPERATOR’S MANUAL
PROUDLY DESIGNED AND MANUFACTURED BY
WWW.EDIC-USA.COM

UNPACKING YOUR NEW COMET:
When your package is delivered, check the carton
carefully for signs of rough handling. If the COMET is
damaged, notify the carrier immediately and request an
inspection. Be sure to keep the carton, packing inserts,
packing lists and carrier’s receipt until the inspector has
veried your claim.
EDIC’s liability ceases when the carrier picks up the
shipment. However, our customer service sta will be
happy to furnish any information needed in connection
with the claim and will attempt to expedite a resolution.
PLEASE READ BEFORE
OPERATING YOUR NEW FIVESTAR:
Read the manual carefully and completely before at-
tempting to operate the unit. is manual has important
information for the use and safe operation of the ma-
chine. Keep this manual handy at all times.
is equipment has been engineered and manufactured
to provide excellent performance and service. To ensure
that your equipment will continue to perform as intend-
ed:
• Maintain equipment regularly- following the sug-
gested maintenance schedule provided.
• Use only original EDIC parts when servicing.
• Operate equipment with care.
If additional information is needed, please contact EDIC
All information and specications printed in the man-
ual are current at the time of printing; however because
of EDIC’s policy of continual product development, we
reserve the right to make changes at any time without
notice.
FAILURE TO COMPLY WITH THE FOL-
LOWING WARNINGS AND INSTRUC-
TIONS WILL VOID THE WARRANTY.
WARNING!
• Make sure the machine is plugged into an electrical
outlet with the same voltage and frequency rating as
shown on the nameplate of the machine. Do not at-
tempt to plug a 115 volt machine into a 230 volt outlet.
• Do not immerse or use this machine in standing wa-
ter. Such use can cause electric shock.
• Do not use to pick up ammable or combustible liq-
uids such as gasoline or use in areas where they may
be present.
• Do not expose machine to freezing temperatures.
• To avoid electric shock, do not expose the unit to
rain-store indoors only.
• Connect to a properly grounded outlet only. See
“Grounding Instructions.”
• Turn o all controls before unplugging.
• Do not use without lters in place.
• Do not put any object into openings. Do not use with
any opening blocked; keep free of dust, lint, hair and
anything that may reduce air ow.
• Do not pick up anything that is burning or smoking,
such as cigarettes, matches or hot ashes.
• Do not use machine for dry vacuuming. is machine
is not outtted with a ne dust lter and it will dam-
age the vacuum motor( s ).
• Do not turn on the vacuum-pump switch when the
solution tank is empty.
• Use defoamer at all times to prevent damage to the
vacuum motor.
• Do not use water in excess of 140° F ( 62° C).
• Use only commercially available carpet cleaners and
defoamer intended for use with extraction machines
of this type. Do not use dyes, bleaches, ammonia, or
other additives. e use of powdered cleaning solu-
tion if not diluted properly may result in damage to
the pump.
• All servicing of EDIC equipment should be performed
only by EDIC authorized service centers.
• Keep hair, loose clothing, ngers an all parts of the
body away from openings and moving parts.
• Use extra care when cleaning on stairs.
• Do not use replacement parts other than those spec-
ied in the parts list. Proper maintenance if the ma-
chine could be aected if substitutions are made.
• Follow maintenance schedule strictly.
2
GROUNDING INSTRUCTIONS:
is piece of equipment must be grounded. Should an
electrical malfunction occur, grounding provides a path
of least resistance for electrical current- reducing the risk
of electric shock. is piece of equipment is furnished
with a cord that has a grounding conductor and ground-
ing plug. e grounded plug must only be plugged
into an appropriate outlet that is properly installed and
grounded in accordance with all local codes and ordi-
nances.
WARNING:
Connecting the equipment to an improperly grounded
outlet can result in an increased risk of electric shock. A
qualified electrician should be consulted if you are un-
sure that the outlet is properly grounded. Do not modify
the plug provided with the equipment. If it will not fit
the outlet, have a proper outlet installed by a qualified
electrician.
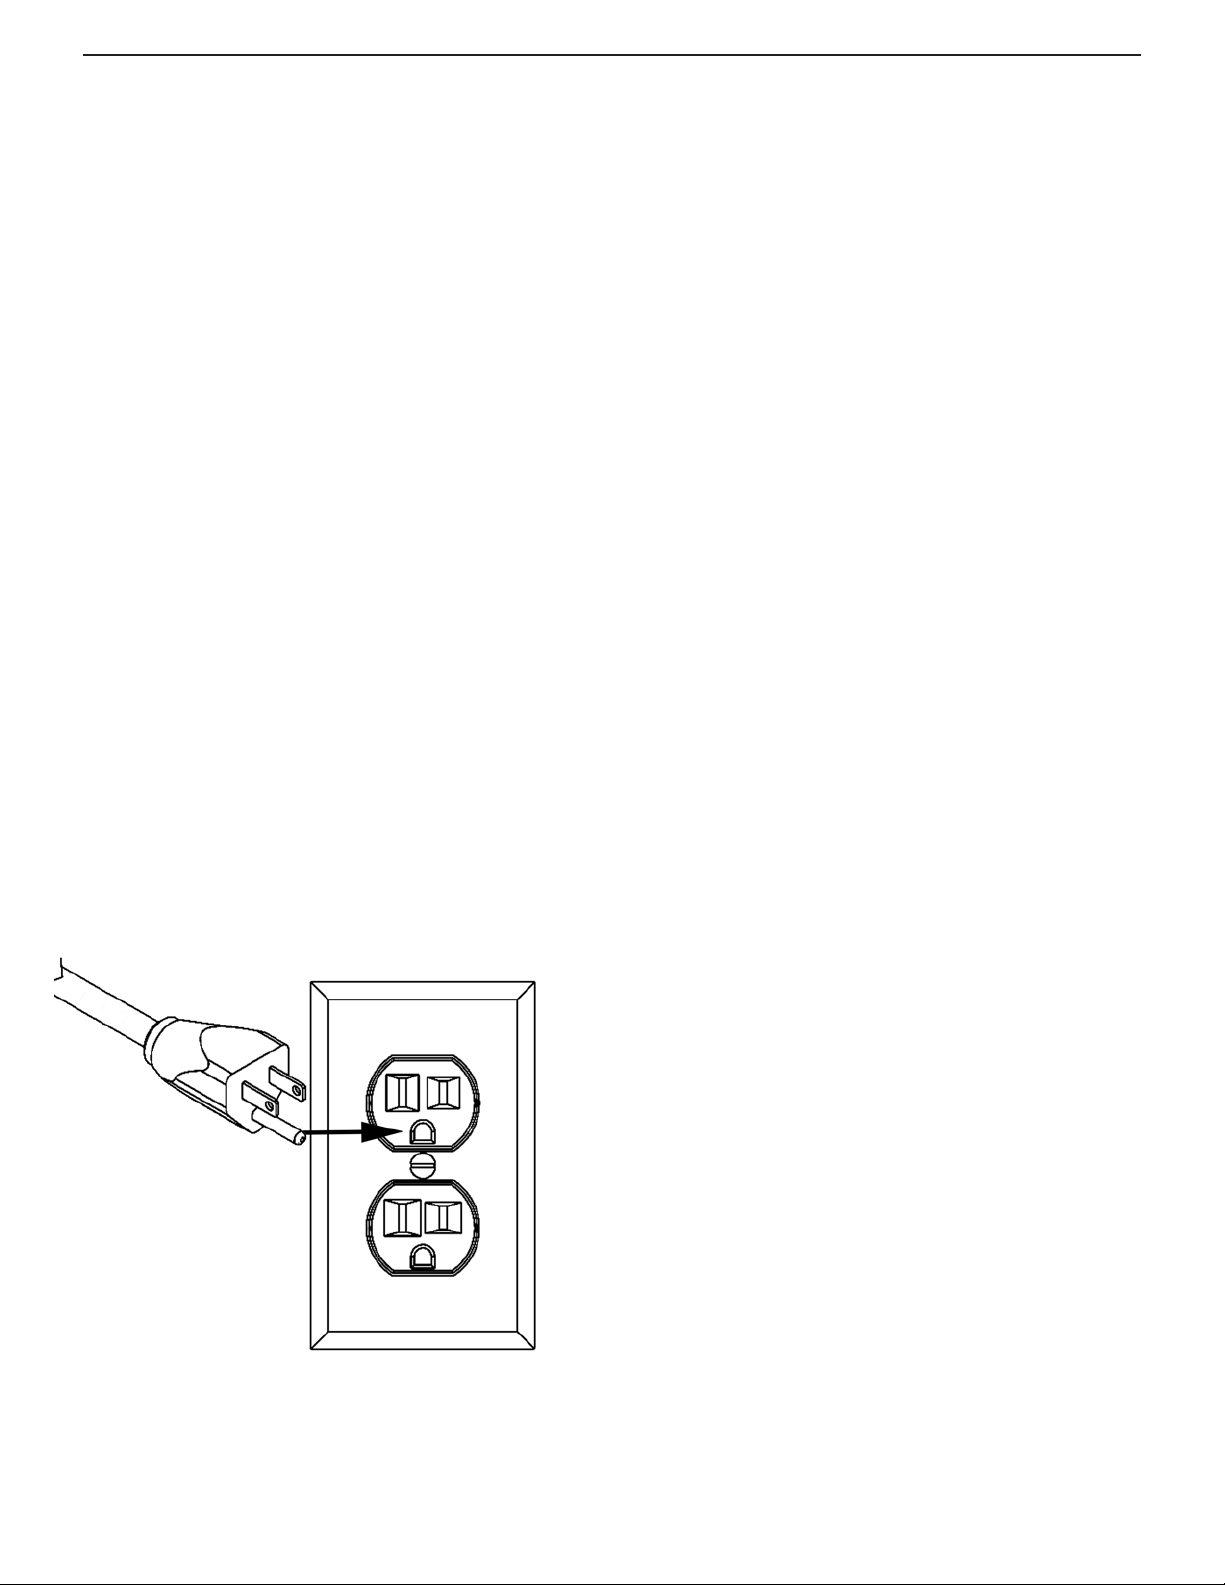
is appliance is designed for use on a 120-volt circuit.
e grounding plug provided looks like the plug illus-
trated in Figure 1. Replace the power cord if the ground-
ing pin is damaged or broken.
Extension cords connected to this machine should be
12 gauge, three-wire cords with three-prong plugs and
outlets. DO NOT use extension cords more than 25 feet
(7.6 m) long.
DAILY MAINTENANCE:
e COMET is engineered and built to require mini-
mum maintenance. But like any machine, it does require
some care to keep it in optimum working condition.
Careful attention to these maintenance instructions
will give you maximum operating performance and life
expectancy of the machine.
CAUTION: Disconnect the power cord from the out-
let before doing any clean up or maintenance on the
machine
1. Keep the machine clean, inside and out including the
lid, bucket, brush and brush chamber.
2. Pour a gallon of clean hot water in the smaller open-
ing of the bucket. Tum the pump on and ush the
entire system through the spray nozzles for about a
minute to prevent alkaline build-up.
3. Keep lters clean.
4. Quick connect coupler- Spray with silicone lubricant
to keep coupler from sticking.
5. Valve, upholstery tool- If the plunger on the valve
sticks, spray with silicone lubricant.
Servicing:
In the event that your heater requires service, please
contact EDIC at:
800-338-3342
Do not attempt repairs yourself. EDIC will assist you in
locating an indepedent service contractor.
Fig. 1
3

CLEANING TIPS
• Check the condition of the area to be cleaned. Look
for loose carpet, heavily soiled areas, stains or spots
and worn areas. Bring these to the attention of the
person in charge before performing the cleaning job.
Make sure all edges of the carpet are securely tacked
in place and all seams are sewn ( or glued) tight. is
is your protection against shrinkage.
• Locate an inconspicuous spot on the area to be
cleaned. Test carpet for colorfastness before pro-
ceeding. Pour the concentrated cleaning solution on
the spot, cover with a white towel and place a heavy
object on top to absorb the cleaning solution. Wait
approximately 10 minuets for any reaction to take
place. Remove weight. If there is no color transfer, it
should be safe to clean. Apply this procedure if dif-
ferent color-texture carpet is seen in adjacent rooms
or areas to be cleaned.
• Remove the furniture from the area to be cleaned.
Large pieces can be moved to opposite end of the
room from where you start cleaning and replaced
when it is completed. Aer cleaning carpet, place a
small square of aluminum foil under the furniture
legs to prevent moisture from damaging the nish
and avoid dye and rust from transferring to the car-
pet.
• Clean the area with an upright vacuum. DO NOT
USE THIS MACHINE AS A DRY VACUUM! Heav-
ily soiled carpet or areas of concentrated foot trac
should be treated with recommended pre-spotting
or pre-spray chemicals. If a spotter is used, follow
label directions exactly. Do not allow any spotter or
prespray to dry on the carpet as it may damage the
carpet permanently.
• Identify the type of carpet ber to be cleaned. Most
commercial carpet bers in use are acrylic or nylon
based. Best results in cleaning would be obtained if
hot water is used to clean these bers. On the other
hand, hot water would shrink natural ber carpet-
ing, like wool and cotton in particular. Exercise
caution when cleaning natural bers by using cool
water, testing for colorfastness and applying the least
amount of cleaning solution possible.
• Plan your cleaning route. Start cleaning at the far-
thest point away from where you plugged the ma-
chine and work back towards the outlet so that the
cord will not get in the way.
TO CLEAN CARPET:
PREPARE THE MACHINE
1. Make sure the switch is in the “OFF” position and all
hoses are connected. Using only approved cleaning
solution, mix according to the bottle instructions
and pour in the smaller opening of the bucket. Pay
attention to the ll level labels. To reduce foaming,
pour 2 ounces of defoamer into the recovery bladder.
Place bucket onto machine and close lid.
2. TO CLEAN
Turn switch to “CARPET” position. While pushing
the “ACTIVATE” switch, pull the machine as you
step backwards. Release the “ACTIVATE” switch 6
inches before ending a stroke. Repeat cleaning stroke
with 3” overlaps. Continue until cleaning solution is
consumed. Empty and rinse bucket. Repeat steps 1
and 2.
3. CHECK BUCKET LID
If excessive foam appears in the lid, add 2 ounces
of defoamer or empty and rinse the bucket. Repeat
steps I and 2.
4. CLEAN MACHINE BEFORE RETURNING
Clean the lid lter screen and rinse out bucket. Wipe
all surfaces including the bottom of machine. Re-
move carpet lint and strings from brush and vacuum
nozzle.
4

TO CLEAN UPHOLSTERY:
Cleaning upholstery with success requires a good knowl-
edge of the type of fabric to be worked on. Look for the
cleaning label sewn on the underside of the furniture
for the recommended method of cleaning the fabric. If
it calls for dry cleaning, do not attempt to clean with the
wet extraction method. Otherwise, damage to the fabric
could occur. Extraction works on most synthetic bers.
Before proceeding, test fabric for colorfastness. Pour a
small amount of cleaning solution on the fabric in an in-
comspicious spot. Rub the area with a white terry towel.
If no color comes o the towel, the fabric should be safe
to clean. If color transfers, do not continue.
NOTE: UPHOLSTERY KITS ARE SOLD SEPARATELY
AND DO NOT COME WITH THE MACHINE
PREPARE THE MACHINE
1. Complete Step 1 under “TO CLEAN CARPET”
Instructions.
2. Disconnect the vacuum hose with black hose cu
from the lid and disconnect the solution hose from
the back of the machine. Replace them with the up-
holstery vacuum and solution hoses.
3. TO CLEAN
Turn switch to “UPHOLSTERY” position. Depress
upholstery tool trigger while pulling tool across
upholstery surface with overlapping strokes. To
speed drying, go over the upholstery again without
depressing the trigger. Continue cleaning until clean-
ing solution is consumed. Empty and rinse bucket.
Repeat Step I and 2.
4. CHECK BUCKET LID
See Step 3 under “To Clean Carpet.”
5. CLEAN MACHINE BEFORE RETURNING
See Step 4 under “To Clean Carpet.”
5

6
7
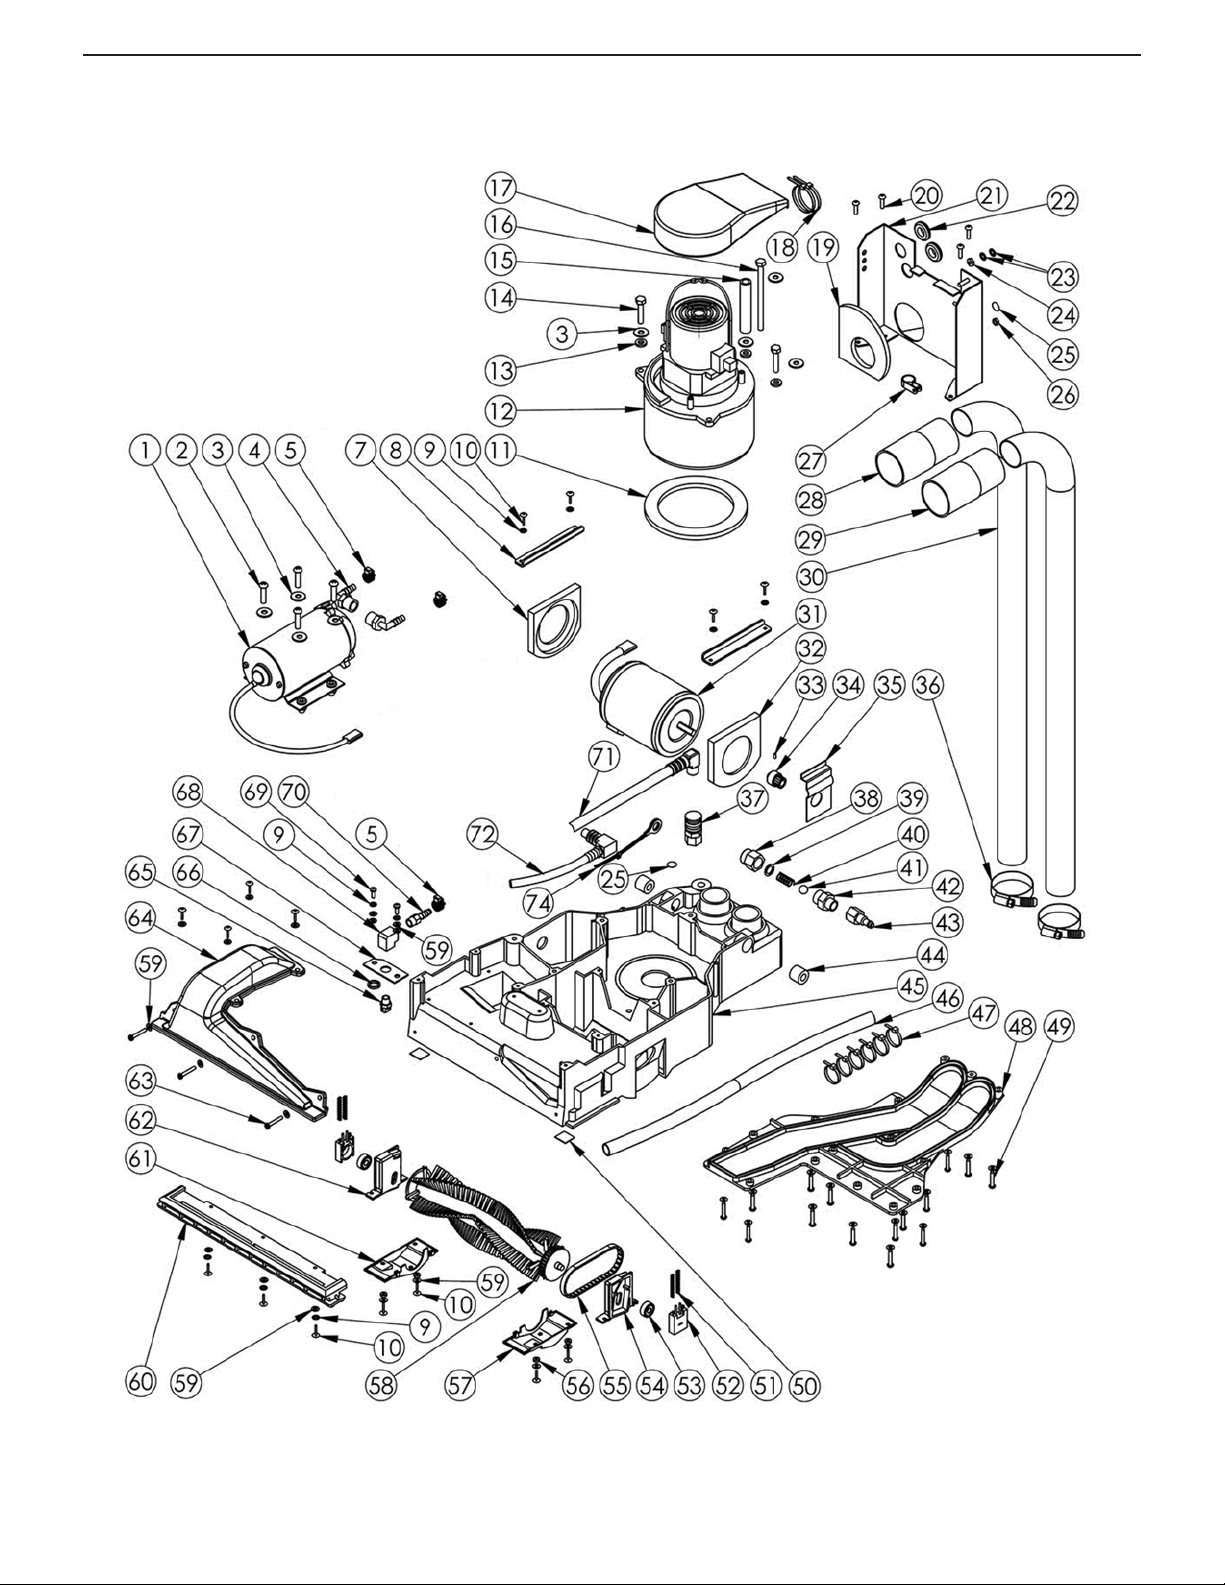
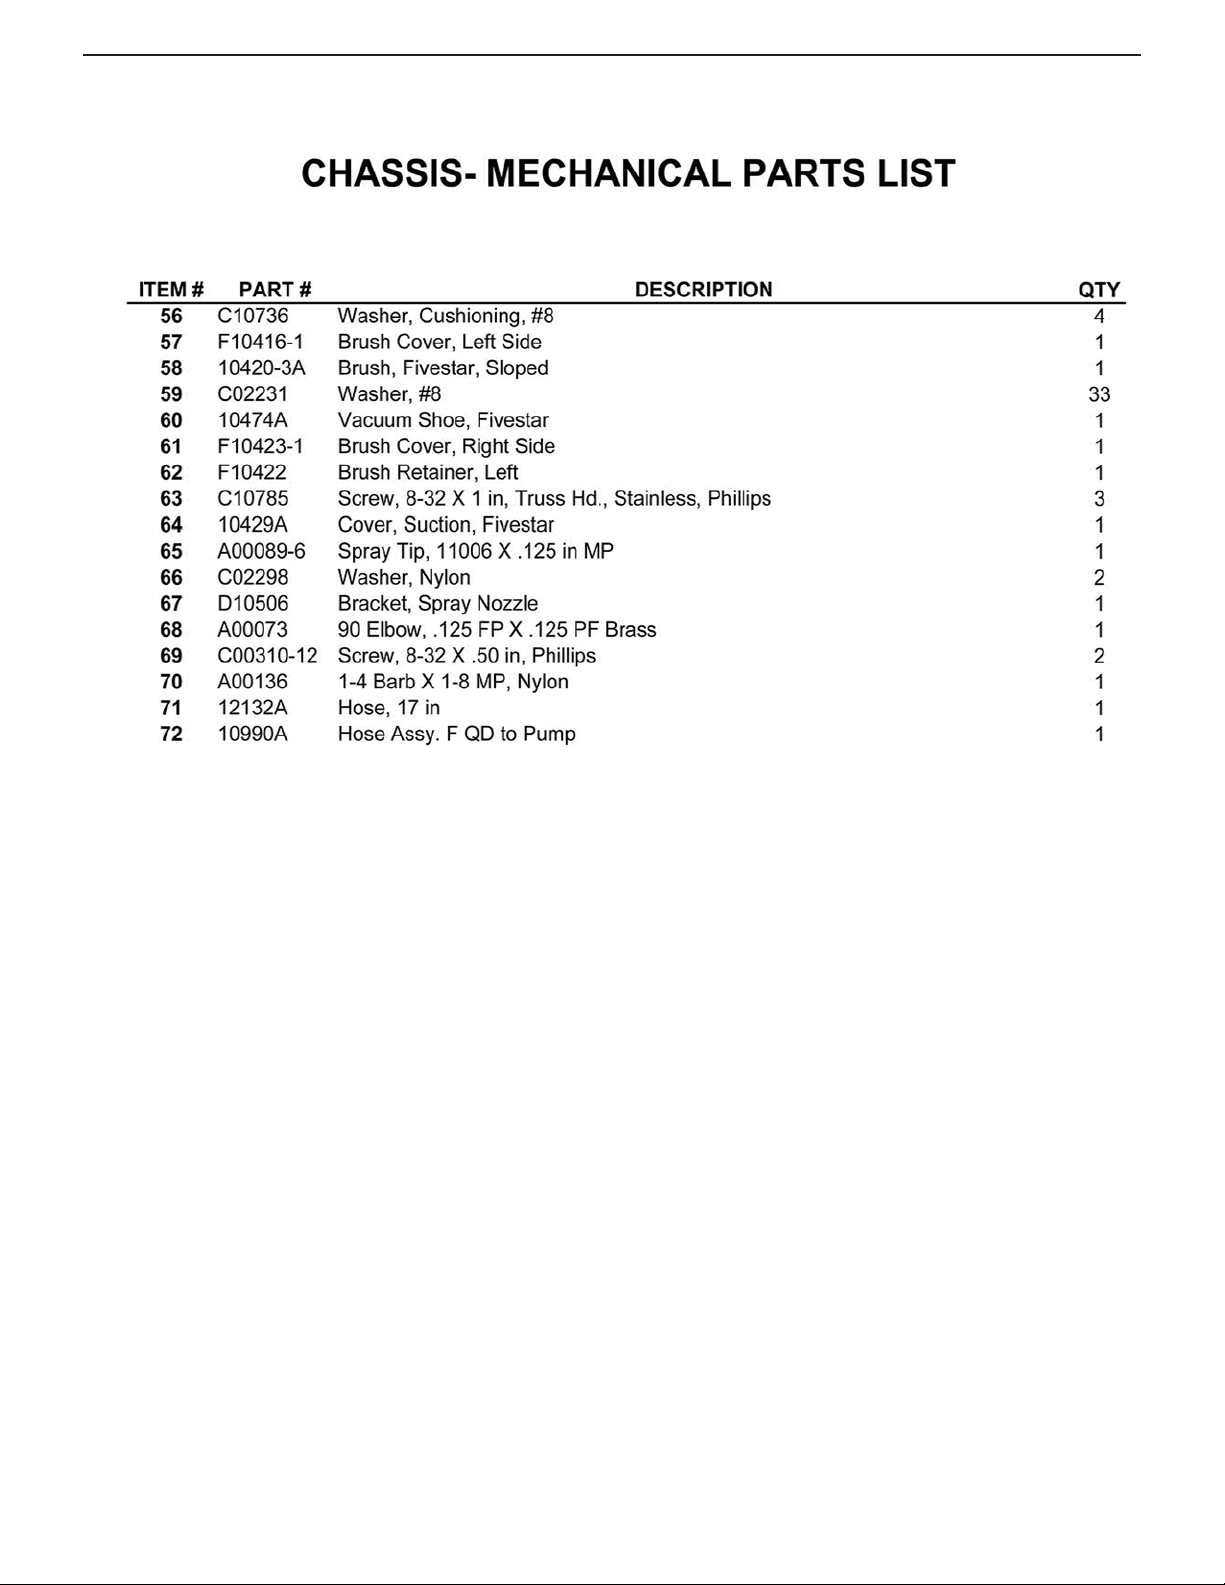
CHASSIS

8
9

10
HOUSING

-G
-G
-5
11

12
HANDLE

-G
2
1
1
998
13
This manual suits for next models
1
Table of contents
Other Edic Scrubber manuals


