EDISecure DCP360i User manual

Direct Dye Sublimation Printer
DCP360i
• Thank you for purchasing our product.
•Please ensure that you have read through the “Notes for Safe Operation” on Page 3 of the Startup uide
(separate book) in advance to ensure its safe use.
Notes regarding this manual.
(1)The contents of this manual shall not be reprinted or redistributed in any form without prior consent.
(2)The contents of this manual or the specifications and external appearance of this unit may be altered
without prior notice.
(3)Illustrations used in this manual may differ slightly from the actual shape of this unit.
KAT-T194-005
Instructions
Please ensure that you read through the Startup Guide that is supplied with the printer before use.
Model
Operating the Printer............................................2
LED Display ............................................................. 2
Names of Various Sections on Control Panel .......... 2
Button Control ..........................................................3
Initialization ..............................................................4
Test print using the printer alone.............................. 4
Differences Between Printing Modes ................... 4
How to Use the Status Monitor ............................5
Screen Configuration ............................................... 5
Monitoring Printer Status .........................................6
Ready Status Display...........................................7
Error Status Display ............................................. 7
Other Status Display ............................................ 7
Changing Printer Settings ........................................8
Checking the Media and Printing Status.................. 9
Display When Ink is Unknown ...............................10
Checking Printer Configuration .............................. 11
Resetting the [No. of Cards Issued] Item ...............12
Test Printing ........................................................... 12
Upgrading Firmware ..............................................13
Troubleshooting (Detailed Version) ............................... 14
Internal Configuration.............................................14
List of Error Codes and Corresponding Actions..... 15
When ink ribbon is torn .......................................... 17
Problems Related to Printing ................................. 17
Problems related to Color Printing .........................18
Problems Related to Text Printing.......................... 19
Problems Related to Protective Layer (OP)........... 20
Actions to Take When Printer Fails to Start Up...... 20
Version Upgrade ................................................21
Specifications .....................................................22
Main Specifications ................................................22
External Dimension................................................ 22
Table of Contents

2
Operating the Printer
Names of Various Sections on Control Panel
ERROR
CARD
INK
RESET
CLEAN
POWER
READY
1
25 78
34 6
1 POWER LED ( reen)
2 READY LED ( reen)
3 ERROR LED (Red)
4 CARD LED (Red)
5 INK LED (Red)
6 RESET Button
7 CLEAN Button
8 Buzzer
Status
Description
Power Off
Power On
Not ready: Unable to issue card (unable to accept issuing command)
Ready: Ready to issue card.
Active: Card inside. Ready to issue card.
No defect. Not lit in the cases of No Card and Ink End as these are not defects.
Irrecoverable error: Error that requires power to be turned off and on again.
Recoverable error: Error that requires reset or door to be opened and closed.
No defect or unknown defect related to card.
No card inside the card cassette.
Card transport error (JAM)
No defect or unknown defect related to ink ribbon.
Ink End
Ink defect (Ink ribbon ran out, unknown type of ink ribbon, etc)
INK (Ink ribbon status)
CARD (Card status)
ERROR (Error status)
READY (ONLINE/LOCAL)
LED indicator status
-- Light off -- Light on -- Blinking
* When in the Download mode, the POWER, READY, ERROR, CARD and INK LEDs will all light up.
LED Name
POWER (Power supply status)
LED Display

3
Button Control
Other than when turning on the power, operation only starts after pressing the button for more than 1 second. Release
the button upon hearing a "beep" sound from the buzzer and the respective function will be activated. This is used to
prevent operational errors.
Operation Status Operation ReferenceRESET CLEAN
When turning on power
Initialization (Usual startup)
Changes to Unit Number Setting mode
Startup uide (Separate book)
Connecting multiple printers
Changes to Download mode Troubleshooting in this manual
Action to take when printer fails to
startup
Initialization (Usual startup)
Changes to Magnetic Head Cleaning mode
Startup uide (Separate book)
Cleaning the magnetic head
Initialization (Software reset)
Also initializes ink ribbon
Performs test pattern printing
Ready
Recoverable error
with printer door closed
Caution (1)
Changes to Card Transport
Roller Cleaning mode Startup uide
Cleaning the card transport roller
Operating the printer in this manual
Test print using the printer alone
Initialization (Software reset)
Also initializes ink ribbon
Irrecoverable error Not Applicable
(1) Open and close printer door during a recoverable error to start initialization automatically.
(2) For initialization without performing software reset, the ink ribbon will not be initialized if the same ribbon is
used. Refer to the next section of this manual on initialization.
(3) When there is no error while card is inside the printer, the RESET button cannot function. Open and close
printer door if you wish to remove the cards. Initialization will start automatically and card will be ejected from
the N Card Outlet.
(4) When the thermal head is being cooled down, the RESET button cannot function. “Thermal head cooling” is
displayed as a status of the status moniter. For details, see page 7 of this manual.
Caution
Operating the Printer (continued)
Button status: Not pressed. Pressed.

4
Initialization
Operating the Printer
Initialization operations are performed as follows.
1. Initialization starts automatically when printer
door is closed.
2. Ink ribbon will be initialized when a different rib-
bon is used.
However, when initialization is activated using the
RESET button, ink ribbon initialization also will be
done even where the same ink ribbon is used.
Test print using the printer alone
Even when not connected to the host computer, test print-
ing of built-in patterns can still be done in the Ready mode
by pressing the RESET and CLEAN buttons simulta-
neously for more than 1 second (a "beep" sound will be
heard from the buzzer) and releasing it. For details, please
refer to “Checking After Changing Thermal Head” in the
“Startup uide” (separate book).
Differences Between Printing Modes
The setting of this printer can be switched between the
Standard mode and Fine mode for both YMC (color) print-
ing and Resin K (text) printing by using the setting func-
tion in the status monitor (Printer setting tool). When car-
rying out double-sided printing on the card, the same mode
setting will apply to both the front and rear faces. (Setting
a separate mode for the front and back is not possible.)
A longer printing time will be required when set to the
Fine mode. Printing time and merits of the Fine mode are
as follows.
YMC
Resin K
Approx. 5 sec / side
Approx. 2 sec / side
Improvement in evenness,
texture and sharper outline
Lesser broken and faded words
Additional Time when Set
to Fine Mode
Merits of Using Fine Mode
1) Upon removing a card during a card jam
2) Upon changing an ink ribbon when ink runs
out
Example
5
How to Use the Status Monitor
The DCP360i Status Monitor(“Status Monitor”) is a software for displaying printer status and performing various
printer settings.
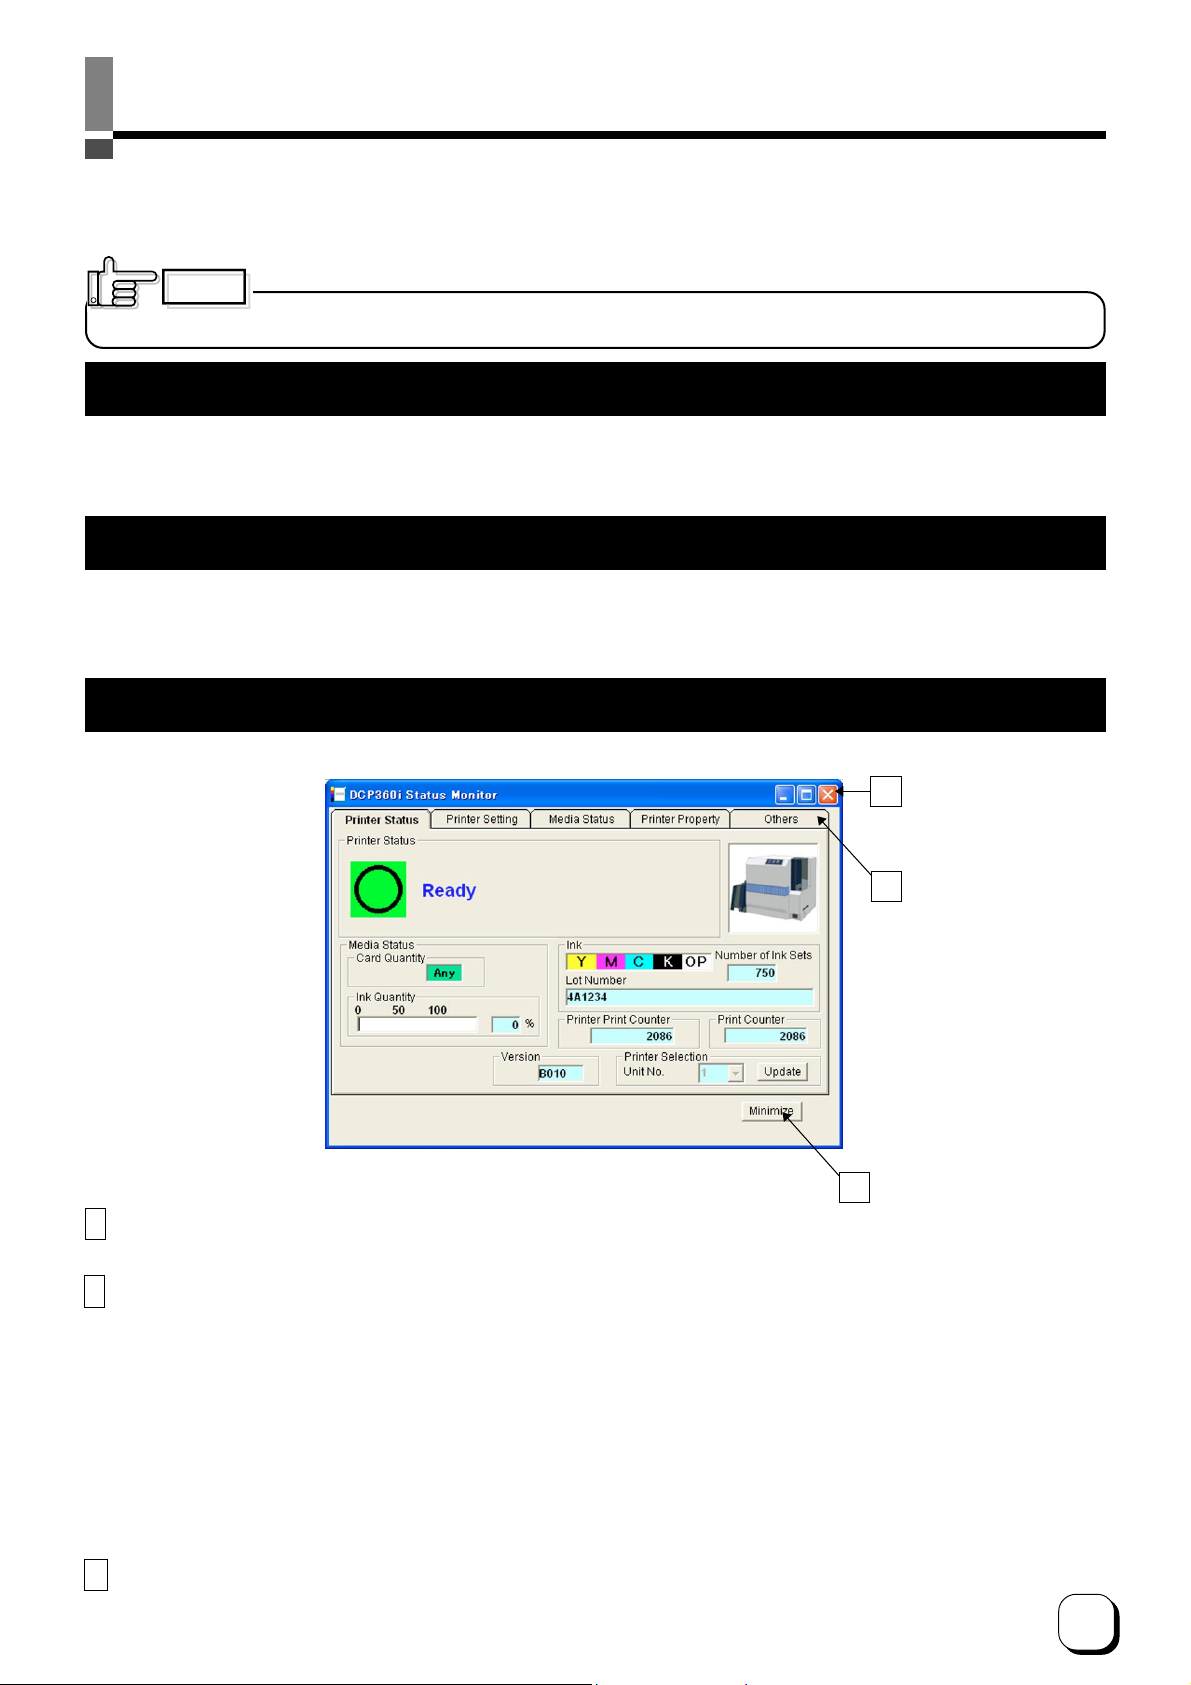
Screen Configuration
A
B
C
A : Close button
Exits the status monitor
B : TAB for switching screens
Switches to the following screens.
(1) Printer Status screen : Displays printer status.
(2) Printer Setting screen : For displaying/changing printer settings.
(3
) Media Status screen
: Displays status of card and ink ribbon.
(4) Printer Property screen : Displays printer configuration.
(5) Others screen : For updating printer firmware and performing test printing. Number of cards
issued is set to 0.
C : Minimize button
Minimizes the Status Monitor to an icon. The icon is displayed in the task bar.
Operation Environment
The Status Monitor can operate under the following environment.
• Windows® XP Professional and Home Edition
• Windows® 2000 Professional
Software Licensing Agreement
Before using the software contained in the CD-ROM supplied, please read through the “Software Licensing Agree-
ment” at the end of the “Startup uide” (separate book).
You will not be allowed to use this software unless you have agreed to accept the terms stated in the agreement.
Caution
Use the Status Monitor only when the printer power is tuened on.
6
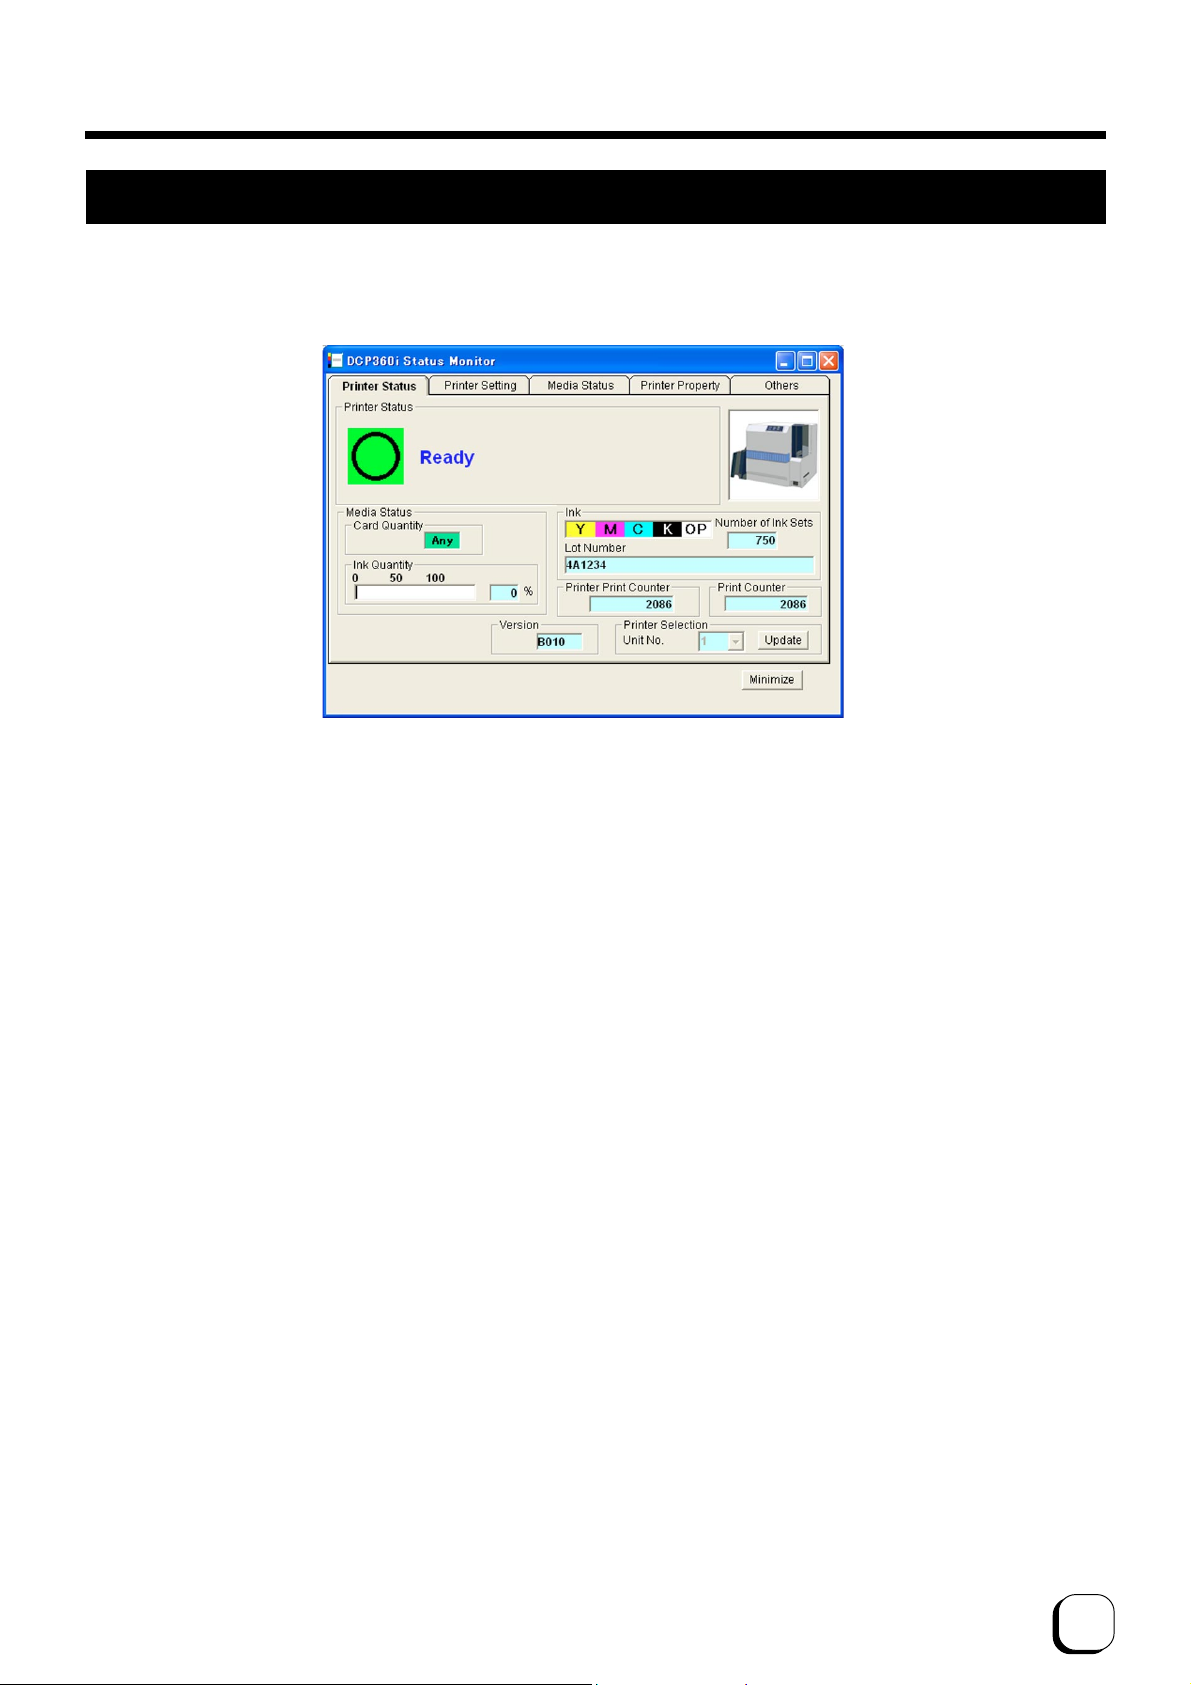
Monitoring Printer Status
(1) Printer status : Displays status of printer. (For details, refer to next page.)
(2) Media status : Indicates whether cards are present as well as the remaining ink quantity.
(3) Ink : Displays information of the installed ink ribbon. Check that the installed ink ribbon is
correctly displayed. The quantity and lot number will be blank if ink ribbon is not recognized
correctly or if K monochrome ink ribbon is installed. In such a case, it may not be possible
to control the ink ribbon properly. Check the installation status of the ink ribbon. Please
refer to “Setting the Ink Ribbon” in the “Startup uide” (separate book).
(4) Printer Print Counter : Displays the accumulation number of cards issued by the printer.
(5) Print Counter : Displays the number of cards issued. This figure can be reset to 0 on the Others screen.
(Refer to page 12 in this book)
(6) Version : Displays the version of the printer firmware.
(7) Printer Selection : Switches to the target printer when the same host computer is connected to multiple
printers. Click the Update button to update the status of the connected printer and select
a Unit No. Then the status of the selected printer will be displayed.
How to Use the Status Monitor (continued)
The Printer Status screen is used to monitor the printer status.

7
Indicates that printing is enabled.
Shows the details of a failure. A is an error code indicating
the type of failure. Please refer to the Error Code list (Pages
15-16 of this manual) for the Error Codes and Correspond-
ing Actions.
A
No Printer is found.
Initializing
Cleaning
Offline Mode
Self Test Mode
Download Mode
Thermal Head Cooling
Card Loading
Card Transporting
MA Encoding
Printing
Contact IC Encoding
Non-contact IC Encoding
Card Unloading
Unloading to N Card Outlet
Display Message
Power of printer is not switched on or the host computer and printer are not
connected properly with a USB cable.
Initializing printer. Printer will switch to the Ready mode after initialization is complete.
Cleaning of magnetic head in progress. Printer will switch to the Ready mode
after cleaning is complete.
Printer is in the offline mode.
Self-diagnostic mode. Turn on the printer power again to set printer to the
Ready mode.
Download mode. Turn on the printer power to set printer to the Ready mode.
The thermal head is being cooled down since its temperature became too
high. When cooled down, print opration will automatically start again.
Status of printer when it is issuing cards. Printer will return to the Ready
mode upon completion of card issuance.
Description
Ready Status Display Error Status Display
Other Status Display
How to Use the Status Monitor (continued)
Do not switch off printer's power when downloading as this will result in failure.
Caution
8
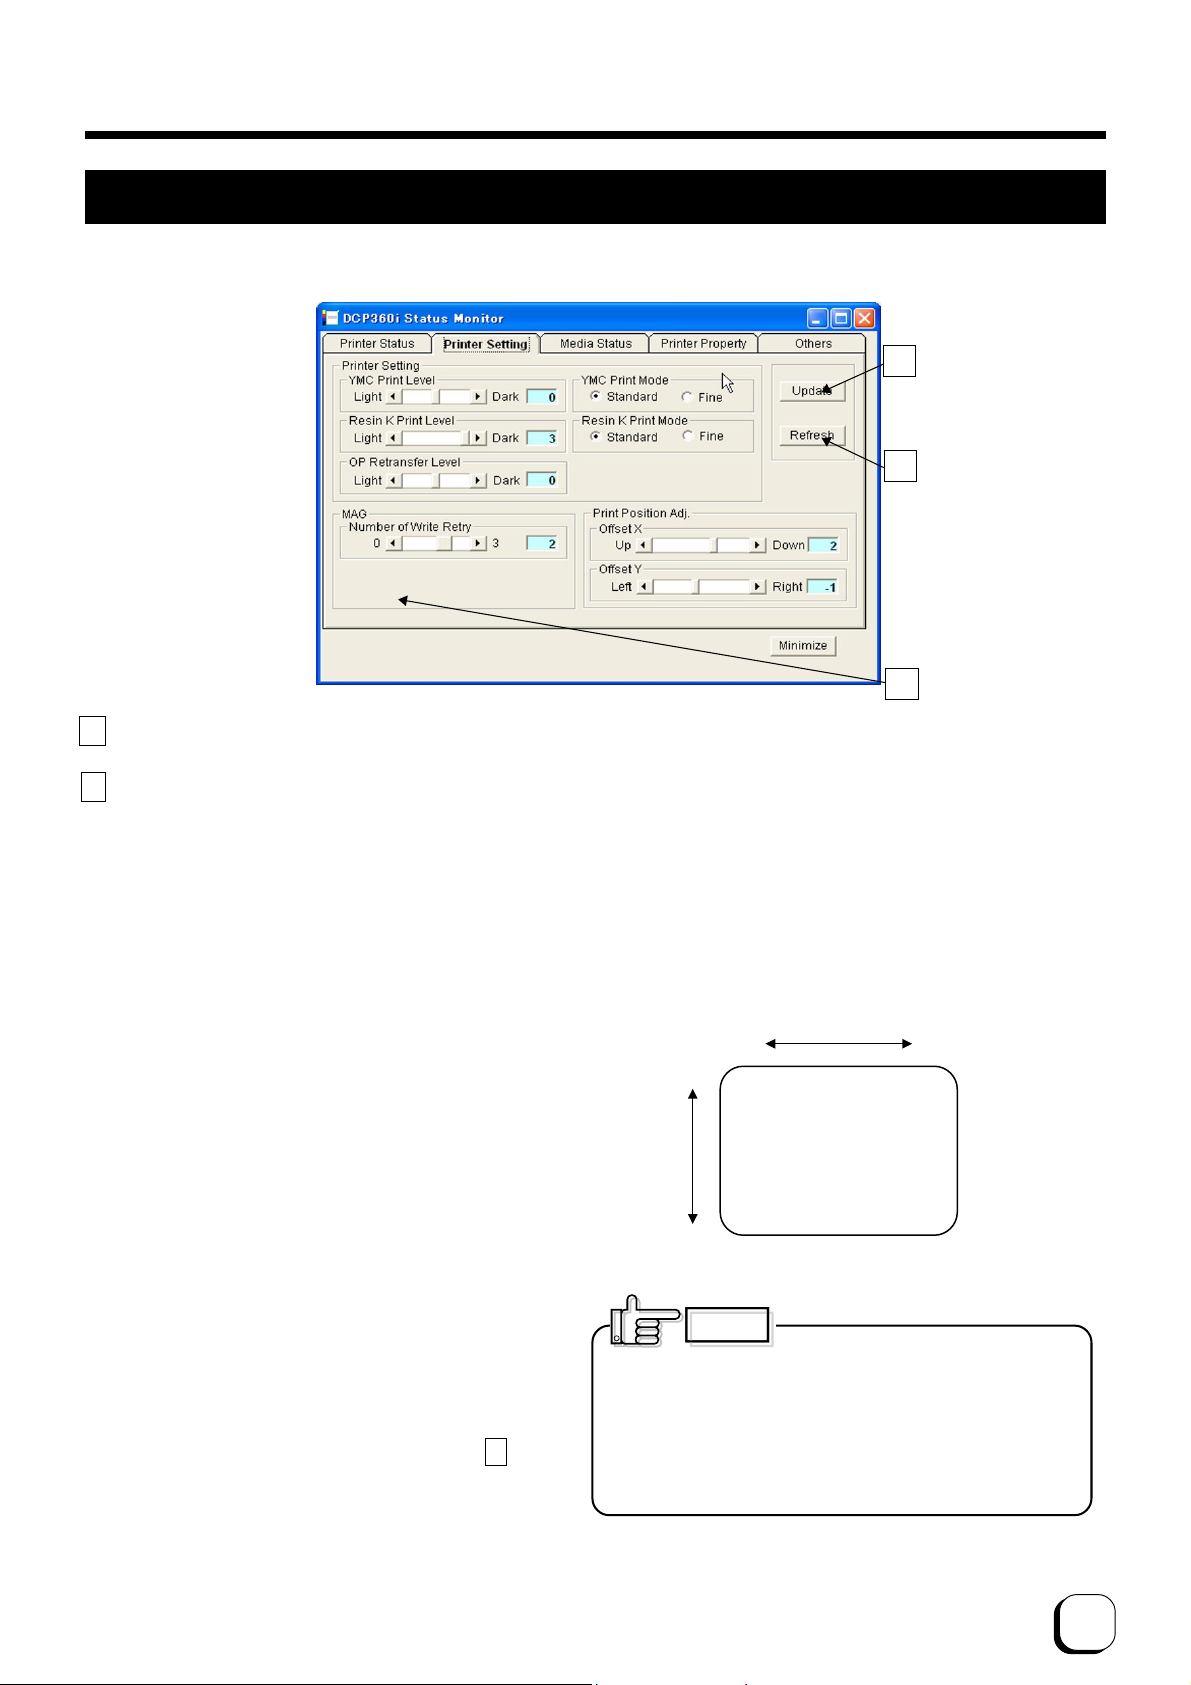
Changing Printer Settings
A: Update button
Changes printer settings.
B: Refresh button
Displays printer settings status on the screen
(1)
YMC Print Level
: Adjusts the print density of
YMC ink.
(2)
Resin K Print Level
: Adjusts the print density of
Resin K ink.
(3)
OP Retransfer Level
: Adjusts the transfer level
of the OP layer (protective
layer) of the ink to the
card.
(4) YMC Print Mode : Adjusts the printing quality
of YMC ink. If "Fine" is
selected, print quality will
be enhanced but printing
speed will decrease.
(5)
Resin K Print Mode
: Adjusts the print quality of
Resin K ink. If "Fine" is
selected, print quality will
be enhanced but printing
speed will decrease.
(6)
Number of Write Retry
:Sets the maximum
number of retries when
error occurs while writing
to the magnetic stripe.
(7)
Coercive Force Setting
: Change using C on the
screen. It will not be
displayed if the magnetic
unit is not installed on the
printer. Changes can only
be made if the magnetic
A
B
C
Offset X
Offset Y
Left
Down
Right
Card Stacker Side
Card Cassette Side
Up
How to Use the Status Monitor (continued)
Change printer settings on the Printer Settings screen.
unit is the ISO type, but
not for the JIS type.
(8)
Print Position Adj.
: Sets the position to start
printing. 1 unit is
equivalent to 1/150 inch.
The following diagram
illustrates the direction of
movement for the print
image.
Offset X and offset Y is already set by factory default.
But is necessary to set again after replacing the
thermal head. Setting offset X upwards too mach may
cause card jamming. In that case try to set offset X
downwards a little
Caution
9
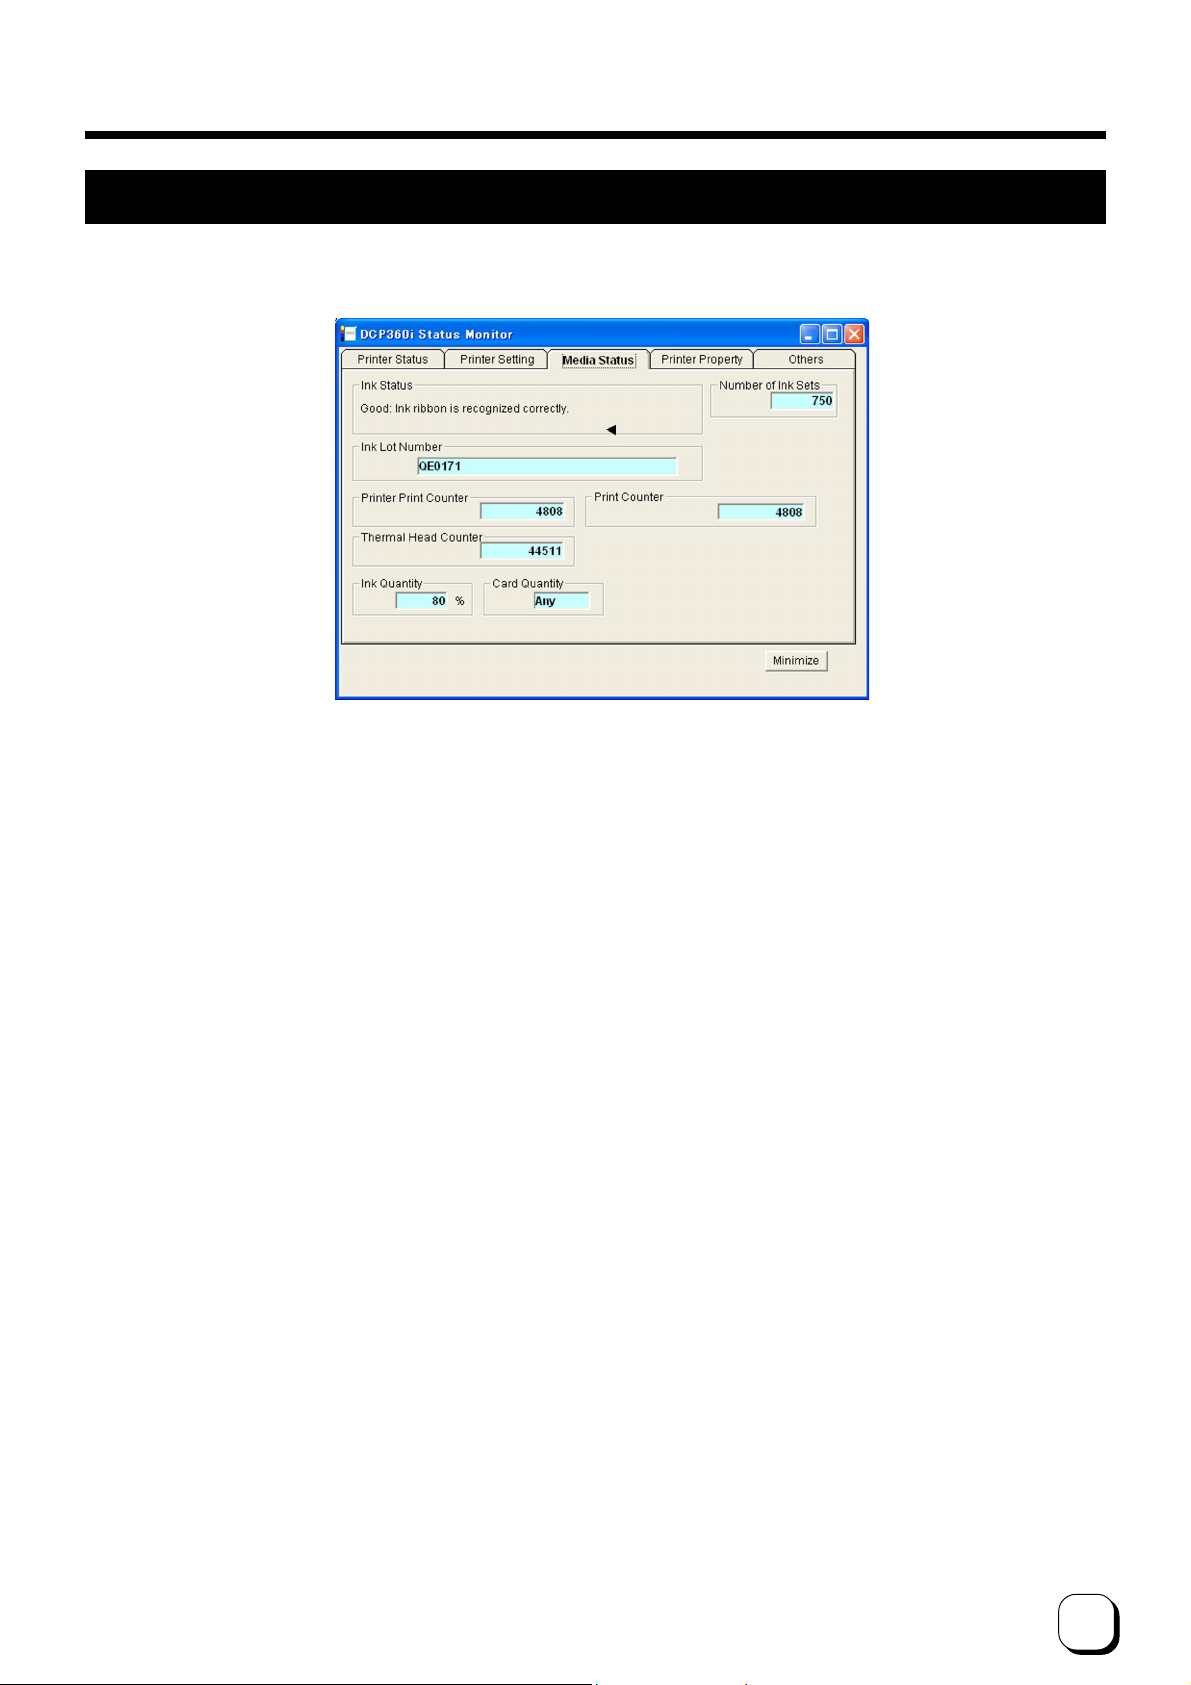
Checking the Media and Printing Status
Check the status of the printer media and printing on the Media Status screen.
(1) Ink Status : Displays the status of the installed ink ribbon. (For details, refer to next page.)
(2) Number of Ink Sets : Displays the number of screens for the ink ribbon that has been fitted. In the example on the
screen, a YMC-K-OP ink ribbon with 750 screen are installed. A YMC-K-OP cycle is counted
as 1 screen. The display will be blank when ink ribbon in use is unknown.
(3) Ink Lot Number : Displays the lot number of ink ribbon installed. The display will be blank when ink ribbon in
use is unknown.
(4)
Printer Print Counter
: Displays the accumulation number of cards issued by the printer.
(5) Print Counter : Displays number of cards issued. This figure can be initialized to 0.
(Refer to page 12 in this book)
(6)
Thermal Head Counter
: Displays number of printing ink panels of the thermal head. For example, 5 is added when all
YMCK-OP inks are used for printing.
(7) Ink Quantity : Displays remaining quantity of the ink ribbon.
(8) Card Quantity : Indicates whether cards are present.
How to Use the Status Monitor (continued)

10
Display When Ink is Unknown
Displays the tag status of ink ribbon in A.
• ood : Ink ribbon is recognized correctly.
•(252: Tag Data Defect) : Recorded data of tag is incorrect. Try again after replacing the ink ribbon.
•(253: Tag Data Defect) : Unable to communicate correctly with tag. Try again after replacing the ink ribbon.
•(254: No Tag) : Unable to read tag. In this case, recognized as K monochrome ink ribbon.
•(255: R/W Defect) : Printer's tag reader is defective. Repair of printer is required.
How to Use the Status Monitor (continued)
A
Other manuals for DCP360i
1
This manual suits for next models
1
Table of contents
Other EDISecure Printer manuals


