Parts
Page 2 Parts, Maintenance &Trouble Shooting
Pump Performance Depends On an air tight diaphragm, valve assemblies that seal well on the pump inlet and discharge
valve seats and inlet plumbing that is air tight all the way to the point it is submerse in the liquid. If the pump is not pumping
check first for anything blocking the hose. If it is clear then check the pump by:
1. Removing all hose and fittings from the pump.
2. To check the discharge valve assembly and diaphragm put your hand tightly over the pump inlet and pull back on the
handle. You should feel a vacuum suction and if the discharge valve assembly and diaphragm are working properly, you
should not be able to raise thediaphragm all the way. If you do not feel any suction, do the same thing again and listen for
air being sucked in around the diaphragm. If you hear air movement, inspect for loose bolts or warn diaphragm. If you
hear no air movement, remove the discharge chamber and inspect the valve assembly and valve seat. Clean or replace
the valve and clean or resurface the valve seat as appropriate.
3. To check the inlet valve assembly raise the diaphragm; put your hand over the discharge and push forward on the
handle. If the inlet valve is sealing properly, you should feel the pressure against your hand. If you don't, then remove the
inlet chamber and inspect the valve assembly and valve seat. Clean or replace the valve and clean or resurface the
valve seat as appropriate.
4. When you are sure the pump is working properly and the pump still will not pump liquid, check the inlet plumbing for
leaks. Depending on the height above the liquid even one unsealed fitting can prevent liquid from getting to the pump.
PUMPS USED FOR CRITICALAPPLICATIONS SHOULD BE INSPECTEDAND TESTED OFTEN
Visually Inspect Pump Inside and Out for Corrosion and Wear. Oil pivot pins. Replace Parts as Required.
Maintenance & Trouble Shooting
P-165AL-30-07pg.2
CAUTION
SpecialApplications-Edsonpumpsareusedformany
diverseapplications.Somemayrequirespecialpartsor
maintenanceprocedure.i.e..pumpingliquidwithgasoline
orotherfuelsrequiresusingVitondiaphragmsandvalves.
Ifyouhaveanyquestionsregardingproceduresforyour
application,callEdsoncustomerservice.
146
Duchaine
Blvd.,
New
Bedford,
MA
02745-1292 Tel. 508-995-9711 Fax 508-995-5021 E-Mail [email protected]165AL-30-200 Parts:
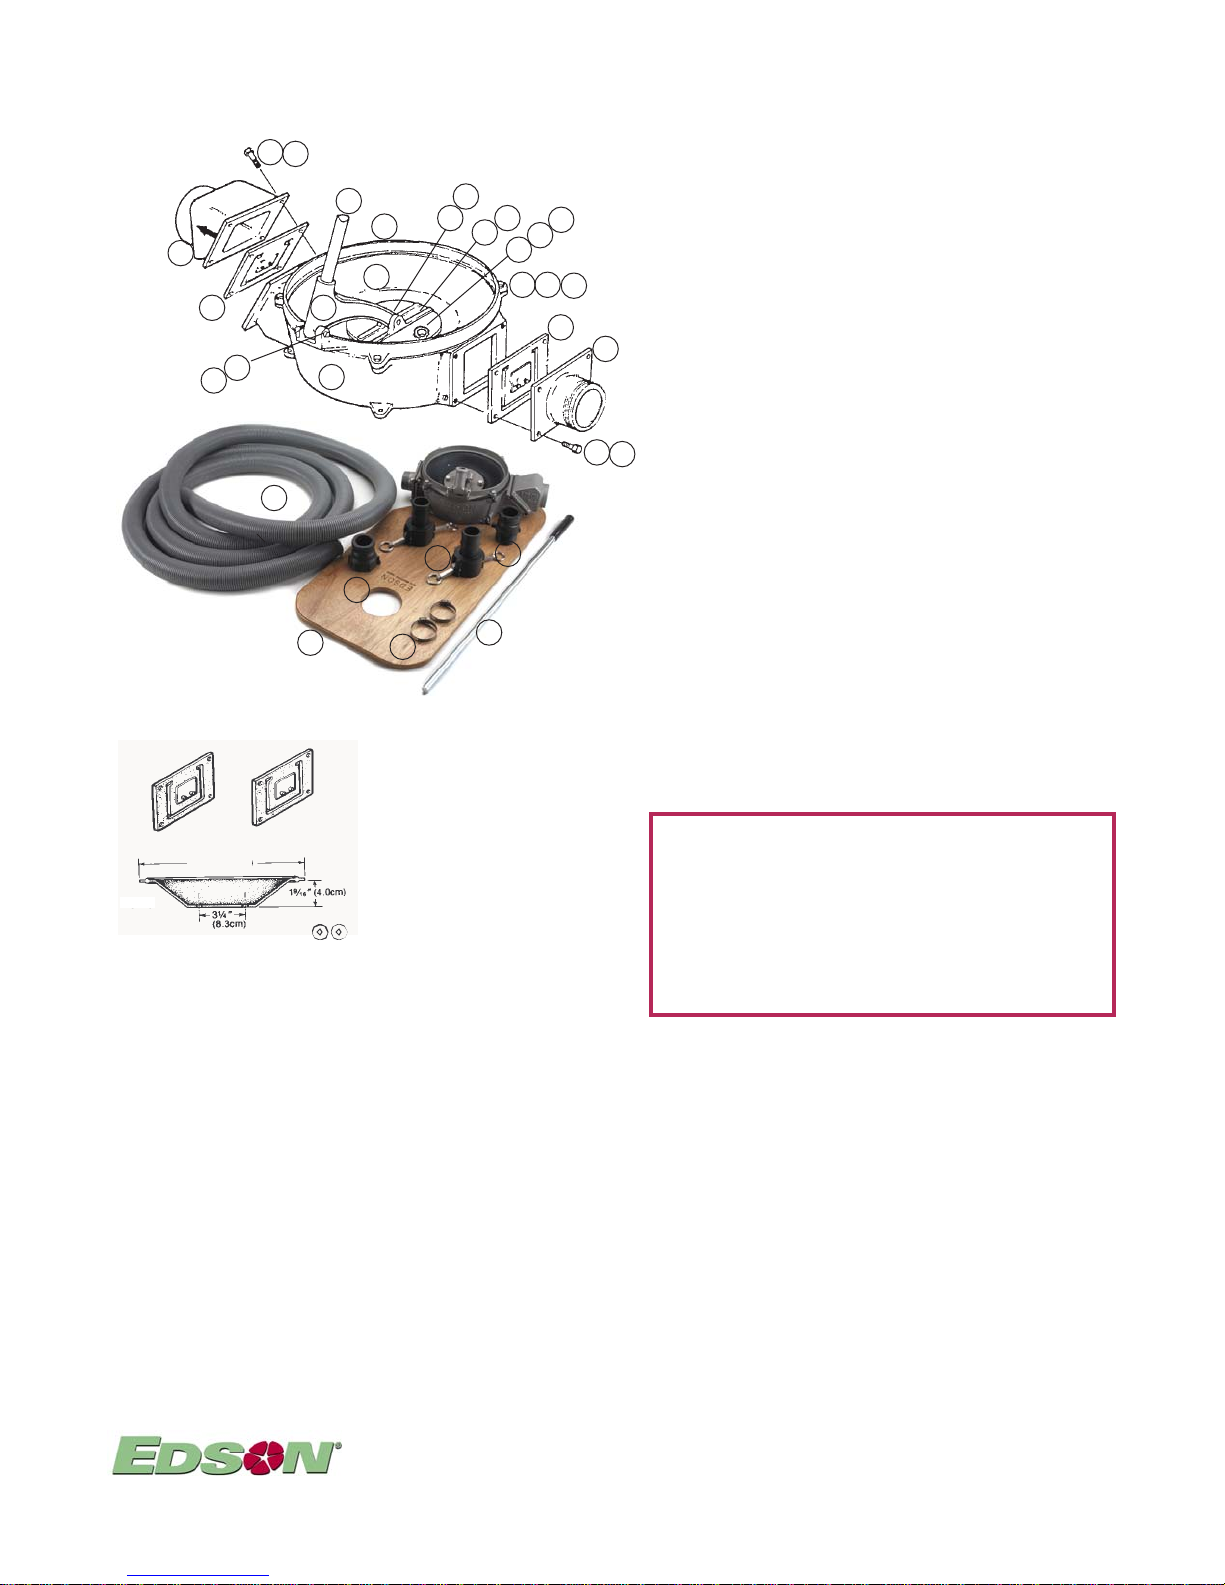
Key# Part No. Description Qty
1 113N-0 Size0 Diaphragm- Nitrile 1
2 160-G-107 ValveAssembly 1
3 160-A-1200 3/8" SealingWasher- Stainless 2
4 160-B-50A-200 2" DischargeChamber-Alum. 1
5 160-B-68A 2"Suction Chamber- Alum. 1
6 160-C-186 SideInlet Pump Base - Alum. 1
7 160-C-4A HeadringAlum. 1
8 160-B-28A DriveArm-Alum. 1
9 160-A-1A UpperStandard - Alum. 1
10 160-A-906 LowerStandard-SS(not visible in drawing) 1
11 160-A-41ST 32"Pump Handle with Grip 1
12 960-A-1315C HeadRingPivotPin 1
13 960-A-1315E StandardPivot Pin 1
14 F1/4-1.75-SC 1/4-20X 1.75 Socket HeadCapSrewStainless 4
15 F1/4-FN 1/4-20NutStainless 12
16 F1/4-LW 1/4"LockWasher 4
17 F1/4-1-SC 1/4-20 X1"SocketHeadCapScrewStainless 8
18 F3/8-LW 3/8"LockWasher 2
19 F3/8-1-HH 3/8-16X1"HHCSStainless 2
20 1/8"X3/4"Cotter Pin Stainless 4
21 1/4"-20X1.5"Carriage Bolts (Not Shown) 4
22 116CB-31 PumpCarryBoard 1
23 671FH-200 FlexHose2” 20’
24 670ST-200 HoseClamps 2”Stainless 2
25 156FE-200NY QuickClampHoseCoupling,Female 2” 2
26 158MF-200NY QuickClamp Adapter MaleQC XFNPT 2” 1
27 157MM-200NY QuickClampAdapter Male QC XMNPT2” 1
165AL-30-150 Parts: same as above except for the following:
Key# Part No. Description Qty
4 160-B-50A-150 1 1/2" Discharge Chamber-Alum. 1
5 160-B-324A 11/2" Suction Chamber - Alum. 1
23 671FH-150 FlexHose11/2” 20’
24 670ST-150 HoseClamps 11/2” Stainless 2
25 156FE-150NY QuickClampHoseCoupling,Female1 1/2” 2
26 158MF-150NY QuickClamp Adapter Male QCX FNPT1 1/2” 1
27 157MM-150NY QuickClampAdapter Male QC XMNPT 11/2” 1
Optional Parts substituted upon request:
1 113H-0 Size0Diaphragm- Hypalon 1
1 113V-0 Size0 Diaphragm - Viton 1
2 160-G-107V PumpValveAssembly-Viton 1
10
1
2
3
4
5
6
7
8
9
11 12
13
14
15
17
1819
20
2
15
17
15 16
20
27
11
22
23
24
25
26
Pump Spares Kits: SideInlet Nitrile Pump Spares Kit
Order# 114N-117-120Includes:
113N-0 Size 0 Diaphragm - Nitrile
160-G-107 ValveAssembly - Nitrile(2)
160-A-1200 3/8" Sealing Washer - Stainless (2)
SideInlet Hypalon Pump SparesKit
Order# 114H-117-120Includes:
113H-0 Size0 Diaphragm -Hypalon
160-G-107 ValveAssembly - Nitrile(2)
160-A-1200 3/8" Sealing Washer - Stainless (2)
SideInlet Viton Pump Spares Kit
Order# 114V-117-120Includes:
113V-0 Size 0Diaphragm -Viton
160-G-107V ValveAssembly - Viton(2)
160-A-1200 3/8" Sealing Washer - Stainless(2)
G-107
13H-0
Size 0
10.5"
G-107
113


