EFI bizhub PRESS C6000 Installation and operation manual

Part Number: 45097576
February 17, 2011
Copyright 2011 © Electronics for Imaging, Inc.
*45097576*
Upgrading the Fiery PRO80 80C-KM or
Fiery PRO80 70-60C-KM Color Server to
System Version 2.0
Overview
This document describes how to upgrade the Fiery PRO80 80C-KM or Fiery PRO80
70-60C-KM Color Server to system software version 2.0.
Notify the network administrator at the customer site that some archived jobs may no longer
print after you install version 2.0 system software.
NOTE:The term “Fiery PRO80” is used in this document to refer to the Fiery PRO80 80C-KM
or Fiery PRO80 70-60C-KM Color Server.
Contents of this kit
In addition to this document, this kit contains:
• Two 1GB DIMMs — for upgrading the memory from 2GB to 4GB.
• BIOS Upgrade CD — for upgrading the BIOS from version 1.31 to version 1.55.
• One-time use dongle — for upgrading the BIOS from version 1.31 to version1.55.
•MediaPackage
–System Software Package — System Software version 2.0 for installation on the
Fiery PRO80 following the BIOS upgrade procedure.
–User Software Package — User Software for installation on client computers; User
documentation CD; printed release notes; additional documentation.
Procedures
The list below is a summary; see the complete procedures in the following pages.
To upgrade the Fiery PRO80, perform the following procedures in the order shown below.
1. Install the additional DIMMs (see page 2).
2. Upgrade the BIOS (see page 3).
3. Install system software (see page 4).
Installing system software deletes everything on the HDD. Coordinate with the network
administrator at the customer site before installing system software.
4. Verify the product upgrade (see page 6).
Page 2 of 7
Part Number: 45097576
7
TOINSTALL THE DIMMS
1. Shut down and then open the Fiery PRO80 (see the Installation and Service Guide).
To access the DIMM sockets on the motherboard, you must remove the left panel.
2. Locate the two 1GB DIMMs provided in this upgrade kit.
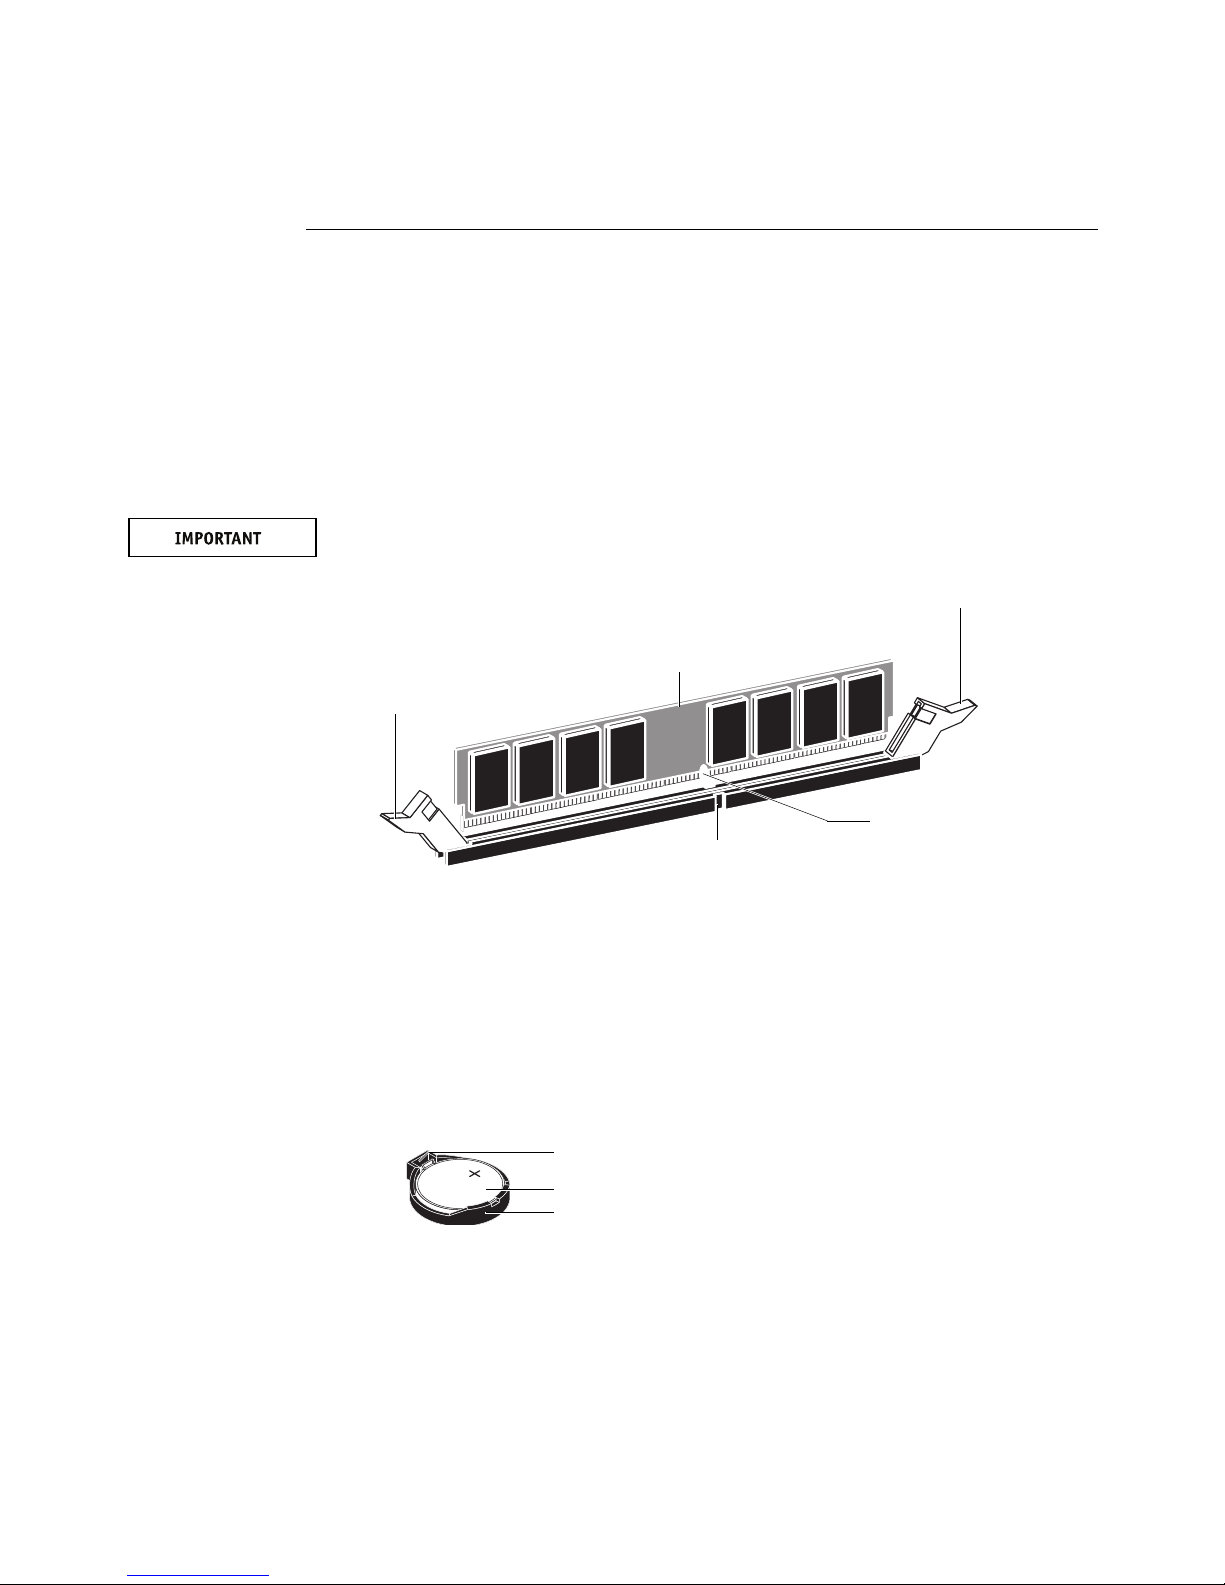
3. Install the DIMMs in the two empty DIMM sockets on the motherboard (DIMM1 and DIMM3).
Close the levers at each side of the socket to lock the DIMM into place.
NOTE:The socket is keyed so that the DIMM fits only one way. (See the notches in the
following figure.)
Make sure that the entire length of the DIMM (ends and center) is fully seated in the socket
and that the levers close securely around the ends of the DIMM.
4. Clear the CMOS as follows:
NOTE:You must clear the CMOS after installing a new DIMM to ensure compatibility
between the new component and the previous settings stored in the BIOS. Make sure that the
power cable is removed from the power outlet before clearing the CMOS.
• Remove the battery from the motherboard.
Carefully push the clip away from the battery until the socket ejects the battery. Then slide
the battery out of its socket.
• Wait two minutes to allow the motherboard electrical components to fully discharge.
• Reinstall the battery by sliding it into the socket so that the positive (+) side of the battery
faces up. Press the battery down into the socket until it snaps securely into place.
5. Reassemble the Fiery PRO80 and verify its functionality (see “Restoring and verifying
functionality after service” in the Installation and Service Guide).
Lever
Lever
DIMM
Socket notch
DIMM notch
Battery
Socket
C
li
p

Page 3 of 7
Part Number: 45097576
7
TOUPGRADE THE BIOS
1. Verify the current BIOS version.
Print a Configuration page and verify the BIOS version shown in the BIOS Setup section. If
the BIOS is version 1.31 or lower, proceed to step 4. If the BIOS is version 1.55, do not
perform this procedure; the BIOS does not require updating. Proceed to page 4.
2. Remove all USB storage devices and dongles (if any) that may be connected to any Fiery PRO80
USB ports.
3. Locate the one-time use dongle provided in this upgrade kit, and attach the dongle to any
Fiery PRO80 USB port.
4. Power on the Fiery PRO80, and immediately insert the BIOS upgrade CD into the DVD drive.
The BIOS upgrade CD must be in the DVD drive in time for the Fiery PRO80 to boot from
the CD. If you wait too long and the Fiery PRO80 does not boot from the CD, allow the
system to finish booting, and then power off and repeat this step.
5. Allow the Fiery PRO80 to boot up and display the BIOS Update CD screen.
At the message “Continue with BIOS Update?,” select YES by pressing the corresponding
button on the Control Panel.
The upgrade takes approximately 2 minutes, but may take longer for some systems. The
following messages display on the Control Panel during the upgrade:
• “Please wait...”
• “Updating BIOS. Do not shut down!”
6. At the message “BIOS updated successfully! Press OK to reboot,” select OK. Remove the BIOS
upgrade CD and one-time use dongle, and wait for the Fiery PRO80 to reboot.
Allow the Fiery PRO80 to reboot without interruption. Do not press any buttons on the
Control Panel during this time. When the Fiery PRO80 reaches idle on the Control Panel,
proceed to “To install system software” on page 4.
NOTE:The one-time use dongle is now expended and cannot be used again.

Page 4 of 7
Part Number: 45097576
7
TOINSTALL SYSTEM SOFTWARE
NOTE:This procedure assumes that you have already upgraded the BIOS as described
on page 3.
Installing system software deletes everything on the HDD. Coordinate with the network
administrator at the customer site before installing system software.
Software installation takes approximately 1 hour (not including the time needed to configure
Setup).
1. Ask the network administrator to archive any jobs that the customer wants to keep.
The network administrator should save the jobs to removable media or a location on the
network, so that the jobs can be imported back into the Fiery PRO80 queue after software
installation.
2. If you have not done so already, allow the network administrator the opportunity to print
the Job Log and save any custom simulation and output profiles. Also, print the following
(if possible):
• Configuration page—lists any installed options and records the customer’s current Setup
configuration so that it can be restored after the software installation.
• Font List—lists the fonts currently on the HDD. Along with the fonts provided in system
software, the customer may have installed additional fonts.
3. Remove all USB storage devices and dongles (if any) that may be connected to any Fiery PRO80
USB ports.
The system may hang if USB storage devices or dongles are connected to Fiery PRO80 USB
ports during software installation.
4. Insert the System Software DVD into the DVD drive.
5. From the Control Panel (or the Start menu, if a monitor is connected), reboot the Fiery PRO80.
Allow the system to reboot. This takes approximately one minute. Do not push any buttons
during this time.
6. At the message “All data will be deleted?” select Yes to continue.
7. When the Select Language screen displays, select a language.
Wait as messages display describing the installation process.
NOTE:This installation segment takes approximately 10 minutes.
8. At the message “System software is copied to the system. Remove media and press OK to
reboot,” remove the System Software DVD, and then select OK.
During this segment the Fiery PRO80 reboots several times. The Control Panel (and monitor,
if connected) may appear blank for up to 5 minutes during this segment. Various messages
display as the installation process continues.
NOTE:This installation segment takes approximately 20 minutes.

Page 5 of 7
Part Number: 45097576
7
9. At the message “Please insert User Software to continue installation,” insert the User
Software DVD into the DVD drive, and then select OK to reboot the Fiery PRO80.
During this segment, the following installations are performed:
• The entire contents of the User Software DVD are copied to a shared folder on the
Fiery PRO80 HDD, in e:\efi\user_sw.
• User software is installed on the Fiery PRO80.
After installation, when the Fiery PRO80 is connected to the customer’s network, users can
access the user software in the shared folder and install it on client computers.
During this segment, the message “Copying user software to Fiery shared folder. Please wait”
displays, as well as other messages describing the user software installation process.
If the installation hangs during this segment, possibly the time and date were not configured
in the BIOS following removal of the motherboard battery. To troubleshoot, see the
Installation and Service Guide.
NOTE:This installation segment takes approximately 30 minutes.
10. At the message “User Software installation complete. Remove CD/DVD. Press OK to reboot,”
remove the User Software DVD.
The system ejects the User Software DVD and reboots automatically. This segment takes
approximately two minutes. Wait for the system to boot completely and for Idle to appear on
the Fiery PRO80 Control Panel.
NOTE:If the message “Check digital press power and cable” displays on the Fiery PRO80
Control Panel (and the optional monitor, if present), verify that the digital press interface
cable is connected correctly to the digital press and the Fiery PRO80 and that the digital press
is on.
11. If a monitor, mouse, and keyboard are present:
When the Log On to Windows dialog box appears on the monitor, type Administrator in the
user name field, type Fiery.1 in the password field, and then click OK.
Type Fiery.1 exactly. The password is case-sensitive; for example, fiery.1 will not work.
12. Configure Setup using one of the following methods:
•Using the digital press touch panel—(assumes the Fiery PRO80 is connected to the digital
press). Access the Controller tab, select Setup, and then configure Setup using the
Configuration page that you printed earlier.
•Using Command WorkStation—(assumes a monitor, keyboard, and mouse are connected to
the Fiery PRO80). From the Server menu, choose Setup, and then configure Setup using
the Configuration page that you printed earlier.
NOTE:Bypass any settings if it is more appropriate for the network administrator to set them.
For more information, see Configuration and Setup on the User Documentation CD. The
system reboots after you exit Setup.

Page 6 of 7
Part Number: 45097576
7
13. If user documentation was stored on the Fiery PRO80, advise the site administrator to reinstall
the documentation files from the User Documentation CD.
14. Reinstall any required software patches:
Contact your authorized service/support center for a list of valid software patches. Some or all
of the patches listed on the Configuration page that you printed earlier may no longer be
valid. Before installing a patch, be sure to verify with your authorized service/support center
that it is valid for your system version. Installing an invalid patch may result in system
corruption.
Software patches may be accessed from one or more of the following locations:
• System Updates—Using the keyboard (if present), choose Start > All Programs > Fiery >
System Updates, and then click Check Now.
• Check for Product Updates—In a Web browser, connect to the IP address of the
Fiery PRO80, click the Configure tab, and then click Check for Product Updates.
15. Ask the network administrator to reinstall any custom simulations that may have been
deleted when you installed the software.
16. Print the Font List and ask the network administrator to reinstall any customer-supplied
fonts that may have been deleted when you installed the software.
Compare the new Font List with the old Font List that you printed before the software
installation. Any fonts that appear on the old Font List but not on the new Font List must be
reinstalled.
17. Ask the network administrator to import any archived jobs into the Fiery PRO80 queue.
NOTE:Some archived jobs may no longer print after you install version 2.0 system software.
18. Remind the network administrator to install the latest user software onto all computers that
print to the Fiery PRO80.
Using incompatible versions of the system and user software may result in system problems.
The latest user software is provided on the User Software media included with this upgrade
kit.
TOVERIFY THE PRODUCT UPGRADE
• Print a Configuration page and verify the following:
• Server Info > Memory (MB) is approximately 4096.
• Server Info > Version is “2.0.”
• BIOS Setup > BIOS Version is “1.55.”

Page 7 of 7
Part Number: 45097576
7
Error messages
One of the following error messages may display on the Control Panel when you attempt to
perform the upgrade. If an error condition cannot be corrected, restore the previous
configuration, if possible, and contact your authorized service/support center.
Error message Cause and solution
BIOS already enabled. Press OK to reboot. The BIOS has already been upgraded to
version 1.55. Remove the dongle and BIOS
upgrade CD, and proceed to install system
software (see page 4).
Product mismatch. Press OK to reboot. You are attempting to perform the BIOS
upgrade on an invalid system. Make sure that
you are performing the upgrade on a
Fiery PRO80 80C-KM or Fiery PRO80
70-60C-KM Color Server.
No uses remaining One of the following:
•Thedonglehasalreadybeen used and cannot
be reused. Obtain an unused dongle.
• The dongle is missing or improperly
attached. Attach the dongle securely to the
Fiery PRO80.
Invalid dongle found! Please remove dongle
and connect the correct dongle
One of the following:
• The attached dongle is not valid. The dongle
may have been attached by mistake. Obtain a
valid dongle and try again.
• More than one dongle is attached to the
Fiery PRO80. The BIOS upgrade cannot
proceed when multiple dongles are attached
to the system. Remove all dongles except the
correct dongle, and try again.
Updating BIOS. Do not shut down! This is a normal status message indicating that
the BIOS upgrade is in process.
However, if this message persists for longer
than 10 minutes, the BIOS upgrade has failed
due to a faulty system component. Refer to the
Fiery PRO80 Installation and Service Guide for
information on troubleshooting the faulty
component.
DVD does not support platform! Press OK to
reboot.
You are attempting to install version 2.0 of
system software on a Fiery PRO80 that does not
have BIOS version 1.55. First perform the
BIOS upgrade (see page 3), and then try
installing system software again.
This manual suits for next models
4
Table of contents
Other EFI Printer Accessories manuals


Popular Printer Accessories manuals by other brands


Ricoh
Ricoh Container Stacker Unpacking & setup instructions

Techsage
Techsage SpinJet 1000 Service guide

Kyocera Mita
Kyocera Mita FS-1800N+ Operation guide

Star Micronics
Star Micronics Automatic Sheet Feeder 10DK user manual

Xerox
Xerox STACKER 8855/721P Operator's manual

Epson
Epson T549300 Material safety data sheet