Inepro 132320 User manual

© 2019 Inepro B.V. All rights reserved
Installation Manual | Konica Minolta Kit - Bizhub
132320
Konica Minolta Kit - Bizhub
132320
Inepro Kit number: 132320
Konica Kit number: 9967000267

Version 2.2.20 Inepro B.V.http://www.inepro.com
Table of Contents
Introduction 1
Check Kit Content 3
Hardware Setup 8
........................................................................................................................................................ 91 Attach the PayCon to the bracket
........................................................................................................................................................ 112 Attach the bracket to the copier
Set up the copier 15
........................................................................................................................................................ 161 Konica Minolta Bizhub 250 Series
Set up the PayCon 18
........................................................................................................................................................ 191 Behaviour
........................................................................................................................................................ 202 Network
........................................................................................................................................................ 213 General Settings
Notes 24

Introduction
Part
I

2 - Konica Minolta Kit - Bizhub 132320
Introduction
Introduction
This kit is meant for the following Konica Minolta Bizhub copiers:
Konica Minolta
- Bizhub 200
- Bizhub 250
- Bizhub 350
- Bizhub C451
- Bizhub C550
- Bizhub C650
To install this kit we shall:
1. Check the content of kit, read more on page
2. Prepare and construct the hardware. To read more go to page
3. Set up the copier, read more on page
4. Set up the PayCon, you will find more information on page
4
4
4
4

Check Kit Content
Part
II

4 - Konica Minolta Kit - Bizhub 132320
Check Kit Content
Check Kit Content
Before you start installing the kit, you should check if you have received all the packages you need.
KM Mounting kit for Bizhub 250 / 350
Please check the content of the box and make sure all kits are complete.
KM Mounting kit for Bizhub 250 / 350
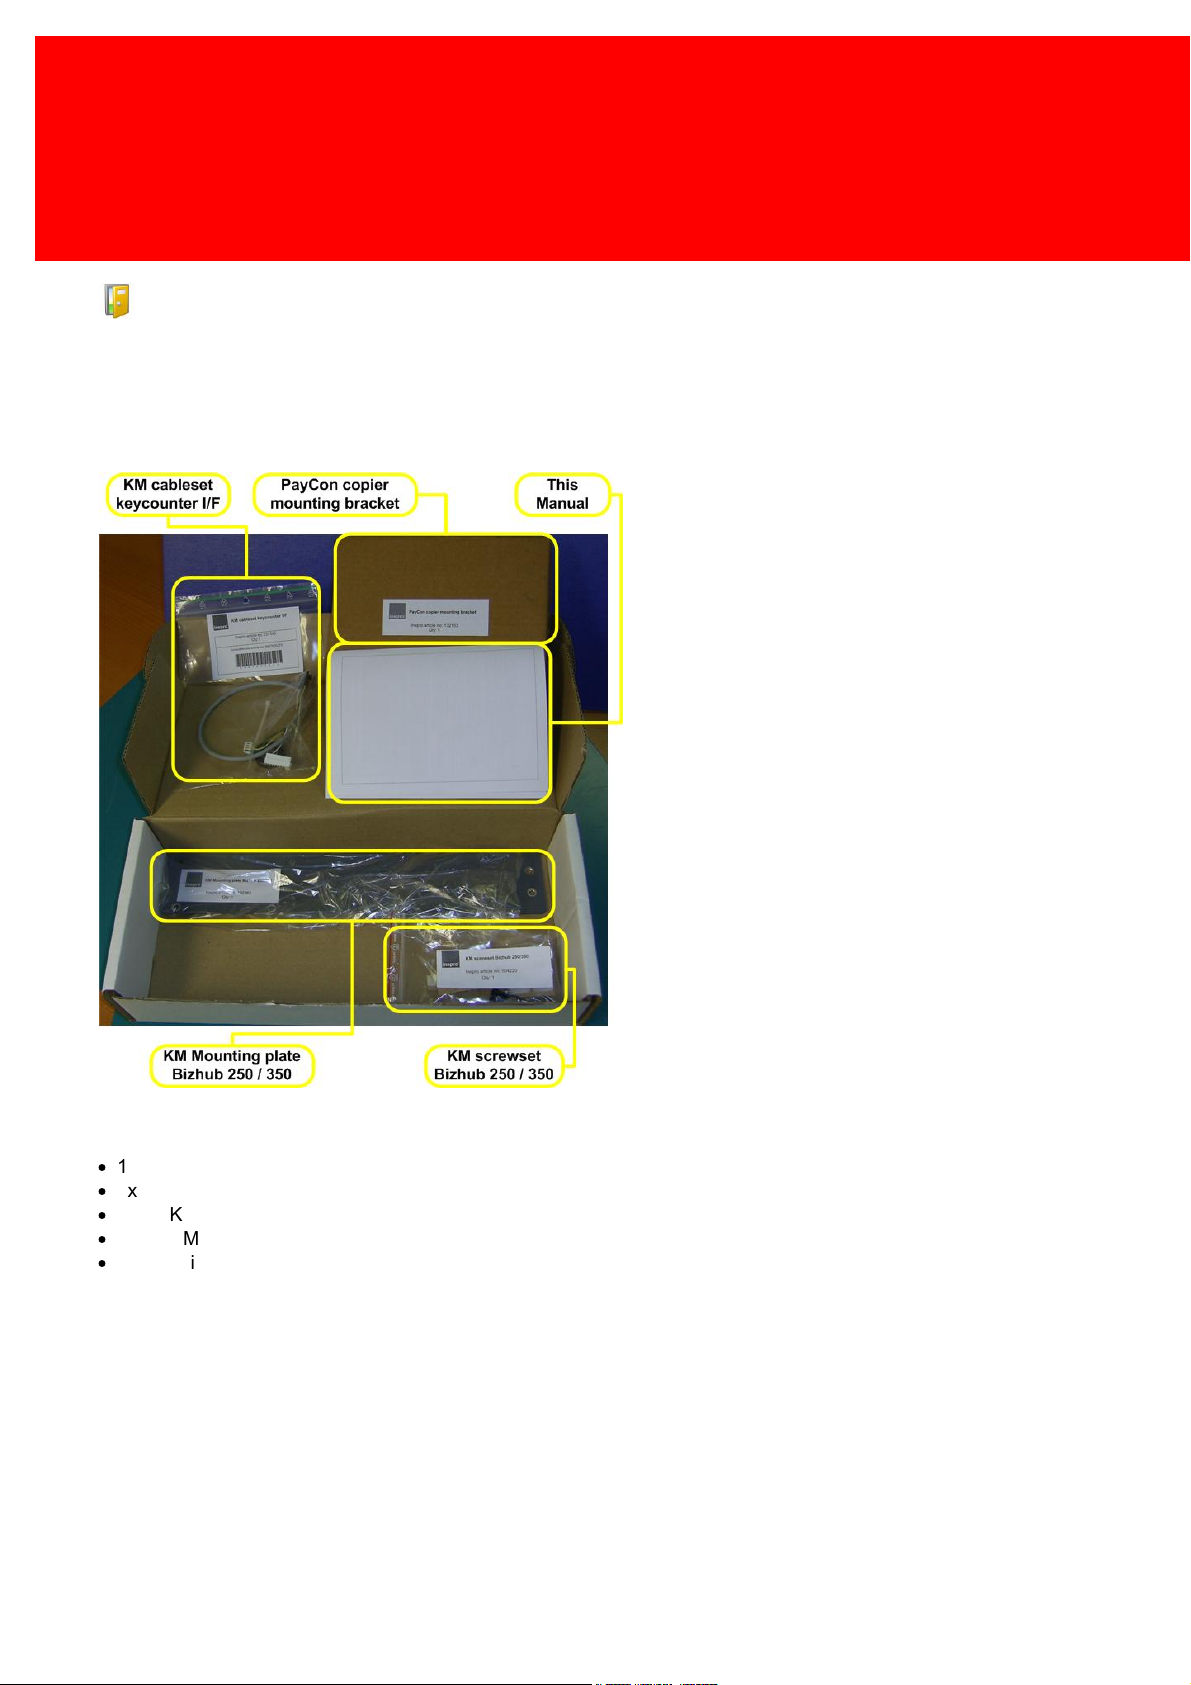
In the "KM Mounting kit for Bizhub 250/350" you should find:
·
1x KM cableset keycounter I/F
·
1x PayCon copier mounting bracket
·
1x KM screwset Bizhub 250 / 350
·
1x KM Mounting plate Bizhub 250 / 350
·
1x This manual

5
KM Screwset Bizhub 250 / 350
KM Screw set Bizhub 250 / 350
In the "KM Screwset Bizhub 250 / 350" you should find:
·
12x Cable guiders
·
1x Cable Relief
·
3x M4 x 5mm Dome shaped, cross head screws
·
2x M3 x 16mm Dome shaped, cross head screws
·
3x M3 x 30mm Dome shaped, cross head screws
·
5x M3 Star lock washers
·
3x M4 Star lock washers
KM Mounting plate Bizhub 250 / 350
1x KM mounting plate Bizhub 250 / 350

6 - Konica Minolta Kit - Bizhub 132320
Check Kit Content
KM Cableset keycounter I/F
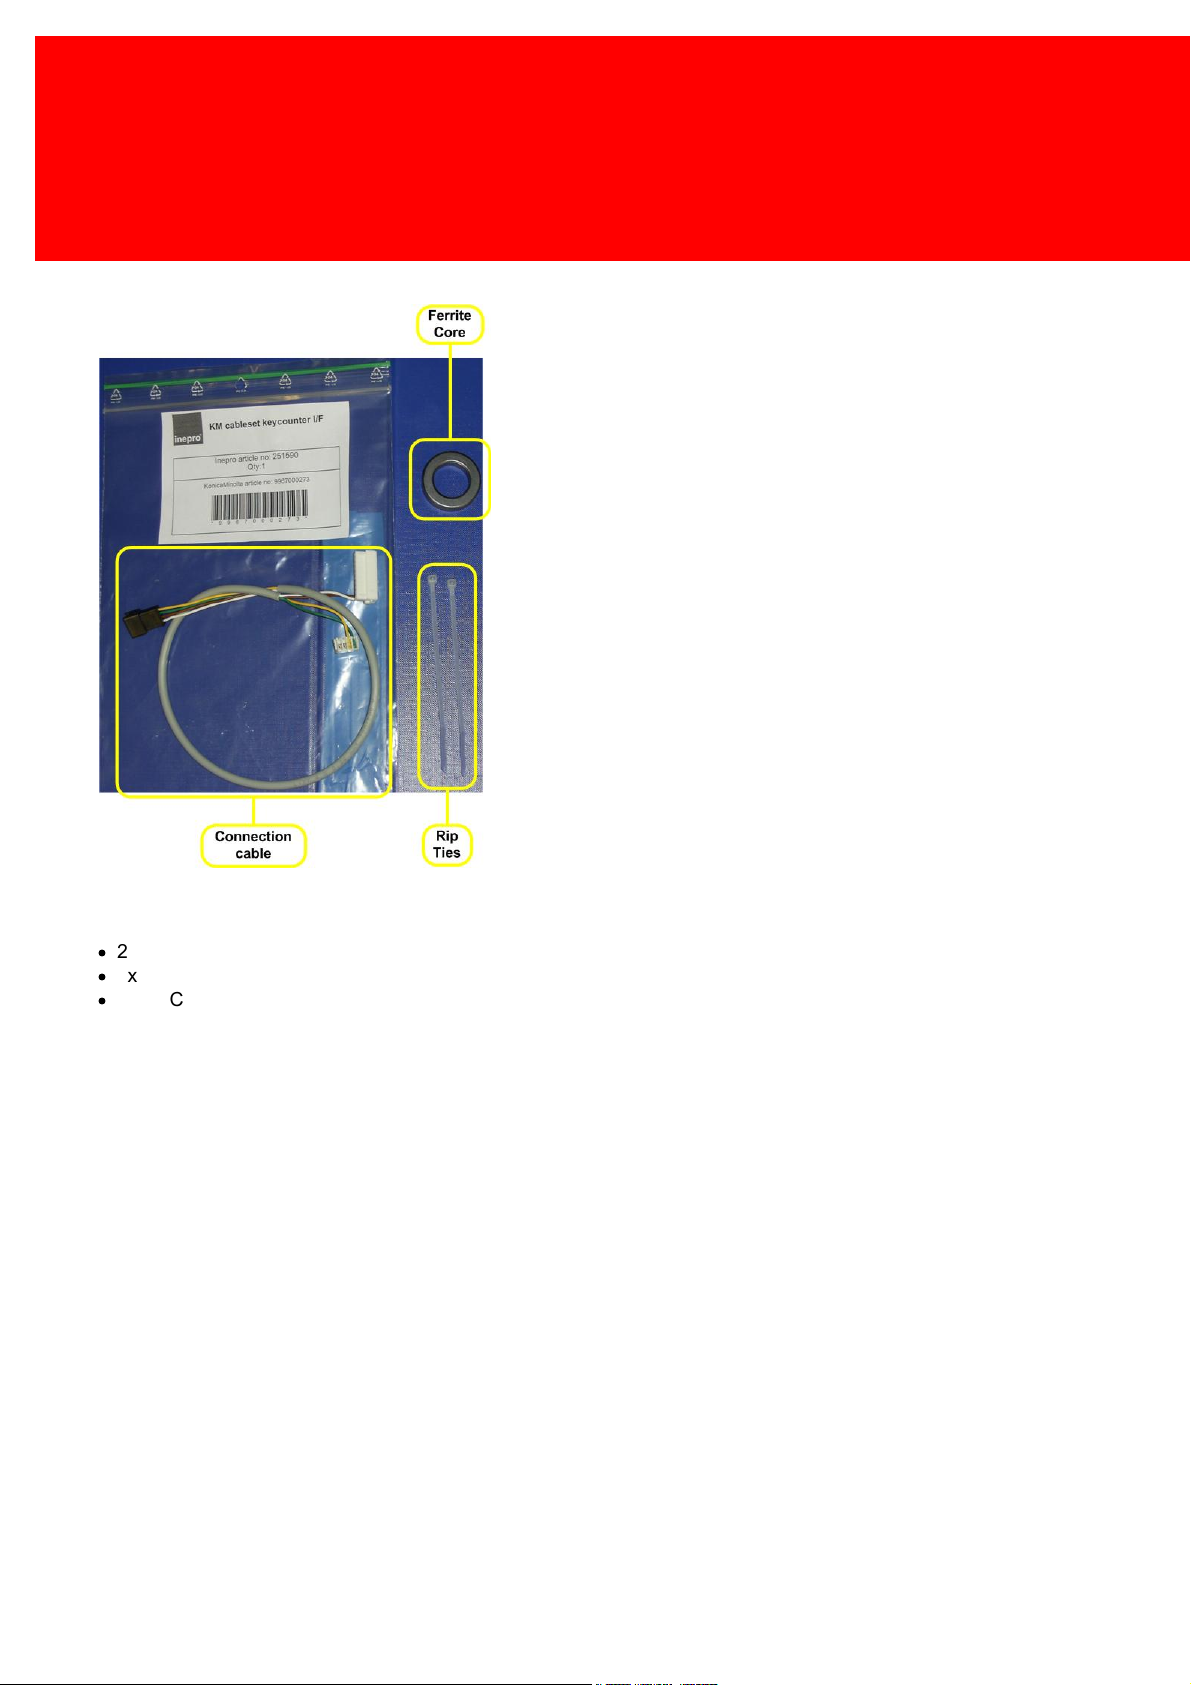
In the "KM Cableset keycounter I/F" you should find:
·
2x Rip tie
·
1x Ferrite core
·
1x Connection cable

7
PayCon copier mounting bracket
PayCon copier m ounting bracket
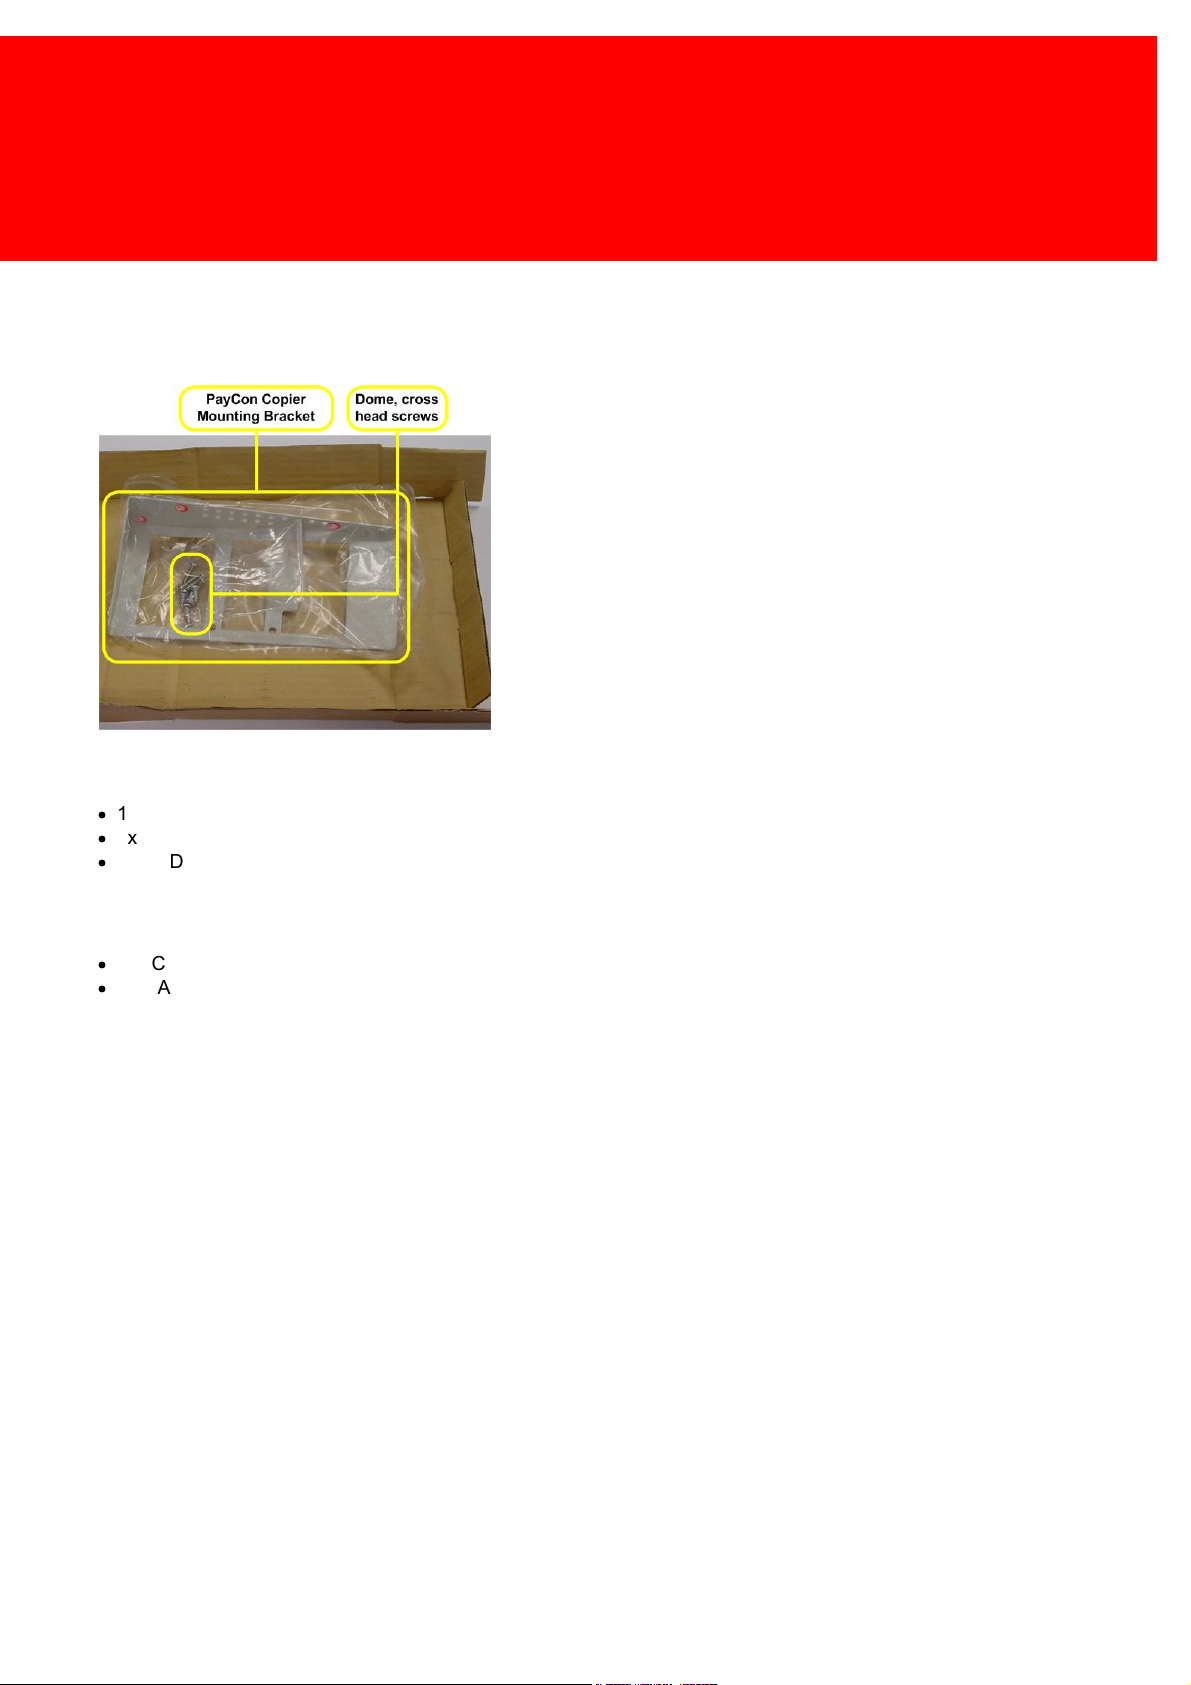
In the "PayCon copier mounting bracket" you should find:
·
1x PayCon copier mounting bracket
·
4x Dome shaped, cross head screws
·
3x Dome shaped, cross head screws (not needed for this installation)
Additional requirements for installation
·
PayCon Copy
·
2x CAT-5 Network cables (one cable included)

Hardware Setup
Part
III

9
Hardware Setup
Additional requirements:
·
Pair of wire cutters
·
No. 2 cross head screwdriver
·
No. 1 PosiDriv head screwdriver
·
PayCon Copy
·
2x CAT-5 Network cables (one cable included)
Attach the PayCon to the PayCon bracket
Please follow these steps:
1. Break out the appropriate gaps in the flaps
2. Feed the wires through the bracket and through the compartm ent border in the PayCon, then connect them as show n to the
'Copy_Out' and the 'Copy_In'. Also connect the pow er supply to the socket bottom -left to the 'Opto COM 12' as show n in the
picture on the left.

10 - Konica Minolta Kit - Bizhub 132320
Hardware Setup
3. Close the tw o left flaps and fasten the m iddle one w ith it's screw . Then use the rip tie to attach the pow er cable and
connection cable to the flap, thus creating a cable relief, and clip the rip tie using the w ire cutter
4. Close and gently screw dow n the final flap
5. Place the PayCon bracket on the PayCon w ith the screw s from the bracket kit

11
Attach the PayCon to the bracket
6. Align the holes of the mounting plate with the PayCon bracket and fasten it w ith the 3 M4 x 5m m screw s and their star lock
w ashers
7. Wrap the pow er w ire around the ferrite core twi ce, the netw ork cables once and attach the ferrite cores to the PayCon with
the adhesive tape
8. Place the connection wire and its cable relief in the bracket
Attach the PayCon bracket to the copier
1. Unscrew the copier cover.

12 - Konica Minolta Kit - Bizhub 132320
Hardware Setup
2. Pull the flap tow ards you, to free the cover connection. Then pull the cover out from under the flap and tow ards you.
3. The cover is now rem oved from the copier and the connection w ire can be seen. Release the w ire from the clips, making
sure you have enough length to w rap it around the ferrite ring.
4. Use the ferrite ring to shield the w ire from interference, fasten it w ith the rip tie. (Remove any other connectors from the
main connector, if present).
5. Break out the hole in the cover. Place the cover and the bracket on the copier and guide the w ire through the hole in the
cover and connect the w ire from the PayCon w ith that of the copier.

13
Attach the bracket to the copier
6. Screw the cover and bracket in place w ith the M3 x 16mm and M3 x 30mm screw s and fasten the cover w ith the cover screw
7. Place the 12 cable guiders
8. Open the little side flap to feed the netw ork cable through
9. Guide the cables through the 12 cable guiders

14 - Konica Minolta Kit - Bizhub 132320
Hardware Setup
10. Remove the transport foils from the PayCon to finish the installation
11. Finished

Set up the copier
Part
IV

16 - Konica Minolta Kit - Bizhub 132320
Set up the copier
Set up the copier
Turn on the copier. In this chapter you will set up the copier for use with the PayCon system. Examine the exact settings
below.
Konica Minolta Bizhub Series
·
Konica Minolta Bizhub 200
·
Konica Minolta Bizhub 250
·
Konica Minolta Bizhub 350
The PayCon Interface setting should be 'Double Click'. (See chapter: 'Set up the PayCon' on page ).
Activating the payment system:
1. Press <Utility>
2. Press <Check Detail>
3. Press <Stop> <0> <0> <Stop> <0> <1>
4. Press <0> <0> <0> <0> <0> <0> <0> <0> <END> Tech. Rep. Mode
5. Press <Stop> <9> Meter Count
6. Select <Key Counter>
- Select <Yes>
- Press <END>
7. Select <Vendor Mode>
- Select <OFF> (for correct working of duplex)
- Press <END>
8. Select <Total Counter>
- Select <Mode 2> (for correct working of duplex)
- Press <END>
9. Select <Large Size>
- Select <A3 11x17>
- Press <END>
10. Press <Reset>
11. Press <Exit>
19

17
Konica Minolta Bizhub 250 Series

Set up the PayCon
Part
V
This manual suits for next models
1
Table of contents
Popular Printer Accessories manuals by other brands

3D Fun Printz
3D Fun Printz Cord Holder manual

Xerox
Xerox 5500DN - Phaser B/W Laser Printer manual

TonerRefillKits
TonerRefillKits ReChargX RX076 instructions

Konica Minolta
Konica Minolta ViZion DR+ 1417V2 Calibration manual

Toshiba
Toshiba MY-1026 Service manual

Simplicity
Simplicity Printer Accessories How to use