EFX ILED-7TC User manual

LED Panel 7TC
ILED-7TC
PLEASE READ THESE INSTRUCTIONS
CAREFULLY BEFORE USE
USER GUIDE

1B
Contents
1.SafetyInstructions....................................................................................................2
2.TechnicalSpecifications ............................................................................................3
3.Installation................................................................................................................4
4.HowtoSettheFixture..............................................................................................4
4.1ControlPanel ......................................................................................................4
4.2MainFunction .....................................................................................................5
5.HowtoControltheUnit .........................................................................................10
A.UniversalDMXcontroller ...................................................................................10
B.Master/Slaveoperation......................................................................................11
C.EasyController(byCA‐8)....................................................................................11
6.DMX512Configuration ..........................................................................................12
7.DMX512Connection..............................................................................................13
8.Troubleshooting......................................................................................................14
9.CleaningAndMaintenance ....................................................................................15
2B
1.SafetyInstructions
WARNING
yPleasekeepthisUserManualforfutureconsultation.Ifyousellthefixturetoanotheruser,be
surethattheyalsoreceivethisinstructionbooklet.
yUnpackandcheckcarefullythereisnotransportationdamagebeforeusingthefixture.
yBeforeoperating,ensurethatthevoltageandfrequencyofpowersupplymatchthepower
requirementsofthefixture.
yIt’simportanttogroundtheyellow/greenconductortoearthinordertoavoidelectricshock.
yDisconnectmainpowerbeforeservicingandmaintenance.
yUsesafetychainwhenfixesthisfixture.Don’thandlethefixturebytakingitsheadonly,but
alwaysbytakingitsbase.
yMaximumambienttemperatureisTa:40℃.Don’toperateitwherethetemperatureishigher
thanthis.
yIntheeventofseriousoperatingproblem,stopusingthefixtureimmediately.Nevertryto
repairthefixturebyyourself.Repairscarriedoutbyunskilledpeoplecanleadtodamageor
malfunction.Pleasecontactthenearestauthorizedtechnicalassistancecenter.Alwaysusethe
sametypespareparts.
yDonotconnectthedevicetoanydimmerpack.
yDonottouchanywireduringoperationandtheremightbeahazardofelectricshock.
yTopreventorreducetheriskofelectricalshockorfire,donotexposethefixturetorainor
moisture.
yThehousingmustbereplacediftheyarevisiblydamaged.
yDonotlookdirectlyattheLEDlightbeamwhilethefixtureison.
Warning:
Pleasereadtheinstructionscarefullywhichincludesimportant
informationabouttheinstallation,operationandmaintenance.
Ifusinga230Vac50Hzpowersupply,donotconnectinseriesmorethan20units,use
anothermainssupplyforthenext20units.
Ifusinga120Vac60Hzpowersupply,donotconnectinseriesmorethan10units,use
anothermainssupplyfornext10units.

3B
yTopreventorreducetheriskofelectricalshockorfire,donotexposetheunittorainor
moisture.
yDonotopentheunitwithinfiveminutesafterswitchingoff.
yThehousing,thelenses,ortheultravioletfiltermustbereplacediftheyarevisiblydamaged.
Caution:
Therearenouserserviceablepartsinsidethefixture.Donotopenthehousingorattemptany
repairsyourself.Intheunlikelysituation,yourunitmayrequireservice,pleasecontactyour
nearestdealer.
2.TechnicalSpecifications
•DMXchannel:4channelmodes
•LED:7x3WRGB(Tri‐color)LED
•Powersupply
InputVoltage:AC100V‐240V~50/60Hz
•Powerconsumption:28.5W
•Fuse:T6.3A
•Dimension:212x80x212mm
•Weight:2.5kgs
4B
3.Installation
Theunitshouldbemountedviaitsscrewholesonthebracket.Alwaysensurethattheunitis
firmlyfixedtoavoidvibrationandslippingwhileoperating.Alwaysensurethatthestructureto
whichyouareattachingtheunitissecureandisabletosupportaweightof10timesoftheunit’s
weight.Alsoalwaysuseasafetycablethatcanhold12timesoftheweightoftheunitwhen
installingthefixture.
Theequipmentmustbefixedbyprofessionals.Anditmustbefixedataplacewhereisoutofthe
touchofpeopleandhasnoonepassbyorunderit.
4.HowtoSettheFixture
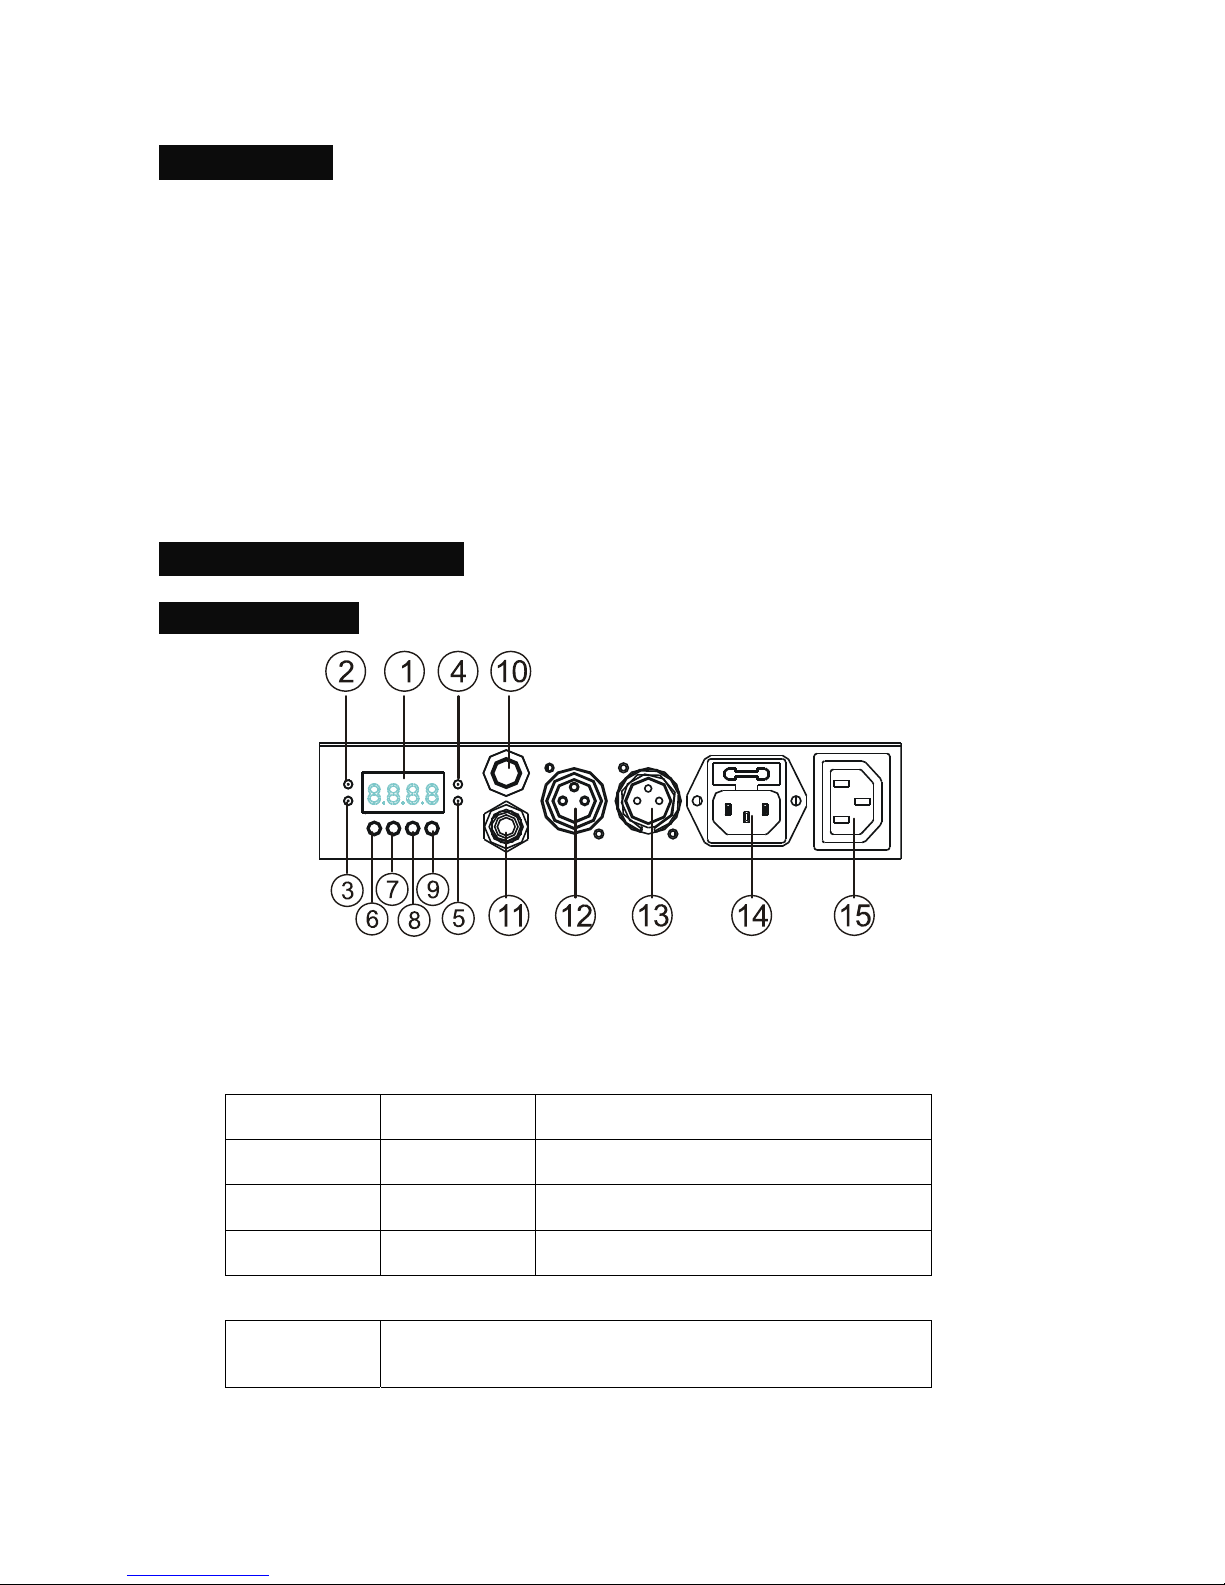
4.1ControlPanel
○
1Display:Toshowthevariousmenusandtheselectedfunctions
LED:
○
2DMXOnDMXinputpresent
○
3MASTEROnMasterMode
○
4SLAVEOnSlaveMode
○
5SOUNDFlashingSoundactivation
Button:
○
6MENUToselecttheprogrammingfunctions
5B
○
7DOWNTogobackwardintheselectedfunctions
○
8UPTogoforwardintheselectedfunctions
○
9ENTERToconfirmtheselectedfunctions
○
10 Microphone:Receivemusicforthesoundactive.
○
11 Onlyforremotecontrol:ByconnecttotheCA‐8tocontroltheunitforStandby,Function
andModefunction.
○
12 DMXoutput:ForDMX512link,use3/5 ‐pinXLRplugcabletolinkthenextunit.
○
13 DMXinput:ForDMX512link,use3/5 ‐pinXLRplugcabletoinputDMXsignal.
○
14 Mainsinput:Connecttosupplymainspower.
○
15 Mainsoutput:Connecttosupplymainspowerforthenextunit.
4.2MainFunction
Toselectanyofthegivenfunctions,presstheMENUbuttontoshowtherequiredoptiononthe
display.SelectthefunctionwiththeENTERbuttonandthedisplaywillblink.UsetheDOWNand
UPbuttonstochangethemode.Oncetherequiredmodehasbeenselected,PresstheENTER
buttontostore.TogobacktothemainmenuwithoutanychangespresstheMENUbutton.Hold
andpresstheMENUbuttonaboutonesecondorwaitforoneminutetoexitthemenumode.The
mainfunctionsareshownbelow:

6B
7B
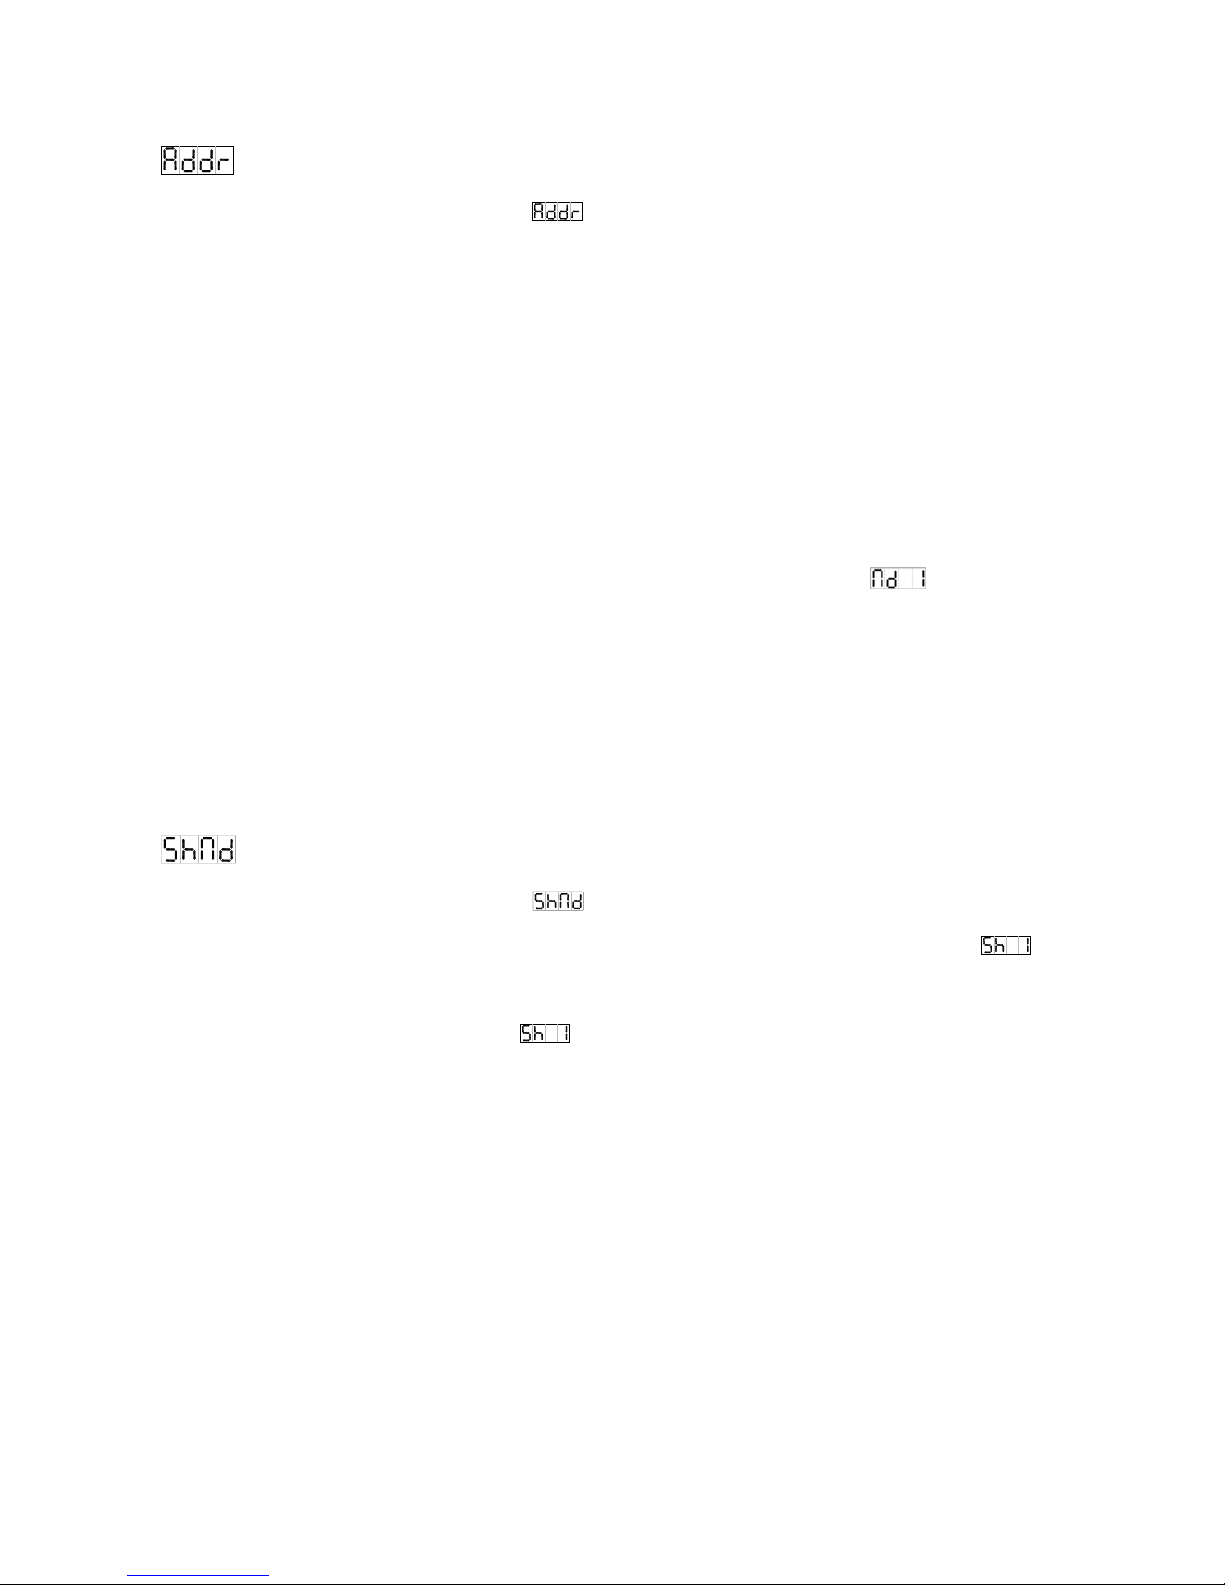
DMX512AddressSetting
PresstheMENUbuttonuptowhenthe isshownonthedisplay.PressENTERbuttonand
thedisplaywillblink.UseDOWNandUPbuttontochangetheDMX512Address(1‐512)orselect
(autosettingDMX512address).Onceselected,presstheENTERbuttontostoreor
automaticallyreturntothemainfunctionswithoutanychangesafter8seconds.Togobacktothe
functionswithoutanychangepresstheMENUbuttonagain.
Channelmode
PresstheMENUbuttonuptowhenthe isshownonthedisplay.PressingtheENTER
buttonandthedisplaywillblink.UsetheDOWNandUPbuttontoselectthe (channel1)
or (channel2)or(channel3)or (channel4)mode.Oncethemodehasbeen
selected,presstheENTERbuttontosetuporautomaticallyreturntothemainfunctionswithout
anychangeafter8seconds.TogobacktothefunctionswithoutanychangepresstheMENU
buttonagain.
ShowMode
PresstheMENUbuttonuptowhenthe isshownonthedisplay.PressingENTERbutton
andthedisplaywillblink.UseDOWNandUPbuttontoselectthe (autoshow)or
(show1)or (show2)or…(show12).Oncetheshowhasbeenselected,pressthe
ENTERbuttontoconfirm,ifyouselect(show1)or (show2)or…(show
12),youcanpressDOWNandUPbuttontoselect(slowest)or… (fastest),press
ENTERbuttontostoreorautomaticallyreturntothemainfunctionswithoutanychangeafter8
seconds.TogobacktothefunctionswithoutanychangepresstheMENUbuttonagain.
ChaseMode
PresstheMENUbuttonuptowhenthe isshownonthedisplay.PressingENTERbutton
andthedisplaywillblink.UseDOWNandUPbuttontoselectthe (chase1)or…or
(chase16)or (fade).Oncethechasehasbeenselected,presstheENTERbuttontoconfirm,

8B
thenpressDOWNandUPbuttontoselect (slowest)or… (fastest),pressENTER
buttontostoreorautomaticallyreturntothemainfunctionswithoutanychangeafter8seconds.
TogobacktothefunctionswithoutanychangepresstheMENUbuttonagain.
SlaveMode
PresstheMENUbuttonuptowhenthe isshownonthedisplay.PressingENTERbutton
andthedisplaywillblink.UseDOWNandUPbuttontoselectthe(Mater)or
(normal)or…or (16lightshow)mode.Oncethemodehasbeenselected,presstheENTER
buttontosetuporautomaticallyreturntothemainfunctionswithoutanychangeafter8seconds.
TogobacktothefunctionswithoutanychangepresstheMENUbuttonagain.
Soundcontrol
PresstheMENUbuttonuptowhenthe isshownonthedisplay.PressingENTERbutton
andthedisplaywillblink.UseDOWNandUPbuttontoselectthe (soundcontrolon)or
(soundcontroloff).Oncethemodehasbeenselected,presstheENTERbuttontosetupor
automaticallyreturntothemainfunctionswithoutanychangeafter8seconds.Togobacktothe
functionswithoutanychangepresstheMENUbuttonagain.
BlackoutMode
PresstheMENUbuttonuptowhenthe isshownonthedisplay.PressingENTERbutton
andthedisplaywillblink.UseDOWNandUPbuttontoselectthe (noblackout)or
(yesblackout)mode.Oncethemodehasbeenselected,presstheENTERbuttontosetupor
automaticallyreturntothemainfunctionswithoutanychangeafter8seconds.Togobacktothe
functionswithoutanychangepresstheMENUbuttonagain.
ColorMode
PresstheMENUbuttonuptowhenthe isshownonthedisplay.PressingENTERbutton
andthedisplaywillblink.UseDOWNandUPbuttontoselectthe (color1)or…or

9B
(show16)or (manualsetting).Onceselect,presstheENTERbuttontoconfirm,ifyou
select (manualsetting),youcanpressDOWNandUPbuttontoselect (red)or
(green)or (blue),pressENTERbuttontoconfirm,thenuseDOWNandUPbutton
toadjustthevalue(0‐255)andpressENTERbuttontostore,automaticallyreturntothemain
functionswithoutanychangeafter8seconds.Togobacktothefunctionswithoutanychange
presstheMENUbuttonagain.
LEDDisplay
PresstheMENUbuttonuptowhenthe isshownonthedisplay.PressingENTERbutton
andthedisplaywillblink.UseDOWNandUPbuttontoselectthe (LEDon)or (LED
off)mode.Oncethemodehasbeenselected,presstheENTERbuttontosetuporautomatically
returntothemainfunctionswithoutanychangeafter8seconds.Togobacktothefunctions
withoutanychangepresstheMENUbuttonagain.
DisplayInversion
Itisgoodforyoutoinstalltheunitonthefloororunderceiling.PresstheMENUbuttonupto
whenthe isshownonthedisplay.PressingENTERbuttonandthedisplaywillblink.Use
DOWNandUPbuttontoselectthe (displayinversion)or (displaynormal).Once
select,presstheENTERbuttontosetuporautomaticallyreturntothemainfunctionswithoutany
changeafter8seconds.TogobacktothefunctionswithoutanychangepresstheMENUbutton
again.
FixtureTemperature
PresstheMENUbuttonuptowhenthe isblinkingonthedisplay.PressingENTERbutton
andthedisplaywillshowthetemperatureoftheunit.TogobacktothefunctionspresstheMENU
buttonagain.

10B
Whitebalance
PresstheMENUbuttonuptowhenthe isshownonthedisplay.PressingENTERbutton
andthedisplaywillblink.UseDOWNandUPbuttontoselectthe (red)or (green)
or (blue),pressENTERbuttontoconfirm,thenuseDOWNandUPbuttontoadjustthe
value(125‐255)andpressENTERbuttontostore,automaticallyreturntothemainfunctions
withoutanychangeafter8seconds.Togobacktothefunctionswithoutanychangepressthe
MENUbuttonagain.
FixtureHours
PresstheMENUbuttonuptowhenthe isblinkingonthedisplay.PressingENTERbutton
andthedisplaywillshowthenumberofworkinghoursoftheunit.Togobacktothefunctionspress
theMENUbuttonagain.
Softwareversion
PresstheMENUbuttonuptowhenthe isblinkingonthedisplay.PressingENTERbutton
andthedisplaywillshowtheversionofsoftwareoftheunit.Togobacktothefunctionspressthe
MENUbuttonagain.
5.HowtoControltheUnit
Therearethreewaystocontrolthefixture
A.UniversalDMXcontroller
B.Master/Slaveoperation
C.Easycontroller(byCA‐8)
A.UniversalDMXcontroller
ThefixturecanbesettheDMXaddressremotelybyuniversalDMXcontroller.First,youneedto
programmingtwoscenesintoachase,andthenlinkthefixturestotheuniversalDMXcontroller.
Whenyourunthechase,allthefixturesofthechainwillbesettheseriesDMXaddress
automatically.Thefixtureusesfourchannels.Pleaserefertothefollowingdiagramtosetthe
11B
addressforthefirstfourunits.
B.Master/Slaveoperation
Thefixturewillallowyoutolink16fixturestogetherandoperatewithoutacontroller.In
Master/Slavemode,thefirstfixturewillcontroltheotherstogiveanautomatic,soundactivated,
synchronizedlightshow.Thisfunctionisgoodwhenyouwantaninstantshow.Thefirstfixtureit’s
DMXinputcablewillhavenothingconnectit,andtheotherfixtureswillbesetinslavemode
automatically.TheirDMXinputcablesconnectthelastfixtureDMXoutputcable(daisychain).Any
fixturecanactasaMasterorasaSlave.
C.EasyController(byCA‐8)
Theeasyremotecontrolisusedonlyinmaster/slavemode.Thereisaterminatorfor
connecttheeasycontrollerinsidethefixture.ByconnectingthecableintoDMXIN
waterproofcableentryglandtotheCA‐8terminatorofthefirstfixture,youwillfind
thattheremotecontrolonthefirstfixturewillcontrolalltheotherfixturesforStand
by,FunctionandModefunctions.
BlackoutToblackoutallthefixture
FunctionStrobe
1.Synchronousstrobe
inwhitecolor
2.Thesamecolorchase
3.Differentcolorstrobe
SelectColor
Color1‐16or
manualsetting
color
Selectshow
Show1‐12
SelectChase
Chase1‐16orfade
ModeSound1
(LEDOFF)
Manual
(LEDON)
Sound2
(LEDslowblinking)
Auto
(LEDfastblinking)
12B
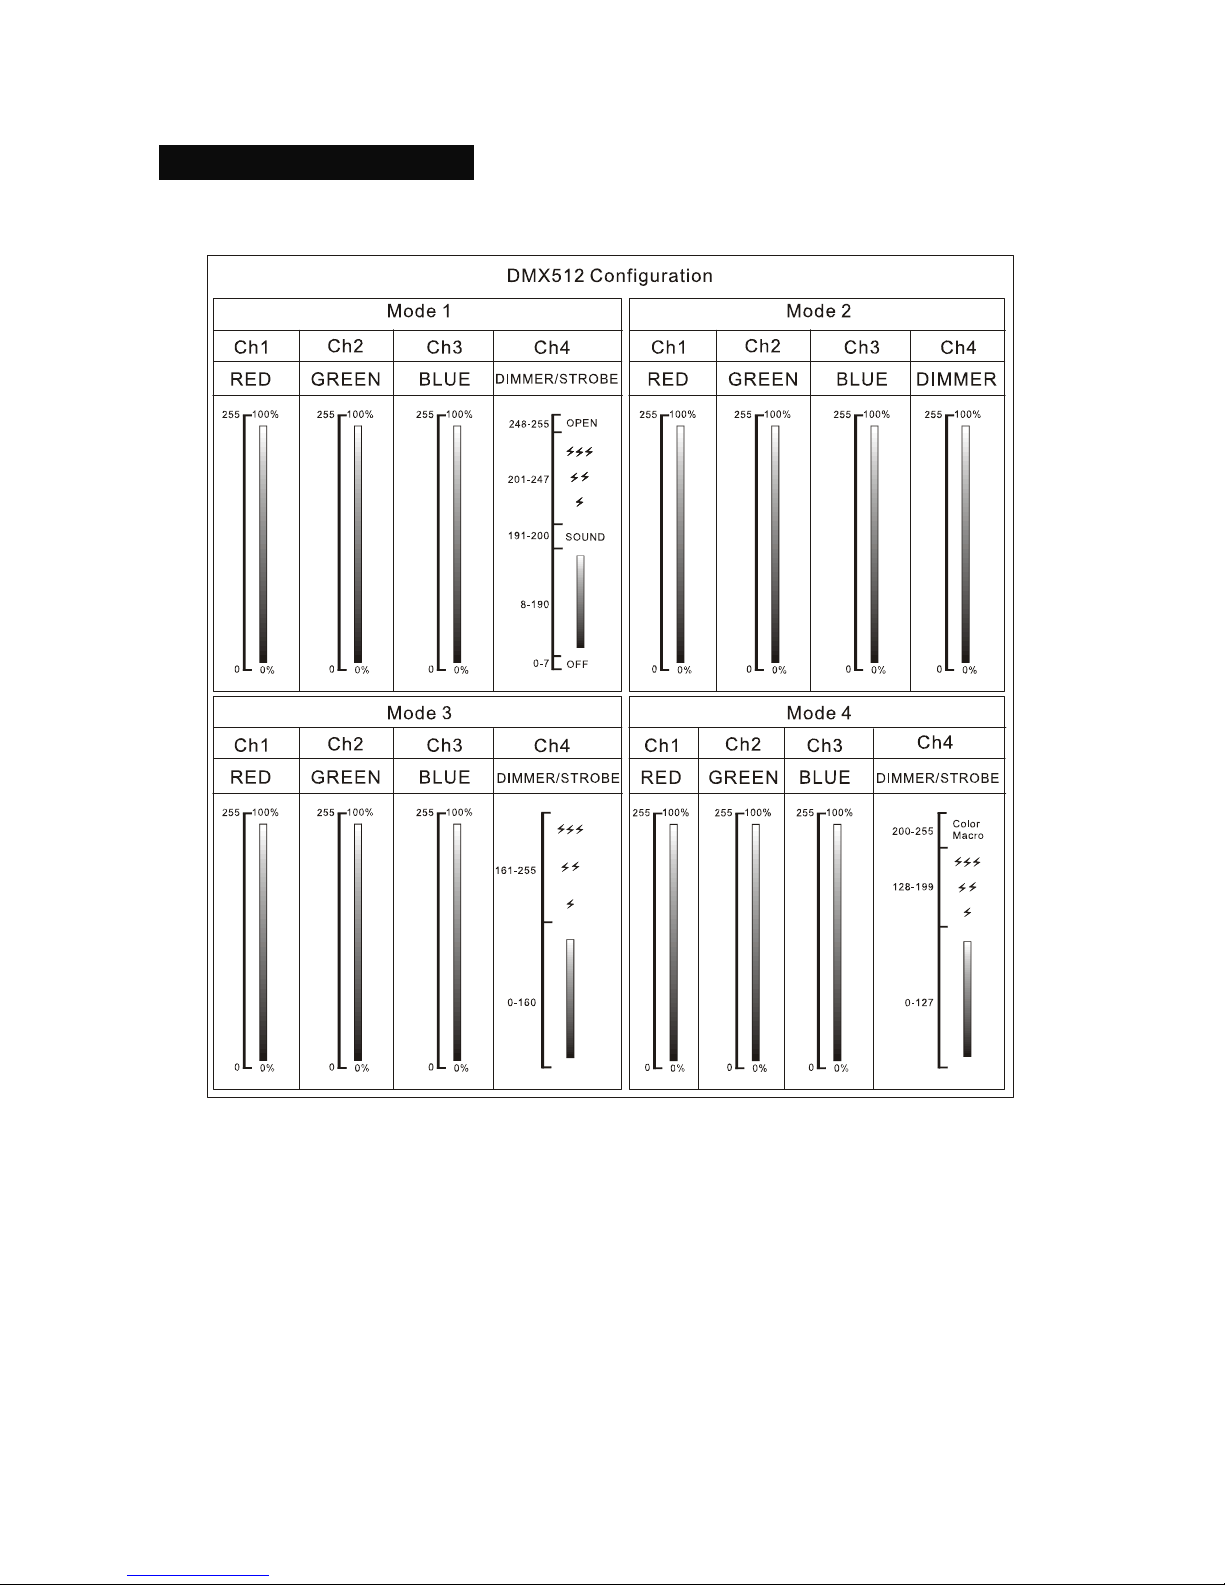
6.DMX512Configuration
4ChannelsMode:
13B
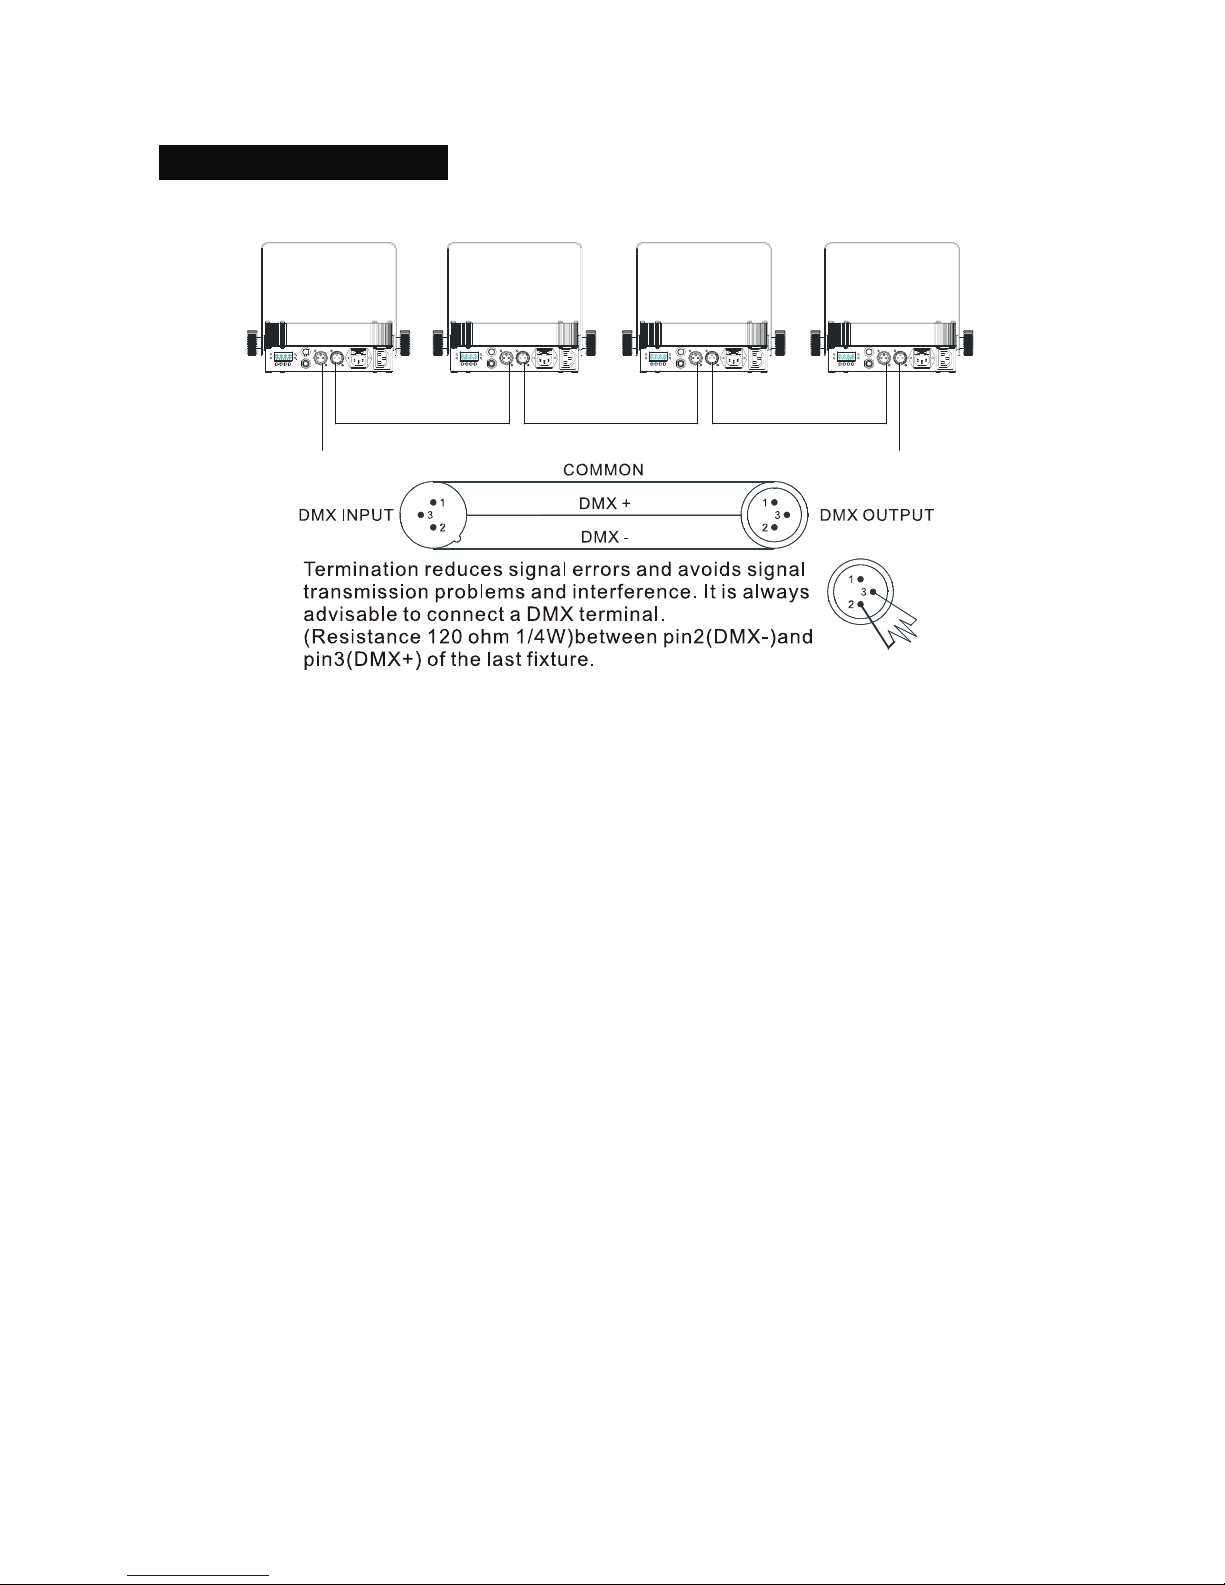
7.DMX512Connection
TheDMX512iswidelyusedinintelligentlightingcontrol,withamaximumof512channels.
1. Connectthefixturetogetherina“daisychain”withtheXLRplugcablefromtheoutputofthe
fixturetotheinputofthenextfixture.Thecablecannotbebranchedorsplittoa“Y”cable.
Inadequateordamagedcables,badsolderjointsorcorrodedconnectorscaneasilydistortthe
signalandshutdownthesystem
2. TheDMXoutputandinputconnectorspass‐throughtomaintaintheDMXcircuitwhenoneof
theunits’powerisdisconnected.
3. Atlastfixture,theDMXcablehastobeterminatedwithaterminatortoreducesignalerrors.
Soldera120‐ohm1/4 W resistorbetweenpin2(DMX‐)andpin3(DMX+)intoa3‐pinXLR‐plug
andplugitintheDMX‐outputofthelastfixture.
4. Eachlightingfixtureneedstohaveanaddresssettoreceivethedatasentbythecontroller.
Theaddressnumberisbetween0‐511(usually0&1areequalto1).
5. 3pinXLR:Pin1:GND,Pin2:Negativesignal(‐),Pin3:Positivesignal(+)
5pinXLR:Pin1:GND,Pin2:Negativesignal(‐),Pin3:Positivesignal(+),
Pin4/5:notused.

14B
8.Troubleshooting
Followingareafewcommonproblemsthatmayoccurduringoperation.Herearesome
suggestionsforeasytroubleshooting:
A. Thefixturedoesnotwork,nolight
1. Checktheconnectionofpowerandmainfuse.
2. Measurethemainsvoltageonthemainconnector.
B. NotrespondingtoDMXcontroller
1. DMXLEDshouldbeon.Ifnot,checkDMXconnectors,cablestoseeiflinkproperly.
2. IftheDMXLEDisonandnoresponsetothechannel,checktheaddresssettingsand
DMXpolarity.
3. IfyouhaveintermittentDMXsignalproblems,checkthepinsonconnectorsoronPCBofthe
fixtureorthepreviousone.
4. TrytouseanotherDMXcontroller.
5. CheckiftheDMXcablesrunnearorrunalongsidetohighvoltagecablesthatmaycause
damageorinterferencetoDMXinterfacecircuit.
C. Somefixturesdon’trespondtotheeasycontroller
1. YoumayhaveabreakintheDMXcabling.ChecktheLEDfortheresponseofthemaster/slave
modesignal.
2. WrongDMXaddressinthefixture.Settheproperaddress.
D. Noresponsetothesound
1. MakesurethefixturedoesnotreceiveDMXsignal.
2. Checkmicrophonetoseeifitisgoodbytappingthemicrophone.
E. Oneofthechannelsisnotworkingwell
1. ThesteppermotormightbedamagedorthecableconnectedtothePCBisbroken.
2. Themotor’sdriveIConthePCBmightbeoutofcondition.

15B
9.CleaningAndMaintenance
Thecleaningofinternalmustbecarriedoutperiodicallytooptimizelightoutput.Cleaning
frequencydependsontheenvironmentinwhichthefixtureoperates:damp,smokyorparticularly
dirtysurroundingcancausegreateraccumulationofdirtonthefixture’soptics.
yCleanwithsoftclothusingnormalglasscleaningfluid.
yAlwaysdrythepartscarefully.
yCleantheexternalopticsatleastevery20days.Cleantheinternalopticsatleastevery30/60
days.

Declaration of Conformity
We declare that our products (lighting equipments) comply with the
following specification and bears CE mark in accordance with the
provision of the Electromagnetic Compatibility (EMC) Directive
2004/108/EC.
EN55103-1: 2009 ; EN55103-2: 2009;
EN61000-3-2: 2006 + A1:2009 + A2:2009; EN61000-3-3: 2008.
&
Harmonized Standard
EN 60598-1:2008 + All:2009; EN 60598-2-17:1989 + A2:1991;
EN 62471:2008; EN 62493: 2010
Safety of household and similar electrical appliances
Part 1: General requirements

EFX is continuously developing and improving all its products. We reserve the right to change
specifications without prior notification. Images are representing but not necessarily a precise product
reference. EFX shall be under no liability for any loss, damage or injury for direct or indirect dependence
on the information contained in this guide.
Table of contents
Popular Lighting Equipment manuals by other brands


GTV
GTV SENSA OP-SENZWOKB-10 user manual

Multikomplex
Multikomplex SLT973 Installation, Use and Maintenance Instruction

Ecco
Ecco EB7181 Series Installation and operation instructions

SloanLED
SloanLED SignBOX II installation guide

Prizmatix
Prizmatix UHP-T Series user manual

Hama
Hama 00176547 operating instructions