4
EN - Installation Instructions
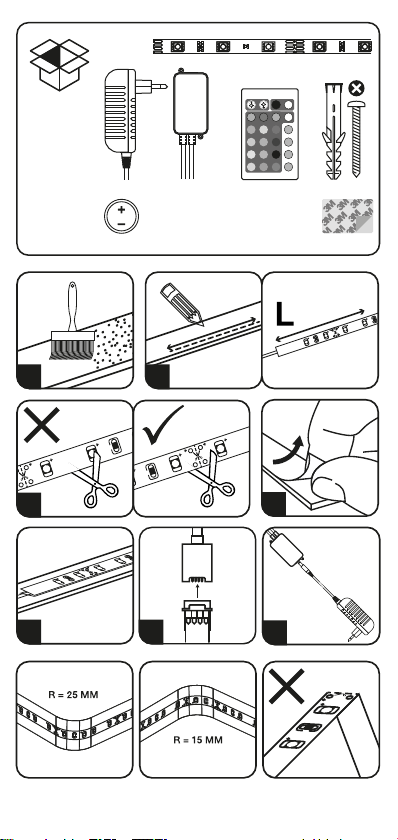
Please read the Safety Instructions first.
1. Clean the surface
2. Measure the desired lenght
3. Cut to size
4. Peel o protective foil
5. Stick the strips in place
6. Connect strips to the controller
7. Connect controller to the DC adapter (2)
Remote control instructions
The remote control uses a CR2025-3.3V button battery. The
remote control is on automatic standby mode when not in use.
Normally the battery can be used for more then six months. The
battery can be replaced by the same type.
NL - Installatie instructies
Lees eerst de veiligheid instructie.
1. Maak het oppervlak schoon
2. Meet de gewenste lengte
3. Knip de gewenste lengte af
4. Verwijder de beschermfolie
5. Plak de strip op zijn plek
6. Verbind de strip met de controller
7. Verbind de controller met de DC adapter (2)
Instructies afstandsbediening
De afstandbediening werkt op een knoop batterij (CR2025 - 3,3
Volt). Wanneer de afstandbediening niet in gebruik is staat deze
automatisch op stand-by modus. De levensduur van de batterij
bij normaal gebruik is ten minste zes maanden. De batterij kan
vervangen worden door een gelijk type.
FR - Consignes de montage
Veuillez lire les consignes de sécurité préalablement à
toute utilisation.
1. Nettoyez le support
2. Prenez les mesures pour la longueur souhaitée
3. Coupez à la taille souhaitée
4. Retirez le film protecteur
5. Collez le ruban à l’endroit souhaité
6. Connectez le ruban au contrôleur
7. Connectez le contrôleur à l’adaptateur CC
Instructions de la télécommande
La télécommande utilise une pile bouton CR2025-3.3V. La
télécommande se met en mode veille automatiquement
lorsqu’elle n’est pas utilisée. En conditions normales, elle peut
être utilisée pendant plus de six mois. La pile peut être
remplacée par le même type.
DU - Bedienungsanleitung
Bitte lesen Sie zuerst die Sicherheitshinweise
1. Reinigen Sie die Oberfläche
2. Messen Sie die gewünschte Länge
3. Auf die gewünschte Länge zuschneiden
4. Ziehen Sie die Schutzfolie ab
5. Kleben sie den Streifen fest
6. Verbinden Sie den Streifen mit dem Controller
7. Verbinden Sie den Controller mit dem DC Adapter
Anweisungen zur Fernbedienung
Die Fernbedienung funktioniert mit einer Konpatterie
CR2025-3,3V die im Lieferumfang enthalten ist. Die Fernbedien-
ung befindet sich im automatischen Standby-Modus wenn sie nicht
verwendet wir. Erfahrungsgemäß hält der Akku länger als sechs
Monate. Die Batterie kann durch denselben Typ ersetzt werden.
PL - Instrukcje Instalacji
Przeczytaj najpierw Instrukcje bezpieczeństwa.
1. Oczyść powierzchnię
2. Zmierz pożądaną długość
3. Przytnij do rozmiaru
4. Zdejmij folię ochronną
5. Przyklej pasek na miejscu
6. Połącz listwę ze sterownikiem
7. Podłącz kontroler do adaptera prądu stałego
Instrukcje zdalnego sterowania
Pilot zdalnego sterowania używa baterii przycisku CR2025-3.3V.
Pilot zdalnego sterowania jest w trybie automatycznego trybu
gotowości, gdy nie jest używany. Zwykle bateria może być
używana przez ponad sześć miesięcy. Baterię można zastąpić tym
samym typem.
CS - Pokyny pro instalaci
Nejprve si přečtěte bezpečnostní pokyny.
1. Vyčistěte povrch
2. Změřte požadovanou délku
3. Vyrežte na velikost
4. Odstraňte ochrannou fólii
5. Přilepte pásek na místo
6. Připojte pásek k regulátoru
7. Připojte ovladač ke stejnosměrnému adaptéru
Pokyny k dálkovému ovládání
Dálkový ovladač používá bateriovou kartu CR2025-3.3V.
Dálkový ovladač je v automatickém pohotovostním režimu,
pokud jej nepoužíváte. Normálně lze baterii používat více než
šest měsíců. Baterie lze vyměnit stejným typem.
IT- Istruzioni per l’installazione
Si prega di leggere prima le istruzioni di sicurezza.
1. Pulire la superficie
2. Misurare la lunghezza desiderata
3. Taglia su misura
4. Staccare la pellicola protettiva
5. Attaccare la striscia in posizione
6. Collegare la striscia al controller
7. Collegare il controller all’adattatore CC
Istruzioni di controllo remoto
Il telecomando utilizza una batteria a bottone CR2025-3.3V. Il
telecomando è in modalità standby automatica quando non è in
uso. Normalmente la batteria può essere utilizzata per più di sei
mesi. La batteria può essere sostituita dallo stesso tipo.
SK - Pokyny pre inštaláciu
Najprv si prečítajte bezpečnostné pokyny.
1. Vyčistite povrch
2. Zmerajte požadovanú dĺžku
3. Vyrežte na veľkosť
4. Odlepte ochrannú fóliu
5. Prilepte pásik na miesto
6. Pripojte pásik k ovládaču
7. Pripojte ovládač k DC adaptéru
Pokyny pre diaľkové ovládanie
Diaľkové ovládanie používa tlačidlovú batériu CR2025-3.3V.
Diaľkový ovládač je v režime automatického pohotovostného
režimu, keď sa nepoužíva. Bežne sa batéria môže používať viac
ako šesť mesiacov. Batériu je možné vymeniť rovnakým typom.
ES - Instrucciones de instalación
Por favor, lea las instrucciones de seguridad primero.
1. Limpiar la superficie
2. Medir la longitud deseada.
3. Cortar a medida
4. Retire la lámina protectora
5. Pegue la tira en su lugar
6. Conecte la tira al controlador
7. Conecte el controlador al adaptador de CC
Instrucciones de control remoto
El control remoto utiliza una pila de botón CR2025-3.3V. El
control remoto está en modo de espera automático cuando no
está en uso. Normalmente, la batería se puede utilizar durante
más de seis meses. La batería puede ser reemplazada por el
mismo tipo.