Egholm 2100 User manual

OPERATOR’S MANUAL
Snow Blower
90101111-02 GB

Introduction
Dear Customer
Thank you for buying an Egholm product
The Egholm 2001 is a Danish designed and manufactured product which offers a very flexible way
of maintaining outdoor areas.
Optimal perfromance of your Egholm Snow Blower:
To ensure the optimal performance of your Egholm Snow Blower, please read this operator’s manual
carefully before starting to use the machine. Failure to do so can result in personal injury and
damage to the machine.
Safety:
The Snow Blower is equipped with various devices to ensure optimal operational safety both for the
user and the surroundings. We therefore ask you to pay particular attention to Section 1.1 Safety. The
machine must only be serviced by professionals.
The Snow Blower is designed only for use by professionals. On delivery, the user will receive thor-
ough instructions in the use of the machine and will thus become a competent operator. Do not lend
the machine to anyone who has not been thoroughly trained and has not read this manual carefully.
The operator’s manual should be considered as a permanent part of the machine and so must
remain with it if the machine is sold.
Warnings:
Some items in this operator’s manual are marked with this warning symbol.
The warning indicates areas where extra care has to be taken to avoid personal
injury or damage to the machine and its accessories. The warning also shows
what you should pay special attention to.
Reservations:
As it is the Egholm policy to make continuous improvements, we reserve the right to alter the specifi-
cations and equipment at any time without notice. Egholm Maskiner A/S accepts no liability for errors
or shortcomings in the operator’s manual.
Contact us:
Should you have questions of any kind regarding your new Egholm product, do not hesitate to con-
tact Egholm Maskiner A/S.
Best regards
Egholm Maskiner A/S - Transportvej 27 - DK - 7620 Lemvig
Tel: (+45) 97 81 12 05 - Fax: (+45) 97 81 12 10
22

Contents
1. General information page
1.1 Safety . . . . . . . . . . . . . . . . . . . . . . . . . . . . . . . . . . . . . . . . . . . . . . . . . . . . . . . .4
1.2 EC Declaration of Conformity for Machinery . . . . . . . . . . . . . . . . . . . . . . . . . . . .6
1.3 Technical data . . . . . . . . . . . . . . . . . . . . . . . . . . . . . . . . . . . . . . . . . . . . . . . . . .7
2. Instructions for use
2.1 Assembly / Disassembly . . . . . . . . . . . . . . . . . . . . . . . . . . . . . . . . . . . . . . . . . .8
2.2. Before start-up . . . . . . . . . . . . . . . . . . . . . . . . . . . . . . . . . . . . . . . . . . . . . . . . .9
2.3 Start-up . . . . . . . . . . . . . . . . . . . . . . . . . . . . . . . . . . . . . . . . . . . . . . . . . . . . . . .9
2.4 Adjustment . . . . . . . . . . . . . . . . . . . . . . . . . . . . . . . . . . . . . . . . . . . . . . . . . . .10
3. Service and maintenance
3.1 Cleaning . . . . . . . . . . . . . . . . . . . . . . . . . . . . . . . . . . . . . . . . . . . . . . . . . . . . .11
3.2 Maintenance . . . . . . . . . . . . . . . . . . . . . . . . . . . . . . . . . . . . . . . . . . . . . . . . . .11
3.3 Trouble-shooting . . . . . . . . . . . . . . . . . . . . . . . . . . . . . . . . . . . . . . . . . . . . . . .12
4. Conditions
4.1 Warranty . . . . . . . . . . . . . . . . . . . . . . . . . . . . . . . . . . . . . . . . . . . . . . . . . . . . .13
4.2 Complaints . . . . . . . . . . . . . . . . . . . . . . . . . . . . . . . . . . . . . . . . . . . . . . . . . . .14
4.3 Disposal . . . . . . . . . . . . . . . . . . . . . . . . . . . . . . . . . . . . . . . . . . . . . . . . . . . . .14
33
1. General information
The Snow Blower is a tool for dealing with large
volumes of snow and quickly deals with up to
50 cm of snow in a working width of 1 metre.
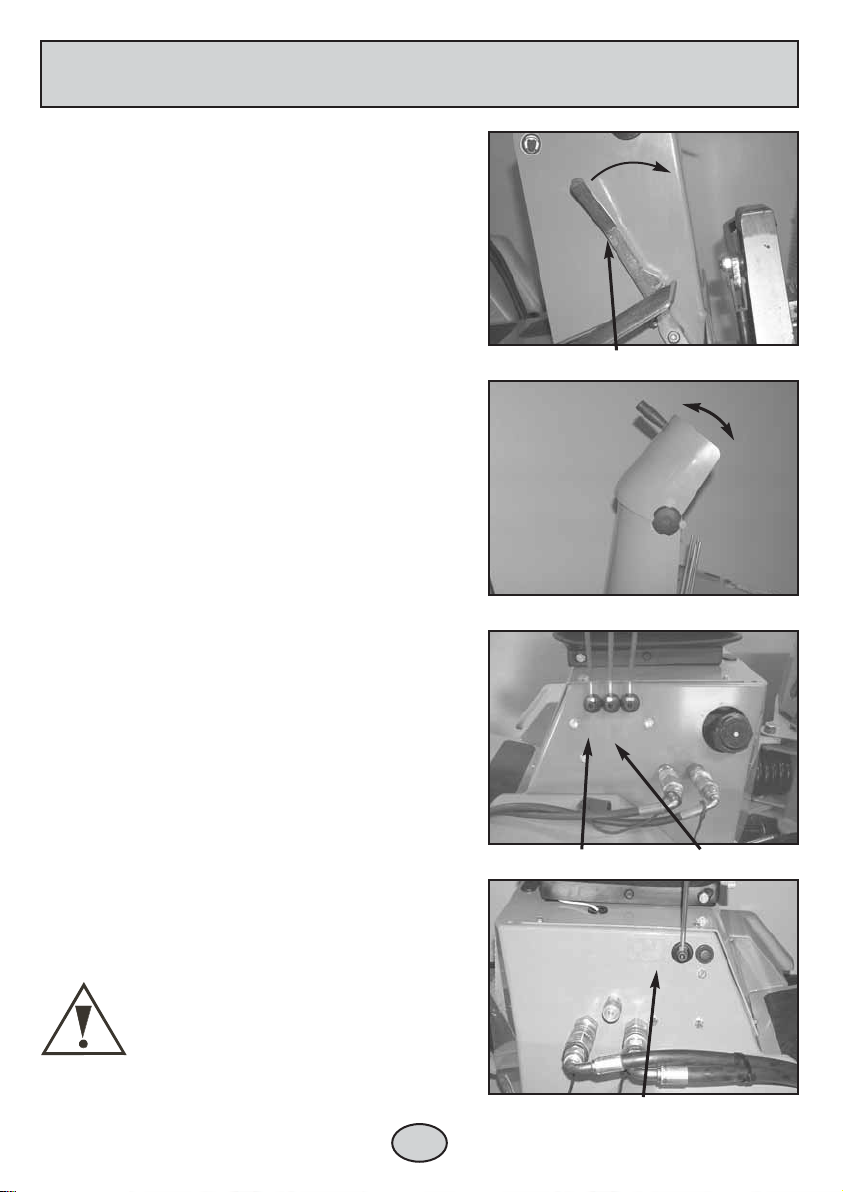
It can plough through snowdrifts and send the
snow wherever you wish via the hydraulically
adjustable discharge chute.
The Snow Blower is very powerful and can
throw snow high up over hedges or other obsta-
cles – far away from cyclists and pedestrians.
Useful tips
Spray silicone inside the discharge chute before
use. This makes it smoother and so the dis-
charge capacity is increased.
Wipe the snap couplings before fitting, as this
protects the hydraulic system.
Daily cleaning and maintenance will extend the
lifetime of both the machine and the attachment.

1. General information
1.1 Safety
N.B!
As it is articulated, the rear end of the
machine swings out when turning.
Make sure that no one is standing near the
machine while it is in use. (Picture 1)
Make sure no one is
standing too close to the
machine while it is in use:
Make sure that no one is near the machine
while it is in use as there is a danger of
crushing.
Make sure there are no people or objects
which can be damaged within 60 metres of
the discharge direction. There can be
things hidden in the snow which can be
ejected at high speed, with subsequent
risks of serious injury or damage.
Inspect the working area:
The working area must be inspected
carefully before snow clearing is started, for-
eign elements can be very dangerous if
they are discharged with the snow.
Warning! Rotating parts!
Make sure that no one puts their fingers or
toes into the Snow Blower while it is running,
to avoid personal injuries. (Pictures 2 - 4)
Make sure that no one puts their hands or
any objects into the discharge chute when
the Snow Blower is running, to avoid
injuries. (Picture 2)
44
Prevent people from standing
in the working area.
Warning! Rotating parts!
Keep away from the auger
11
11
22
22
33
33
44
44

1. General information
Avoid crushing fingers
Keep your hands and fingers away from
areas where there is a danger of crushing.
Stop the machine before
servicing the Snow Blower:
No form of service whatsoever may be car-
ried out on the Snow Blower while the
machine is running.
Avoid roll-overs:
Do not drive the machine in a place where it
can slide, tip or roll. Do not drive on slopes
with an incline of more than 10°. (Picture 1)
Reduction of noise and
energy consumption:
It is recommended not to drive with a higher
engine speed than necessary, to reduce the
noise and the energy consumption.
Avoid damage to your hearing:
Use approved hearing protectors while the
machine is in use. (Picture 2)
55
Do not drive on slopes with an incline of more than 10°
Use approved hearing protectors
11
11
22
22
Max. 10°

1. General information
1.2 EC Declaration of Conformity for Machinery
Fabrikant: Egholm Maskiner A/S
Address: Transportvej 27, DK-7620 Lemvig
Telefon: (+45) 97 81 12 05
hereby declares that
-Machine: Snow Blower Type: SN100
Serial no.: ____________________________ Year: _________________
- has been manufactured in conformity with the provisions of the Machinery
Directive, Directive 98/37/EU
66
The Egholm 2100 fitted with the cab FH 2100 (ROPS approved)
- has been tested at the Danish Institute of Agricultural Sciences at Bygholm in
conformity with directive 86/298/EEC concerning rear mounted, roll-over pro-
tection structures of narrow-track wheeled agricultural and forestry tractors.
Place: Lemvig
Date: ______________
Signature: ______________
Managing Director Kaj Egholm

1. General information
77
Side view
Front view
Location of model plate
11
11
22
22
33
33
1.3 Technical data
Dimensions:
Assembled: Storage
dimensions:
Length (L): 2,740 mm 680 mm
Width (W): 1,015 mm 1,010 mm
Height without cab (H): 1,050 mm 1,050 mm
Height with cab 1,935 mm
Technical data:
Type description: SN100
Clearing width: 1,000 mm
Intake height: 600 mm
Ground clearance below Snow Blower: 420 mm
Weight of Snow Blower: 105 kg
N.B!
Specifications may be changed without prior notice.
LL
LL
HH
HH
WW
WW

2. Instructions for use
2.1 Assembly / Disassembly
1. Make sure to keep the hydraulic hoses clear and
free from dirt when the Snow Blower is being fitted.
2. The locking handle on the A-frame of the basic
machine must be in the open position. (Picture 1)
3. Drive the basic machine right up to the A-frame of
the Snow Blower, so the A-frames fit into each other.
4. Raise the A-frame with lever A until the Snow Blower
is freely suspended above the ground. (Picture 2)
5. Lock the Snow Blower in place with the locking han-
dle on the A-frame. (Picture 1)
6. Stop the machine. (See the operator’s manual for
the basic machine, section 2.2)
7. Fit the hydraulic hoses for turning the discharge
chute to the B-connectors. (Picture 2)
8. Fit the hydraulic hoses for rotating the auger to the
D-connectors. (Picture 3)
9. Attach the hydraulic hoses with the rubber ring
under the running board to ensure it runs correctly
over the screen. (Picture 4)
Disassembly:
Follow the procedure for fitting in reverse order. Put
the protective caps on the snap couplings to protect
them from dirt.
88
Locking handle on the A-frame - open
Lever A B-connector
D-connectors
The hoses are fastened
with a rubber strap
11
11
22
22
33
33
44
44
LLeefftt--hhaannddssiiddee
AA
AABB
BBCC
CC
BB
BB11
11BB22
LL
LL
oo
oo
cc
cc
kk
kk
ee
ee
dd
dd
RRiigghhttssiiddee
DD
DD11
11
DD
DD22
22
DD
DD33
33

2. Instructions for use
2.2. Before start-up
During transport lock the Snow Blower in the raised
position with the transport lock. (Picture 1)
2.3 Start-up
1. The angle of discharge is altered manually by
changing the angle of the upper part of the dis-
charge chute; stop the machine before changing
the angle. (Picture 2)
2. Start the machine. (See the operator’s manual for
the basic machine, section 2.2)
3. Lower the Snow Blower by pushing lever A down to
position 2 and holding it there for approximately 2 sec-
onds; the Snow Blower is now in a floating position
and follows the contours of the ground. (Picture 3)
4. Turn the discharge chute using lever B until it is in
the required position. (Picture 3)
5. Start the auger by pushing lever D up to position 1.
(Picture 4)
6. Adjust your driving speed so that the Snow Blower
can deal with the snow.
N.B!
TThheewwoorrkkiinnggaarreeaammuussttbbeeiinnssppeecctteedd
ccaarreeffuullllyybbeeffoorreessnnoowwcclleeaarriinnggiissssttaarrtteedd,,ffoorr--
eeiiggnneelleemmeennttssccaannbbeevveerryyddaannggeerroouussiiff
tthheeyyaarreeddiisscchhaarrggeeddwwiitthhtthheessnnooww..
99
Transport lock
Changing the discharge direction
Lever A Lever B
Lever D
11
11
22
22
33
33
44
44
LL
LLee
eeff
fftt
tt
ss
ssii
iidd
ddee
ee
AA
AABB
BBCC
CC
LL
LL
oo
oo
cc
cc
kk
kk
ee
ee
dd
dd
RRiigghhttssiiddee
DD
DD

2. Instructions for use
N.B!
MMaakkeessuurreetthheerreeaarreennooppeeoopplleeoorroobbjjeeccttss
wwhhiicchhccaannbbeeddaammaaggeeddwwiitthhiinn6600mmeettrreessiinn
tthheeddiisscchhaarrggeeddiirreeccttiioonn..TThheerreeccaannbbee
tthhiinnggsshhiiddddeenniinntthheessnnoowwwwhhiicchhccaannbbee
eejjeecctteeddaatthhiigghhssppeeeedd,,wwiitthhssuubbsseeqquueenntt
rriisskkssooffsseerriioouussiinnjjuurryyoorrddaammaaggee..
After clearing the snow:
Let the Snow Blower run for a couple of minutes
after you have finished clearing the snow to make
sure no snow is left, as this can freeze up the auger.
2.4 Adjustment
Adjusting the intake height:
Adjust the skid shoe to the correct height above the
ground. Stones and pebbles can cause damage
both to the machine and to other things.
1. Unscrew the nuts and bolts which hold the skid shoe.
2. Reattach the skid shoe at the required height.
Repeat the procedure on the other skid shoe.
1100
Adjusting the skid shoes
11
11

3. Service and maintenance
3.1 Cleaning
Daily cleaning and maintenance will extend
the lifetime of both the machine and the attachment.
Clean the Snow Blower with water after use.
3.2 Maintenance
Lubricating the swivel
for the discharge chute:
The swivel for the discharge chute must be lubricat-
ed regularly with good quality lubricant.
1. Stop the machine.
2. Clean the lubricating nipple and lubricate the swivel
until the grease starts to come out. (Picture 1)
Changing the safety bolts:
In each of the two augers there is a safety bolt
which can shear if the auger catches on something
in the snow.
1. Stop the machine. (See the operator’s manual for
the basic machine, section 2.2)
2. Disconnect the hydraulic hoses.
3. Remove the sheared bolt.
4. Push a new bolt through the auger and put on the nut.
These safety bolts must be original bolts, which can
be ordered from an authorised Egholm distributor.
Egholm item no. 03200430 and 03803060
1111
Location of the lubricating nipple on the discharge chute
Safety bolts
11
11
22
22

3. Service and maintenance
1122
Adjust the spout so that it is completely upright
Use the wooden shaft
to push out the snow
11
11
22
22
33
33
44
44
Before storing the Snow Blower after the
season, do the following:
1. Inspect the Snow Blower carefully for any damage,
and repair any damage found.
2. Remove any loose paint and repaint any
damaged areas.
3. Spray the Snow Blower with preservative oil
(to prevent rust).
3.3 Troubleshooting
Blockage in the discharge chute:
1. Stop the machine. (See the operator’s manual for
the basic machine, section 2.2)
2. Remove the hydraulic hoses.
3. Move the top section of the discharge chute so that
it is completely upright. (Picture 1)
4. Pick up the wooden shaft which is on the Snow
Blower and push down the compacted snow until
the chute is no longer blocked. (Pictures 2 and 3)
5. Put the shaft back in place.
6. Reconnect the hydraulic hoses.
Stop the machine before
working on the Snow Blower:
NNooffoorrmmooffsseerrvviicceewwhhaattssooeevveerrmmaayybbee
ccaarrrriieeddoouuttoonntthheeSSnnoowwBBlloowweerrwwhhiilleetthhee
mmaacchhiinneeiissrruunnnniinngg..

1133
4. Conditions
4.1 Warranty
The warranty period for the materials and manu-
facture of this Snow Blower is 12 months from
the date of purchase.
In case of errors or defects on the machine with-
in the warranty period, Egholm Maskiner A/S will
carry out the necessary repairs without charge
for materials and working hours in accordance
with the terms and conditions listed below. The
customer is to cover the costs for transportation
for repair.
The scope of warranty:
1. The Egholm warranty is only valid on
presentation of the original receipt supplied
with model description, serial number and
date of purchase.
2. Regular checks, adjustments, services and
technical alterations are not covered by
the guarantee.
3. All inquiries concerning the warranty are to
be addressed to the place where the
machine was purchased.
4. This warranty does not cover faults and
defects which cannot be traced back to
defects in material or production errors.
5. Egholm Maskiner A/S reserves the right to
make improvements and design-related
alterations to the machine without being
obliged to modify previously delivered mod-
els in relation hereto.
6. This warranty is valid for persons who have
legally acquired the machine within the war-
ranty period.
The guarantee does not cover:
*Wear and tear, accidents, damage to the
equipment caused by operating errors,
changes to the construction of the machine, or
use of non-Egholm spare parts or implements.
* Machines with illegible serial numbers.
* Damage caused by force majeure such as
lightning, flood, fire, war, civil disturbance
etc. or other causes over which Egholm
Maskiner A/S has no control.

1144
4. Conditions
4.2 Complaints
All inquiries regarding the machine should be made to the distributor from whom the machine was
purchased. This applies to inquiries concerning normal use, service, maintenance and spare parts as
well as to any complaints.
If there are questions that the distributor cannot answer, please do not hesitate to contact Egholm
Maskiner A/S directly. Also feel free to contact us with suggestions or requests for special implements
and/or features for the machine. We wish you many years of safe and satisfied use of your machine.
Best regards
Egholm Maskiner A/S - Transportvej 27 - DK -7620 Lemvig, telephone: +45 97 81 12 05, fax: 97811210
4.3 Disposal
When – many years from now – your Egholm Snow Blower comes to the end of its working life, it
should be disposed of in a responsible manner and conform with the relevant disposal regulations.
1. Used hydraulic oil is to be disposed of at an approved waste disposal facility or site.
2. Remove all plastic and rubber parts and discard in a dustbin.
3. After the parts mentioned have been removed, the machine is ready to be handed over to one of
your local approved scrap merchants.

1155
Notes

Egholm Maskiner A/S * Transportvej 27 * DK-7620 Lemvig
Tel: +(45) 97 81 12 05 - Fax: (+45) 97 81 12 10
Other manuals for 2100
8
Table of contents
Other Egholm Snow Blower manuals