Egoman Technology MD398IFOD User manual

0

1
2
Note: Please recharge the MP4 player before using it!
Please use your MP4 player properly in case of explosion, fire, electric shock,
etc.
1.
Do not repair the player by yourself, or it will cause damage.
2.
Do avoid getting the MP4 player wet or drop it in water.
3.
As Udisk, it will be writeprotected if you switch the 【HOLD 】button to “ Lock ”
position.
4.
Please backup important data onto your personal computer as repair or other
causes may result in data loss.
When using your MP4 player, pay attention to your health, especially the power
of hearing.
1.
Do not use the earphones while driving or riding a bicycle.
2.
It may cause traffic accident if you turn up the volume of the earphones while
walking down the street.
3.
Do not turn up the volume too high, doctors warn against prolonged exposure to
high volume.
4.
Stop using the device or turn down the volume if you have ringing in your ears.
5.
Always use the accessories provided by or approved by our company, also do not
spray water on the player.
3
Function features
The player supports MP3 and WMA music file formats. I ncluding WMA files with
DRM (Digital Rights Management) function.
Support USB 2.0 capability, much faster than USB 1.1, to enable faster
communication with your PC.
The player can record outside voice and FM radio.
The player has repeat functions.
T he player has Video Playback, Photo Viewe r, Ebook,FM transmitter function,
etc.
The player can power off automatically after a preset time.
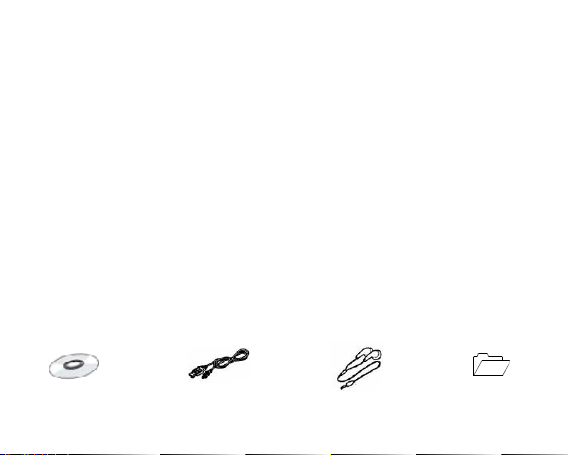
A ccessories
Installation CD USB Cable Earphones User Guide

4
Components and button functions
1.
Power on/off or
Play/Pause
2.
Backward/Previous
one/Volume down
3.
Forward/Next one/Volume
up
4.
MENU button
5.
Record/Volume
6.
LCD display
7.
HOLD button
8.
Micro SD/Tflash card slot
9.
RESET/Microphone
10.
USB port
11.
Earphone jack
5
C harging Li – polymer battery safely
1.
Connect the PC USB port and the MP3 USB port with the provided USB cable.
2.
The power sign is shown dynamic when charging, once full charged, the power
sign will stop moving, power is full, please shut off the power. T he charging time is
approximately 4 hours.
3.
T he unit could not be used during charg e.
4.
T o stop recharging, disconnect the USB cable.
Notes
Before your first time use, please recharge your MP 4 player.
Your computer must be turned on while connected to your MP 4 for charging.
Do not overcharge your player, or it may shorten the battery ’ s life.
CAUTION
1.
Danger of explosion if battery is incorrectly replaced. Replace only with the same
or equivalent type.
2.
Do not disassemble, crush, shortcircuit or incinerate your battery as it may cause
fire, injury, burns, or other hazards.
B asic operations
Turn power on and play music
1.
Connect earphone to earphone jack.
2.
Switch HOLD button to unlock position
3.
P ress and hold button to turn on and enter “ MUSIC ” mode (the default mode
is “ MUSIC ” mode).
4.
Short press button to play music.
5.
T o return main menu: Press and hold Mbutton.
T o Pause/Play: Short press button.
6
To change tracks: Short press / button .
To turn unit off: P ress and hold button.
NOTE:
1.
Please reset your player by pressing the RESET hole while failing to power on or
hanging up in power on mode.
2.
Please use the Micro SD card correctly in case of happening anything wrong, do
not insert or pull out the card while power on.
Volume Adjustment
In m usic or MTV files playing , Voice, FM tuner mode, short press R/V button to pitch
on the volume rim , at this time press /button to turn down or turn up volume.
Adding/Removing files/Folders – you can use the player as a removable USB storage.
1.
Connect the PC USB port and the MP4 USB port with the provided USB cable.
2.
Add files/folders to the USB storage ‘s folder.
Ⅰ.Open files/folders to transfer from your computer.
Ⅱ.Open My Computer →Removable Disk from the desktop.
Ⅲ. Select the files/folders to transfer from your computer and draw and put them to a
folder of your choice in the Removable Disk (you also can transfer files on your PC to the
player using the "Copy" and "Paste" functions).

7
3.
Delete MP3 files from the removable USB storage (use the "Delete" command).
Remove the player from PC –please follow the steps in case of damaging the player or
data loss.
1. Click the left mouse button on the icon that is on the taskbar at the bottom
right corner of the desktop.
2. Click the " Safely remove USB Mass storage Device – Drive (G:) " column.
3. Disconnect the player from your computer.

8
CAUTION:
Do not remove the player while files within the USB Mass Storage are being
played on your computer.
Do not disconnect the player from your computer while transferring file s , or it will
cause damage to the player or data loss.
Menu Navigation
Mbutton: Enter main menu, submenu or return.
Skip button ( / ): Shift menus.
Play/Pause button ( ): Play, Pause, or confirm.
1.
P ress and hold Mbutton to enter main menu.
2.
P ress / button s to select your desired option (e.g. MUSIC, FILE, VOICE,
PHOTO, FM, SETUP, VIDEO, EBOOK, FM Tx. ).
MUSIC
P ress and hold button to turn unit on and enter “ MUSIC ” mode (the default mode
is “ MUSIC ” mode), then short press button to play music.
Music Playback Submenu
Short press Mbutton to enter into submenu and short press /buttons to select
your desired M ode (e.g. Repeat, Equalizer, 3D, Play Rate, Intro, File Browse, AB).
Repeat
1.
Select Repeat mode and short press button to enter.
2.
Short press /button s to select your desired option (e.g. No Repeat, Repeat
One, Repeat All, RandomAll, DirRepOne, DirRep, DirRanAll).

9
3.
Short press button to confirm.
Equalizer
1.
Select Equalizer mode and short press button to enter.
2.
Short press /button s to select your desired op t ion (e.g. Normal, Pop, Rock ,
Classic, Jazz, Bass, Custom EQ).
3.
Short press button to confirm.
3D
1.
Select 3D mode and short press button to enter.
2.
Short press /button s to select your desired option (e.g. Off, On).
3.
Short press button to confirm.
Play Rate
1.
Select Play Rate mode and short press button to enter.
2.
Short press /button s to select your desired speed (e.g. 1.00X, 1.14X, 1.33X ,
0.67X, 0.80X).
3.
Short press button to confirm.
Intro
1.
Select Intro mode and short press button to enter.
2.
Short press /button s to select your desired option (from “ 00 ’ second to “ 15 ”
seconds).
3.
Short press button to confirm.
File Browse
1.
Select File Browse mode and short press button to enter.
2.
Short press /button s to select your desired file.
3.
Short press button to playback the file

10
AB
1.
Select AB mode and short press button to enter.
2.
Short press R/V button to select A point, short press R/V button again to start AB
repeat mode, short press R/V button for the third time to cancel AB repeat mode.
FILE
1.
In main menu, short press / buttons to select FILE mode .
2.
Short press button to enter into.
3.
Short press / buttons to choose your desired file(including MTV files, music
files, photo files, and voice files, etc)
4.
Short press R/V button to delete the file, and s hort press /buttons to select
“ No ” or “ Y es ” , then short press button to confirm.
5.
P ress and hold Mbutton to return to main menu.
VOICE
1.
In main menu, short press / buttons to select VOICE mode .
2.
Short press button to enter into.
3.
Short press / button to choose your desired recording file
4.
Short press button to play the recording file.
5.
P ress and hold R/V button to enter record mode .
6.
Short press Mbutton to save the record file, short press button to play the
record file.
7.
Whilst in playback mode short p ress Mbut ton to enter into submenu (e.g. Repeat,
Play Rate, Intro, Record , File Browse, AB). this part please refer to <music
playback submenu>
11
8.
P ress and hold Mbutton to return to main menu.
PHOTO
1.
In main menu, short press / buttons to select PHOTO mode .
2.
Short press button to enter into.
3.
Short press / buttons to choose your desired photo file
4.
Press R/V button to delete the photo file, press / buttons to select “No ”or
“Yes ”, then press button to confirm.
5.
Short press button to scan your desired picture.
6.
Short press button again to browse all photos, or short press / buttons to
scan previous or next picture
7.
P ress and hold Mbutton to return to main menu.
FM ( O ptional function)
1.
Short press / buttons to select “ FM “ mode .
2.
Short press button to enter “ FM ” mode.
3.
Short press / button to tune your desired stations (at intervals of 0.1 MHz).
4.
Long press R/V button to start recording FM.
5.
Short press Mbutton to enter submenu (e.g. Preset, Auto Search, Manual Search,
Save, Exit).
6.
Short press button to confirm.
SETUP
1.
In main menu, short press / buttons to select “ SETUP “ mode .
12
2.
Short press button to enter into.
3.
Short press / buttons to choose your desired mode(e.g. USB Mode, Power,
Language, Display, Record, Sys Tools, Storage)
4.
Short press button to confirm.
USB Mode
Short press /buttons to select USB Mode (MSC mode or MTP mode)
DRM 10 (optional function)
What is DRM?
Stands for digital rights management, a technology used to protect digital products
from copyright infringement. When a customer buys a DRMprotected music download,
the download is encrypted specifically for that customer. T o allow the customer to use th e
file on a separate music player they must link the DRM enabled player to Windows
Media Player 10 and link both applications. This allows the downloaded music file to then
be used on a separate digital music player.
How to synchronize the DRM songs into your MP 4 player?
1.
Purchase DRM songs from the internet, and download them into your computer.
2.
Playback the songs that you downloaded, if it could be played, the download is
successful, or you need to download again.
3.
To make DRM function , the computer OS must be Windows XP system SP2 or
higher version, installed with Windows Media player 10 or above, and have a
valid internet connection.
4.
Connect the DRM MP 4 player with your PC, your PC will display:

13
NOTE: There are 2 ways to set your MP 4 player into MTP mode
(1) In “ USB Mode ” select “ MTP mode ” mode and short press button to confirm.
(2) After connecting the MP 4 player with your P C , press 【M】button to switch between
“ MSC mode ” and “ MTP (Media Transfer Protocol ) mode ” for DRM function.
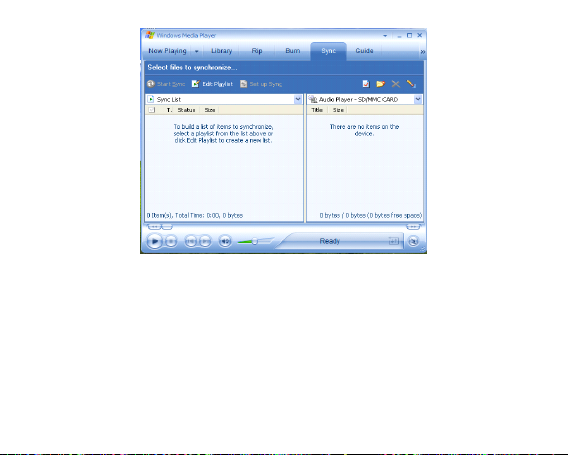
5. Click “ OK ” to start synchronization, your PC will display:

14
6. Select “ Manual ” or “ Automatic ” as your requirement, for example, select ” Manual ”
and click “ Finish ” , it will display:
15
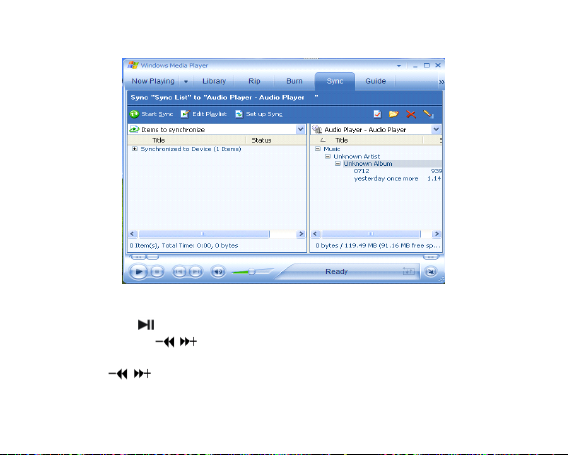
7. Add the songs that you want to synchronize into the sync List.

16
8. Y ou can select the synchronal media: N AND Flash or SD/MMC card, as following
picture shows:

17
9. Click “ Start S ync ”

18
19
10. The dexter frame will display the synchronized songs.
Power
1.
Short press button to enter your desired option (e.g. Auto off: 002, Always on).
2.
Press R/V and /button s to setup the auto off time.
Language
Short press / buttons to select your desired op t ion (e.g. English, CHI (Simp) , CHI
(Trad), French, German, Italian, Polish, Portugues e , Russian , Spanish) .
Other manuals for MD398IFOD
3
Other Egoman Technology Media Player manuals


