Egoman Technology MD398IFOD User manual

1
Digital Player
2
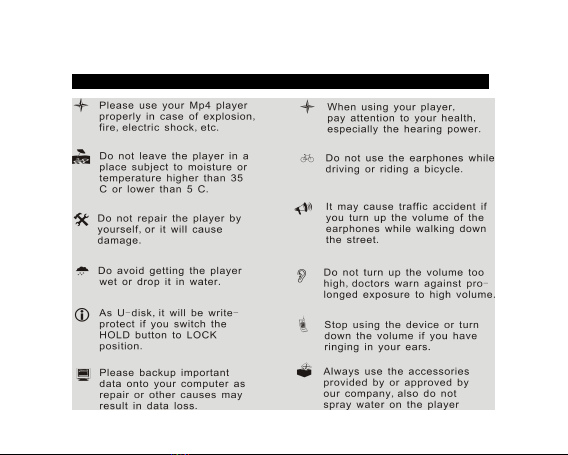
For your safety ─Read this user guide carefully to ensure proper
use of the product and to avoid any danger of physical damage.
Us e Safely

3
Note: Please recharge the digital player before using it!
Function features
The player supports MP3, WMA and WAV format music files. I ncluding WMA
files with DRM (Digital Rights Management) function.
Support USB 2.0 capability, much faster than USB 1.1, to enable faster
communication with your PC.
The pla yer can record outside voice and FM radio.
The player has repeat function.
T he player has Video Playback, Photo Viewer, Ebook, slide show , FM
t ransmitter functions, etc.
The player can power off automatically after a preset time.
A ccessories
Installation CD USB Cable Earphones User Guide

4
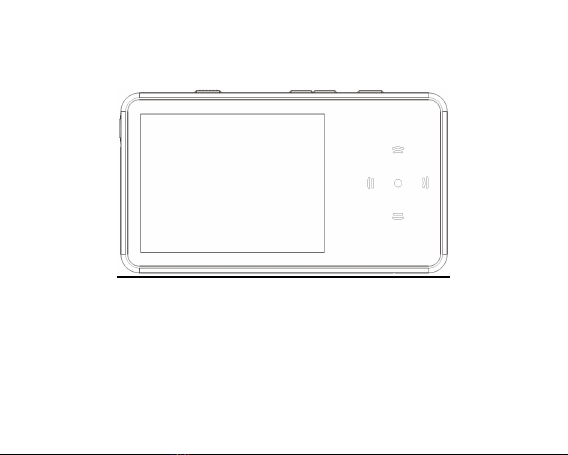
Components and Button functions
1.
Play/Pause/Confirm
2.
Backward/Previous
song
3.
Forward/Next song
4.
Volume up/Previous
one
5.
Volume down/Next
one
6.
LCD display
7.
LOCK button
8.
Record/AB repeat
9.
MENU button
10.
Power on/off
11.
RESET/Microphone
12.
Speaker
13.
Micro SD/Tflash card
slot
14.
Earphone jack
15. USB port

5
Button Definition
Turn power on/off
Press and hold to turn power on/off
Play/Pause/Confirm
Press to play/pause/confirm
Previous song/Backward
Next song/Forward
Press to turn to previous one/next one
In playback mode, press and hold for backward/forward
Adjust the volume
Press to turn up/turn down the volume
Press to previous one/next one
R/AB Record/AB repeat
Short press for AB repeat
Press and hold to start to record
MENU Menu button
Press to return to system menu
HOLD button All buttons are disabled if you switch HOLD button to “ LOCK ”
position.
This is helpful when you are doing sports, like walking, jogging, etc.

6
RESET hole & Microphone
You can reset the system setup of your player by pressing the RESET hole.
It is used for recording the outside voice or FM radio while the player is playing record
function.
Micro SD/Tflash card slot Support Micro SD/Tflash card.
Note: Please do not install or pull out the Micro SD/Tflash card while your player
is in power on state.
Earphones jacks There is a earphones jack on the left side of the player.
C harging Li – polymer battery safely
1.
Connect the PC USB port and the player USB port with the provided USB cable.
2.
The power sign is shown dynamic when charging, once full charged, the power
sign will stop moving, power is full, please shut off the power. T he charging time is
approximately 3 hours .
3.
T o stop recharging, disconnect the USB cable.
Notes
Before your first time use, please recharge your digital player.
Your computer must be turned on while connected to your player for charging.
Do not overcharge your player, or it may shorten the battery ’ s life.
CAUTION
1.
Danger of explosion if battery is incorrectly replaced. Replace only with the same
or equivalent type.
2.
Make sure the output voltage of power supply is 4.8V ~ 5.5V, and the rated current
is more than 400mA.

7
3.
Do not disassemble, crush, shortcircuit or incinerate your battery as it may cause
fire, injury, burns, or other hazards.
B asic operations
Turn power on and play music
1.
Connect earphone to earphone jack;
2.
Switch HOLD button to unlock position;
3.
P ress and hold button to turn on and enter main menu (the default menu is
“ Music ” menu);
4.
T o return main menu: Press and hold M ENU button.
T o Pause/Play: Short press button.
To change tracks: Short press 【 】 button .
To turn unit off: P ress and hold button.
NOTE:
1.
Please reset your player by pressing the RESET hole while failing to power on or
hanging up in power on mode.
2.
Please insert Micro SD/TFlash card as the indicated direction, in case of
happening anything wrong, do not insert or pull out the card while power on.
Volume Adjustment
In Audio playing, playback video files, or tuning FM radio mode, you can press 【
】button to turn up/turn down the volume.
Adding/Removing files/Folders – you can use the player as a removable USB storage.
1.
Connect the PC USB port and the player USB port with the provided USB cable.
2.
Add files/folders to the USB storage ‘s folder.
8
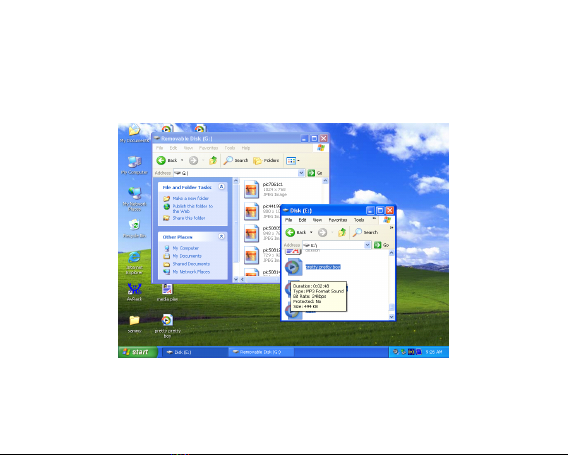
Ⅰ.Open files/folders to transfer from your computer.
Ⅱ.Open My Computer →Removable Disk from the desktop.
Ⅲ. Select the files/folders to transfer from your computer and draw and put them to a
folder of your choice in the Removable Disk (you also can transfer files on your PC to the
player using the "Copy" and "Paste" functions).
3.
Delete files from the removable USB storage (use the "Delete" command).
Remove the player from PC –please follow the steps in case of damaging the player or
data loss.

9
1. Click the left mouse button on the icon that is on the taskbar at the bottom
right corner of the desktop.
2. Click the " Safely remove USB Mass storage Device – Drive (X:) " column.
3. Disconnect the player from your computer.
CAUTION:
Do not remove the player while files within the USB Mass Storage are being
played on your computer.
Do not disconnect the player from your computer or press button while
transferring files, or it will cause damage to the player or data loss.
Menu Navigation
MENU button: Enter main menu, submenu or return.
Skip button 【】: Shift menus
【 】 : Shift pages
Play/Pause button : Play, Pause, or confirm.
1.
P ress and hold MENU button to enter main menu.
2.
P ress 【 】 or 【 】 button s to select your desired option (e.g. Music, F M,
Voice, Photo, Video, Ebook, File, S etup, FM Tx. ).
MUSIC
P ress and hold button to turn unit on and enter main menu, then select “ Music ”
menu and enter by pressing button.
Select the music files and press button to playback it.
Music Playback Submenu
Short press M ENU button to enter into submenu and short press 【 】 buttons to

10
select your desired mode (e.g. Repeat, Equalizer, 3D, Play Rate, File, Classified, Play
List, Slide Show).
Repeat
1.
Select Repeat mode and short press button to enter.
2.
Short press 【 】 button s to select your desired option (e.g. No Repeat,
Repeat One, Repeat All, Random All, Folder Normal, Folder Repeat, Folder
Random).
3.
Short press button to confirm.
Equalizer
1.
Select Equalizer mode and short press button to enter.
2.
Short press 【 】 button s to select your desired op t ion (e.g. Normal, Pop, Ro ck ,
Classic, Jazz, Bass, Custom EQ).
3.
Short press button to confirm.
Custom EQ: you can setup the EQ as your opinion, just need to pitch on the
adjustment frame by pressing 【 】 buttons and press 【 】 button s to adjust.
NOTE: EQ mode is not obvious while playing WMA format music files.
3D
1.
Select 3D mode and short press button to enter.
2.
Short press 【 】 button s to select your desired option (e.g. Off, On).
3.
Short press button to confirm.
Play Rate
11
1.
Select Play Rate mode and short press button to enter.
2.
Short press 【 】 button s to select your desired speed (e.g. 1.00X, 1.14X,
1.33X, 0.67X, 0.80X).
3.
Short press button to confirm.
NOTE: If the audio file is WMA format, it does not support “ Play Rate ” mode.
File
1.
Select File mode and short press button to enter.
2.
Short press 【 】 buttons to scan previous/next page, or press 【 】 butto ns
to select the music files.
3.
Press R/AB button and you can select: “ Add to list" or “ Delete ” .
4.
Press button to confirm.
5.
You can select one of the music files and press button to playback.
6.
Press MENU button to return to previous list.
Classified
1.
Select Classified mode and short press button to enter.
2.
Short press 【 】 button s to select “ No ” or “ Y es ” .
3.
Press button to confirm.
NOTE:
1.
It will take longer time to build classify list, or you can press button to cancel
the classify process.
2.
After classify, the “ Classified ” menu will appear “ Genre ” , “ Artist ” , “ Album ” , “ Title ”
lists.
You also can use Music Classification AP to download, create or delete music
classification database on PC.

12
NOTE: ClassifyMusic_V1.5 will download music files into Root\MUSIC folder
automatically.
AP Usage Step:
1. Connect your player to the PC (Require the PC operating system: Windows 2000,
XP , Vista).
2. Put CD disk into the CD driver and open “ ClassifyMusic_V1.5 ” folder.
3. Click “ Music Classify ” MFC application.

13
4.
Download music files to the player .
1 ) . Click “ Select Music ” command to i nput music files (*.mp3, *.wma formats ) .
2 ) . Click ” Download Music ” command to d ownload selected music into the device
and create/refresh music classification database.
5. Click “ Delete Music ” command to d elete music files on t he device side and create
/refresh music classification database.

14
NOTE:
1.
The “ ClassifyMusic_V1.5 ” AP only can classify music files within the internal flash;
2.
About the detailed introduction to the Classify Musi c AP , please refer to: CD
dis
k →
” ClassifyMusic_V1.5 ” fo lder →“ Music_Classification_AP ” word format file .
Play List
Press button to enter and you can see the play list (My List, *pla, *m3u, *wpl), open
one of the play list and select the music files, then you can press button to playback
it.
NOTE:
1.
Please build the play list (except *pla play list) based on the device ’ s music files;
2.
You must put the play list files (*.m3u or *.wpl) into [Root\P LAYLIST ] folder;
3.
The music playback will pause for several seconds while open a play list.
Slide Show
1.
Select Slide Show mode and short press button to enter.
2.
Short press 【 】 button s to select the time: Off, 5 Seconds, 10 Seconds, 15
Seconds, 30 Seconds, 60 Seconds
3.
Short press button to confirm.
4.
Select a time and it will playback slide show file after playback musi c for the
selected time, or select “ Off ” to cancel the slide show function.
You can use slide show maker AP (open the provided CD and you will see the slide
show maker AP) to make slide show files for our portable audio player chip. It transforms
many images files into single slide show file. The effect of the slide show is like the
window protection program on PC Windows. When a music file is played for a while and
end users do not have any actions, the pictures in the slide show file will be displayed
one bye one. Four (Normal, Shutter (Left to Right), Shutter (Top to Down), Circle) modes
of the sl ide show are supported. Different modes show different visual effects.

15
NOTE: The player just can playback one slide show file, so put one SLS file into the
SLS.DIR folder at one time.
Slide Show AP Usage:
Make Slide Show
1. Required System:
Windows 2000, XP , Vista
2. AP Operation:
1) View of “ Image File Name List ” – Show all image input files.
2) View of “ Preview Window ” – Show an image file or the effects of the slide show
3) Mode Selection – Four modes: Normal, Shutter (Left to Right), Shutter (Top to
16
Down), Circle
4) Command of “ Load Image ” – Input image files. (*.jpg, *.gif, *.bmp)
5) Command of “ Preview ” – Show the effects of the slide show.
6) Command of “ Transform ” – Transform all image input files to single slide show file.
7) Command of “ Cancel ” – Cancel preview or transformation.
8) Command of “ Delete ” – Delete selected image files in the image file name list.
9) Command of “ Up ” – Move the selected image file up in the image file name list.
10) Command of “ Down ” – Move the selected image file down in the image file name
list.
3. AP Usage Step:
1) Set configuration files. (Panel Size, Panel Type, Language)
2) Click “ Load Image ” command to l oad Images (*.jpg, *.gif, *.bmp)
3) Manage Image File Name List (Using the “ Delete ” , “ Up ” , “ Down ” command)
4) Select a mode of the slid show & Preview : Normal, Shutter (Left to Right), Shutter
(Top to Bottom ), Circle .
5) Click “ Transform ” command to transform the images into SLS file.
NOTE: About the detailed introduction to the slide show AP , please refer to: CD
dis
k →
” SlideShowMaker_V1.12.0 ” folder →“ Slide_Show_Maker_AP ” word format file .
FM (Optional function)
1.
Short press 【 】 or 【 】 buttons to select “ FM “ mode, and short press
button to enter.
2.
Press button to switch Normal and Preset mode.

17
3.
In “ Normal ” mode, short press 【 】 button to tune FM frequency between
87.5MHz and 108MHz. (At intervals of 0.1 MHz); Or in “Preset ”mode, Press 【
】button to select the preset stations (Total 30 preset stations).
4.
Short press MENU button to enter submenu: Save Preset, Auto Scan.
5.
You can press and hold R/AB button to start recording FM stations, and press
MENU button to save the FM recorded file.
VOICE
1.
In main menu, short press 【 】 or 【 】 buttons to select “ Voice ” mode a nd
enter by pressing button .
2.
Short press 【 】 button to choose the recorded files, and press button to
playback your desired recorded file.
3.
P ress and hold R /AB button to start record ing.
4.
Short press M ENU button to save the record ed file, and press button to
play back it.
5.
Whilst in playback mode short press MENU button to enter into submenu (e.g.
Repeat, Equalizer, 3D, Play Rate, File). this part please refer to <music playback
submenu>
6.
P ress and hold MENU button to return to main menu.
PHOTO
1.
In main menu, short press 【 】 or 【 】 buttons to select “ Photo ” mode a nd
enter by pressing button .
2.
Short press 【 】 or 【 】 buttons to choose your desired photo file.

18
3.
Press R/AB button to enter “ delete ” menu, and press 【 】 buttons to select
“No ”or “Yes ”, then press button to confirm.
4.
Press MENU button to return to photos list, select one of the photos and press
button to browse it.
5.
Short press button again to browse all photos at interval of 3 seconds, or press
【 】 buttons to browse one by one.
6.
P ress and hold MENU button to return to main menu.
NOTE:
1.
The player supports JPEG (Bestline & Progressive mode) and BMP format
image files.
2.
I f the JPEG image files has thumbnail , you can see their miniatures in
PHOTO list.
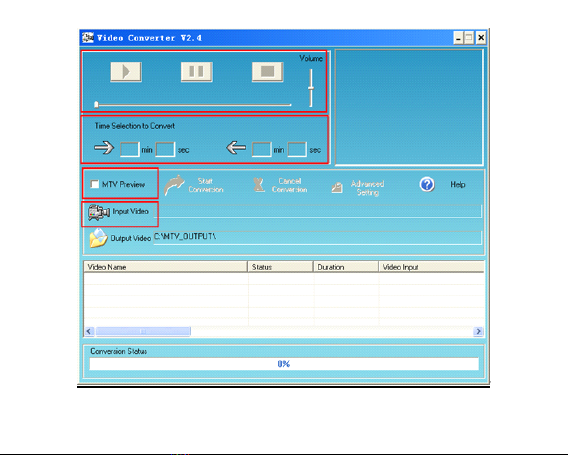
VIDEO
In order to play video files in this digital player, you must change the video files into
MTV format.
1.
MT V Video Converter
1. Put CD disk into the CD driver and open “ VideoConverter_V2.9 ” folder
2. Click “ VideoConvert ” tool, as following picture shows:
19
Usage steps for conversion:
1.
Click “ Input Video ” column to select the video file you wish to convert for use on
Other manuals for MD398IFOD
3
Table of contents
Other Egoman Technology Media Player manuals


