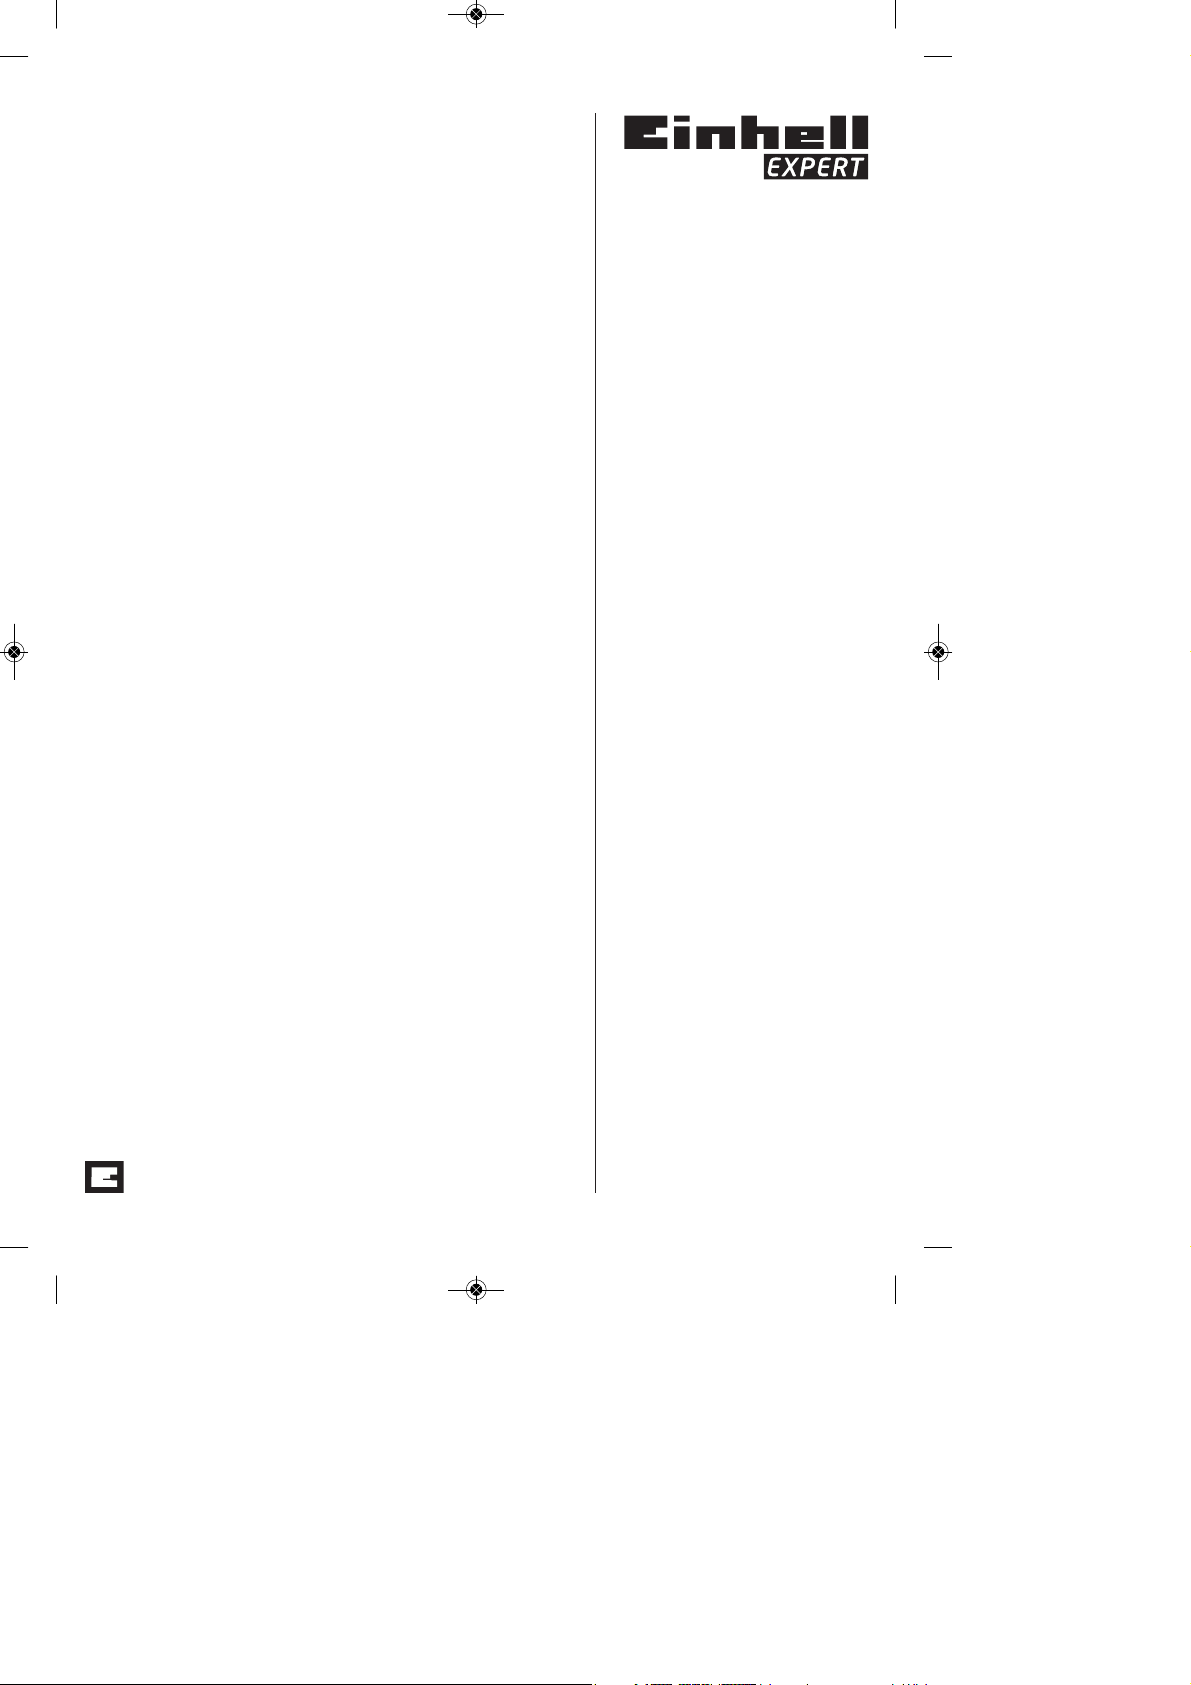
EINHELL Expert GE-EL 1800 E User manual

mManual de instrucciones original
Sopla Aspiradora
tOriginal operating instructions
Garden Blower Vac
GE-EL 1800 E
South America
Anleitung_GE_EL_1800_E_SPK8__ 14.11.12 10:01 Seite 1

2
Leer detenidamente las instrucciones de uso y las advertencias de
seguridad antes de poner en marcha el aparato.
Read and follow the operating instructions and safety information
before using for the first time.
Anleitung_GE_EL_1800_E_SPK8__ 14.11.12 10:01 Seite 2

3
1
9
4
7
510 3
2
1
2
12 6 3 7911 15
14
12 13
Anleitung_GE_EL_1800_E_SPK8__ 14.11.12 10:01 Seite 3

4
3a 3b
3c 3d
3e 3f
12
13
A
AB
A11
Anleitung_GE_EL_1800_E_SPK8__ 14.11.12 10:01 Seite 4

5
3g 4a
4b 4c
4d
15
14
AA
9
4e
A
Anleitung_GE_EL_1800_E_SPK8__ 14.11.12 10:02 Seite 5

6
9
5 6
78a
8b
A
B
3
56
12
34
A
17
AB
10
AB
5
6
8
Anleitung_GE_EL_1800_E_SPK8__ 14.11.12 10:02 Seite 6

7
¡Atención!
Al usar aparatos es preciso tener en cuenta una
serie de medidas de seguridad para evitar lesiones o
daños. Por este motivo, es preciso leer atentamente
estas instrucciones de uso. Guardar esta información
cuidadosamente para poder consultarla en cualquier
momento. En caso de entregar el aparato a terceras
personas, será preciso entregarles, asimismo, el
manual de instrucciones.
No nos hacemos responsables de accidentes o
daños provocados por no tener en cuenta este
manual y las instrucciones de seguridad.
1. Instrucciones de seguridad
Instrucciones
쎲Le rogamos se sirva de observar atentamente
estas instrucciones de uso. Familiarícese con
los dispositivos de mando y regulación, así
como el manejo adecuado del aparato.
쎲Las personas (incluidos niños) que, debido a
sus capacidades físicas, sensoriales o
intelectuales, o a su inexperiencia o
desconocimiento, no sean capaces de emplear
el aparato no deberán hacerlo sin la supervisión
o instrucción de una persona responsable.
Vigilar a los niños para asegurarse de que no
jueguen con el aparato.
쎲Nunca permita que los niños utilicen el aparato.
쎲Nunca permita que otras personas que no estén
familiarizadas con estas instrucciones utilicen el
aparato. La edad mínima del usuario puede
estar regulada por disposiciones locales.
쎲Nunca utilice el aparato cuando haya personas,
en especial niños, o animales domésticos en las
inmediaciones.
쎲El usuario es responsable de los daños o
riesgos que se produzcan a terceros o a sus
propiedades.
Preparación
쎲Cuando utilice el aparato, es recomendable
llevar zapatos resistentes y pantalón largo.
쎲No lleve ropa holgada ni joyas mientras trabaje.
Pueden ser captadas por el orificio de
aspiración. Si trabaja al aire libre, es
recomendable llevar guantes de goma y zapatos
de suela antideslizante. Póngase una redecilla
para el cabello si tiene el pelo largo.
쎲Póngase gafas de protección mientras trabaje.
쎲Póngase una mascarilla cuando realice trabajos
en los que se produzca gran cantidad de polvo.
쎲Antes de cada uso, controle el aparato, el cable
de conexión y la alargadera. Trabaje sólo si el
aparato está en perfecto estado y no presenta
ningún daño. Las piezas dañadas deben ser
sustituidas inmediatamente por un electricista
profesional.
쎲Nunca utilice el aparato cuando los dispositivos
de protección o apantallamientos estén dañados
o falte algún dispositivo de seguridad como, por
ejemplo, los dispositivos de desviación y/o de
recogida de césped.
쎲Solo se podrán utilizar alargaderas
homologadas para realizar trabajos en el
exterior. Las alargaderas utilizadas han de
presentar una sección mínima de 1,5 mm2. Los
enchufes deben estar protegidos a prueba de
salpicaduras.
Servicio
쎲Tire del cable siempre hacia atrás para que se
mantenga en la parte trasera del aparato en
todo momento.
쎲Cuando el cable de conexión o alargadera esté
dañado; retire el enchufe de la toma.
¡NO TOCAR EL CABLE ANTES DE
DESENCHUFARLO!
쎲No traslade el aparato sosteniéndolo por el
cable
쎲Retire el enchufe de la toma:
– cuando no utilice el aparato, lo transporte o lo
deje sin vigilancia;
– cuando controle el aparato, lo limpie o retire
cualquier obstáculo que bloquee;
– cuando realice trabajos de limpieza o
mantenimiento o cambie accesorios;
– al entrar en contacto con cuerpos extraños o
en caso de vibración anormal
쎲Sólo utilice la herramienta a la luz del día o con
suficiente iluminación artificial
쎲No infravalore la fuerza del aparato. Adopte una
posición segura y guarde en todo momento el
equilibrio.
쎲Siempre que sea posible, evite utilizar el aparato
en césped húmedo.
쎲Se ha de guardar especialmente una posición
segura en caso de pendientes.
쎲Camine siempre, jamás corra.
쎲Mantenga siempre limpios los orificios de
ventilación.
쎲Nunca apunte con el orificio de aspiración /
soplado a personas o animales.
쎲La máquina sólo debe ser operada a horas
razonables: ni por la mañana muy temprano ni
por la noche muy tarde para no molestar a los
demás. Se han de respetar los horarios
establecidos por las autoridades locales.
쎲Trabajar con la máquina a las mínimas
revoluciones de motor posibles.
E
Anleitung_GE_EL_1800_E_SPK8__ 14.11.12 10:02 Seite 7

8
E
쎲Antes de comenzar con el soplado, retirar los
posibles objetos sólidos con cepillo y rastrillo.
쎲Donde se genere polvo, se habrá de
humedecer ligeramente la superficie o bien
utilizar una pieza de riego acoplada, en caso de
disponer de ella.
쎲Utilizar el juego completo de boquilla de soplar
para que el caudal de aire pueda actuar cerca
del suelo.
쎲Cuidado con los niños, animales domésticos y
ventanas abiertas, soplar de forma que no se
pueda dañar a nadie ni nada.
Mantenimiento a la hora de guardarlo
쎲Asegúrese de que, todas las tuercas, tornillos y
bulones siempre estén sujetos para garantizar
que el aparato se encuentre en un estado de
servicio seguro.
쎲Comprobar continuamente que la bolsa de
recogida no presente desgaste ni
deformaciones.
쎲Utilizar exclusivamente piezas de repuesto y
accesorios originales.
쎲Compruebe continuamente que los dispositivos
de recogida de césped no presenten desgaste
ni deformaciones.
쎲Deberá colocar las herramientas eléctricas que
no utilice en un lugar seco.
쎲Cuando el cable de conexión a la red esté
dañado, deberá ser sustituido por el fabricante
o su servicio de asistencia técnica o por una
persona cualificada para ello, evitando así
cualquier peligro.
El aparato se puede conectar a cualquier enchufe
protegido con un mín. de 10A (con tensión de 230
V). El enchufe se debe proteger con un interruptor
de corriente de defecto (FI). La corriente de
liberación no debe superar los 30mA máx.
¡AVISO!
Lea todas las instrucciones de seguridad e
indicaciones.
El incumplimiento de dichas instrucciones e
indicaciones puede provocar descargas, incendios
y/o daños graves.
Guarde todas las instrucciones de seguridad e
indicaciones para posibles consultas
posteriores.
Explicación de la placa de advertencia en el
aparato (véase fig. 9)
1. Lea el manual de instrucciones de uso antes de la
puesta en marcha.
2. No utilice el aparato cuando llueva o nieve.
Mantenga el aparato alejado de la humedad.
3. Mantenga a terceras personas fuera de la zona de
peligro.
4. Póngase gafas de trabajo y protectores auditivos.
5. Desconecte el aparato cuando vaya a realizar
trabajos de limpieza o mantenimiento y retire el
enchufe.
6. ¡Piezas giratorias! Mantener las manos y los pies
alejados de los orificios.
2. Descripción del aparato
(Fig. 1/2)
1. Tubo de aspiración anterior
2. Tubo de aspiración posterior
3. Empuñadura adicional
4. Asa de transporte
5. Interruptor ON/OFF
6. Cable de red
7. Bolsa de recogida
8. Conmutador Aspiración/Soplado
9. Rodillos guía
10. Regulador de velocidad
11. Soporte de rueda
12. Tornillo para el montaje del tubo de aspiración
13. Tornillo para el montaje de la carcasa
14. Boquilla adicional
15. Rejilla
3. Volumen de entrega
nAbrir el embalaje y extraer cuidadosamente el
aparato.
nRetirar el material de embalaje, así como los
dispositivos de seguridad del embalaje y para el
transporte (si existen).
nComprobar que el volumen de entrega esté
completo.
nComprobar que el aparato y los accesorios no
presenten daños ocasionados durante el
transporte.
nSi es posible, almacenar el embalaje hasta que
transcurra el periodo de garantía.
ATENCIÓN
¡El aparato y el material de embalaje no son un
juguete! ¡No permitir que los niños jueguen con
bolsas de plástico, láminas y piezas pequeñas!
Anleitung_GE_EL_1800_E_SPK8__ 14.11.12 10:02 Seite 8

9
E
¡Riesgo de ingestión y asfixia!
nManual de instrucciones original
4. Uso adecuado
El aspirador / soplador de hojas sólo está
homologado para hojas y residuos del jardín tales
como césped o ramas pequeñas. No está permitido
darle otros usos.
Utilizar la máquina sólo en los casos que se indican
explícitamente como de uso adecuado. Cualquier
otro uso no será adecuado. En caso de uso
inadecuado, el fabricante no se hace responsable de
daños o lesiones de cualquier tipo; el responsable es
el usuario u operario de la máquina.
Tener en consideración que nuestro aparato no está
indicado para un uso comercial, industrial o en taller.
No asumiremos ningún tipo de garantía cuando se
utilice el aparato en zonas industriales, comerciales
o talleres, así como actividades similares.
5. Características técnicas
Veáse Certificado de Garantia de supais.
6. Antes de la puesta en marcha
Antes de conectar la máquina, asegurarse de que
los datos de la placa de identificación coincidan con
los datos de la red eléctrica.
Desenchufar el aparato antes de realizar ajustes.
6.1. Montaje del tubo de aspiración (fig. 3a-3g)
nEncajar los tubos de aspiración anterior y
posterior (fig. 3a) y fijarlos con un tornillo (fig.
3b/Pos. 12).
nA continuación deslizar el tubo de aspiración
completo en la carcasa del motor (fig. 3c) y fijarlo
con el tornillo (fig. 3d/pos. 13).
nDeslizar el soporte de la rueda (fig. 3e/pos. 11)
sobre el tubo de aspiración anterior hasta
alcanzar el tope (fig. 3e/pos. A) y fijar con el
tornillo (fig. 3e/pos. B).
nRetirar el tornillo de orejetas (fig. 3f/pos. A) y fijar
el eje de la rueda (fig. 3g/pos. 9) con él.
nCon el tornillo de orejetas aflojado, es posible
ajustar la altura del eje de la rueda y adaptarla
según lasnecesidades. A continuación, volver a
apretar el tornillo .
Advertencia: antes de fijarlo al aparato,
comprobar siempre primero que ambos tubos
estén unidos entre sí de tal forma que no se
puedan desarmar.
6.2. Montar la bolsa de recogida (fig. 4a+4b)
Enganchar el gancho en el tubo de aspiración (fig.
4a). A continuación, introducir la bolsa sobre la
tubuladura de la carcasa del motor (fig. 4b) hasta
escuchar como encaja .
6.3. Montar la boquilla adicional (fig. 4c-4e)
La boquilla adicional (fig. 4e/pos. A) está diseñada
para aspirar con rapidez grandes superficies. La
rejilla (fig. 4d/pos. 15) está diseñada para aspirar
superficies con césped.
Atención: la boquilla adicional sólo funciona en modo
de aspiración (véase 6.4).
Montar el accesorio sobre la boquilla adicional
mediante los dos tornillos moleteados (fig. 4c/pos. A).
A continuación, deslizar la boquilla adicional dentro
del extremo anterior del tubo de aspiración (fig. 4e).
Poner el aparato en servicio una vez haya realizado
el montaje por completo. Antes de cada puesta en
marcha, se deberá comprobar que el cable de
conexión del equipo no presente señales de
deterioro y sólo se deberá utilizar en perfecto estado.
7. Manejo
7.1. Determinar la longitud del cinturón (fig. 1)
Regular la longitud del cinturón (4) de tal forma que el
tubo de aspiración apenas llegue al suelo.
Adicionalmente, los rodillos guía (9), situados en el
extremo del tubo de aspiración, sirven para guiar
ligeramente a éste.
7.2. Ajuste de la empuñadura adicional (fig. 5)
Soltar la palanca (fig. 5/pos. A) desplegándola. A
continuación, llevar la empuñadura adicional (fig.
5/pos. 3) a la posición deseada y volver a plegar la
palanca .
7.3 Conexión y encendido del aparato (fig. 6)
El aparato se puede conectar a cualquier enchufe
protegido con un mín. de 10A (con tensión de 230
V). El enchufe se debe proteger con un interruptor
de corriente de defecto (FI). La corriente de
liberación no debe superar los 30mA máx.
쎲Introduzca el enchufe en la pieza de
acoplamiento del cable de conexión de equipo
(prolongación).
쎲Asegure el cable de conexión del equipo con la
Anleitung_GE_EL_1800_E_SPK8__ 14.11.12 10:02 Seite 9

10
E
descarga disponible de tracción del cable en el
aparato según se ilustra.
쎲Para conectarlo presionar el interruptor ON/OFF
(5) y mantenerlo pulsado.
쎲Para desconectarlo soltar el interruptor ON/OFF
(5).
7.4 Régimen de funcionamiento
7.4.1 Aspirar (fig. 7)
쎲Girar la palanca (fig. 7/pos. 8) a la posición A.
Esto se puede realizar tanto cuando el aparato
está parado como cuando está en
funcionamiento.
7.4.2 Soplar (fig. 7)
쎲Girar la palanca (fig. 7/pos. 8) a la posición B.
Esto se puede realizar tanto cuando el aparato
está parado como cuando está en
funcionamiento.
쎲Dirija el chorro de aire hacia delante y muévase
lentamente para juntar las hojas o los residuos
del jardín o para retirarlos de lugares de difícil
acceso.
쎲¡Atención!
Antes de soplar, vacíe la bolsa de recogida. De
lo contrario, podría escaparse el material ya
aspirado.
7.5 Vaciar bolsa de recogida (fig. 1)
Vacíe la bolsa de recogida (7) puntualmente.
Cuando la bolsa está muy llena, la fuerza de
aspiración se debilita de forma considerable. Destine
para compost los residuos orgánicos.
쎲Desconecte el aparato y retire el enchufe.
쎲Abra la cremallera de la bolsa de recogida (7) y
vacíela del material aspirado.
쎲Volver a cerrar la cremallera de la bolsa de
recogida (7).
7.6 Regulación de velocidad (fig. 8a)
El aparato está provisto de un regulador de velocidad
electrónico. Para ello, girar el regulador de velocidad
(fig. 8a/pos. 10) a la posición deseada. Poner el
aparato en funcionamiento sólo a la velocidad
necesaria y no permitir que gire innecesariamente.
8. Cambio del cable de conexión a la
red eléctrica
Cuando el cable de conexión a la red de este
aparato esté dañado, deberá ser sustituido por el
fabricante o su servicio de asistencia técnica o por
una persona cualificada para ello, evitando así
cualquier peligro.
9. Mantenimiento y limpieza
Desenchufar siempre antes de realizar algún trabajo
de limpieza.
9.1 Limpieza
nReducir al máximo posible la suciedad y el polvo
en los dispositivos de seguridad, las rendijas de
ventilación y la carcasa del motor. Frotar el
aparato con un paño limpio o soplarlo con aire
comprimido manteniendo la presión baja.
nSe recomienda limpiar el aparato tras cada uso.
nLimpiar el aparato con regularidad con un paño
húmedo y un poco de jabón blando. No utilizar
productos de limpieza o disolventes ya que se
podrían deteriorar las piezas de plástico del
aparato. Es preciso tener en cuenta que no entre
agua en el interior del aparato.
nUna vez finalizado el trabajo, retire la bolsa de
recogida, vuélquela y límpiela a fondo para evitar
que se produzca moho u olores desagradables.
nUna bolsa de recogida muy sucia se podrá
limpiar con agua y jabón.
nEn caso que aparezcan dificultades a la hora de
cerrar la cremallera, frote los dientes de la
cremallera con jabón seco.
nLimpiar la suciedad del tubo de
aspiración/soplado con un cepillo.
nDebido a la suciedad producida por el material
aspirado, se puede dañar la marcha suave de la
palanca de cambio (soplar / aspirar). En este
caso, la marcha suave de la palanca de cambio
se vuelve a ajustar tras cambiar varias veces de
aspirar a soplar.
nPara limpiar el interior de la carcasa, soltar los
tornillos (fig. 8a/pos. A) y retirar la tapa (fig.
8a/pos. B). No limpiar nunca el aparato con un
producto de limpieza o líquidos. Retirar la
suciedad incrustada con un cepillo, un paño seco
o aire comprimido. Al montar la tapa, asegurarse
de que la pestaña situada en el extremo inferior
de la tapa (fig. 8b/pos. A) entre en la ranura de la
carcasa (fig. 8b/pos. B) prevista para ello .
Atención: si la tapa no está correctamente
cerrada, el aparato no puede funcionar, un
Anleitung_GE_EL_1800_E_SPK8__ 14.11.12 10:02 Seite 10

11
E
microinterruptor interrumpe la alimentación
de corriente. Por este motivo, comprobar
siempre que la tapa se encuentre bien
asentada y correctamente atornillada.
9.2 Mantenimiento
nEn caso de que se produjeran averías, lleve el
aparato a un especialista autorizado o un taller
de servicio técnico.
nNo hay que realizar el mantenimiento a más
piezas en el interior del aparato
10. Almacenamiento
Guardar el aparato y sus accesorios en un lugar
oscuro, seco, protegido de las heladas e inaccesible
para los niños. La temperatura de almacenamiento
óptima se encuentra entre los 5 y 30 ˚C. Guardar la
herramienta eléctrica en su embalaje original.
11. Eliminación y reciclaje
El aparato está protegido por un embalaje para
evitar daños producidos por el transporte. Este
embalaje es materia prima y, por eso, se puede
volver a utilizar o llevar a un punto de reciclaje.
El aparato y sus accesorios están compuestos de
diversos materiales, como, p. ej., metal y plástico.
Depositar las piezas defectuosas en un contenedor
destinado a residuos industriales. Informarse en el
organismo responsable al respecto en su municipio
o en establecimientos especializados.
Anleitung_GE_EL_1800_E_SPK8__ 14.11.12 10:02 Seite 11

12
E
12. Plan para localización de fallos
Fallo Posobles causas Solución
El aparato no arranca No hay tensión
Cable defectuoso
Se han soltado las conexiones en
el motor
El tubo de aspiración no esta
montado correctamente
Tapa de limpieza no montada
correctamente.
Compruebe cable y fusible
Compruébelo
Un especialista autorizado deberá
comprobarlo
Tenga en cuenta el montaje
correcto
Tenga en cuenta el montaje
correcto
Anleitung_GE_EL_1800_E_SPK8__ 14.11.12 10:02 Seite 12

Important!
When using equipment, a few safety precautions
must be observed to avoid injuries and damage.
Please read the complete operating manual with due
care. Keep this manual in a safe place, so that the
information is available at all times. If you give the
equipment to any other person, give them these
operating instructions as well.
We accept no liability for damage or accidents which
arise due to non-observance of these instructions
and the safety information.
1. Safety information
General instructions
쎲Read the complete operating manual with due
care. Acquaint yourself with the controls and
how to use the tool.
쎲All persons (including children) who, for reasons
of physical, sensory or mental ability or
inexperience or lack of knowledge, are not in a
position to be able to use this device safely,
should not use the device unsupervised or
without instruction by or from a responsible
person.
Children must always be supervised in order to
ensure that they do not play with the device.
쎲Never allow children to use the tool.
쎲Never allow other persons who are not familiar
with the operating instructions to use the tool.
Contact your local government offices for
information regarding minimum age
requirements for operating the tool.
쎲Never use the tool when there are people –
particularly children – or pets nearby.
쎲The user is responsible for any accidents or
hazards suffered by third parties or their
property.
Preparation
쎲Always wear sturdy footwear and long trousers
when using the tool.
쎲Never wear loose fitting clothes or jewelry. They
may get drawn into the suction opening. Rubber
gloves and non-slip shoes are recommended
when working outdoors. Wear a hair net if you
have long hair.
쎲Wear safety goggles while you work.
쎲Use a dust mask when working on dusty jobs
쎲Always check the tool, the power cable and the
extension cable before using the tool. Only
operate the tool when it is in good working order
and is not damaged in any way. Damaged parts
have to be replaced immediately by a qualified
electrician.
쎲Never use the tool if any of its safety devices or
guards are damaged or if any safety
attachments such as deflectors and/or grass
catching devices are missing.
쎲When working outdoors, use only extension
cables which are approved for outdoor use.
Extension cables must have a minimum cross-
section of 1.5 mm2. The plug connections must
be splash-proof.
Operation
쎲Always trail the power cable behind the tool.
쎲If the power cable or extension cable is
damaged, pull the plug out of the socket.
NEVER TOUCH THE CABLE BEFORE THE
PLUG HAS BEEN PULLED OUT OF THE
SOCKET.
쎲Do not carry the tool by its power cable.
쎲Always pull out the power plug:
- when the tool is not being used, when it is
being transported or when you leave it un-
supervised.
- when you are checking the tool, cleaning
it or removing blockages.
- when you want to carry out cleaning or
maintenance work on the tool or replace
accessories.
- after the tool impacts with foreign bodies or
you notice unusual vibrations.
쎲Use the tool only in broad daylight or in well-lit
conditions.
쎲Do not underestimate the forces involved. Make
sure you stand squarely and keep your balance
at all times.
쎲If possible, avoid using the tool on wet grass.
쎲Ensure that you maintain a steady foothold
particularly while working on slopes.
쎲Always walk. Never run.
쎲Always keep the ventilation opening clean.
쎲Never direct the vacuum/blow hole at persons
or animals.
쎲The machine may only be used at reasonable
times of the day, i.e. not in the early morning or
late evening when it will be a nuisance to other
people. Permitted times of use specified by local
authorities must be observed.
쎲The machine must be run at the lowest possible
motor speed required to carry out the work.
쎲Remove all foreign objects with a rake and
brush before starting any blowing work.
쎲Where conditions are dusty, dampen the
surface a little or use a sprinkler attachment.
쎲Use the full-length blower nozzle extension so
that the air current can work near to the ground.
쎲Watch out for children, pets, open windows etc.
13
GB
Anleitung_GE_EL_1800_E_SPK8__ 14.11.12 10:02 Seite 13

and blow the foreign objects safely away from
them.
Maintenance and storage
쎲Check that all nuts, bolts and screws are
securely tightened in order to be sure that the
machine is in a safe working condition.
쎲Frequently check the debris bag for signs of
wear and deformation.
쎲Use only genuine accessories and spare parts.
쎲For your own safety, replace worn or damaged
parts without delay.
쎲Electric tools should be kept in a dry place when
not in use.
쎲If the mains cable for this device is damaged, it
must be replaced by the manufacturer or its
after-sales service or similarly trained personnel
to avoid danger.
The tool can be plugged into any socket-outlet (with
230 V AC) that is equipped with a 10A fuse or higher.
The socket-outlet has to be safeguarded by an earth-
leakage circuit breaker (e.l.c.b.). The operating
current must not exceed 30 mA.
CAUTION!
Read all safety regulations and instructions.
Any errors made in following the safety regulations
and instructions may result in an electric shock, fire
and/or serious injury.
Keep all safety regulations and instructions in a
safe place for future use.
Explanation of the warning signs on the
equipment (see Fig. 9)
1. Read the directions for use before operating the
tool.
2. Do not use the tool in rain or snow. Do not ex-
pose the tool to wet conditions.
3. Keep all other persons away from the danger
zone.
4. Wear goggles and ear muffs.
5. Switch off the tool and pull out the power plug be-
fore carrying out any cleaning or maintenance
work.
6. Rotating parts. Keep your hands and feet away
from all openings.
2. Layout (Fig. 1/2)
1. Front suction tube
2. Rear suction tube
3. Additional handle
4. Carrying strap
5. ON/OFF switch
6. Power cable
7. Debris bag
8. Selector switch for vacuum/blower
9. Castors
10. Speed controller
11. Wheel support
12. Screw for fitting the suction tube
13. Screw for fitting the housing
14. Additional nozzle
15. Rake attachment
3. Items supplied
nOpen the packaging and take out the equipment
with care.
nRemove the packaging material and any
packaging and/or transportation braces (if
available).
nCheck to see if all items are supplied.
nInspect the equipment and accessories for
transport damage.
nIf possible, please keep the packaging until the
end of the guarantee period.
IMPORTANT
The equipment and packaging material are not
toys. Do not let children play with plastic bags,
foils or small parts.There is a danger of
swallowing or suffocating!
nOriginal operating instructions
14
GB
Anleitung_GE_EL_1800_E_SPK8__ 14.11.12 10:02 Seite 14

4. Proper use
The garden blower vac is designed to handle only
foliage and garden refuse such as grass and small
branches. Any other use is prohibited.
The equipment is to be used only for its prescribed
purpose. Any other use is deemed to be a case of
misuse. The user / operator and not the
manufacturer will be liable for any damage or injuries
of any kind caused as a result of this.
Please note that our equipment has not been
designed for use in commercial, trade or industrial
applications. Our warranty will be voided if the
machine is used in commercial, trade or industrial
businesses or for equivalent purposes.
5. Technical data
See warranty card of your country.
6. Before starting the equipment
Before you connect the equipment to the mains
supply make sure that the data on the rating plate
are identical to the mains data.
Always pull the power plug before making
adjustments to the equipment.
6.1. Mounting the vacuum tube (Fig. 3a-3g)
nPlug together the front and rear suction tube (Fig.
3a) and secure with the screw (Fig. 3b / Item 12).
nNow slide the complete suction tube into the
motor housing (Fig. 3c) and secure with the screw
(Fig. 3d / Item 13).
nSlide the wheel support (Fig. 3e / Item 11) onto
the front suction tube as far as the stop (Fig. 3e /
Item A) and secure with the screw (Fig. 3e/Item
B).
nRemove the thumb screw (Fig. 3f / Item A) and
secure the axle (Fig. 3g / Item 9) with the thumb
screw.
nWhen the thumb screw is slackened, the axle can
be adjusted in height in accordance with the
relevant requirements. Then retighten the thumb
screw.
Note: Please note that the two vacuum tubes
must always be joined together before they are
mounted on the motor housing, and that they
must never be taken apart when mounted!
6.2. Mounting the debris bag (Fig. 4a + 4b)
Hang the hook on the suction tube (Fig. 4a) Then slip
the debris bag over the socket on the motor housing
(Fig. 4b). It engages correctly when it makes an
audible click.
6.3. Mounting the additional nozzle (Fig. 4c - 4e)
The surface nozzle attachment (Fig. 4e / Item A) is
designed for a quick vacuum cleaning of large
surfaces.The rake attachment (Fig. 4d / Item 15) is
designed for a vacuuming lawn areas.
Important: The additional nozzle can be operated only
in suction mode (see 6.4)
Fit the attachment to the additional nozzle with the
two knurled screws (Fig. 4c /Item A). Then slide the
additional nozzle into the front end of the suction tube
(Abb. 4e).
Start up the tool only after the mounting has been
fully completed. Always inspect the tool power cable
for damage before starting up. The tool may only be
used if the cord is in flawless condition.
15
GB
Anleitung_GE_EL_1800_E_SPK8__ 14.11.12 10:02 Seite 15

7. Operation
7.1 Sizing the strap (Fig. 1)
Size the length of the carrying strap (4) so that the
vacuum tube just clears the ground. The guide rollers
(9) at the bottom end of the suction tube will help you
to maneuver the suction tube on the ground.
7.2. Adjusting the additional handle (Fig. 5)
To do so, undo the lever (Fig. 5 / Item A) by flipping it
open. Now set the additional handle (Fig. 5 / Item 3) to
the required position and flip back the lever.
7.3 Connecting the tool to the power supply and
switching on (Fig. 6)
The tool can be plugged into any socket-outlet (with
230 V AC) that is equipped with a 10A fuse or higher.
The socket-outlet has to be safeguarded by an earth-
leakage circuit breaker (e.l.c.b.). The operating
current must not exceed 30 mA.
nInsert the tool plug into the power cord coupling
(extension).
nSecure the power cord with the sleeve provided
on the tool as shown.
nTo switch on, press and hold the ON/OFF switch
(5).
nTo switch off, let go of the ON/OFF switch (5).
7.4 Selecting the mode of operation
7.4.1 Suctioning (Fig. 7)
Turn the lever (Fig. 7/Item 8) to position A.You can do
this both when the device is at a standstill and while it
is running.
7.4.2 Blowing (Fig. 7)
nTurn the lever (Fig. 7/Item 8) to position B.You can
do this both when the device is at a standstill and
while it is running.
nChannel the air stream forward and walk slowly
to blow foliage or garden refuse into a pile or to
clear out hard-to-reach places.
nImportant!
Empty the debris bag before blowing. Otherwise,
the material that has been vacuumed up could
drop out.
7.5 Emptying the debris bag and pre-screen
(Fig. 1)
Empty the debris bag (7) in good time. When the bag
is heavily loaded with material, vacuum power is
considerably reduced. Deposit organic refuse at a
compost site.
nSwitch off the tool and pull out the plug.
nOpen the zipper on the debris bag (7) and shake
out the material.
nClose the zip on the debris bag (7) again.
7.6 Speed control (Fig. 8a)
The device is fitted with an electronic speed
controller. To use it, turn the speed controller (Fig. 8a/
Item 10) to the desired position. Use the device only
with the speed which is actually required and do not
let it run at a speed which is faster than necessary.
8. Replacing the power cable
If the power cable for this equipment is damaged, it
must be replaced by the manufacturer or its after-
sales service or similarly trained personnel to avoid
danger.
9. Cleaning and maintenance
Always pull out the mains power plug before starting
any cleaning work.
9.1 Cleaning
nKeep all safety devices, air vents and the motor
housing free of dirt and dust as far as possible.
Wipe the equipment with a clean cloth or blow it
with compressed air at low pressure.
nWe recommend that you clean the device
immediately each time you have finished using it.
nClean the equipment regularly with a moist cloth
and some soft soap. Do not use cleaning agents
or solvents; these could attack the plastic parts
of the equipment. Ensure that no water can seep
into the device.
nAfter shaking out the debris bag, turn it inside out
and thoroughly clean it in order to prevent mould
and unpleasant odors from forming.
nYou can use soap and water to clean out a
heavily soiled debris bag.
nRub a bar of dry soap across the zipper teeth if
the zipper becomes difficult to pull.
nClean the vacuum/blower tube with a brush upon
evidence of dirt and grime.
nDirt and grime can make the switch
(blower/vacuum) more difficult to operate as a
result of the material that swirls up off the
ground. When this occurs, simply flip the switch
back and forth a few times, which should bring it
back to the normal feel.
nTo clean the interior of the housing undo the
screw connection (Fig. 8a / Item A) and remove
the cover (Fig. 8a / Item B). Never use cleaning
agents or liquids for cleaning purposes. Remove
16
GB
Anleitung_GE_EL_1800_E_SPK8__ 14.11.12 10:02 Seite 16

17
GB
deposits with a brush, a dry cloth or compressed
air. When you fit the cover, make sure that the nib
at the bottom end of the cover (Fig. 8b / Item A) is
inserted into the corresponding recess in the
housing (Fig. 8b / item B).
Important: If the cover is not correctly closed,
a microswitch will interrupt the power supply
and the equipment cannot operate properly.
For this reason, always check that the cover
is properly fitted and secured.
9.2 Maintenance
nShould the tool experience problems beyond
those mentioned above, let only an authorized
professional or a customer service shop perform
an inspection.
nThere are no parts inside the equipment which
require additional maintenance.
10. Storage
Store the equipment and accessories out of children’s
reach in a dark and dry place at above freezing
temperature. The ideal storage temperature is
between 5 and 30 °C. Store the electric tool in its
original packaging.
11. Disposal and recycling
The unit is supplied in packaging to prevent its being
damaged in transit. This packaging is raw material
and can therefore be reused or can be returned to
the raw material system.
The unit and its accessories are made of various
types of material, such as metal and plastic.
Defective components must be disposed of as
special waste. Ask your dealer or your local council.
Anleitung_GE_EL_1800_E_SPK8__ 14.11.12 10:02 Seite 17

18
GB
12. Troubleshooting guide
Fault Possible cause Remedy
Motor does not start No voltage present.
Power cord defective
Motor terminals disconnected
Suction tube not mounted correctly
The cleaning cover is not mounted
correctly.
Check the cord and fuses
Check the power cord
Have the unit checked by a
customer service workshop
Mount the tube correctly
Mount the cover correctly
Anleitung_GE_EL_1800_E_SPK8__ 14.11.12 10:02 Seite 18

19
Anleitung_GE_EL_1800_E_SPK8__ 14.11.12 10:02 Seite 19

20
Anleitung_GE_EL_1800_E_SPK8__ 14.11.12 10:02 Seite 20
Table of contents
Languages: