EINHELL BT-TJ 2020 User manual

Original operating instructions
Hydraulic Trolley Jack
Manual de instrucciones original
Gato hidráulico para coches sobre rodillos
Art.-Nr.: 20.117.78 I.-Nr.: 01019 BT-TJ 2020
Anleitung_BT_TJ_2020_SPK7:_ 24.06.2009 7:59 Uhr Seite 1

2
2
1
1
2
3
10
11
12
13
4
5
6
14
7
8
Anleitung_BT_TJ_2020_SPK7:_ 24.06.2009 7:59 Uhr Seite 2

3
Important!
When using the equipment, a few safety precautions
must be observed to avoid injuries and damage.
Please read the complete operating instructions and
safety regulations with due care. Keep this manual in
a safe place, so that the information is available at all
times. If you give the equipment to any other person,
hand over these operating instructions and safety
regulations as well. We cannot accept any liability for
damage or accidents which arise due to a failure to
follow these instructions and the safety instructions.
1. Safety instructions
앬Before you raise the load, check that the
lowering screw is tightly shut.
앬Always place the hydraulic trolley jack on firm
and level ground when using it to raise a load.
앬Never work underneath a raised load which is
supported only by the hydraulic trolley jack.
Working on and under raised vehicles is only
permitted when the vehicle in question is
secured and supported against tipping and
slipping.
앬The trolley jack is designed only for raising loads.
After a load is raised it must be supported
immediately by at least one jack stand. Vehicles
must be sufficiently secured against rolling
before they are raised with the trolley jack. Never
use the trolley jack at an angle.
앬Position the trolley jack only where specified by
the vehicle manufacturer.
앬Make sure that no one leans against a raised
vehicle or load.
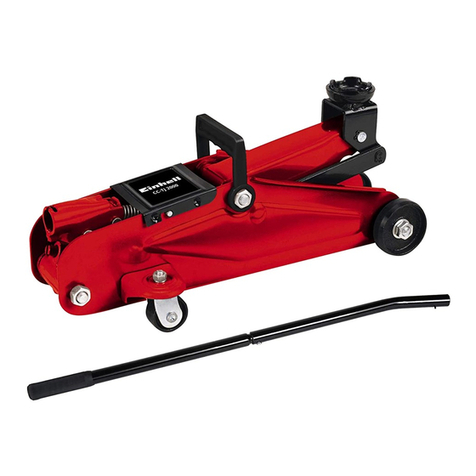
2. Layout (Fig. 1)
1. Drain screw
2. Piston rod mount
3. Carry-handle
4. Lifting arm
5. Support plate
6. Roller
7. Guide roller
8. Piston rod
3. Proper use
The hydraulic car jacks comply with EN1494: 2000.
They are designed for lifting loads, preferably cars, at
an ambient temperature of over 0°C.
The machine is to be used only for its prescribed
purpose. Any other use is deemed to be a case of
misuse. The user / operator and not the
manufacturer will be liable for any damage or injuries
of any kind caused as a result of this.
Please note that our equipment has not been
designed for use in commercial, trade or industrial
applications. Our warranty will be voided if the
machine is used in commercial, trade or industrial
businesses or for equivalent purposes.
4. Technical data
Lifting (load) capacity (kg): 2000
Min. lifting height (mm): 135
Max. lifting height (mm): 330
5. Before starting the equipment
Air pockets may form in the hydraulic fluid passages
if the jack is not used for a long time or if there is too
little fluid in the hydraulic system from the outset.
In both cases, proceed as follows:
a) Topping up with oil (Fig. 2)
Remove the cover plate. On the hydraulic cylinder
you will see a rubber plug in the fluid filler hole. With
the trolley jack in horizontal position on the floor,
remove the rubber plug by pressing it in on the side
with a screwdriver. Fill in hydraulic fluid (type: HLP
32 Iso or equivalent) through the fluid filler hole.
You must fill in enough fluid to cover the cylinder
visible inside. Re-insert the rubber plug in the filler
hole.
b) Venting (Fig. 2)
The hydraulic system has to be vented at least after
each time you add hydraulic fluid. Air pockets may
also form in the hydraulic fluid passages if the jack is
not used for a long time. This is the case if the load
sinks again abruptly after being raised half or only
part of the way.
To vent the hydraulic system, pump up the unloaded
jacking arm approximately half way. Now press your
foot against the jacking arm to exert a little pressure
on the hydraulic system. The lowering screw must of
course be closed when you do this.
Use a screwdriver to press the rubber plug slightly
sideways until the air escapes. Now lower the trolley
jack by opening the lowering screw and repeat the
procedure 2 or 3 times. Air is also vented from the
GB
Anleitung_BT_TJ_2020_SPK7:_ 24.06.2009 7:59 Uhr Seite 3

system via the lowering screw. Any drops of fluid
which may then escape are irrelevant for the jackʼs
further use. You can now rest assured that there are
no longer any air pockets in the fluid passages and
that the jack will work correctly.
Catch old and escaping fluid in a special
container and deliver to your old oil disposal
center!
6. Raising vehicles (Fig. 1)
Before you raise a vehicle, make sure it is standing
on a firm surface so that the trolley jack does not sink
into the ground under the raised load. In hot summer
conditions the trolley jack may easily sink into tarmac
surfaces and slip sideways.
Pull the hand brake and also secure the vehicle with
chocks if available. Now place the trolley jack under
the vehicle so that the support disk can rest against a
strong part of the floor. On old vehicles with rusted
floor elements there is the risk of the support disk
breaking through the floor.
Make sure that the lowering screw is closed. Use the
jacking bar to pump up the jacking arm to a point
where it is not quite touching the vehicle. You can
now make final adjustments of position to ensure that
the vehicle is raised correctly and safely.
For your own safety, always use at least one jack
stand to provide additional support for a raised
vehicle with only one wheel off the ground.
When you have completed your work, first remove
the jack stand and then lower the jacking arm of the
trolley jack by slightly unscrewing the lowering screw
with the jacking bar. You can control the lowering
speed yourself by opening the lowering screw to a
greater or lesser degree. The trolley jack is equipped
with an overload valve on the side of the hydraulic
pump. This valve is set at the factory so that the
maximum load cannot be exceeded.
Do not adjust this valve or you will forfeit your rights
under the warranty if the jack suffers any damage.
Once the jacking arm reaches its highest position,
the safety valve and an overflow device will prevent
additional pressure being exerted on the hydraulic
system even if you continue to pump with the jacking
bar.
7. Cleaning, maintenance and ordering
of spare parts
7.1 Maintance
All moving joints should be oiled and the roller
bearings of the steering wheels greased every three
to six months, depending on how often the trolley
jack is used. Every hydraulic system is sealed with
O-rings or cup packings which result in wear
depending on how often the trolley jack is used.
Repair sets are available from Customer Service on
request. To prevent damage to the seals, use only
acid-free hydraulic fluid to top up the system.
Catch old and escaping fluid in a special
container and deliver to your old oil disposal
center!
You should always move the hydraulic system
(piston) to idle position (piston inserted) once the
trolley jack is no longer needed. This will protect the
precision-machined surfaces of the piston and the
piston rod from corrosion.
Your trolley jack will give you good service if you use
only high-grade hydraulic fluid. Never mix different
types of fluid! Never use brake fluid, alcohol,
glycerin, dirty fluid, etc.
7.2 Ordering replacement parts:
Please quote the following data when ordering
replacement parts:
Type of machine
Article number of the machine
Identification number of the machine
Replacement part number of the part required
For our latest prices and information please go to
www.isc-gmbh.info
8. Disposal and recycling
The unit is supplied in packaging to prevent its being
damaged in transit. This packaging is raw material
and can therefore be reused or can be returned to
the raw material system.
The unit and its accessories are made of various
types of material, such as metal and plastic.
Defective components must be disposed of as
special waste. Ask your dealer or your local council.
4
GB
Anleitung_BT_TJ_2020_SPK7:_ 24.06.2009 7:59 Uhr Seite 4

5
GB
9. TROUBLESHOOTING
FAULTS CAUSES AND REMEDIES
The load cannot be raised with the trolley jack 1. The lowering screw has not been tightened.
- Tighten the screw clock-wise.
2. The level of fluid is too low.
- Add more fluid as described in the instructions.
The trolley jack cannot hold the load 3. See No. 1 and No. 2.
in raised position 4. The hydraulic system is clogged with dirt.
- First close the lowering screw and then open
the vent plug.
- Place your foot against a front wheel and pull up
the jacking arm as far it will go.
- Lower the jacking arm and try again to raise
the load.
The hydraulic system (piston) cannot be 5. See No. 1 and No. 2.
extended to its full height. 6. There is air in the hydraulic system.
- Open the vent plug and then remove the air from
the hydraulic system by pumping up and down
several times as described in the instructions.
The hydraulic system cannot be fully lowered. 7. The return spring is worn or disconnected.
- You should clean and lubricate all moving parts in
regular intervals.
Anleitung_BT_TJ_2020_SPK7:_ 24.06.2009 7:59 Uhr Seite 5

¡Atención!
Al usar aparatos es preciso tener en cuenta una serie
de medidas de seguridad para evitar lesiones o
daños. Por este motivo, es preciso leer atentamente
este manual de instrucciones/advertencias de
seguridad. Guardar esta información
cuidadosamente para poder consultarla en cualquier
momento. En caso de entregar el aparato a terceras
personas, será preciso entregarles, asimismo, el
manual de instrucciones/advertencias de seguridad.
No nos hacemos responsables de accidentes o
daños provocados por no tener en cuenta este
manual y las instrucciones de seguridad.
1. Advertencias de seguridad:
앬Compruebe antes de elevar la carga si el tornillo
de purga está bien cerrado.
앬Coloque el gato siempre sobre una superficie
lisa y resistente a la horar de elevar la carga.
앬No trabaje nunca debajo de la carga elevada si
ésta solo se apoya en el gato. Sólo está
permitido trabajar debajo de un vehículo elevado
con un gato si éste se halla asegurado lo
suficiente contra el deslizamiento y el volteo.
앬El gato se ha diseñado sólo para elevar cargas.
앬Tras elevar una carga, es preciso colocar
inmediatamente como mínimo un cric para
coches que sirva de soporte. Antes de utilizar el
gato, calce el vehículo que desea elevar de
forma adecuada para evitar que se desplace. No
coloque nunca el gato inclinado o ladeado a la
hora de elevar la carga.
앬Coloque el gato sólo en los puntos previstos
para ello por el fabricante del automóvil.
앬Asegúrese de que nadie se apoye contra una
carga o automóvil elevados.
2. Descripción del aparato (fig. 1)
1. Tornillo purgador
2. Alojamiento de la palanca elevadora
3. Estribo portante
4. Brazo elevador
5. Disco de apoyo
6. Rodillo
7. Ruedecilla orientable
8. Biela de émbolo
3. Uso adecuado
Los gatos hidráulicos cumplen la norma EN 1494:
2000. Ha sido concebido para elevar cargas,
preferiblemente turismos, a una temperatura
ambiente superior a 0°C.
Utilizar la máquina sólo en los casos que se indican
explícitamente como de uso adecuado. Cualquier
otro uso no será adecuado. En caso de uso
inadecuado, el fabricante no se hace responsable de
daños o lesiones de cualquier tipo; el responsable es
el usuario u operario de la máquina.
Tener en consideración que nuestro aparato no está
indicado para un uso comercial, industrial o en taller.
No asumiremos ningún tipo de garantía cuando se
utilice el aparato en zonas industriales, comerciales
o talleres, así como actividades similares.
4. Caractarísticas técnicas:
Capacidad de elevación (carga): kg 2000
Altura min.: mm 135
Altura max.: mm 330
5. Antes de la puesta en marcha
Un largo periodo de tiempo sin utilizar el gato podría
originar que se formaran burbujas de aire en los
pasos de aceite del sistema hidráulico, o se constata
la falta de aceite en el sistema hidráulico desde un
principio.
En ambos casos, proceda del modo siguiente:
a) Rellenar aceite (fig. 2)
Retire la placa de protección. En el sistema
hidráulico es posible distinguir un tapón de goma
que obtura el orificio de llenado del aceite. Retire
dicho tapón haciendo presión en los lados con la
ayuda de un destornillador. El gato debe colocarse
en posición horizontal sobre el suelo. El aceite
hidráulico (tipo: HLP 32 Iso o similar) se llena a
través de la apertura.
En caso de necesidad, introduzca aceite hasta re
cubrir el cilindro que había quedado al descubierto.
Vuelva a apretar el tapón de goma en la apertura.
6
E
Anleitung_BT_TJ_2020_SPK7:_ 24.06.2009 7:59 Uhr Seite 6

b) Purgar el aire (fig. 2)
Es preciso extraer el aire del sistema hidráulico
como mínimo después de cada rellenado de aceite.
Un largo periodo de tiempo sin utilizar el gato puede
originar también la formación de burbujas de aire en
las mangueras de aceite del sistema hidráulico.
La falta de purga provoca que la carga elevada
descienda ligeramente o incluso hasta la mitad. Para
proceder a la purga: eleve el brazo de elevación sin
carga
hasta aprox. la mitad de su capacidad. Presione a
continuación el pedal del gato con el pie para que se
genere un cierta contrapresión en el sistema
hidráulico. Es imprescindible que el tornillo de purga
del gato esté cerrado. Presione ligeramente con el
destornillador en el tapón de goma lateralmente
hasta que se escape el aire. Baje el gato abriendo el
tornillo de purga y repita el procedimiento unas 2 ó 3
veces.
También se ventila el sistema hidráulico por medio
del tornillo de purga. El hecho de que salga aceite
gota a gota durante el procedimiento no influye para
nada en el buen funcionamiento posterior del gato.
De este modo se asegura de que se expulsen las
posibles burbujas de aire de los canales de aceite y
de que el gato funcione en perfecto estado.
¡Recoja el aceite usado o derramado en un
recipiente especial y deshágase del mismo de
forma ecológica en el lugar adecuado!
6. Para elevar automóviles (fig. 1)
Asegúrese antes de elevar un automóvil de que el
mismo se encuentre aparcado sobre un suelo
resistente para que el gato no se hunda cuando se
eleve la carga. Cuando hace calor puede suceder
fácilmente que el gato se hunda en superficies
alquitranadas y se resbale lateralmente.
Ponga en todo caso el freno de mano y calce
adicionalmente el vehículo, si es posible, para evitar
que se desplace. Coloque el gato debajo del coche
de manera que los discos de apoyo puedan encajar
de forma segura en las superficies de apoyo. En el
caso de automóviles viejos con piezas oxidadas, se
corre fácilmente el riesgo de que se produzcan
roturas en la carrocería.
Es preciso que el tornillo de purga esté bien cerrado.
Bombee con la palanca elevadora el brazo de
elevación hasta estar justo debajo del coche pero sin
ejercer todavía presión.
De este modo, tiene la posibilidad de ajustar de
forma exacta el gato para que el automóvil pueda
elevarse de forma segura y estable.
Por motivos de seguridad personal, el automóvil
elevado debe asegurarse siempre de forma adicional
con un cric de apoyo para coches como mínimo,
siempre y cuando se haya elevado sólo una rueda.
Una vez realizado el trabajo, saque primero el cric y,
con ayuda de la palanca elevadora, descienda el
brazo de elevación girando ligeramente el tornillo de
purga. Ud. mismo puede regular la velocidad de
descenso girando más o menos el tornillo de purga.
El gato está equipado con una válvula de
sobrecarga. La válvula se halla colocada
lateralmente en la bomba hidráulica. Esta válvula
viene ajustada de fábrica de tal modo que no puede
sobrepasarse la carga máxima.
No trate de reajustar Ud. mismo esta válvula, ya que,
de lo contrario, la garantía perdería su validez en
caso de que se dañara el aparato.
Una vez que el brazo haya alcanzado su altura
máxima ya no se podrá ejercer presión en el sistema
hidráulico aunque se siga bombeando, gracias a la
válvula de seguridad
o al dispositivo de sobrecorriente.
7. Mantenimiento, limpieza y pedido de
piezas de repuesto
7.1 Mantenimiento
Sería preciso engrasar con aceite todas las
articulaciones móviles, dependiendo del uso, cada
tres meses, o bien engrasar los rodamientos de
rodillos o las ruedas de desviación. Todos los
sistemas hidráulicos están equipados con juntas
tóricas que, dependiendo del uso, producen
desgaste. En nuestro taller de servicio técnico
obtendrá juegos de reparación.
Utilice sólo aceite exento de ácidos para evitar que
se dañen las juntas.
¡Recoja el aceite usado o derramado en un
recipiente especial y deshágase del mismo de forma
ecológica en el lugar adecuado!
Siempre que el gato hidráulico esté fuera de servicio,
el sistema hidráulico (émbolo) debería estar siempre
en posición de reposo (émbolo recogido). Esto
protege de la corrosión las superficies de acabado
preciso del émbolo y del vástago.
Para conseguir que el gato funcione de forma
correcta emplee sólo aceite hidráulico de alta
calidad. ¡No mezcle aceites distintos bajo ningún
concepto! No utilice nunca líquido de frenos, alcohol,
glicerina, aceite contaminado, etc.
7
E
Anleitung_BT_TJ_2020_SPK7:_ 24.06.2009 7:59 Uhr Seite 7

7.2 Pedido de piezas de recambio:
Al solicitar recambios se indicarán los datos
siguientes:
Tipo de aparato
No. de artículo del aparato
No. de identidad del aparato
No. del recambio de la pieza necesitada.
Encontrará los precios y la información actual en
www.isc-gmbh.info
8. Eliminación y reciclaje
El aparato está protegido por un embalaje para
evitar daños producidos por el transporte. Este
embalaje es materia prima y, por eso, se puede
volver a utilizar o llevar a un punto de reciclaje.
El aparato y sus accesorios están compuestos de
diversos materiales, como, p. ej., metal y plástico.
Depositar las piezas defectuosas en un contenedor
destinado a residuos industriales. Informarse en el
organismo responsable al respecto en su municipio
o en establecimientos especializados.
8
E
Anleitung_BT_TJ_2020_SPK7:_ 24.06.2009 7:59 Uhr Seite 8

9
E
9. FUENTES DE ERROR
FUENTES DE ERROR CAUSA Y SOLUCIONES
La carga no puede elevarse con ayuda del 1. El tornillo de purga no está bien apretado.
gato hidráulico - Apriete el tornillo en el mismo sentido de las
agujas de un reloj
2. El caudal de aceite es demasiado escaso
- Llene aceite tal y como se indica en las
instrucciones
El gato hidráulico no puede sostener la carga 3. Compare con punto 1. y 2.
en la posición elevada 4. El sistema hidráulico se atascó por suciedad
- Cierre primero la válvula de escape y abra a
continuación el tornillo de ventilación
- Coloque un pie en una rueda delantera y tire del
brazo de elevación con la mano hasta la máxima
altura
- Baje entonces el brazo de elevación e intente
elevar la carga de nuevo
El gato hidráulico no puede elevarse hasta el tope 5. Compare con punto 1. y 2
6. Existe aire en el sistema hidráulico
- Abra el tornillo de ventilación y saque el aire del
sistema hidráulico bombeando varias veces tal y
como se describe en las instrucciones
El gato hidráulico no puede descender del todo 7. El muelle recuperador se ha enganchado o
desviado
- Es preciso que engrase todas las piezas móviles
de forma periódica
Anleitung_BT_TJ_2020_SPK7:_ 24.06.2009 7:59 Uhr Seite 9

10
The reprinting or reproduction by any other means, in whole or in part,
of documentation and papers accompanying products is permitted only
with the express consent of ISC GmbH.
La reimpresión o cualquier otra reproducción de documentos e
información adjunta a productos, incluida cualquier copia, sólo se
permite con la autorización expresa de ISC GmbH.
Technical changes subject to change
Salvo modificaciones técnicas
Anleitung_BT_TJ_2020_SPK7:_ 24.06.2009 7:59 Uhr Seite 10

11
tGUARANTEE CERTIFICATE
Dear Customer,
All of our products undergo strict quality checks to ensure that they reach you in perfect condition. In the unlikely
event that your device develops a fault, please contact our service department at the address shown on this
guarantee card. Of course, if you would prefer to call us then we are also happy to offer our assistance under
the service number printed below. Please note the following terms under which guarantee claims can be made:
1. These guarantee terms cover additional guarantee rights and do not affect your statutory warranty rights.
We do not charge you for this guarantee.
2. Our guarantee only covers problems caused by material or manufacturing defects, and it is restricted to the
rectification of these defects or replacement of the device. Please note that our devices have not been
designed for use in commercial, trade or industrial applications. Consequently, the guarantee is invalidated
if the equipment is used in commercial, trade or industrial applications or for other equivalent activities. The
following are also excluded from our guarantee: compensation for transport damage, damage caused by
failure to comply with the installation/assembly instructions or damage caused by unprofessional
installation, failure to comply with the operating instructions (e.g. connection to the wrong mains voltage or
current type), misuse or inappropriate use (such as overloading of the device or use of non-approved tools
or accessories), failure to comply with the maintenance and safety regulations, ingress of foreign bodies
into the device (e.g. sand, stones or dust), effects of force or external influences (e.g. damage caused by
the device being dropped) and normal wear resulting from proper operation of the device.
The guarantee is rendered null and void if any attempt is made to tamper with the device.
3. The guarantee is valid for a period of 2 years starting from the purchase date of the device. Guarantee
claims should be submitted before the end of the guarantee period within two weeks of the defect being
noticed. No guarantee claims will be accepted after the end of the guarantee period. The original guarantee
period remains applicable to the device even if repairs are carried out or parts are replaced. In such cases,
the work performed or parts fitted will not result in an extension of the guarantee period, and no new
guarantee will become active for the work performed or parts fitted. This also applies when an on-site
service is used.
4. In order to assert your guarantee claim, please send your defective device postage-free to the address
shown below. Please enclose either the original or a copy of your sales receipt or another dated proof of
purchase. Please keep your sales receipt in a safe place, as it is your proof of purchase. It would help us if
you could describe the nature of the problem in as much detail as possible. If the defect is covered by our
guarantee then your device will either be repaired immediately and returned to you, or we will send you a
new device.
Of course, we are also happy offer a chargeable repair service for any defects which are not covered by the
scope of this guarantee or for units which are no longer covered. To take advantage of this service, please send
the device to our service address.
Einhell Chile S.A.
Av. Recoleta 1223, Santiago, Chile
Tel.: +56 2 7979312 • Fax: +56 2 7376799
Anleitung_BT_TJ_2020_SPK7:_ 24.06.2009 8:00 Uhr Seite 11

EH 06/2009 (01)
mCERTIFICADO DE GARANTÍA
Estimado cliente:
Nuestros productos están sometidos a un estricto control de calidad. No obstante, lamentaríamos que este
aparato dejara de funcionar correctamente, en tal caso, le rogamos que se dirija a nuestro servicio de atención
al cliente en la dirección indicada en la parte inferior de la presente tarjeta de garantía. Con mucho gusto le
atenderemos también telefónicamente en el número de servicio indicado a continuación. Para hacer válido el
derecho de garantía, proceda de la siguiente forma:
1. Estas condiciones de garantía regulan prestaciones de la garantía adicionales. Sus derechos legales a
prestación de garantía no se ven afectados por la presente garantía. Nuestra prestación de garantía es
gratuita para usted.
2. La prestación de garantía se extiende exclusivamente a defectos ocasionados por fallos de material o de
producción y está limitada a la reparación de los mismos o al cambio del aparato. Tenga en consideración
que nuestro aparato no está indicado para un uso comercial, en taller o industrial. Por lo tanto, no
procederá un contrato de garantía cuando se utilice el aparato en zonas industriales, comerciales o talleres,
así como actividades similares. De nuestra garantía se excluye cualquier otro tipo de prestación adicional
por daños ocasionados por el transporte, daños ocasionados por la no observancia de las instrucciones de
montaje o por una instalación no profesional, no observancia de las instrucciones de uso (como, p. ej.,
conexión a una tensión de red o corriente no indicada), aplicaciones impropias o indebidas (como, p. ej.,
sobrecarga del aparato o uso de herramientas o accesorios no homologados), no observancia de las
disposiciones de mantenimiento y seguridad, introducción de cuerpos extraños en el aparato (como, p. ej.,
arena, piedras o polvo), uso violento o influencias externa (como, p. ej., daños por caídas), así como por el
desgaste habitual por el uso.
El derecho a garantía pierde su validez cuando ya se hayan realizado intervenciones en el aparato.
3. El periodo de garantía es de 2 años y comienza en la fecha de la compra del aparato. El derecho de
garantía debe hacerse válido, antes de finalizado el plazo de garantía, dentro de un periodo de dos
semanas una vez detectado el defecto. El derecho de garantía vence una vez transcurrido el plazo de
garantía. La reparación o cambio del aparato no conllevará ni una prolongación del plazo de garantía ni un
nuevo plazo de garantía ni para el aparato ni para las piezas de repuesto montadas. Esto también se aplica
en el caso de un servicio
in situ
.
4. Para hacer efectivo su derecho a garantía, envíe gratuitamente el aparato defectuoso a la dirección
indicada a continuación. Adjunte el original del ticket de compra u otro tipo de comprobante de compra con
fecha. ¡A tal efecto, guarde en lugar seguro el ticket de compra como comprobante! Describa con la mayor
precisión posible el motivo de la reclamación. Si nuestra prestación de garantía incluye el defecto
aparecido en el aparato, recibirá de inmediato un aparato reparado o nuevo de vuelta.
Naturalmente, también solucionaremos los defectos del aparato que no se encuentren comprendidos o ya no
se encuentren comprendidos en la garantía, en este caso contra reembolso de los costes. Para ello, envíe el
aparato a nuestra dirección de servicio técnico.
Einhell Chile S.A.
Av. Recoleta 1223, Santiago, Chile
Tel.: +56 2 7979312 • Fax: +56 2 7376799
Anleitung_BT_TJ_2020_SPK7:_ 24.06.2009 8:00 Uhr Seite 12
This manual suits for next models
1
Table of contents
Languages:
Other EINHELL Jack manuals