Ekinex EK-DF2-TP Instructions for use

Application manual
Indoor presence sensors
EK-DF2-TP
EK-DG2-TP

Application manual
Presence / movement sensors EK-DF2/DG2-TP
Rev. 1.2 - 2020-02-06 MAEKDF2DG2TP_EN
© Ekinex S.p.A. –All rights reserved Pag. 2
Contents
1Scope of the document.............................................................................................................................. 3
2Product description.................................................................................................................................... 4
3Main features............................................................................................................................................. 4
4Technical data............................................................................................................................................ 4
5Switching, display and detection elements................................................................................................ 5
6Operation................................................................................................................................................... 5
6.1 Brightness measurement...................................................................................................................... 5
6.2 Lighting control channels...................................................................................................................... 5
6.3 Constant ambient brightness regulation ............................................................................................... 5
6.4 HVAC control channels......................................................................................................................... 5
7Positioning ................................................................................................................................................. 6
7.1 Positioning for EK-DF2-TP.................................................................................................................... 6
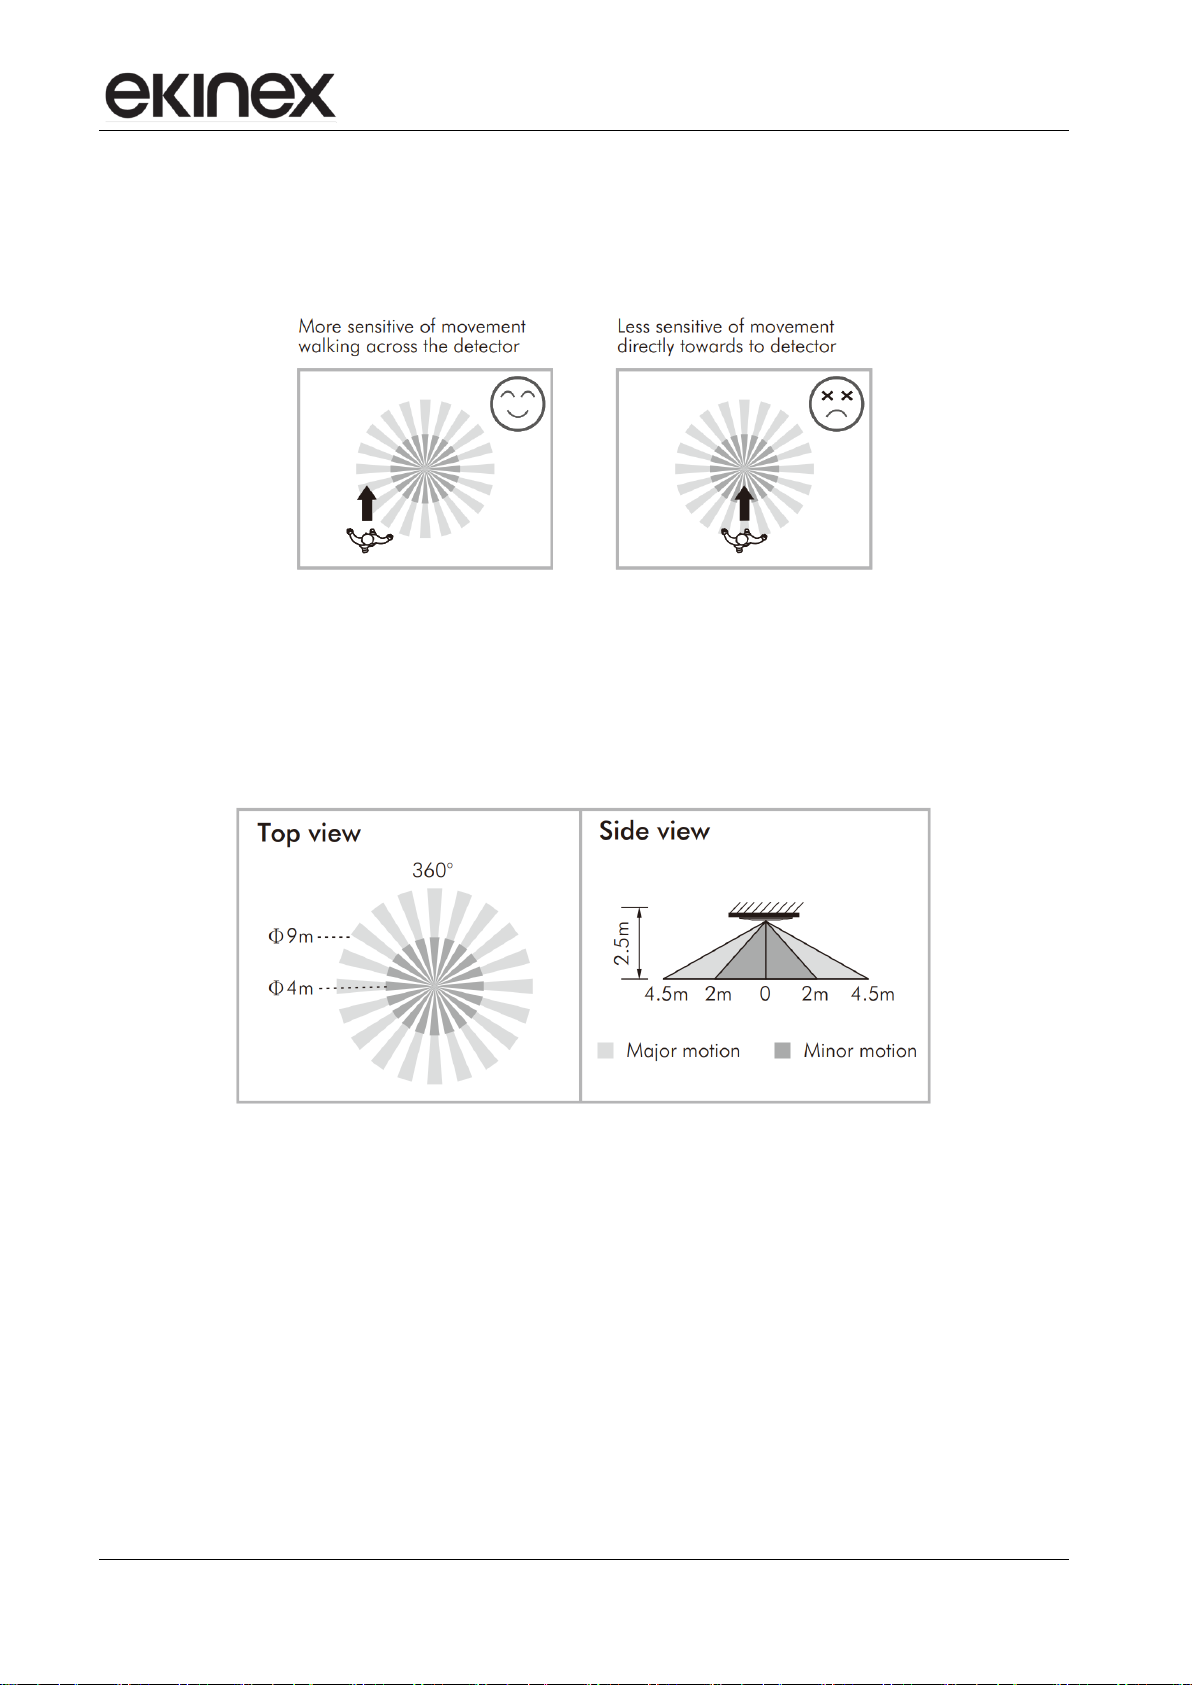
7.2 Positioning for EK-DG2-TP................................................................................................................... 6
8Limitation of the detection area.................................................................................................................. 8
9Installation.................................................................................................................................................. 9
10 Connection of the KNX bus line............................................................................................................... 11
11 Configuration and commissioning............................................................................................................ 11
12 Walk test.................................................................................................................................................. 12
13 List of ETS parameters............................................................................................................................ 13
13.1 Menu: General .................................................................................................................................... 13
13.2 Menu: Motion sensors......................................................................................................................... 13
13.3 Menus: Light control output C1 / C2 ................................................................................................... 14
13.4 Menus: HVAC control output C3 / C4................................................................................................. 15
13.5 Menus: Alarm function ........................................................................................................................ 16
14 Elenco oggetti di comunicazione ETS..................................................................................................... 17
15 Troubleshooting....................................................................................................................................... 19
16 Package contents .................................................................................................................................... 19
17 Optional accessories ............................................................................................................................... 20
18 Dimensions.............................................................................................................................................. 21
19 Markings .................................................................................................................................................. 21
20 Maintenance ............................................................................................................................................ 21
21 Disposal................................................................................................................................................... 22
22 General warnings..................................................................................................................................... 22
23 Other information..................................................................................................................................... 22
Revision
Changes
Date
Written by
Verified by
1.2
Minor corrections
2020-02-06
G.Croci C.
1.1
Minor corrections
2020-01-14
G.Croci C.
1.0
First issue
2019-12-11
G.Croci C.

Application manual
Presence / movement sensors EK-DF2/DG2-TP
Rev. 1.2 - 2020-02-06 MAEKDF2DG2TP_EN
© Ekinex S.p.A. –All rights reserved Pag. 3
1 Scope of the document
This application manual describes application details for the ekinex® presence / movement sensors
EK-DF2-TP and EK-DG2-TP.
The document is aimed at the system configurator as a description and reference of device features
and application programming. For installation, mechanical and electrical details of the device please
refer to the technical description datasheet.
Application manual and application programs for ETS are available for download at
www.ekinex.com.
Item
File name (## = release)
Version
Device rel.
Update
Technical datasheet
STEKDF2TP_IT.pdf
STEKDG2TP_IT.pdf
-
A1.0
11 Dic 2019
Application manual
MAEKDF2DG2TP_IT.pdf
-
Application program
APEKDF2TP##.knxprod
APEKDG2TP##.knxprod
-
You can access the most up-to-date version of the full documentation for the device using following
QR codes:
EK-DF2-TP EK-DG2-TP

Application manual
Presence / movement sensors EK-DF2/DG2-TP
Rev. 1.2 - 2020-02-06 MAEKDF2DG2TP_EN
© Ekinex S.p.A. –All rights reserved Pag. 4
2 Product description
The ekinex® presence sensors EK-DF2-TP and EK-DG2-TP are flush-mount ceiling passive infrared
(PIR) motion detectors, for the detection of movement / presence of people in indoor environments
in order to drive lighting and HVAC systems.
The devices have the same functionality and differ only in the aspects listed below.
Throughout the manual, both devices will be referenced indifferently; the respective different
features will be pointed out wherever required.
The detection area, which has a coverage angle of 360°, can be extended using other sensors
configured as slave devices.
An integratedlight sensor, combinedwith themotion detector, can managelight switching depending
on brightness level as well as presence.
The device has two distinct output channels for lighting, with independent parameters; the operation
can be automatic or semi automatic.
The device is also capable of maintaining a constant brightness level in the room by controlling a
dimmable light source.
All of the above parameters can be set by the user either through ETS or by means of a dedicated
IR remote during installation.
The device has two additional HVAC channels, which act in a similar way as the Light Control
channels but without the standby time and light level dependence.
An additional alarm channel can switch the load on or off depending on the number of trigger events
(movements) detected in a time frame of configurable duration.
3 Main features
•Semi-automatic or fully automatic operation
•Two independent Light control channels
•Two independent HVAC control channels
•One alarm channel
•An additional device can be used as slave for any of the channels
•Detection span of 360°, sectors can be masked through optical shields
•Adjustable Sensitivity, with "Walk test" to verify detection range
•Most parameters can be set from ETS or through an IR remote
4 Technical data
•Rated voltage: 24 Vdc (21 - 30 Vdc) supplied by KNX bus
•Current consumption (on KNX bus): max 10 mA (operation) / 5 mA (Standby)
•Detection range: 360° circular (maskable), up to 9m diameter at 2.5m mounting height
•Light measurement range: 10..2000 Lux
•Housing, lens and frame in plastic material
•Safety standards: IEC 61000-6-1 / IEC 61000-6-3 / EN 55014 / EN 50491
•Dimensions:
oBody diameterØ 60 mm
i

Application manual
Presence / movement sensors EK-DF2/DG2-TP
Rev. 1.2 - 2020-02-06 MAEKDF2DG2TP_EN
© Ekinex S.p.A. –All rights reserved Pag. 5
oRim diameter Ø 75 mm
oMounting Hole diameter Ø 65 mm
oTotal height 78 mm
oRecess depth 72 mm
•Environmental conditions:
oOperating temperature: - 20 ... + 40°C
oRelative humidity: 95% not condensing
oEnvironmental protection: IP20
5 Switching, display and detection elements
The device is equipped with:
•on the rear side, a programming pushbutton
•visible through the plastic lens, a blue programming LED, a red signalling LED, a PIR sensor,
a brightness sensor and an IR receiver.
6 Operation
The sensor reacts to the thermal radiation emitted by moving bodies; the detection area is optically
divided in small sections through a composite lens. A person walking in the detection area across
the sections triggers the sensor.
6.1 Brightness measurement
The measurement of the room brightness is carried out by an integrated light sensor with linear
output and optical filter set on the profile of the human eye. The brightness value, measured in Lux,
can be transmitted on the bus.
6.2 Lighting control channels
The lighting channel has two operation modes, Automatic or Semi-automatic. The automatic mode
controls both switch-on and switch-off; the semi-automatic mode only controls switch-off after a
manual switch-on.
The lighting source can be controlled through two different types of communication objects: On-Off
switch or Absolute dimming percentage.
In automatic mode, a load connected to a lighting channel will be switched on when movement is
detected and (if desired) the ambient light level is below a preset brightness value.
When no movement has been detected for a programmable time duration, a stand-by phase can be
entered, during which the light can be dimmed to alower intensity; if nofurther movement is detected,
once stand-by time has expired, the light will be automatically switched off.
Both the light level threshold and stand-by time functions can be disabled if not required.
6.3 Constant ambient brightness regulation
The internal brightness sensor can be used to maintain a constant ambient brightness if a dimmable
light source is available. The light source must be capable of being controlled through a Relative
dimming communication object.
6.4 HVAC control channels
The HVAC channels act in a similar way as the Light Control channels, but without the standby time
and the dependence from the light level.

Application manual
Presence / movement sensors EK-DF2/DG2-TP
Rev. 1.2 - 2020-02-06 MAEKDF2DG2TP_EN
© Ekinex S.p.A. –All rights reserved Pag. 6
7 Positioning
The actual detection range of the sensors depends on the mounting height.
The optimal range is achieved walking through several portions of the detection area.
7.1 Positioning for EK-DF2-TP
For the EK-DF2-TP sensor, at a standard mounting height of 2.5 m, presence detection range (for
small movements) is about 4 meters of diameter, while movement detection range (person walking
through the detection area) is about 9 meters of diameter.
The recommended mounting height varies from 2 m up to 5 m.
7.2 Positioning for EK-DG2-TP
For the EK-DG2-TP sensor, at a standard mounting height of 2.5 m, presence detection range (for
small movements) is about 3 meters of diameter, while movement detection range (person walking
through the detection area) is about 12 meters of diameter.

Application manual
Presence / movement sensors EK-DF2/DG2-TP
Rev. 1.2 - 2020-02-06 MAEKDF2DG2TP_EN
© Ekinex S.p.A. –All rights reserved Pag. 7
Since the detector responds to temperature change, be aware that following conditions may
cause lower sensitivity:
•In very foggy days, the sensitivity may be less due to moisture collecting on
the lens.
•In very hot days, the sensitivity may be less since high ambient temperature
is close to body temperature.
•In very cold days when heavy clothing is worn, especially if the facial area is
covered, very little heat will be emitted from the body causing the unit to be
less sensitive.
Please also verify following conditions during installation:
•Avoid pointing the detector toward objects with highly reflective surfaces,
such as mirrors, glass, etc.
•Avoid mounting the detector very close to heat sources, such as heating
vents, air conditioners, lights, etc.
•Avoid pointing the detector toward objects which may sway in air currents,
such as curtains, tall plants, etc.
i

Application manual
Presence / movement sensors EK-DF2/DG2-TP
Rev. 1.2 - 2020-02-06 MAEKDF2DG2TP_EN
© Ekinex S.p.A. –All rights reserved Pag. 8
8 Limitation of the detection area
The detection area can be limited, in order to avoid unwanted activations, by means of the supplied
optical shielding filters.
Cut the supplied shield in such a way to remove the sectors corresponding to the desired detection
area as in following figure:
EK-DF2-TP
EK-DG2-TP
Apply the shield by inserting its edge between the lens and the rim:
Section of shield
applied
Active range
(h = 2.5m)
Settore
-30° per settore
A + B + C
Ø 2 m
A + B
Ø 5 m
A
Ø 7 m
Nessuna
Ø 9 m
Section of shield
applied
Active range
(h = 2.5m)
Settore
-30° per settore
A + B + C
Ø 2 m
A + B
Ø 5 m
A
Ø 8 m
Nessuna
Ø 12 m

Application manual
Presence / movement sensors EK-DF2/DG2-TP
Rev. 1.2 - 2020-02-06 MAEKDF2DG2TP_EN
© Ekinex S.p.A. –All rights reserved Pag. 9
EK-DF2-TP EK-DG2-TP
When the device is installed in place, make sure that the shield is in the correct position according
to the required area masking.
9 Installation
Warning! The electrical connection ofthe device can be carried out only by qualified
personnel. The incorrect installation may result in electric shock or fire. Before
making the electrical connections, make sure the power supply has been turned off.
Warning! In order to supply the KNX bus lines use only KNX bus power supplies
(e.g. ekinex EK-AB1- TP or EK-AG1-TP). The use of other power supplies can
compromise the communication and damage the devices connected to the bus.
The device has degree of protection IP20, and is therefore suitable for use in a dry indoor
environment.
The device can be flush mounted through a 65 mm (EK-DF2-TP) / 68 mm (EK-DG2-TP) diameter
hole on a ceiling board with 5 mm to 25 mm thickness.
EK-DF2-TP EK-DG2-TP
For solid ceilings, a plastic barrel-shaped plastic support for external mounting is available as an
accessory.

Application manual
Presence / movement sensors EK-DF2/DG2-TP
Rev. 1.2 - 2020-02-06 MAEKDF2DG2TP_EN
© Ekinex S.p.A. –All rights reserved Pag. 10
Warning:
•Do not mount on conductive surface.
•Do not open the enclosure frequently.
•The sensor is a low voltage circuit; never connect it with the 230V line network.
•Do not run the KNX wiring in the same conduit used by line network wiring.
Connect the device to the bus cable terminated by the standard terminal block on the back of the
device. EK-DG2-TP
At this point it is recommended to carry out the commissioning of the device (see “Commissioning”),
or at least the download of the physical address, using the programming button placed close to the
bus connector; alternatively, programming mode can be activated later when the device is already
installed by means of the EK-QR6-IR remote controller.
To insert the device into the hole on the ceiling board, raise and hold the spring clips; guide them
into the hole and gently slide the body of the sensor until it falls into place.
EK-DF2-TP EK-DG2-TP
To remove the sensor, gently pry under the external rim with a screwdriver or another flat object;
once you can get a firm hold with your hands on the rim, pull gently but firmly to extract the body of
the sensor.

Application manual
Presence / movement sensors EK-DF2/DG2-TP
Rev. 1.2 - 2020-02-06 MAEKDF2DG2TP_EN
© Ekinex S.p.A. –All rights reserved Pag. 11
Warning:
Before extracting the last part of the sensor body, please hold both spring clips with
a hand. Take extreme care of preventing the clips to jump back and harm your hand
holding the sensor!
10 Connection of the KNX bus line
The connection of the KNX bus line is made through the terminal block included in delivery and
inserted into the slot of the housing.
11 Configuration and commissioning
Nota: The configuration and commissioning of KNX devices require specialized skills.
To acquire these skills, you should attend the workshops at KNX certified training
centers.
Configuration and commissioning of the device require the use of the ETS® (Engineering Tool
Software) program V4 or later releases. These activities must be carried out according to the design
of the building automation system done by a qualified planner.
For the configuration of the device parameters the corresponding application program or the whole
ekinex® product database must be loaded in the ETS program.
For detailed information on configuration options, refer to the application manual of the device
available on the website www.ekinex.com.
Code
Application program
(## = release)
EK-DF2-TP
APEKDF2TP##.knxprod
EK-DG2-TP
APEKDG2TP##.knxprod
For the commissioning of the device the following activities are required:
•make the electrical connections as described above;
•turn on the bus power supply;
•switch the device operation to the programming mode by pressing the programming
pushbutton; the blue programming LED (visible through the device lens) turns ON;
•download into the device the physical address and the configuration with the ETS program;
•at the end of the download, the operation ofthe device automatically returns to normal mode.
During the programming process, the programming LED is turned off.
Now the bus device is programmed and ready for use.
i

Application manual
Presence / movement sensors EK-DF2/DG2-TP
Rev. 1.2 - 2020-02-06 MAEKDF2DG2TP_EN
© Ekinex S.p.A. –All rights reserved Pag. 12
IMPORTANT:
After a download, it takes approximately 60 s for the sensor to stabilize before it enters
normal operation mode.
Both the light output channels and the red LED are steady ON during the warm-up
phase, and they are switched OFF at the end.
During this settling period, the sensor may not appear to reactor perform itsprogrammed
functions.
The programming pushbutton is placed on the rear side of the device, close to the KNX connector;
it is therefore recommended to program at least the physical address before the device is installed
on the ceiling. Once the physical address has been assigned, the device configuration can be later
downloaded without pressing the programming pushbutton.
If a further activation of the programming button should become necessary, the device can be
switched in programming mode through the IR remote (available separately).
12 Walk test
The purpose of the walk test is to select a proper location and verify the desired detection coverage.
Lux setting value is not regarded during this process.
First of all, make sure the sensor is connected to the powered KNX bus and allow the 60 s warm-up
time to pass.
Set the operating mode to “Test” via ETS or IR remote control EK-QR6-IR, then refer to the following
steps:
•Walk from outside across to the detection pattern until red LED and load turn on for approx.
2s, then turn off again
•If required, adjust the sensitivity setting throughETS or IR remote to reach desired coverage.
•Also if required, adjust the time setting through ETS or IR remote to change the switch-off
delay.
•Repeat the procedure in other selected radial directions, particularly if a shield is applied on
the lens.
•Repeat the above steps until desired performance is achieved.
i

Application manual
Presence / movement sensors EK-DF2/DG2-TP
Rev. 1.2 - 2020-02-06 MAEKDF2DG2TP_EN
© Ekinex S.p.A. –All rights reserved Pag. 13
13 List of ETS parameters
The paramters available in ETS are the same for both types of sensor..
13.1 Menu: General
Parameter name
Conditions
Values [Default]
Device type
Master
Slave
When the sensor is configured as master, all features are available; it can also receive the trigger signal
from one or more slave sensors for only one of the 4 output channels available.
When the sensor is configured as slave, it can only be used to extend the field od dcoverage for a master
sensor.
Input slave
Device type = Master
Light output C1
Light output C2
HVAC output C3
HVAC output C4
Assign the signal from the slave to one of the device channels.
Measured Lux value report
Disable
Enable
When enabled, the measured ambient brightness value in Lux is transmitted on the bus every 5 s.
Light control output C1
Device type = Master
Disable
Enable
Enable the control channel and show the respective group of parameters.
Light control output C2
Device type = Master
Disable
Enable
Enable the control channel and show the respective group of parameters.
HVAC output C3
Device type = Master
Disable
Enable
Enable the control channel and show the respective group of parameters.
HVAC output C4
Device type = Master
Disable
Enable
Enable the control channel and show the respective group of parameters.
Alarm function
Device type = Master
Disable
Enable
Enable the alarm function and show the respective group of parameters.
13.2 Menu: Motion sensors
Parameter name
Conditions
Values [Default]
External switch
as ON / OFF / Dim input
Device type = Master
No
Yes

Application manual
Presence / movement sensors EK-DF2/DG2-TP
Rev. 1.2 - 2020-02-06 MAEKDF2DG2TP_EN
© Ekinex S.p.A. –All rights reserved Pag. 14
Parameter name
Conditions
Values [Default]
If enabled, each channel can also be controlled from the KNX bus through communication objects #5-6-
7-8.
For Light control channels, the CO (which is of 1-bit Switch type) also controls the dimming function.
This pushbutton is required to switch those channels On for which semi-auto mode is selected.
Lux / Time /
Sensitivity(Meter)/
STBY selected by
Device type = Master
ETS
IR
Selects the source for the main device parameters: Brightness threshold, activation delay, sensitivity,
standby delay. If the source is "ETS", the IR remote has no effect on these parameters.
This setting is only relevant for the two Light Control channels (C1-C2).
Test mode
Device type = Master
Disable
Enable
If enabled, starts the test mode at the end of the download. Test mode automatically exits to normal
operation after 10 min. or upon command from the IR remote.
Sensor sensitivity
Maximum
High
Medium
Low
OFF
Used to increase or decrease the sensitivity of the PIR according to user’s requirement.
This setting is available both for master and slave configurations.
LED turns on when PIR is
triggered
Disable
Enable
When enabled, the red LED will turn on for 1 s every time movement is detected. This indication can be
suppressed; however, all other indication functions of the LED remain enabled.
13.3 Menus: Light control output C1 / C2
Following parameters are repeated for each of the two Light Control channels C1 and C2.
Although not specified below, these options are only listed if the corresponding channels are active.
Parameter name
Conditions
Values [Default]
Auto / Semi-auto select
Device type = Master
Auto
Semi-auto
The automatic mode controls both switch-on and switch-off; the semi-automatic mode only controls
switch-off after a manual switch-on through the external control pushbutton.
Output type
Device type = Master
Switching
Dimming
Switching mode is used to control an On/Off actuator through a Switch-type object; in this mode, Standby
function and Constant light control are not available.
Dimming mode controls a dimming-capable actuator through an Absolute dimming object (for the
Standby function) and a Relative dimming object (for Constant light control).
Dimming value during ON
phase
Device type = Master
Output type = Dimming
1...100% [100%]

Application manual
Presence / movement sensors EK-DF2/DG2-TP
Rev. 1.2 - 2020-02-06 MAEKDF2DG2TP_EN
© Ekinex S.p.A. –All rights reserved Pag. 15
Parameter name
Conditions
Values [Default]
Sets the light output level when the channel is active.
Constant light control
Device type = Master
Output type = Dimming
Disable
Enable
Enables light control for constant ambient brightness
Preset setpoint
Device type = Master
Output type = Dimming
Constant light control = enable
10...2000 Lux [300 Lux]
Sets target value for constant ambient brightness
Lux deviation
Device type = Master
Output type = Dimming
Constant light control = enable
0...255 Lux [10 Lux]
Allowed deviation from target value (plus or minus) for constant ambient brightness
Time after switch-on until
constant light control starts
Device type = Master
Output type = Dimming
Constant light control = enable
1 s ... 5 min [1 min]
After switching the light On, a time period might be necessary for the light to warm up or reach a stable
condition before brightness regulation starts.
Switch ON Lux value
Device type = Master
Lux / Time etc. selected by = ETS
5...2000 Lux [2000 Lux], Infinity
Sets the reference brightness for the sensor light level threshold.
The "Infinity" value disables the threshold, i.e. makes detection independent from light level.
Lighting delay time
Device type = Master
Lux / Time etc. selected by = ETS
5 s...60 min [5 min]
Sets the delay before the output is switched off (or to standby level, if enabled) in absence of detected
movement.
Lighting standby time
Device type = Master
Lux / Time etc. selected by = ETS
Disable
Enable
Enables the standby phase before the output is switched off in absence of detected movement.
Standby time
Device type = Master
Lux / Time etc. selected by = ETS
Lighting standby time = enabled
30 s...60 min [5 min]
Duration of the Standby phase
Standby brightness
Device type = Master
Lux / Time etc. selected by = ETS
Lighting standby time = enabled
1...60% [10%]
Light brightness level during the Standby phase
13.4 Menus: HVAC control output C3 / C4
Following parameters are repeated for each of the two HVAC Control channels C3 and C4.
Although not specified below, these options are only listed if the corresponding channels are active.

Application manual
Presence / movement sensors EK-DF2/DG2-TP
Rev. 1.2 - 2020-02-06 MAEKDF2DG2TP_EN
© Ekinex S.p.A. –All rights reserved Pag. 16
Parameter name
Conditions
Values [Default]
Auto / Semi-auto select
Device type = Master
Auto
Semi-auto
The automatic mode controls both switch-on and switch-off; the semi-automatic mode only controls
switch-off after a manual switch-on through the external control pushbutton.
HVAC switch-'ON' delay
Device type = Master
0...30 min [1 min]
Sets the delay before the output is switched ON whenever movement is detected; this is required to
prevent immediate activation when a person is present in the coverage area for just a brief period of time.
HVAC delay time
Device type = Master
5 s...60 min [5 min]
Sets the delay before the output is switched OFF whenever movement is no longer detected.
Behaviour at switching on
lock by communication
object
Device type = Master
No reaction
Switch off
Switch on
Value used as output when movement / presence is detected and confirmed.
Behaviour at switching off
lock by communication
object
Device type = Master
No reaction
Switch off
Switch on
Value used as output when absence of movement / presence is detected and confirmed.
13.5 Menus: Alarm function
Although not specified below, these options are only listed if the alarm function is active.
Parameter name
Conditions
Values [Default]
Duration of one switch-on
window
Device type = Master
0.5 s...60 min [0.5 s]
Duration of the period in which the specified number of movements (see next parameter) must occur in
order to cause the alarm to be switched ON
Number of switch-on
windows
Device type = Master
0...100 min [10]
Number of movements in the specified period (see previous parameter) that cause the alarm to be
switched ON
Duration of one switch-off
window
Device type = Master
0.5 s...60 min [0.5 s]
Duration of the period in which the specified number of movements (see next parameter) must occur in
order to cause the alarm to be switched OFF
Number of switch-off
windows
Device type = Master
0...100 min [10]
Number of movements in the specified period (see previous parameter) that cause the alarm to be
switched OFF
Behaviour at switching on
lock by communication
object
Device type = Master
No reaction
Switch off
Switch on
Value used as output when the alarm status is switched to ON.

Application manual
Presence / movement sensors EK-DF2/DG2-TP
Rev. 1.2 - 2020-02-06 MAEKDF2DG2TP_EN
© Ekinex S.p.A. –All rights reserved Pag. 17
Parameter name
Conditions
Values [Default]
Behaviour at switching off
lock by communication
object
Device type = Master
No reaction
Switch off
Switch on
Value used as output when the alarm status is switched to OFF.
14 Elenco oggetti di comunicazione ETS
CO
number
Object name
Conditions
Size
Flags
DPT
1
Slave input - Slave motion
Device type = Master
1 bit
C-W--
[1.017] Trigger
2
Slave output - Slave motion
Device type = Slave
1 bit
CR-T-
[1.001] Switch
3
Test output
Device type = Master
1 bit
CR-T-
[1.001] Switch
4
Measured lux value output
Device type = Master
2 bytes
CR-T-
[7.013]
Brightness [Lux]
5
C1 Manual Input
Device type = Master
External Switch = Yes
Light Control Output C1
= enabled
1 bit
C-W--
[1.001] Switch
6
C2 Manual Input
Device type = Master
External Switch = Yes
Light Control Output C2
= enabled
1 bit
C-W--
[1.001] Switch
7
C3 Manual Input
Device type = Master
External Switch = Yes
HVAC Output C3 =
enabled
1 bit
C-W--
[1.001] Switch
8
C4 Manual Input
Device type = Master
External Switch = Yes
HVAC Output C4 =
enabled
1 bit
C-W--
[1.001] Switch
9
C1 Light Control Output
Device type = Master
Light Control Output C1
= enabled
1 bit
CR-T-
[1.001] Switch
10
C1 Light Control Dimming
value
Device type = Master
Light Control Output C1
= enabled
1 byte
CR-T-
[5.001]
Percentage
(0..100%)
11
C1 Constant Light Control
Device type = Master
Light Control Output C1
= enabled
4 bit
CR-T-
[3.007]
Dimming control
12
C2 Light Control Output
Device type = Master
Light Control Output C2
= enabled
1 bit
CR-T-
[1.001] Switch
13
C2 Light Control Dimming
value
Device type = Master
Light Control Output C2
1 byte
CR-T-
[5.001]
Percentage

Application manual
Presence / movement sensors EK-DF2/DG2-TP
Rev. 1.2 - 2020-02-06 MAEKDF2DG2TP_EN
© Ekinex S.p.A. –All rights reserved Pag. 18
= enabled
(0..100%)
14
C2 Constant Light Control
Device type = Master
Light Control Output C2
= enabled
4 bit
CR-T-
[3.007]
Dimming control
15
C3 HVAC Control Output
Device type = Master
HVAC Output C3 =
enabled
1 bit
CR-T-
[1.001] Switch
16
C4 HVAC Control Output
Device type = Master
HVAC Output C4 =
enabled
1 bit
CR-T-
[1.001] Switch
17
Lock Alarm
Device type = Master
Alarm function =
enabled
1 bit
C-W--
[1.003] Enable
18
Alarm Output
Device type = Master
Alarm function =
enabled
1 bit
CR-T-
[1.005] Alarm

Application manual
Presence / movement sensors EK-DF2/DG2-TP
Rev. 1.2 - 2020-02-06 MAEKDF2DG2TP_EN
© Ekinex S.p.A. –All rights reserved Pag. 19
15 Troubleshooting
Lighting / HVAC
output
does not turn on
Sensor is not powered.
Verify the KNX bus connection
Incorrect wiring
Refer to wiring diagram for correct
connection
Incorrect Lux setting.
Check if Lux is set to the correct value
Unable to detect movement
Check detection range setting
Lighting / HVAC
output does not turn
off
Auto off time is set too long
Set auto off time to a shorter time and
check if the load is or not switched off
according to the pre-set delay off time
Sensor is triggered
Keep away from the detection range
to avoid activating the sensor while
doing the test
Red LED
does not
turn on
Sensor is not set to Test mode
Activate test mode
Detection range exceeded
Walk in the effective detection range
LED indicating function is set
to “Disable”.
Set the LED indicating function to
“Enable” via ETS software
The sensor has an incorrectly
positioned shield
Check the positioning of the optical
shield on the lens
Erratic trigger events
Sources of heat may affect the
sensor
Verify that the sensor is not aimed
towards any heat source such as air
conditionings, electric fans, heaters
etc.
Reflective surfaces are
reflecting radiation from heat
sources toward the sensor
Verify that the sensor is not aimed
towards any highly reflective surfaces
There are moving objects in
the detection area
Make sure there are no swaying or
moving objects within the detection
coverage
16 Package contents
EK-DF2-TP:
EK-DF2-TP Sensor
Lens shield
Instruction sheet

Application manual
Presence / movement sensors EK-DF2/DG2-TP
Rev. 1.2 - 2020-02-06 MAEKDF2DG2TP_EN
© Ekinex S.p.A. –All rights reserved Pag. 20
EK-DG2-TP:
EK-DG2-TP Sensor
Lens shield
Instruction sheet
17 Optional accessories
EK-QR6-IR
IR remote controller
EK-QS3
Support for external mounting
This manual suits for next models
1
Table of contents
Other Ekinex Accessories manuals
Popular Accessories manuals by other brands

aquilar
aquilar AquiTron AT-OPSEN installation instructions

QOLSYS
QOLSYS IQ SHOCK MINI-S Quick install guide

BOMANN
BOMANN KSG 238.1 instruction manual

Bresser
Bresser Solar filter Safety information and Note of use

Panasonic
Panasonic LS-H Series instruction manual

senva
senva TG Series installation instructions