Ekolos EVL30SW Installation guide

R A N G E H O O D
SERIES EVL30SW
ESL30SW.BW
USE, CARE, AND
INSTALLATION MANUAL
Read all lnstructions before installing and operating the appliance
XP02293(1)
EVL36SW
ESL36SW.BW
EFL30GW
EFL36GW
ESQ30SW
ESQ36SW
1
SAFETY NOTICE .......................................... 2
INSTALLATION
Mounting Height & Clearance ........................ 3
Ducting Options ............................................. 4
Hood Specifications ...................................... 5-7
Mounting the Range Hood ............................. 8
Ductless Recirculating................................ 9
FEATURES & CONTROLS
Touch Controls .............................................. 10
MAINTENANCE
Cleaning and Metal Mesh Filter Care ............ 11
Lights ..............................................................12
13
TROUBLESHOOTING...................................

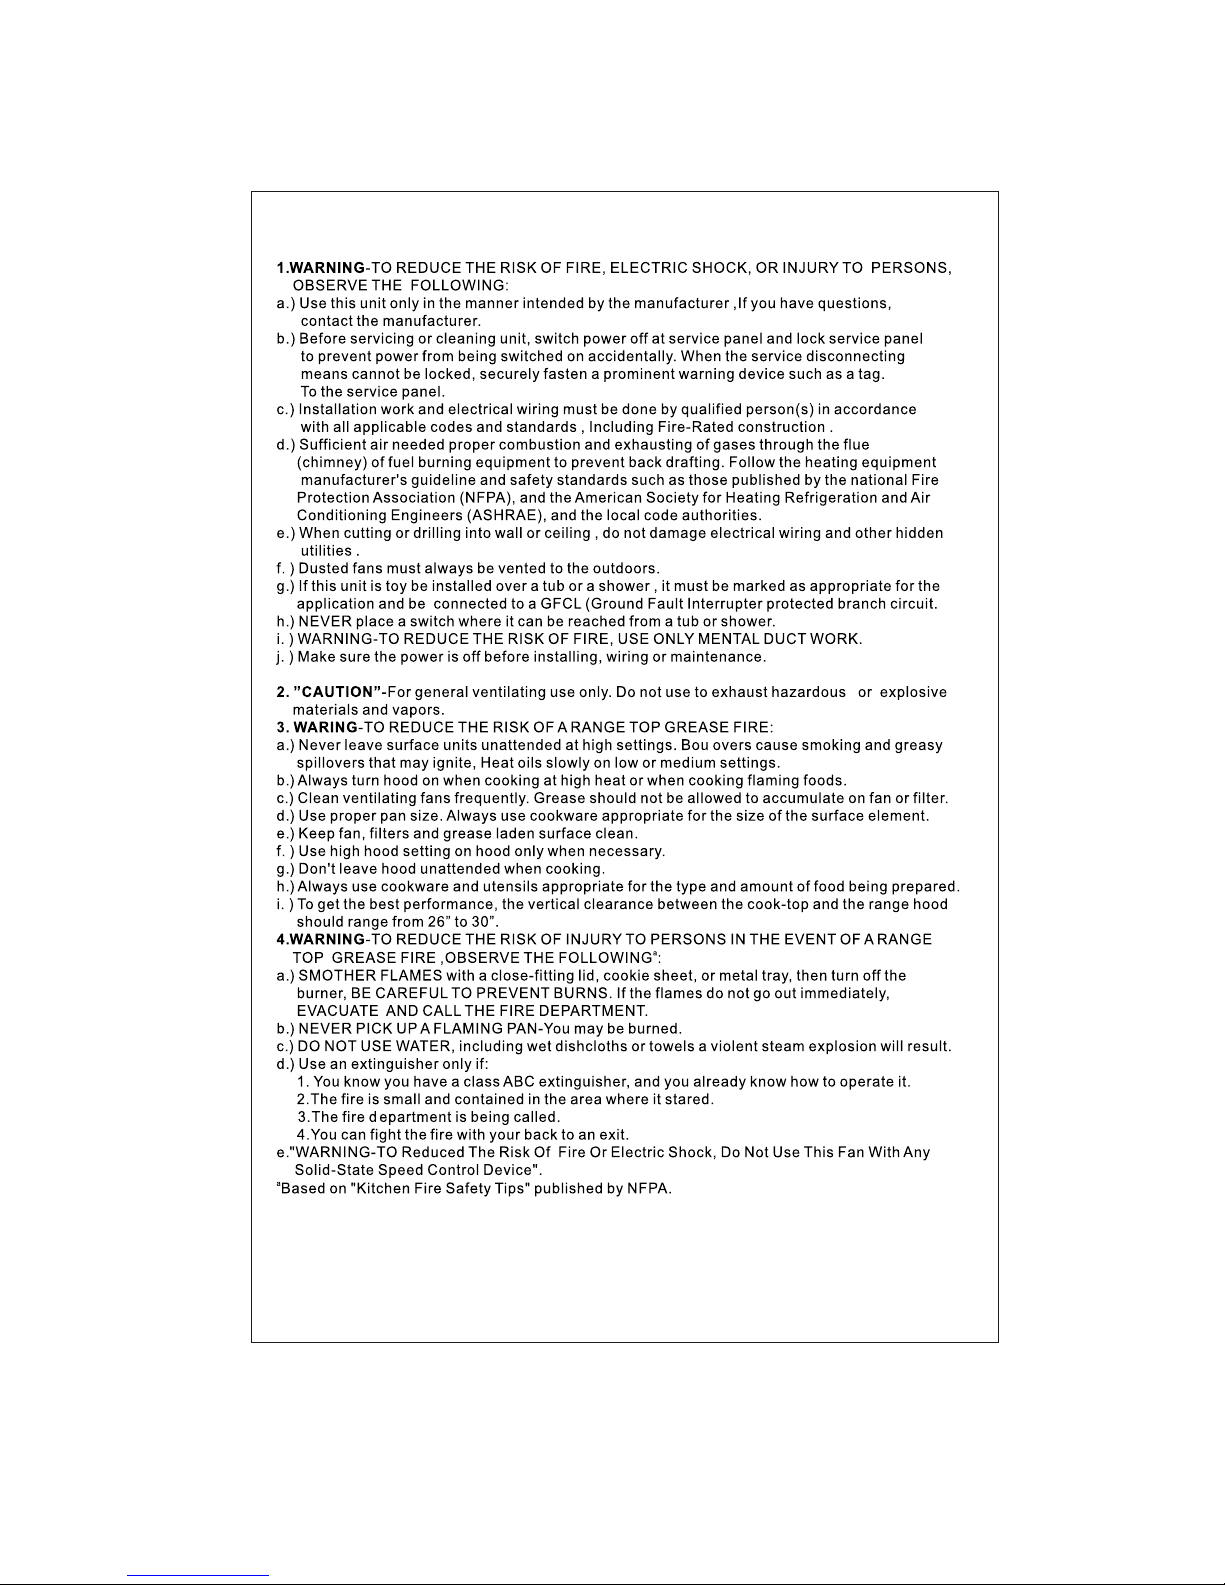
IMPORTANT SAFETY NOTICEIMPORTANT SAFETY NOTICE
2

3
InstallationInstallation
Minimum mount height between range top to hood
bottom should be no less than 28”
Maximum mount height should be no higher than
36”.
It is important to install the hood at the proper
mounting height. Hoods mounted too low could
result in heat damage and fi re hazard; while hoods
mounted too high will be hard to reach and will
lose its performance and effi ciency.
If available, also refer range manufacturer’s height
clearance requirements and recommended hood
mounting height above range. Always check your
local codes for any differences.
DUCTING
A minimum of 6” round or 3-1/4”x10” rectangular
duct must be used to maintain maximum air flow
efficiency.
Always use rigid type metal ducts only. Flexible
ducts could restrict air fl ow by up to 50%.
ALWAYS, when possible, reduce the number or
transitions and turns. If long duct run is required,
increase duct size from 6” to 7” or 8”.
If turns or transitions are required; install as far
away from opening and as far apart, between 2,
as possible.
- Mounting Height & Clearance
Minimum Mounting Height (Ducted)
8’. Hood mounted 28” above cooking surface;
64” from floor.
Minimum Mounting Height (Recirculating)
8’4”. Hood mounted 28” above cooking surface;
64” from floor.
Maxmimum Mounting Height
10’3”. Hood mounted 36” above cooking surface;
72” from floor.
Duct cover extension kit available for ceiling
heights up to 14 feet.

4
InstallationInstallation
WARNING FIRE HAZARD
NEVER exhaust air or terminate duct work into spaces between walls, crawl spaces, ceiling, attics
or garages.
All exhaust must be ducted to the outsid, unless using the recirculating option.
Use single wall rigid Metal ductwork only.
Fasten all connections with sheet metal screws and tape all joints with certified Silver Tape or Duct Tape.
Some Ducting Options
- Ducting Options

5
InstallationInstallation -Hood Specifications
ESQ-30/36 SW
ESL-30/36-SW.BW

6
InstallationInstallation -Hood Specifications
EFL-30/36GW

7
InstallationInstallation -Hood Specifications
EVL-30.36SW
InstallationInstallation
8
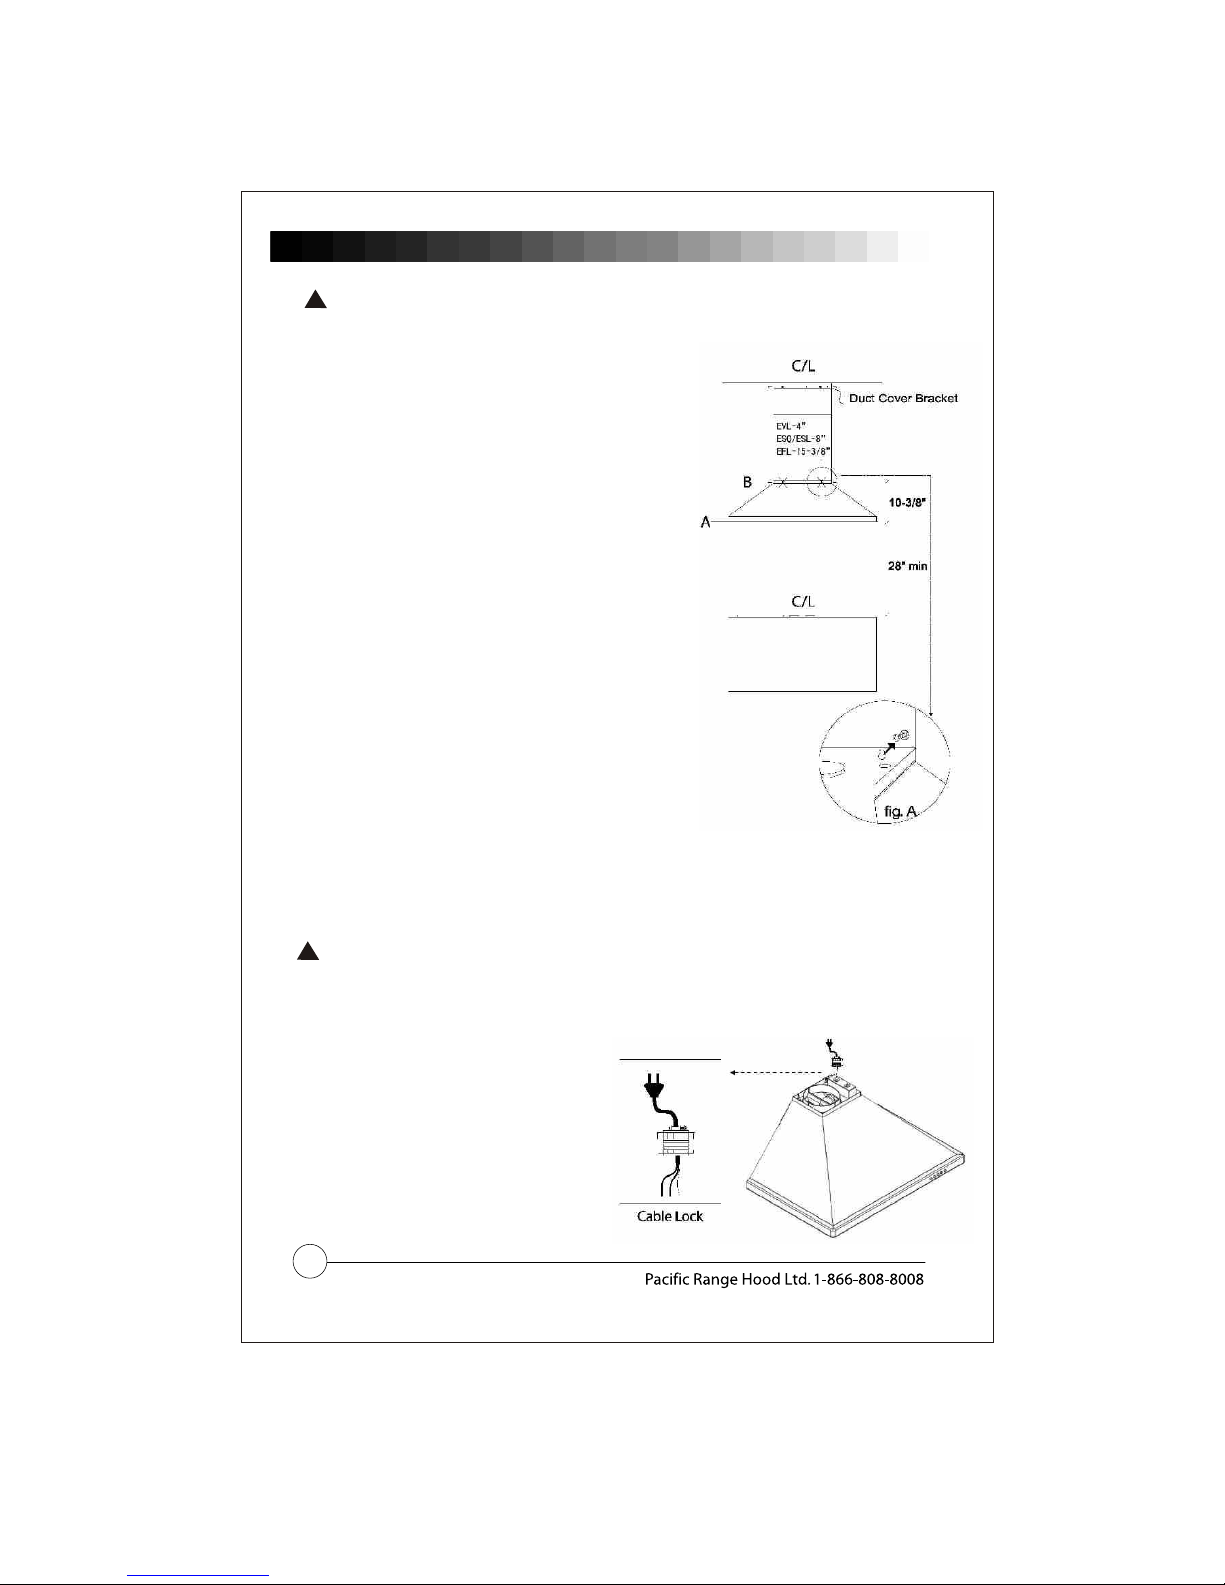
- Mounting the Range Hood
CAUTION: At least two installers are
required due to the weight and size of the
hood.
1. Measure from range top to hood bottom and mark line A.
(28”minimum from range top)
2. Plum and mark center line.
3. Mark mounting height line B. (10-3/8”from line A)
4. EVL series - Mark mounting spread from C/L on line B. (4”)
ESQ/ESL series - Mark mounting height line B. (8”)
EFL series -Mark mounting height line B. ( 15-3/8”)
5. Fasten (2) M4x1-1/4” screws into studs on line B. Do not
fasten screws all the way. note: wood blocking may
need to be added behind the drywall if no studs are
present. Wall anchors may also be used, check local
codes before using wall anchors.
6. Hang hood onto screws and hand tighten. (Fig.A) Use
the last M4x1-1/4”screw to further secure the hood to
the wall from inside the hood.
7.Center and attach duct cover bracket to wall below
ceiling or soffit using (2) M4x1” screws.
8.Install electrical.
9.*Install duct work and duct tape.
10.Power up hood and check for leaks around duct tape.
11.Place telescopic duct covers onto hood and extend
inner (top) duct cover upwards and secure to duct cover
bracket using (2) M4x3/8” screws.
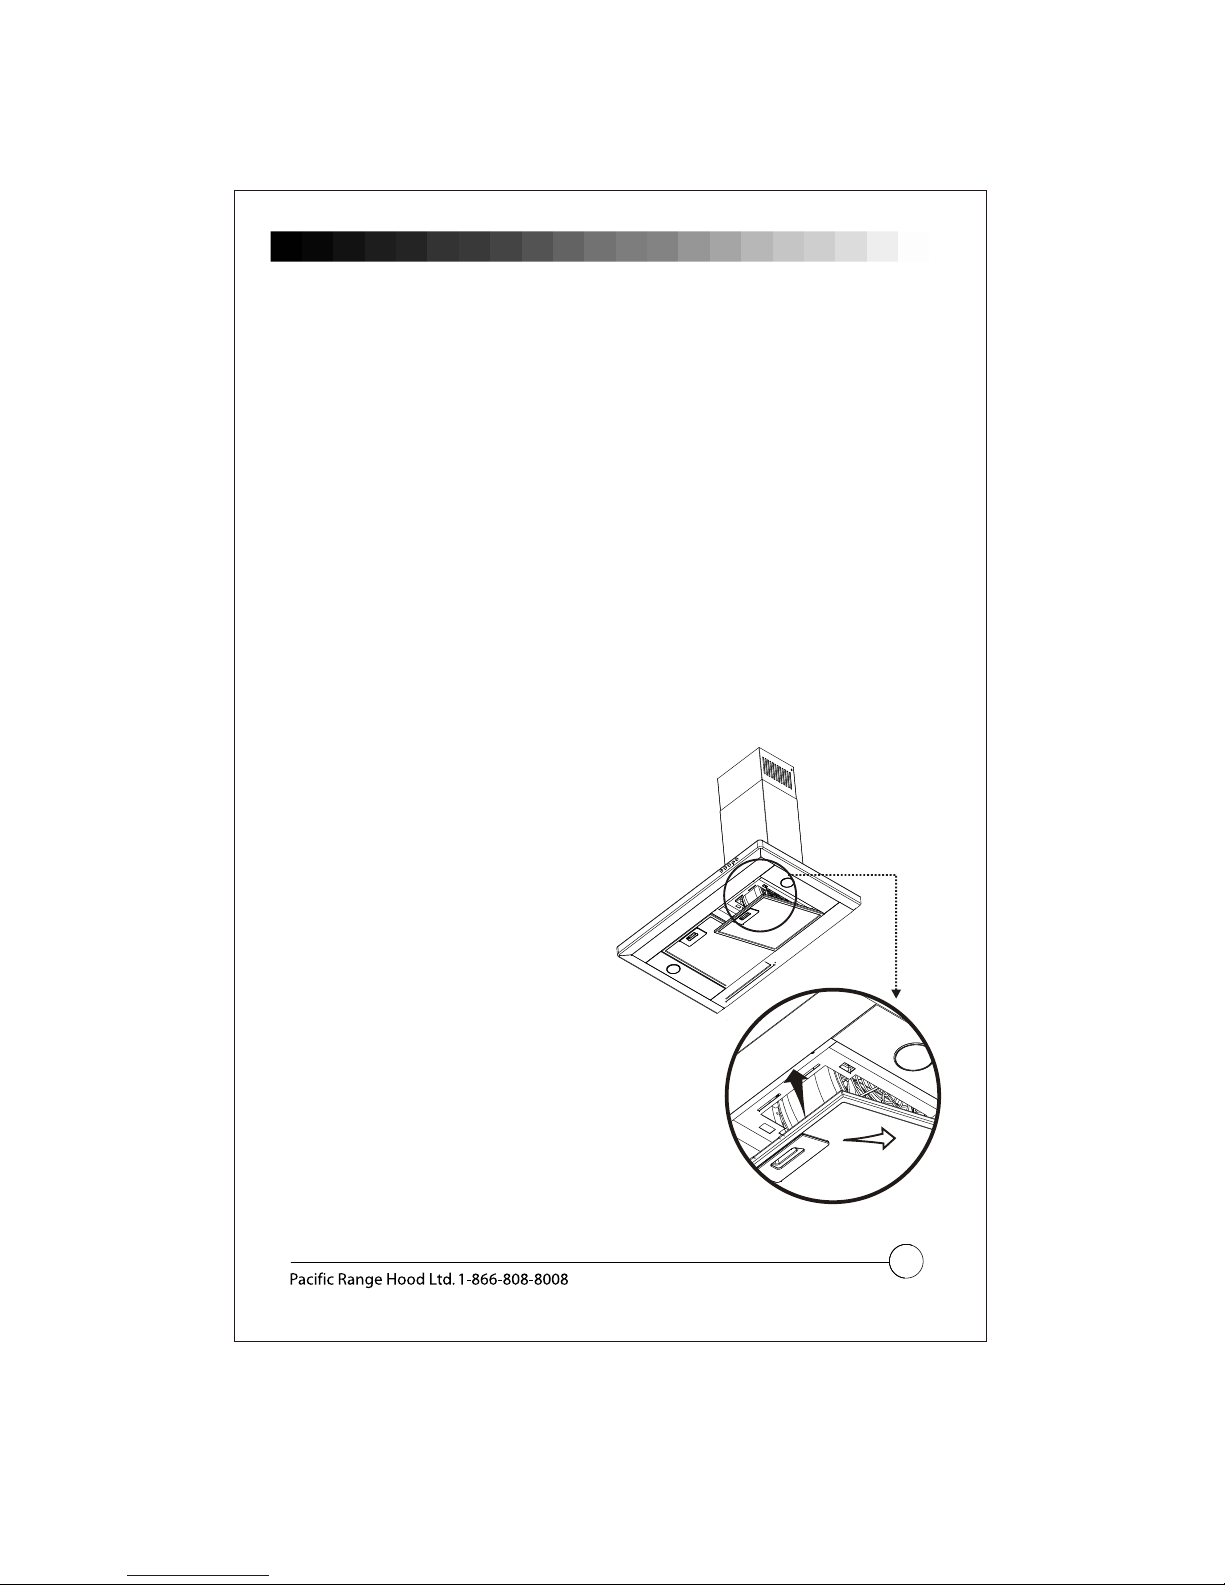
*if using hood in recirculating mode you must secure air
diverter plate onto wall before installing duct work and
duct covers. Turn to page 9 for more details.
!
!
WARNING: Electrical wiring must be done by a qualified person(s) in
accordance with all applicable codes and standards. This range hood must be
properly grounded. Turn off electrical power at service entrance before wiring.
Cable Lock
A cable locking connector (not supplied) might
be required by local codes. Check with local
requirements and codes, purchase and install
appropriate connector if necessary.
9
InstallationInstallation
Ductless recirculating is intended for applications where an exhaust duct work is not possible to be
installed.When converted, the hood functions as a recirculating hood rather than an exhaust hood. Fumes
and exhaust from cooking are drawn and fi ltered by a set of optional charcoal fi lters. The air is then
purified and recirculated back within the home.
We recommend to ALWAYS exhaust air outside of the home by employing existing or installing new duct
work, if possible. The hood is most effective and effi cient as an exhaust hood. Only when the exhaust
option is not possible should you recourse to converting the hood into a recirculating hood.
When converted to be a recirculating hood, a set of charcoal fi lters are required on top of its standard
Metal Filter set. The standard Metal Filters are intended to
capture residue from cooking and the optional charcoal fi lters help to purify fumes exhausted from
cooking for recirculation.
- Ductless Recirculating

FEATURES & CONTROLSFEATURES & CONTROLS
10
B.
C.Speed
A.
" " is low speed.
" " is medium speed.
" " is high speed.
A.Power C Speed B Lamp
- Touch Controls
11
SURFACE MAINTENANCE:
Clean periodically with hot soapy water and clean cotton cloth. Do not use corrosive or abrasive detergent ,
or steel wool/scouring pads which will scratch and damage surface.
For heavier soil use liquid degreaser.
After cleaning it is recommended that you use non-abrasive stainless steel polish/cleaners, to polish and
buff out the stainless luster and grain. Always scrub lightly, with clean cotton cloth, and with the grain.
Do not use any product containing chlorine bleach. Do not use “orange” cleaners.
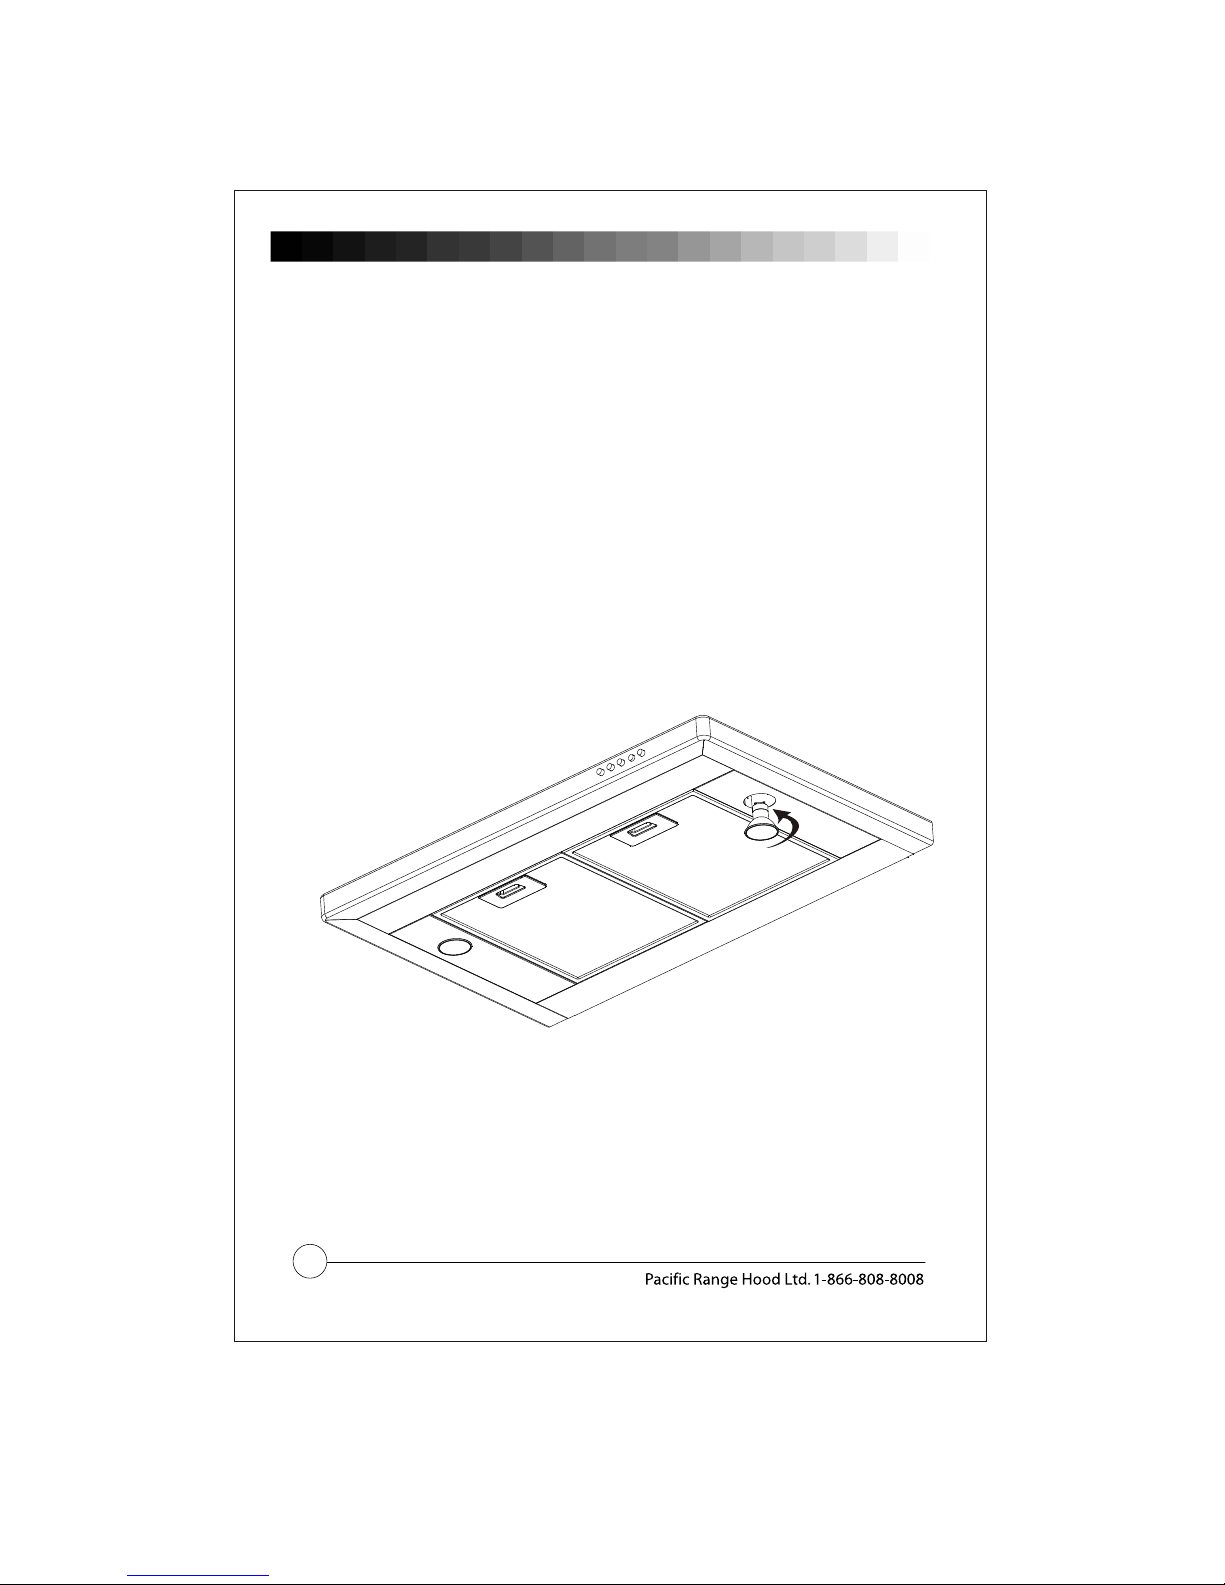
Metal Mesh Filters
The metal mesh filters installed by the factory are intended to fi lter out residue and grease from cooking.
They need not be replaced on a regular basis but are required to be kept clean.
Filters should be cleaned after every 30 hours of use or once a month.
Remove and clean by hand or in dishwasher on low heat. Spray degreasing detergent and leave to soak if
heavily soiled.
Dry fi lters and re-install before using hood.
Removing Metal Mesh Filters
1. Push in on spring loaded handle
2. Pull down on fi lter hande to remove filter
Metal Mesh Filter Dimensions:
12 5/8in. x 10 3/16in.
321mm x 259mm
Maintenance-Maintenance- Cleaning and metal mesh filter care
12
Lights
Maintenance-Maintenance-
REPLACING LIGHT BULBS
CAUTION: Light bulb becomes extremely hot when turned on.
DO NOT touch bulb until switched off and cooled. Touching hot bulbs could cause serious burns.
Make sure all power is turned off and bulbs are not hot.
Remove by turning bulb counter clockwise. Note: Bulb does not unscrew; it turns 60 degrees,
stops and falls out.
If bulbs are diffi cult to turn due to prolonged use, fi rmly attach a glass suction cup
approximately the diameter of the bulb or use a rubber/latex glove and turn counter clockwise.
Replacement bulbs are available at specialty lighting stores. Purchase type
Mr16 (GU-10) 35W halogen.
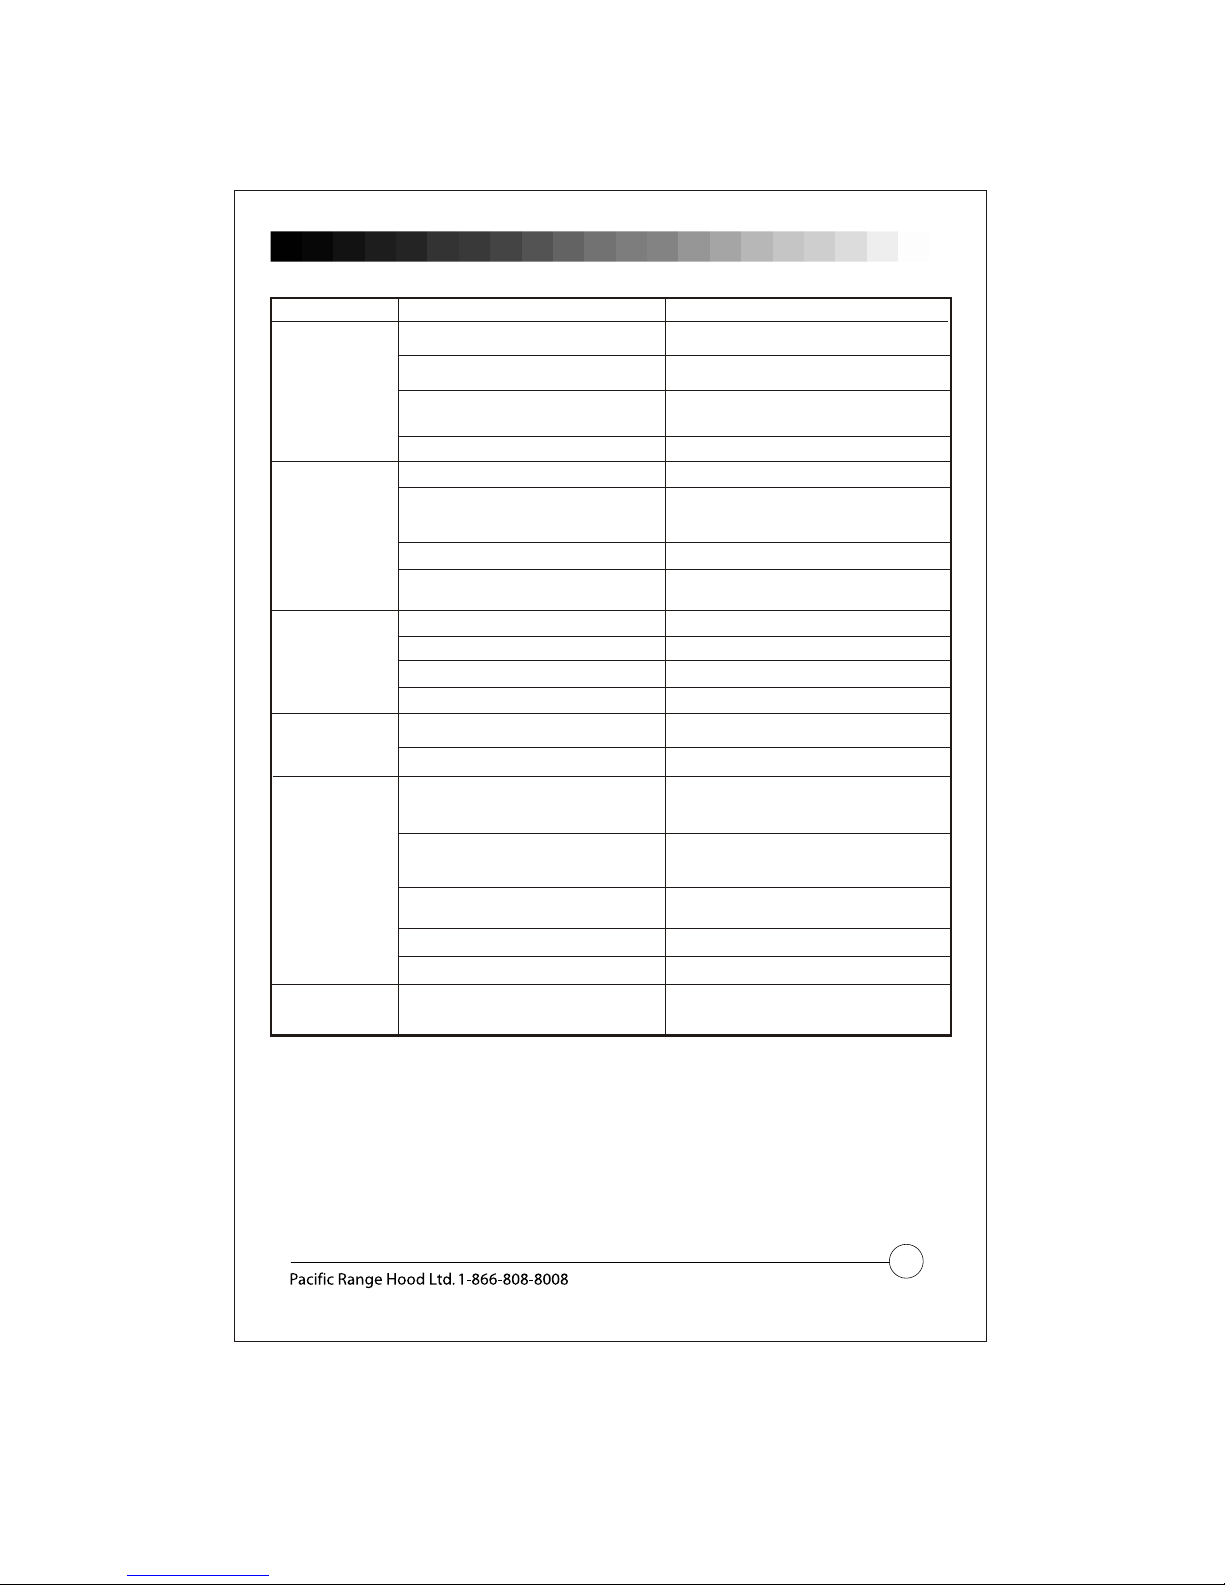
Issue Cause What to do
After installation,
the unit doesn’t
work.
2. The power line and the cable locking connector
is not connecting properly.
2. Check the power connection with the unit is
connected properly.
3. The switch board and control board wirings
are disconnected.
3. Make sure the wirings between the switch
board and control board are connected
properly.
4. The switch board or control board is defective. 4. Change the switch board or control board.
Light works,
but motor is
not turning.
1. The motor is defective, possible seized. 1. Change the motor.
2. The thermally protected system detects if
the motor is too hot to operate and shuts
the motor down.
2. The motor will function properly after the
thermally protected system cool down.
3. Damaged capacitor. 3. Change the capacitor.
4. The switch board or control board is
defective.
The unit is
vibrating.
1. The motor is not secure in place. 1. Tighten the motor in place.
2. Damaged blower wheel. 2. Replace the blower.
3. The hood is not secured in place . 3. Check the installation of the hood.
4. The switch board or control board is defective.
The motor is
working, but the
lights are not.
1. Defective halogen bulb. 1. Change the halogen bulb.
2. The light bulb is loose. 2. Tighten the light bulb.
The hood is
not venting out
properly.
1. The hood might be hanging to high from the
cook top.
1. Adjust the distance between the cook top and
the bottom of the hood within 26” and 36”
range.
2. The wind from the opened windows or
opened doors in the surrounding area
are affecting the ventilation of the hood.
2. Close all the windows and doors to eliminate
the outside wind ow.
3. Blockage in the duct opening or duct work. 3. Remove all the blocking from the duct work
or duct opening.
4. The direction of duct opening is against the wind.
5. Using the wrong size of ducting. 5. Change the ducting to correct size.
Metal lter is
vibrating.
TroubleshootingTroubleshooting
TROUBLESHOOTING PROCEDURES FOR EVL
1. The power source is not turned ON. 1. Make sure the circuit breaker and the unit’s
power is ON.
4. Adjust the duct opening direction.
1. Metal lter is loose. 1. Change the metal filter.
4. Change defective part.
4. Change defective part.
13

EVL30SW
ESL30SW
ESL30BW
EVL36SW
ESL36SW
ESL36BW
EFL30GW
EFL36GW
ESQ30SW
ESQ36SW
RANGE HOOD
PACIFIC RANGE HOOD LTD.
:
TO L L F R E E
1 - 8 6 6 - 8 0 8 - 8 0 0 8
Printed in Conada
This manual suits for next models
7
Popular Ventilation Hood manuals by other brands


AIRFORCE
AIRFORCE F179 Instruction on mounting and use

Siemens
Siemens LC21BA582 instruction manual

Electrolux
Electrolux EFTD26K user manual

Sirius Satellite Radio
Sirius Satellite Radio SIU3 installation instructions

JUNO
JUNO JDWF606E5 user manual

Hearth and Home Technologies
Hearth and Home Technologies Termination Cap ST1175 installation instructions


