EKT Arduino R3 User manual

ARDUINO SHIELD CAPACITIVE TOUCH
User Manual
Introduction:
The
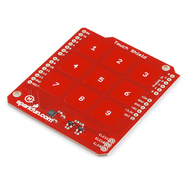
ARDUINO SHIELD CAPACITIVE TOUCH is an Arduino R3 compatible shield that enables capacitive
touch capabilities for your project using the MPR121 IC. The shield itself has 9 touch pads on it
(conveniently numbered 1-9 in a 3x3 grid), and has headers for 3 additional electrode connections.
The shield connects directly to the 3.3V pin on the Arduino. There is no on-board voltage regulation
on the VCC line, so keep that in mind if you intend to use this with a 5V Arduino Pro board. However,
there is an onboard logic level converter to step down 5V levels to the 3.3V for the sensor’s I2C lines.
This shield is designed to interface with an Arduino Uno R3. You can use other microcontrollers as
well with the same footprint, such as the Arduino Mega. You will need access to the I2C pins, SDA and
SCL. Other than that, you will need access to the 3.3V and GND pins and to digital pin 2. This connects
to the INT pin on the MPR121 sensor.
We generally use stackable headers for attaching shields to Arduino boards, but you can use standard
male headers if you prefer. The
R3 Stackable Header Kit
is the easiest option to use if you are planning
on stackable headers. For detailed instructions on how to assemble your shield, have a look at
our
Shield Tutorial.
The shield also has 3 pins labeled ELE9, ELE10, and ELE11. These correspond to electrodes 9,10, and
11 on the MPR121 chip. You can solder additional buttons or connections on to these pins at this time
if you want more than the 9 buttons already available on the shield. However, you don’t have to do
this to get the shield to function. It’s up to you!
Check out the Fritzing diagram below to see how your shield should look if you have added buttons on
to your shield on pins ELE9, ELE10, and ELE11.
Note: The yellow squares represent whatever material you’ve chosen to use as your electrode.
Once you’ve got your shield all hooked up, let’s start pulling data from the shield!
www.ekt2.com
Electronics Katrangi Trading

Communicating with the Shield:
Once you’ve got your shield assembled, it’s time
to start talking to it! You can download the example
code
from Software
Open up the
Touch_Sensor_Shield_Example.ino
file. The other files set the register definitions for the
MPR121 chip, so you shouldn’t need to mess with these at all.
//
Match
key
inputs
with
electrode
numbers
#define
ONE
8
#define
TWO
5
#define
THREE
2
#define
FOUR
7
#define
FIVE
4
#define
SIX
1
#define
SEVEN
6
#define
EIGHT
3
#define
NINE
0
//extras
(not
connected
to
button)
#define
ELE9
9
#define
ELE10
10
#define
ELE11
11
//interupt
pin
int
irqPin
=
2; //
D2
First thing the code shows is the pin definitions. This is laying out the keypad functionality (ONE,
TWO, etc.) and defining which electrode pin corresponds to each number. As the comment states,
electrode pins 9, 10 and 11 are not currently connected to anything, but if you did solder on additional
buttons to those pins on the shield, you can change this.
The interrupt pin is also defined as D2. This can’t be modified without some hardware hacking on the
shield, so keep that in mind if you are interfacing additional hardware into your set up.
void
setup()
{
//make
sure
the
interrupt
pin
is
an
input
and
pulled
high
pinMode(irqPin,
INPUT);
digitalWrite(irqPin,
HIGH);
//configure serial out
Serial.begin(9600);
// initalize I2C bus. Wiring lib not used.
i2cInit();
// initialize mpr121
mpr121QuickConfig();
// Create and interrupt to trigger when a button
// is hit, the IRQ pin goes low, and the function getNumber is run.
attachInterrupt(0,getNumber,LOW);
// prints 'Ready...' when you can start hitting numbers
Serial.println("Ready...");
}
The setup loop starts by setting the interrupt pin as an input and pulling it high. The serial bus is
started at 9600 bps. Next, the code initializes the I2C communication lines without using the Wiring
library.
The MPR121 chip is then configured with the proper sensitivity settings on the electrodes. The final
step in the setup loop creates an interrupt in the code that will trigger when any of the buttons are hit.
void loop()
{
//You can put additional code here. The interrupt will run in the backgound.
}
www.ekt2.com
Electronics Katrangi Trading

if
((touchstatus
&
(1<<j)))
touchNumber++;
}
if
(touchNumber
==
1)
{
if
(touchstatus
&
(1<<SEVEN))
{
digits
=
'7';
}
else
if
(touchstatus
&
(1<<FOUR))
{
digits
=
'4';
}
else
if
(touchstatus
&
(1<<ONE))
{
digits
=
'1';
}
else
if
(touchstatus
&
(1<<EIGHT))
{
digits
=
'8';
}
else
if
(touchstatus
&
(1<<FIVE))
{
int touchNumber = 0;
uint16_t touchstatus;
char digits;
touchstatus = getTouchStatus();
for (int j=0; j<12; j++) // Check how many electrodes were pressed
{
The loop function is actually empty currently, as the button presses use the interrupt we created in
the setup loop. If you did have additional hardware you wanted to incorporate into your project, the
code for it can live in this loop.
The last two functions in the example code tell the Arduino to check the electrode states for a button
press and what to print out when a button press is detected.
void getNumber()
{
digits = '5';
}
else if (touchstatus & (1<<TWO))
{
digits = '2';
}
else if (touchstatus & (1<<NINE))
{
digits = '9';
}
else if (touchstatus & (1<<SIX))
{
digits = '6';
}
else if (touchstatus & (1<<THREE))
{
digits = '3';
}
Serial.println(digits);
}
www.ekt2.com
Electronics Katrangi Trading

}
The function
getTouchStatus()
actually returns at 16-bit value which gives the status of each button.
The status of 1 indicates that an electrode is being activated.
language:
c
int
getTouchStatus()
{
int
touch;
touch
=
mpr121Read(0x01)
<<
8;
touch
|=
mpr121Read(0x00);
return
touch;
}
Now that you have basic communication up and running with your shield, you can start integrating
this into projects. If you haven’t yet connected anything to electrodes 9, 10 and 11, consider adding in
additional buttons here. You will also need to update the code. You’ll want to add the following block
of code into the example sketch right beforeSerial.println(digits);. You can change the digits values to
have the buttons output different values instead of “A”, “B”, or “C”.
else
if
(touchstatus
&
(1
<<
ELE9))
{
digits
=
'A';
}
else
if
(touchstatus
&
(1
<<
ELE10))
{
digits
=
'B';
}
else
if
(touchstatus
&
(1
<<
ELE11))
{
digits
=
'C';
//do nothing if more than one button is pressed, or if all are released
else if (touchNumber == 0)
;
else
;
}
How to open Software:
-Enter to http://www.ekt2.com/products/productdetails?ProductId=9D9859E9-9FF2-4479-
8FBC-4D3EE47E0396
-Press the icon to start the download
www.ekt2.com
Electronics Katrangi Trading
Table of contents


