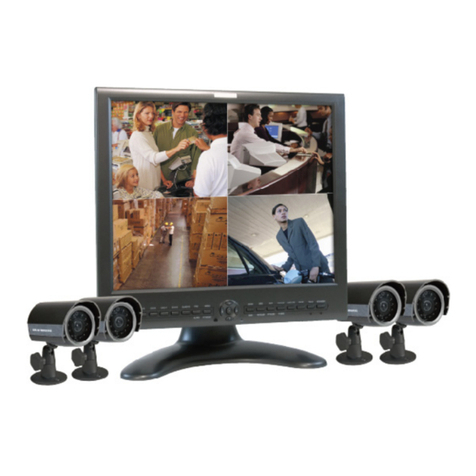
ELANsat Tech vc-s101 User manual

USER'S MANUAL
SURVEILLANCE SYSTEM
2.4 G z WIRELESS
H
1. INTRODUCTION
2. PACKAGE CONTENTS
3. CONTROLS
4. SYSTEM INSTALLATION
5. OPERATION
6. TROUBLE SHOOTING 7
3
4
5
6
1

CAUTION
RISK OF ELECTRONIC
SHOCK DO NOTOPEN
CAUTION:
DO NOT REMOVETHE COVER FORREDUCING THE RISKOF ELECTRIC SHOCK.
NO USER-SERVICEABLE PARTS INSIDE REFERSERVICING TO QUALIFIED SERVICE PERSONNEL.
GENERAL SAFETY SUMMARY
WARNING
Toprevent fire orshock hazard ,do not expose the unit to rain or moisture.
IMPORTANT SAFETY INSTRUCTIONS
All the safety and operating instructions should be read before the product is operated.
The safety and operating instructions should be retained for future reference.
All warnings on the product and in the operating instructions should be adhered to.
All operating and use instructions should be followed.
Unplug this products from the wall outlet before cleaning. Do not use liquid cleaners
or aerosol cleaners. Use a damp cloth for the cleaning.
Do not use attachments not recommended by the products manufacturer if they may
cause hazards.
Do not use this product near water - for example, near a bath tub, wash bowl, kitchen
sink, or laundry tub, in a wet basement, or near a swimming pool; and the like.
Any mounting of the product should follow the manufacturer's instructions, and should
use a mounting accessory recommended by the manufacturer.
.
This product should be operated only from the type of power source indicated on the
marking label. If you are not sure of the type or power supply to your home, consult your
product dealer or local Power Company. For products intended to operate from battery
power, or other sources, refer to the operating instruction.
.
Power supply cord should be routed so that they are not likely to be walked on or pinched
by items placed upon or against them, paying particular attention to cords at plugs, or
other sources, refer to the operating instructions.
1.
2.
5.
3.
4.
6.
7.
8.
9.
10.
Do not overload wall outlets, extension cords, or integral convenience receptacles as this
can result in a risk of fire or electric shock.
Unplug this product from the wall outlet and refer servicing to qualified service personnel
under the following conditions.
When the power- supply cord or plug is damaged.
If liquid have been spilled, or objects have fallen into the products
Never push objects of any kind into this product through openings as they may touch
dangerous voltage points or short-out parts that could result in a fire or electronic shock.
Never spill liquid of any kind on the product.
12.
13.
14.
When replacement parts are required, be sure the service technician has used replacement
parts specified by the manufacturer or that have the same characteristics as the original part.
Unauthorized substitutions may result in fire, electric shock, or other hazards.
Upon completion of any service or repair to this product ask the service technician to
perform safety checks to determine that the product is in proper operating condition.
The product should be situated away from heat sources such as radiators, heat registers,
stoves, or other products including amplifiers that produce heat.
15.
16.
17.
If the product does not operate normally by following the operating instructions, adjust only
those controls that are covered by the operating instructions as an improper adjustment of
other controls may result in damage and will often require extensive work by a qualified
technician to restore this product to its normal operation.
When the product exhibits a distinct change in performance - this indicates a need for service.
If the products has been dropped or damaged in any way.
For added protection for this product during a lightning storm, or it is left unattended and
unused for long periods of time, unplug it from the wall outlet and disconnect cable system.
This will prevent damage to the product due to lightning and powerline surges.
11.

1
Overview
The Wireless SurveillanceSystem with CMOS/CCDImages and four
channels available isjust as yourbaby sitter,home/camp guard and
company monitoring. Easyto install, unequalledquality and reliability
make you havedelighted and securelife.
Features
High Resolution ColorCMOS/CCD Camera( Optional)
Range up to300 feet (L.O. S )
Baby / Medicalcare monitor
Easy installation
1. INTRODUCTION
4 channels selectable
Weather Proof
Built-In Microphone forAudio Monitoring
Outdoor and homesurveillance system
Building and office surveillance system
Video camera recording purpose (connectedto VCR)
Operating frequency ofISM band 2.4- 2.4835 G z
H
Applications
High PerformanceAudio/Video Receiver
Antenna embedded
Specifications
Model Receiver
Specification
Characteristic
Frequency
Receiver Sensitivity
Channel Number
L.O. Stability
Audio Output Level
Supply Voltage
Power Consumption
Antenna
-90 dBm (min.)
1 Vpp / 7 5
9V
200 mA(typ.)
Embedded
Video Output Level
Operation Environment
Dimension
-10 C ~+50 C
83W x 70H x 42L (mm)
1 Vpp /600
2400 M z~ 2483 M z
HH
4 (2414,2432,2450,2468 M z)
H
+/- 100 K z (typ.)
H

2
Model Wireless Camera-CCD
Specification
Characteristic
Scanning System
Image Sensor
Efficiency Pixels
Horizontal Scan Frequency
Vertical ScanFrequency
Synchronize
Resolution
Min. Illumination
S/N Ratio
Video Input
Auto Electronic Exposure
Auto White Balance
Supply Voltage
Power Consumption
Operation Environment
Lens (Optional)
Audio Input
Weight
Size
2:1 Interlace 2:1 Interlace
NTSC PAL
1/4" CCD ImageSensor
512 (H) X582 (V)
15750 Hz 15625 Hz
60 Hz 50 Hz
Internal
More Than 420TVLines
0.3LUX (F1.2)
More Than 48dB(AGC OFF)
1.0Vpp/ 75 compositeVideo Signal
1/60 ~ 1/10000seconds 1/50 ~ 1/10000seconds
Auto
9V
200mA
F3.6 mm, F2.0(Fix Board Lens)
Approximate 160g
512 (H) X492 (V)
116Lx 45W x52.5H (mm)
1.0Vpp/600 load forMono
-10 C ~+50 C
Toprovide the latesttechnologies product toour customer isour responsibility; therefore,we
reserve the rightto change thespecifications without priornotice.
Model Wireless Camera-CMOS
Specification
Characteristic
Scanning System
Image Sensor
Efficiency Pixels
Horizontal Scan Frequency
Vertical ScanFrequency
Synchronize
Resolution
Min. Illumination
S/N Ratio
Video Input
Auto Electronic Exposure
Auto White Balance
Supply Voltage
Power Consumption
Operation Environment
Lens (Optional)
Audio Input
Weight
Size
2:1 Interlace 2:1 Interlace
NTSC PAL
1/3" CMOS ImageSensor
628 (H) X582 (V)
15750 Hz 15625 Hz
60 Hz 50 Hz
Internal
More Than 300 TVLines
3 LUX (F1.2)
More Than 45dB (AGC OFF)
1.0Vpp/ 75 compositeVideo Signal
1/60 ~ 1/2000seconds 1/50 ~ 1/2000seconds
Auto
9V
120mA
F3.6 mm, F2.0(Fix Board Lens)
Approximate 160g
510 (H) X492 (V)
116Lx 45W x52.5H (mm)
1.0Vpp/600 load forMono
-10 C ~+50 C

3
One unit of Wireless Camera
The Wireless Cameraemits Audioand Video signals
over 2.4G zradio frequency carrier.
One unit of Receiver
The Receiver receives2.4G z wirelessAudio and
Video signals from the WirelessCamera.
One unit of Wall Mounting Bracket
The wall mountingbracket is usedto bolster upthe
Wireless Camera onthe wall.
2. PACKAGE CONTENTS
Two units of Power Adaptor
Two poweradaptors supply +9V(300mA)DC
power to theWireless Camera andthe Receiver.
One unit of Ceiling Mounting (Optional)
The ceiling mountingbracket is usedto bolster
up the WirelessCamera.
One unit of Tripod
The tripod isused to bolsterup the WirelessCamera.
One unit of RCA/SCART Cable
The RCA/SCARTcable is usedto connect the
Receiver to yourA/V displays.
A/V displays: computermonitor (converted card
required), powered speakers,TV monitor etc.
Note: If anyaccessories listed aboveare missing, pleasecontact the
sales representative whereyou purchase theWireless Surveillance
System.
H
H
2RCA to phone plug
OR
SCART to phone plug

4
Wireless Camera
8. Ceiling MountingScrew Nut
1. Lens
2. Microphone
3. Channel Rubber
4. TripodScrew Nut
( Ceiling MountingScrew Nut)
5. Power Cable
6. Power IndicationLED
7. WallMounting Slide
Front
Bottom
Top
3. CONTROLS
Receiver
Front & Side
1. Power Switch
2. Channel Selector
3. AV Connector
4. Adaptor Connector
5. Power IndicationLED
22
11
633
44
55
77
1
2
3
4
5
8

5
4. SYSTEM INSTALLATION
Wireless Camera
Connect Wireless Camerawith the attached
adaptor; and plugthe adaptor intothe power
outlet.
Slide the WirelessCamera into theWall
Mounting Bracket.
66
Fasten the MountingBracket on thewall or
ceiling (must underthe roof).
Combine the Tripod andWireless Camera to
assist parents intaking care ofthe baby.
Two waysto combine theCeiling Mounting Bracketand Wireless Camera.
(Ceiling Mounting Bracketis selected.)
Screw the ceilingmounting
bracket into screwnut on topof
the wireless camera.
Screw the ceilingmounting
bracket into screwnut on bottom
of the wirelesscamera.
1. 2.

6
Receiver
Connect Receiver byphone plug toTV with
RCA Cable.
DC9V
A/V
1
ON
2
3
4CH
OFF
Connect Receiver byphone plug toPCI
Capture Card ofPC with RCACable.
Plug Receiver intothe power outletwith
attached adaptor.
Plug Receiver intothe power outletwith
attached adaptor.
Phone plug to2RCA/SCART connecting withTV
Phone plug to2RCA connecting with PC
PCI Capture Card
DC9V
A/V
1
ON
2
3
4CH
OFF
The power indicationLED on WirelessCamera and Receiverwill light up.
5. OPERATION
2.
3.
1. Turn onthe Wireless Cameraand Receiver.
Turn onA/V display.
4.
Wireless Surveillance Systemwatches wherever youwant.
5.
Check the channelof Receiver tobe same asCamera.
( Camera setup to channel1 originally. )
Image will showon A/Vdisplay if thechannel of WirelessCamera and
Receiver is atthe same one.
If switching thechannel of WirelessCamera is necessary, please referto
page 8 -How to adjustthe Channel Selectorof Wireless Camera.
Switch the Receiver'sChannel Selector toC 1.
H
If no imagesor sound onA/V display, switch theReceiver's Channel
Selector to C 2, 3 or4; and checkthe images again.
H
**
CH1CH1
CH2CH2
CH3CH3
CH4CH4
-
-
-
-
Note: The operation temperature isfrom -10 C~ +50 C.

7
No Pictures or Sound
Power ON/OFF switchin right position.
Check all thecables well andrightly connected.
Receiver can not work properly when
connecting with PC
Check PCI capturecard and software/ driver installedcorrectly.
Make sure thesurveillance system workproperly if connectingwith TV.
Check all thecables well andrightly connected whenconnecting with PC.
Check the channelsof wireless cameraand receiver atthe same one.
Check the DCadaptors rightly connected.
6. TROUBLE SHOOTING
Please read thisuser's manual carefullybefore using theWireless Surveillance
System. If youstill have difficulties to usethe Wireless Surveillance System
consult the followingsyndrome, which willguide you tosolve most common
problems.
Interference in the Image and Sound
Move your WirelessCamera or Receiverslowly to finda best receptionposition.
Shorten the distancebetween your Cameraand Receiver.
Check if thereis any interferenceradio frequency sourcenear your Receiver
source such asmicrowave oven orothers 2.4 G z electronic products.
Switch channels ofboth Camera andReceiver to anotherchannel;
e.g. from C 1 to CH3.
H
H

8
Warning :Changes or modificationsto this unitnot expressly approvedby the party
responsible for compliancecould void theuser authority tooperate the equipment.
This device complieswith Part 15of the FCCRules. Operation issubject to the
following two conditions:(1) this devicemay not causeharmful interference, and
(2) this devicemust accept anyinterference received, includinginterference that
may cause undesiredoperation.
The user manualor instruction manualfor an intentionalor unintentional radiator
shall caution theuser that changesor modifications notexpressly approved bythe
party responsible forcompliance could voidthe user's authorityto operate the
equipment.
How to adjust the Channel Selector of
Wireless Camera
Use a toolto open thechannel rubber.
Switch inside selectorby the toolto adjust thechannel you wantto set.
CH1
CH2
CH4CH3

Version 1.2
M
E
T
S
Y
S
E
C
N
A
L
L
I
E
V
R
U
S
s
s
e
l
e
r
i
W
z
G
4
.
2
H
Table of contents
