Electrophysics Hotshot HD Series User manual
QuickStart: Electrophysics HOTSHOT HD
© 2011 The Snell Group / 322 N. Main St. / Suite 8 / Barre, VT 05641 / 800.636.9820 / www.thesnellgroup.com
Hotshot HD Page 1
1. MEMORY: Insert Compact Flash memory card into the slot under the rubber cover on top of the camera.
2. POWER: Insert a charged battery into the battery bay on the bottom of the camera.
3. START: Close the lens cap firmly over the lens them push and hold the Power Button on the top of the camera (for
one second). The lens cap needs to be in place to perform a NUC, an initial internal calibration. Press OK when a
dialog box asks if the lens cap is closed.
The touch screen display will turn on and over the next minute or so the camera will undergo a series of boot
up and test procedures.
You should then see real time video image in the default “Start-up Screen” display.
Note: If the camera is not in the full infrared image mode, (displaying the IR over the Display Icon on
the Shortcut Menu), tap the Display Icon until the IR is displayed.
(The entire display is a touch screen, buttons and menu items can be activated by touching or tapping with either
the provided Stylus or your finger)
4. FOCUS: A properly focused image is achieved by manually turning the Focus Ring either clockwise or
counterclockwise.
5. AUTO ADJUST IMAGE: (Level and Span) The camera will start in one of the default Auto modes
(AGC/ Auto Gain Control) mode. The AGC button on the Shortcut Bar will display which of many auto
modes you are in. Tap the AGC button until the full red sign wave is displayed on the button.
6. MANUAL ADJUST IMAGE: (Level and Span) Tap on either the Min. temp. or Max temp.
displayed on either side of the Thermal Span/Palette Indicator.
Arrows will appear above and below each number as well
as Slider Bars on the upper and right side of the infrared
image.
oAdjust Span by moving the Joystick left to decrease or right to increase span size.
oAdjust Level by moving the Joystick up to raise or down to lower the span.
If the Slider Bars disappear (15-20sec), moving the Joystick will make them reappear.
These Min/Max values can be changed individually by taping the small up/down arrows on their display.
While in the Manual mode a “ONE TIME” auto adjust can be performed, without exiting Manual mode, by
pressing and releasing the Joystick Button straight in. Using Manual mode with the one time auto feature is
the mode most often used.
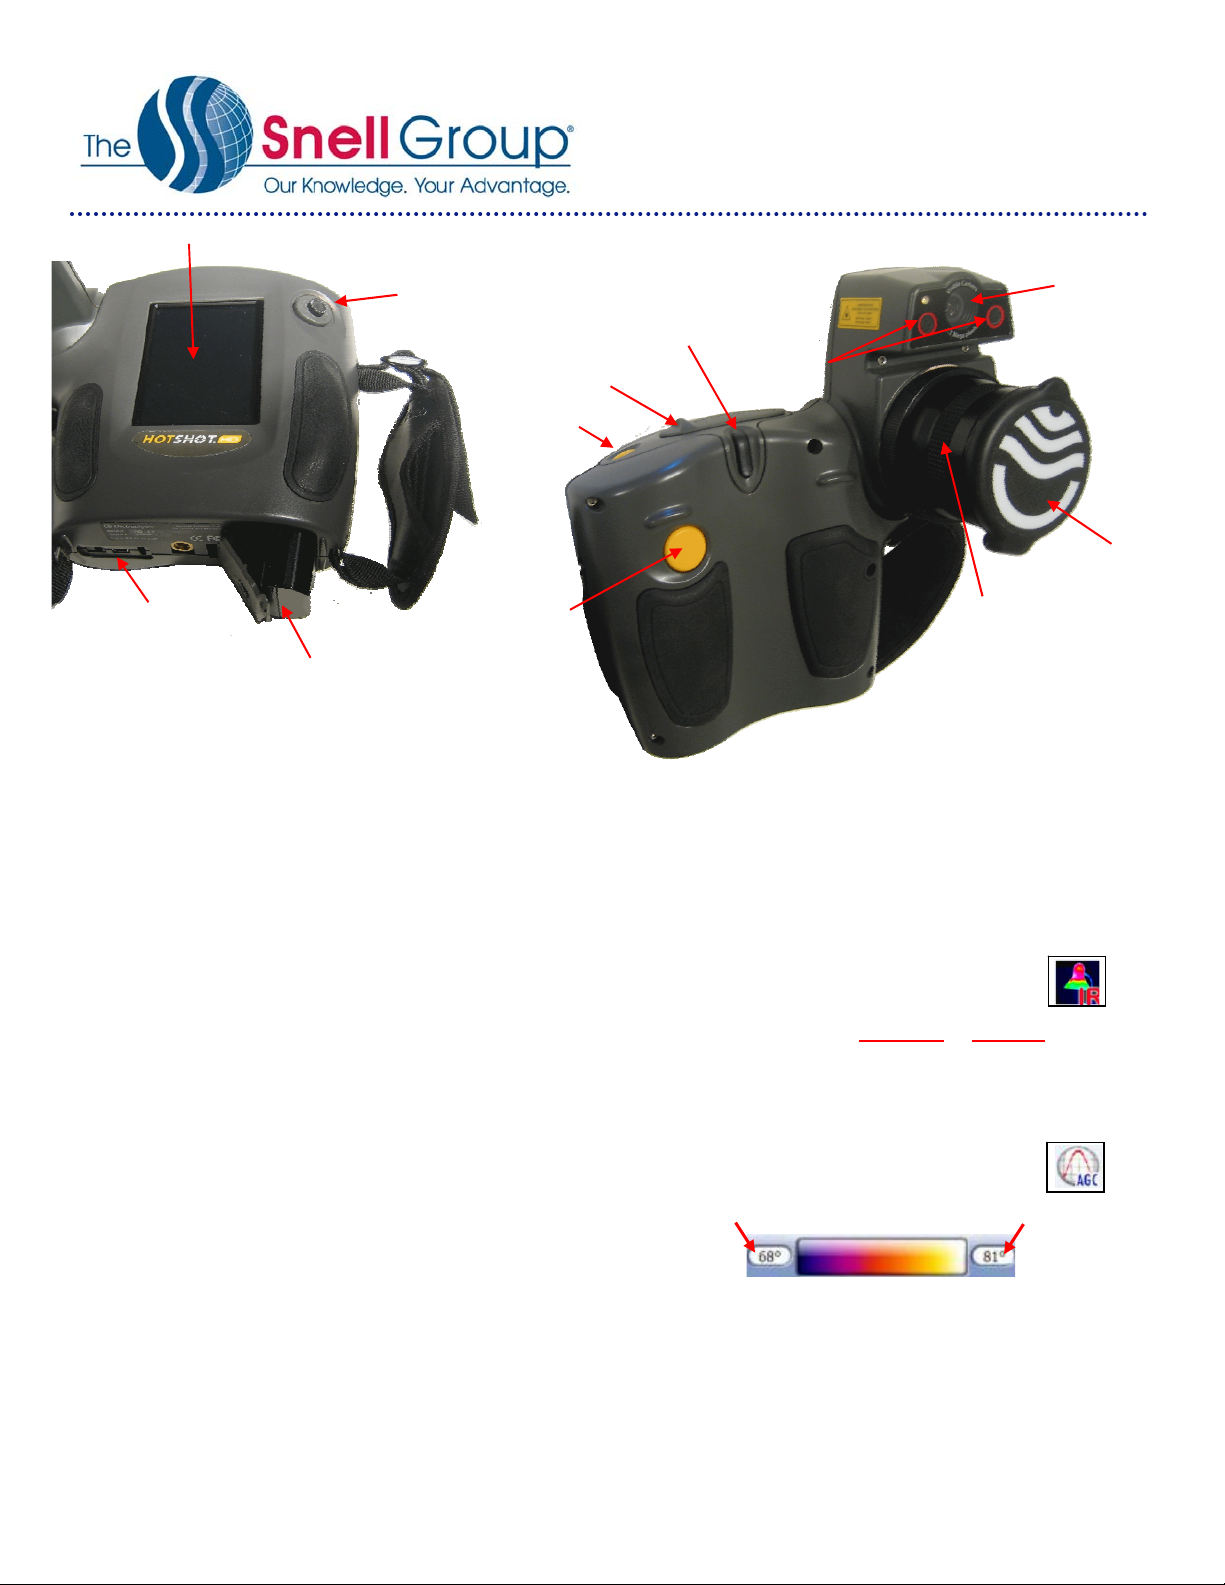
Joystick/Button
Touch Screen Display
Cover and Battery
Trigger Button
Power Button
Memory Slot
Captive IR
Lens Cap
Touch Screen
Stylus
Visible
Camera
Focusing
Ring
AC Power &
Data Ports
Laser Spot
Indicators

QuickStart: Electrophysics HOTSHOT HD
© 2011 The Snell Group / 322 N. Main St. / Suite 8 / Barre, VT 05641 / 800.636.9820 / www.thesnellgroup.com
Hotshot HD Page 2
7. PAUSE IMAGE: Pause or Freeze the image by momentarily pressing the front Trigger Button. (If this is not an
image you desire to save, abort the save by pressing the Trigger Button again returning to a live image)
8. SAVE IMAGE: First, freeze the image as above.
Two small computer disc icons will appear in the lower portion of the
screen:
oYellow Icon for Detailed File Save (you will be prompted for
additional image identification information)
oGreen Icon for Express (quick) Image Save (image is saved without further input)
Now to save the Paused/Frozen image move the joystick either left or right, determined by the position of the
desired Save Mode’s Icon. In this case right for Express (green)or left for Detailed Save (yellow)
9. CHANGE PALETTE: In any mode, tapping the palette color indicator bar will change the image color palette to
the next choice.
10. EMISSIVITY:
Global Emissivity (Applies to line, area, and span values) is adjusted in Object Parameters:
Tap Menu, then under the Measure column tap the Object Parameters Icon.
Tap and change the Emissivity value using the stylus.
Spot Emissivity (Applies only to individual spot temperature points) must be adjusted in Tools.
Tap Menu, then under the Measure column tap the Tools Icon.
Tap and change the Emissivity value using the stylus for each individual spot.
11. BACKGROUND COMPENSATION: (Reflective Temperature)
Tap Menu, then under the Measure column tap the Object parameters Icon.
oMake sure the “Use Camera Temperature” box is unchecked and has a red X
in the box indicating that you are not using ambient camera temperature.
oNow tap and change the Compensation Value with the stylus.
Hotshot HD Series
IFOV =.68 mRad (Theoretical with 640x480 Detector and standard 25˚x18˚lens) Detect 1in. target @ 122ft.
Global Emissivity
Battery Status
Multiple Spot
Temp. Indicators
Span & Level
Manual Sliders
Temperature
Minimum
Menu Button
Spot 1
(Center Point)
Temp and Emissivit
y
Mode Indicator
Readout display
Temperature
Units
Temp Range
Touch Screen
Image Display
Temperature
Maximum
Palette
Shortcut bar Shortcut Scroll
Multiple Spot Temps & Emissivity
Table of contents
Other Electrophysics IP Camera manuals


