Elenberg BV-7182 User manual

ПАРОВАРКА BV-7182
РУКОВОДСТВО ПОЛЬЗОВАТЕЛЯ

2
Пароварку можно использовать для приготовления таких продуктов,
как: овощи, фрукты, рыба, мясо, рис и т.п. Во время приготовления
еды не нужно добавлять жир или масло. При этом количество калорий
снижается, а все полезные вещества остаются. Поэтому данная паровар-
ка является лучшим выбором для тех, кто заботится о своем здоровье.
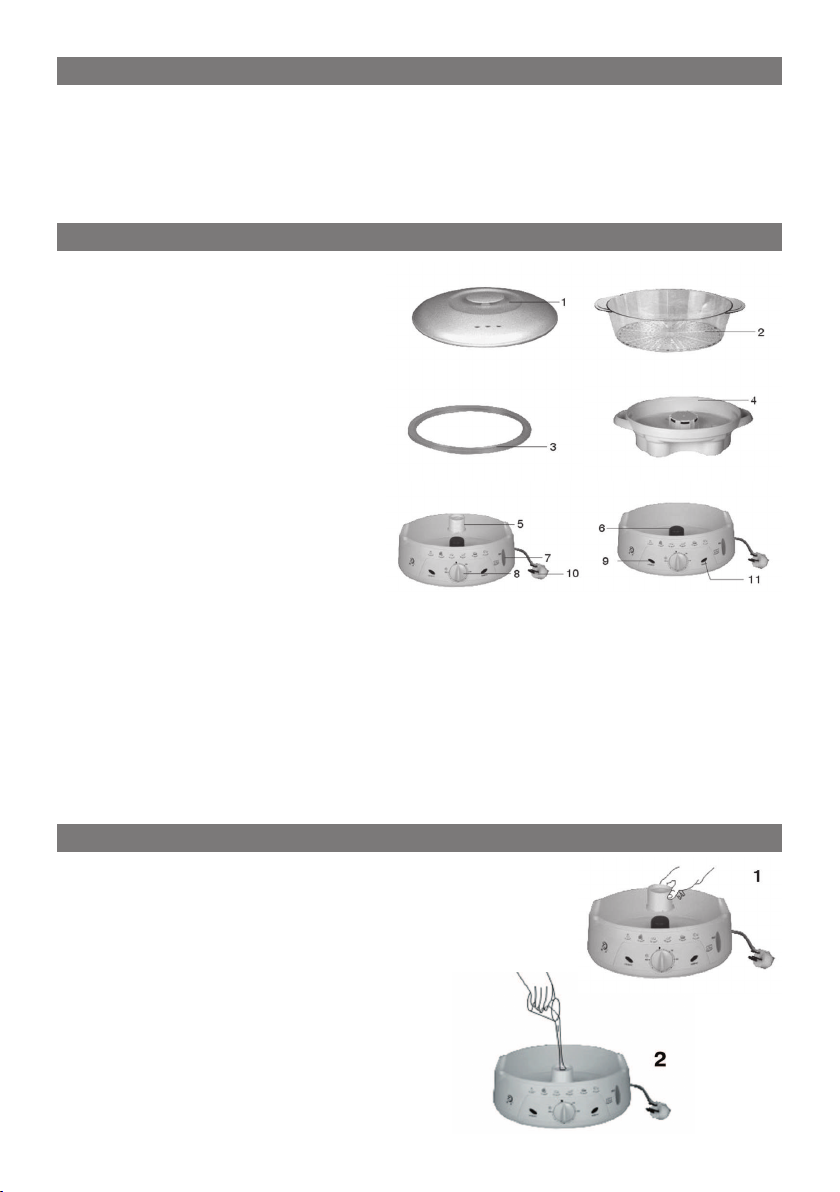
1. Крышка с отводящими пар
отверстиями
2. Чаша
3. Прокладка
4. Поддон для стекающей
воды
5. Турбокольцо
6. Нагревательный элемент
7. Уровень воды
8. Таймер
9. Индикатор нагрева
10. Шнур питания
11. Индикатор питания
Подготовка:
Полностью прочитайте данное руководство перед использованием.
Подготовка пароварки к работе:
1) Извлеките основание пароварки и ее аксессуары из коробки;
2) Удалите внутренние упаковочные материалы;
3) Используя чистящее средство, промойте все принадлежности
пароварки, исключая основание;
4) Промойте все принадлежности водой;
5) Высушите их;
6) Протрите остатки воды насухо.
1. Поставьте основание на стол. Убедитесь, что
рядом не присутствуют предметы, которые
могут быть повреждены паром. Ставьте
пароварку вне досягаемости детей.
2. Установите турбокольцо (Рис. 1)
Отрегулируйте длину шнура
питания.
3. Налейте воду. (Рис. 2)
Залейте воду в пароварку так,
чтобы ее уровень достиг отметки
“МАХ”. (Рис. 2 и Рис. 3)
ВВЕДЕНИЕ
ОПИСАНИЕ ПРИБОРА
ИСПОЛЬЗОВАНИЕ ПРИБОРА

3
Замечание: Не добавляйте приправы, жир
или масло в основание пароварки.
4. Установите поддон для стекающей воды
Замечания:
1) Устанавливать чаши можно в любой
последовательности.
2) При использовании нескольких чаш,
увеличьте время приготовления, массивные куски пищи
располагайте на нижнем уровне.
3) Вы можете положить разнообразные продукты в одну чашу,
однако при этом их запах и вкус могут смешаться.
4) Продукты, для приготовления которых требуется больше време-
ни, необходимо располагать на нижнем уровне.
Выберите продукт с наибольшим временем приготовления
и поместите чашу с ним на пароварку, установив на ней
соответствующее время. В процессе работы пароварки можно
добавлять чаши с другими продуктами, имеющими меньшее
время приготовления, чем тот продукт, который лежит в первой
чаше. Для этого снимите крышку, поставьте новую чашу на первую
и закройте крышку.
Включение питания
Перед тем, как включить прибор, убедитесь, что залили в него
достаточно воды. Перед тем, как устанавливать время, включите
пароварку в электросеть.
Использование таймера
Прибор начинает работать сразу после того, как Вы установите
время, в течение которого он должен работать. Если время, в течение
которого должен работать прибор меньше 10 минут, Вам необходи-
мо сначала установить таймер на 10 минут, а потом перевести его
в нужное положение. Пароварка перестанет работать тогда, когда
указатель таймера совместится с отметкой “0” и погаснет индикатор
нагрева.
Процесс обработки паром
Внимание, уровень воды во время работы прибора может
измениться. Поэтому размораживайте мясо и морепродукты перед
приготовлением.
Окончание процесса приготовления продуктов
Аккуратно снимите крышку; соблюдайте дистанцию, чтобы не
обжечься выходящим из прибора паром. Если продукты развари-
лись, снимите чашу и поставьте ее на тарелку, затем выньте их с
помощью лопатки.

4
Отключите прибор от электросети. Дайте воде, оставшейся в пароварке
остыть.
1. Не используйте порошковые медицинские чистящие средства.
2. Протирайте основание пароварки влажной тряпочкой.
3. Полностью смывайте остатки жира с поддона для стекающей воды.
4. Сливайте оставшуюся воду. Каждый раз заливайте новую воду.
5. Высушите все аксессуары, затем положите их в сухое прохладное
место.
Устранение осадка
После 7-10 раз использования пароварки нагревательный элемент
может покрыться органическим осадком. Возникновение осадка и
его количество зависят от степени жесткости воды в Вашем регионе.
Этот осадок необходимо удалять следующим способом:
1. Залейте нагревательный элемент белым уксусом, разведенным с
водой в соотношении 1:1 так, чтобы он полностью оказался под
водой. Не используйте другие чистящие продукты.
2. Не устанавливая ничего на основание пароварки, включите его.
3. Установите таймер на 20-25 минут.
4. Выключите питание пароварки, когда остановится таймер. Перед
тем, как сливать воду дайте ей полностью остыть.
5. Тщательно промойте водный резервуар основания пароварки
водой.
Рекомендации по использованию
1. Использование горячей воды может сократить время приготовле-
ния продуктов. Однако данные из таблиц приведенных далее
верны при использовании холодной воды.
2. Не кладите в чашу слишком много продуктов. Оставляйте зазоры
для прохождения пара.
3. В таблицах приведены примерные данные, т.к. их значение может
изменяться в зависимости от размера кусков, плотности укладки,
свежести, вкусовых предпочтений потребителя.
4. Нарезайте продукты равными кусками. Продукты небольшого
размера кладите на верхний уровень.
5. Если Вы положили в чашу много продуктов, время от времени
открывайте крышку и перемешивайте их.
6. Сок, слившийся в поддон для стекающей воды можно исполь-
зовать как основу для супа.
ЧИСТКА И УХОД

5
1. Перед тем как включить прибор убедитесь, что напряжение в
электросети соответствует рабочему напряжению прибора.
2. Не оставляйте работающий прибор без присмотра и не позволяйте
детям играть рядом с ним.
Включайте пароварку только после того, как залили в нее воду.
Количество залитой воды не должно превышать максимальную
отметку.
3. Включайте прибор только после того, как проверили правильность
крепления всех аксессуаров.
4. Если чаша сильно нагрелась, используйте жаростойкие варежки,
чтобы снять ее. Будьте внимательны, не обожгитесь паром.
5. Снимая одну из чаш, убедитесь, что она не прилипла к другим.
6. Отключите электропитание перед тем, как чистить прибор. Не
допускайте попадания воды внутрь основания пароварки - это
может привести к удару электрическим током.
8. При возникновении следующих неполадок обратитесь в сервисный
центр: неисправно основание пароварки, пароварка работает
не правильно, поврежден шнур питания прочие анормальные
ситуации.
9. Не используйте этот прибор вне помещения и в коммерческих
целях.
10. Производитель не несет ответственности за неполадки, вызванные
использованием прибор не в соответствии с данным руководством.
ПРЕДУПРЕЖДЕНИЯ

6
В таблицах приведены данные, соответствующие использованию
пароварки (заполненной холодной водой) с одной чашей. Если процесс
приготовления еды превышает 60 минут, может потребоваться повтор-
ная установка таймера.
Овощи
1. Не ставьте свежие овощи в пароварку на долгое время.
2. Добавляйте соль после того, как овощи приготовлены.
3. Не размораживайте замороженные овощи.
Продукт Тип Кол-во
(гр)
Время
(мин) Замечание
Конский
каштан
Свеж.
Морож.
400 38-40
25-28
Помешивать время от
времени
Броколи
Свеж.
Морож.
400 11-16
13-16
Помешивать время от
времени
Цветная
капуста
Свеж.
Морож.
400 11-16
13-16
Помешивать время от
времени
Спаржа
Свеж.
Морож.
400 11-16
13-16
Разложить на двух чашах
Горох
Морож.
400 13-16 Помешивать время от
времени
Капуста 30-35 Помешивать время от
времени
Грибы Свеж. 200 10-13 Помешивать время от
времени
Картофель Свеж. 400 20-22 Помешивать время от
времени
Шпинат
Свеж.
Морож.
250
400
8-10
8-20
Рис, зерно
Продукт Сорт Количество
зерна (гр)
Количество
воды
Время
(мин.)
Рисовый
пудинг
Рис 100 1л
70
Сахар 30 0.5л горячего
молока
Рис Белый 300 450 мл 30
Коричневый 200 300 мл 33
ВРЕМЯ ОБРАБОТКИ ПРОДУКТОВ

7
Замечания:
При варке, соотношение риса и воды 1:1.5.
Рыба и морепродукты
1. Рыба готова тогда, когда свободно отделяется от костей. Увеличьте
время для приготовления замороженной рыбы, разделите ее на
части.
2. Добавьте приправу в рыбу.
Продукт Тип Кол-во
(гр)
Время
(мин) Замечание
Молюск Свеж. 40 6-9
Устрицы Свеж. 6 шт 11-17 Готовы когда
открылись
Филе рыб
Сельдь
Брама 250/400 11-14
Угорь 250/400 11-16
Моллюск Свеж. 400 8-10 Готовы когда
открылись
Лобстер Свеж. 2 шт 20-24 Можно готовить
дольше
Гребешок Свеж. 400 9-11 Двигается в процес-
се приготовления
Мясо и птица
Продукт Varity Кол-во Время Замечание
Курица Грудки 4 шт 12-16 Снимите кожу и разложите
Голени 4 шт 24-29
Барани-
на
Отбивная 4 шт 11-16 Удалите жир
Гуляш 400 11-16
Свинина Вырезка 400 11-16 Удалите жир
Филе 4 шт 13-21
Сосиски 400 16-26 Проделайте отверстия
Говяди-
на
Задняя
часть 250 16-26
Удалите жир
Стейк
1. Мясо, обработанное паром хорошо подходит для барбекю, т.к. с
него удаляется жир.
2. Полейте мясо соевым или другим соусом, чтобы улучшить его вкус.
3. Сделайте надрез, чтобы определить готовность мяса.
4. Сосиски доходят до полной готовности, только если их проткнуть.
5. Добавляйте специи во время приготовления еды.

8
ОБЪЕМ MAX. 4500 мл / MIN. 2500 мл
ПИТАНИЕ ОТ СЕТИ 220 В ~ 50 Гц
МОЩНОСТЬ 700 Вт
По истечении срока службы товара, необходимо обратиться в
сервисный центр за консультацией по дальнейшей эксплуатации
товара. В противном случае дальнейшая эксплуатация может повлечь
невозможность нормального использования товара.
ТЕХНИЧЕСКАЯ ХАРАКТЕРИСТИКА
Изготовитель “ЭЛЕНБЕРГ ЛИМИТЕД”, Великобритания
Адрес: 35 Бромптон Роад, Кнайтсбридж Лондон СВ3 ИДЕ
Сделано в Китае. ”ЭЛЕНБЕРГ ЭЛЕКТРИК КОМПАНИ ЛТД”
А08 Р2-Б4 билдинг, Кеджинан 2 Роад, С энд Т Индастри Парк,
Шензень, Гуандонг Провинс, Китай.
Срок службы данного изделия - 3 года с момента продажи

FOOD STEAMER BV-7182
INSTRUCTION MANUAL
10
The Electric steamer can be easily used to cook all kinds of delicious foods,
braising vegetables, fruits, fish, meat, rice and so on. Its feature is: no ax-
unge need to be added when cooking. As a result, the calories are reduced
while all kinds of celluloses are retained .So, our product is health cared
and it cam be your best choice for cooking.
1. Cape hood with a discharg-
ing stem vent
2. Large layer with a handle
3. Layer ring
4. Drip tray
5. Removable heater cover
6. Heater
7. Water gauge
8. Timer
9. Heating indicator light
10. Power cord and plug
11. Power indicator light
Preparation:
Read the instructions care-
fully and operate accordingly.
Taking out the components:
1) Take out the electric steamer and its attachments;
2) Remove the inner packing;
3) Washing the cape hood, mess ting, layer, layer-ring, removable
heater cover, drip tray with dishwashing detergent;
4) Swash it with clean water;
5) Airing;
6) Clean the water containing utensil with wet cloth
1. Place the pedestal on a stable table-board. Make
sure that all items likely to be damaged by steam
are removed. Keep the steamer out of children’s
reach.
2. Put the heater cover the heater (Pic.
1)
Then open the winding wire device.
Adept the length of the power wire.
3. Fill the water into reservoir.
Effusion: fill cold water into reservoir
or outside water refilling until the
INTRODUCTION
UNIT DESCRIPTION
OPERATING INSTRUCTIONS

11
max water level. (Pic. 2 and Pic. 3)
Note: Seasoning and any unclean lipid cannot
be poured into the reservoir.
4. Fix the drip tray on the pedestal
Notes:
1) Freely fix the layer and mess tin together
according to you will.
2) You’re recommended to lengthen the time when you use more than
one layer and put the massive ones on the bottom layer.
3) You can put different foods in one layer, but should aware that fla-
vors may be mixed.
4) When braising different foods, place the time-consuming food in
the lower layer.
When the time left is equal to the time the other food needs, care-
fully lift the cape hood, put another layer onto the lower one, and
braise them till the food are all finished.
Switch on the power
Make sure that there is enough water in the reservoir before switch on
the power. Before set the timer the power should be switched on first.
You can set the timer according to instructions.
Use common electric steamer
The timer starts to work as soon as you switch on the knob. if the time
needed is less than 10 minutes, you should switch the knob to 10 min-
utes first, then go back to the needed time. The braising starts as soon
as the heat indicator works. the timer will go back to the “closure “ point
and the heat indicate will put out when finish cooking.
Steaming process
Attention the water level index in the process of steaming .Defrost be-
fore meat and seafood are steamed.
Finish steaming
Uncover the lid carefully; keep a certain distance from the electric
steamer. Attention to avoid the vapor. In case food overcooked, re-
member to take away the steaming grill, put into service plate. If use
canteen, take out by the handle carefully.

12
Pull out power plug when finishing cooking. Do not move befor the steamer
cools completely.
1. Don’t use grinding sanitary products or imp regnant to clean the
steamer.
2. Wipe the steamer pedestal and reservoir with wet cloth.
3. Periodically clean heater cover to avoid the base vent of the heater
cover walling up.
4. The water in the water-containing utensil should be disposed when fin-
ishing using the steamer. You should put clean water into it whenever
you use it.
5. You should air all components before you pack it away. And you should
place it in a safe and dry place.
Clearing scale
After seven to ten times using, there will be some scale aggradations
on the heater. The amount of scale is determined by the water rigid-
ity in users’ region. To avoid heat transform is jammed ad prolong the
service life of steamer, clearing scale at a regular intervals are recom-
mended.
1. Pour the liquid mixture of water and white vinegar with 1:1 propor-
tion between water reservoir and heater cover to the highest level.
Any other cleaning products are prohibited to use.
2. Other plastic parts like drip tray are not needed to put on when
switch on the appliance to clear the scale.
3. Set the timer to 20-25 minutes.
4. Pull out power plug after the timer is off. Do not pour out vinegar
befor it becomes cool completely.
5. Wash the reservoir with clean water repeatedly to get rid of vinegar
flavor.
Instructions and suggestions
1. Hot water can be poured into the water reservoir to shorten cooking
time. Meanwhile please attention the recipe referring time all made
by the cold water standard.
2. Do not put too much food on the steaming layer or in the canteen.
Try to leave enough space for steam.
3. The listed cooking time varies slightly according to the food pieces,
distance between food, fresh extent, and private favorite. You will
grasp the perfect cooking time after you are familiar to the unit.
4. To get the ideal cooking purpose, try to make the food size close or
place the smallest one on the top.
5. When large amount of food are cooked, unlid the unit to stir food
and then lid it.
6. The juice in drip tray can be used to cook soup.
CLEANING AND MAINTENANCE

13
1. Befor switch on the power you should make sure that the pressure used
is the same as the pressure required.
2. You should have a person in charge when use the steamer and keep it
out of the reach of children.
Switch on the power only when the water-containing utensil is filled
with water. The water in the steamer should not surpass the water lev-
el.
3. Use the steamer only when the components are all assembled cor-
rectly.
4. If the part you touched is very hot, you should take steps of heat insu-
lation or you can put on adiabatic gloves .To avoid being hurt by the
steam, you are supposed to keep a certain distance from the steam.
5. When the steamer is with a high temperature, if you want to take out
the above components, please make sure that the below components
are not attached together.
6. Clean the steamer after the power is cut off. Don’t wet the pedestal
when doing cleaning or it will be dangerous.
8. The steamer can’t be used and it should be sent to the exclusive main-
tenance point if it is under any of following condition: the pedestal is
broken, the steamer cannot work normally, the power wire is broken,
other deviant situations.
9. Its family appliance, not commercial appliance and can’t be used out-
doors.
10. Problems caused by nonobservance to the instructions are beyond our
responsibility.
CAUTIONS

14
The listed steaming time in the chare is only when placing the food on
the bottom steaming layer and cold water is used. You can cook the food
according to the different conditions .If the steaming time over 90 or 60
minutes (according to the timer), you should reset the timer.
Vegetables
1. Leaves vegetables are not suitable to be cooked for long time in case
that the vegetables will lose bright color.
2. Add the salt to the vegetables after cooked.
3. Frozen vegetables need not to be defrosting before steaming.
Food Type Quantity
(g)
Time
(min) Remark
Horse bean Fresh
Frozen 400 38-40
25-28
Stir and cooking in the
process of cooking
Broccoli Fresh
Frozen 400 11-16
13-16
Stir and cooking in the
process of cooking
Cauliflower Fresh
Frozen 400 11-16
13-16
Stir and cooking in the
process of cooking
Asparagus Fresh
Frozen 400 11-16
13-16
Lie across with two layers
for steam to drill through
Pea Frozen 400 13-16 Stir and cooking in the
process of cooking
Cabbage 30-35 Stir and cooking in the
process of cooking
Mushroom Fresh 200 10-13 Stir and cooking in the
process of cooking
Potato Fresh 400 20-22 Stir and cooking in the
process of cooking
Spinach Fresh
Frozen
250
400
8-10
8-20
Rice, grain
Food Varity Amount of
Grain(g)
Amount of
water
Time
(min)
Rice,
Puddings
Rice 100 1L 70
Lump sugar 30 0.5L hot milk
Rice White (easy cooked) 300 450ml 30
Brown 200 300ml 33
FOOD STEAMING CHART

15
Note:
The proportion of rice and water is 1:1.5(according to capacity ) when
cooking rice.
Postpone steaming time when food cooked with canteen.
Fish and seafood
1. Steam fish till it looks rather clear and easy to separate bones from
fish. Prolong steaming time when cook frozen fish (separate the frozen
fish).
2. Add seasoning to fish to enhance scent.
Food Varity Amount Time Remarks
Clam Fresh 40g 6-9
Fish
Under back Slice
Fresh
Frozen 25g 6-9
10-12
Oyster Fresh 6 pcs 11-17 Shell open is cooked
20cm fish
Herring
Pomfret 250/400 11-14
Eel 250/400 11-16
Mussel Fresh 400 8-10 Shell open is cooked
Lobster Fresh 2 pcs 20-24 Can be cooked a
little longer
Scallop Fresh 400 9-11 Move in the process
of cooking
Meat and fowl
Food Varity Amount
of food Time Remarks
Chicken
Breast 4pcs 12-16 Tore the skin off and lay flat
before steamed
Drumstick 4pcs 24-29
Mutton
Chop 4pcs 11-16 Eliminate fat
Saeele
slices 400 11-16
Pork Tenderloin 400 11-16 Eliminate fat
Loin Chop 4pcs 13-21
Sausage 400 16-26 Made holes before steamed
for easy cooked
Beef
Hind legs
loins 250 16-26
Eliminate fat
Salted steak

16
1. Meat is good for barbecue, because the fat can be removed through
steaming.
2. Meat and fowl immersed by soy sauce or other seasoning will be more
delicious after being steamed.
3. Pierce the meat with knife or fork and according to the clarity of juice
to see if the meat is cooked.
4. Only pickled sausage can be steamed.
5. Add fresh spice in the process of steaming to spice up the food.
RATED VOLUME MAX. 4500 ml / MIN. 2500 ml
POWER SUPPLY 220V ~ 50HZ
RATED POWER 700W
Address to service center for consultation, when the service life of prod-
uct has expired. Otherwise the further operation can entail impossibility of
normal use of the product.
SPECIFICATION
Service life of the given product - 3 years from the moment of sale
Table of contents
Languages:
Popular Electric Steamer manuals by other brands


AccuTemp
AccuTemp EVOLUTION Series Installation & operator's manual

Deni
Deni 7550 Instructions for proper use and care

TEFAL
TEFAL VC1006 ULTRA COMPACT STEAMER Instructions for use

Nemco
Nemco 6625B Operating and maintenance instructions

Cleveland
Cleveland ConvectionPro XVI 36-CGM-16-300 Specification sheet

Proline
Proline FS2 manual