elepho eCheck User manual

Other Accessories Included:
• 1 “½AA” Lithium Battery
(included in the unit)
IMPORTANT PRODUCT NOTICES AND SAFETY
INSTRUCTIONS
• Although the readings from this device are for reference only, the
Mayo Clinic (http://mayoclinic.com/health/hypoxemia/MY00219)
suggests that normal readings are between 95 to 100% under most
circumstances. Readings under 90% are considered low.
• This is a home healthcare product only and is solely intended for
sports and recreational use. It is not intended to serve as a substitute
for the advice of a physician or medical professional.
• The readings from this pulse oximeter are for reference only. Consult
a healthcare professional for interpretation of your pulse oximeter
measurements. Contact a physician if you have or suspect any
medical problem. Do not change your medications without the advice
of your physician or healthcare professional.
• The pulse display is not suitable for checking the frequency of
pacemakers.
• Use the pulse oximeter only for its intended use.
• Please keep this device away from children. Small parts such as
battery and battery door could be hazardous if swallowed.
• The lanyard could cause strangulation in conditions when twisted
around the neck.
• This pulse oximeter should not be used where alarms are required
when taking measurements.
• For greatest accuracy, wait 10 minutes after exercising, bathing, eating,
drinking beverages with alcohol or caffeine, or smoking to measure
blood oxygen level.
• Use only 3.6V “½AA” Lithium battery for power supply.
• Do not use cellular phones or other radio frequency producing devices
near the working device as it may interfere with proper operation of
the pulse oximeter.
• Not for use by or on persons under the age of 18 years old.
CARE, MAINTENANCE & CLEANING
•
Use a cotton swab with isopropyl alcohol solution (70%) to clean the
inside of the finger sleeve or the outside of the unit.
• DO NOT use any other liquid or sprays on the oximeter for
cleaning purposes.
• Under normal usage conditions, this device does not require
calibration or technical maintenance other than infrequent
replacement of the battery.
• Leaky batteries can damage the unit. Remove the battery when
the unit will not be used for a long time.
• This product should only be used on the fingers.
• DO NOT disassemble this device. If in need of repair, refer to the
warranty section of this manual.
• DO NOT use the product if the finger sleeve changes color or is
no longer able to secure on finger.
• DO NOT subject this device to extreme shocks (do not drop on
floor).
• DO NOT drop or insert any object into any opening.
• DO NOT immerse the unit in water as this will result in damage to
the unit.
• DO NOT subject this device to extreme temperatures, humidity,
moisture, or direct sunlight. Protect from dust.
• If the unit is stored near freezing, allow it to acclimate to room
temperature before use.
• This monitor may not meet its performance specifications if stored
or used outside of these temperature and humidity ranges:
TROUBLESHOOTING
If any abnormality arises during use, please check the following points:
ABOUT PULSE OXIMETERS
This pulse oximeter uses patented technology, which utilizes
revolutionary optical sensor technology to measure both blood
oxygen saturation (SpO2%) levels and pulse rate. By placing the
finger into the sleeve and one-touch of a button, this device will
send both red and infrared lights into the skin to collect data and
display your blood oxygen and pulse rate.
NAME/FUNCTION OF EACH PART
Storage Environment
Temperature
-4°F – 158°F
(-20°C – 70°C)
Humidity: Less than 95%
non-condensing
Operation Environment
Temperature
39°F – 107°F
(4°C – 42°C)
Humidity: Less than 95%
non-condensing
DISPLAY EXPLANATIONS
SYMPTOMS POSSIBLE
CAUSES CORRECTION
Pulse Rate or
SpO2is not
appearing.
Position of the
finger is not
correct.
Reposition the finger into the
correct position and measure
again.
The pulse
oximeter will
not power on.
Battery has run
down. Replace the battery with a single
3.6V “½AA” Lithium battery.
Screen
orientation is
upside down.
Viewing angle
needs to be
adjusted.
Press the Multi-directional
button for up to 2 seconds
and the screen will rotate 180°.
REPLACING BATTERY
1. The battery compartment is located
on the top of the unit. Remove battery
cover by pressing down and sliding the
battery cover off. (fig. 1)
2. Install or replace the battery according
to the polarity indicator located inside
the compartment. Use only 3.6V
“½AA” sized Lithium batteries. (fig. 2)
3. Replace the battery cover by inserting it
back into place. (fig. 3)
Replace the batteries if:
• The weak battery symbol appears on
the display.
• Nothing appears on the display after
the finger is inserted into the sleeve and
the button is pressed.
Note: Batteries are hazardous waste. Do
not dispose of them together with the
household garbage.
Fig. 2
Fig. 3
Fig. 1
MEASUREMENT PROCEDURE
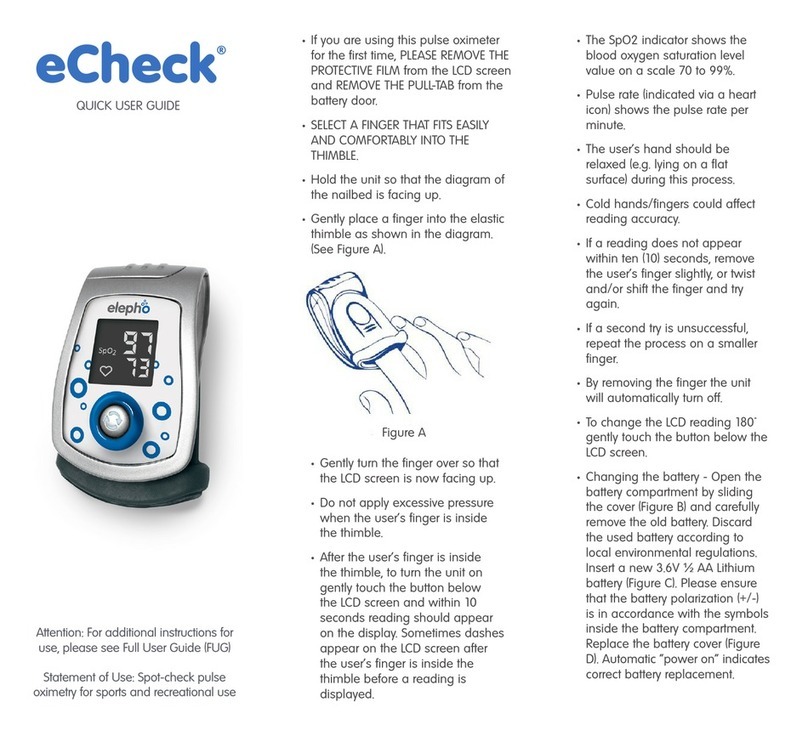
If you are using this pulse oximeter for the
first time, please remove the protective film
from the screen and remove the pull tab
from the battery door.
1. Hold the pulse oximeter so that the
picture of the finger nail on the finger
sleeve is facing up.
2.
Gently place any finger into the finger
sleeve as shown in the diagram
(fig. A). Slightly press on the sides of the
finger sleeve to ease the finger inside.
3. Turn the hand over so that the LCD screen
is now facing you and your finger is
pointed up (fig. B).
4. Push the Multi-directional button to
initiate readings (fig. C).
5. Continue to vertically hold the pulse
oximeter to enable readings
6. To change the direction of the LCD
screen display by 180°, press the Multi-
directional button for up to two (2)
seconds.
Note:
• Signal strength should be greater than one
bar to indicate a proper reading
(fig. D).
• In the event of weak signal strength, please
switch fingers and/or hand and try again.
• For greatest accuracy, limit hand motion
during measurement.
• When the finger is removed, the pulse
oximeter will turn off after 10 seconds.
Fig. A
Fig.B
Fig.C
Fig.D
PRODUCT SPECIFICATIONS
Effective Measuring Range
Saturation 70 to 99%
Pulse Rate 40 to 250 bpm
Resolution 1 digit
Accuracy
Saturation (70%-99%) ±2% or ±2 digits
Pulse Rate ±3% or ±3 digits
Display
Saturation 2 characters
Pulse Rate 3 characters
Signal Indications: Flashing Heart Icon, Sensor ‘Off’ and
Signal intensity strength, battery
indication - near empty
Power Requirements 3.6V “½AA” size Lithium battery
Battery life up to 300 Hours
Type BF Applied Part Spot Measurement No alarms
SpO2
Deluxe Pulse Oximeter
Note: When changing the orientation of the screen, the pulse rate
will be shown on the top near the blinking Pulse Rate Icon, and the
blood oxygen level will be shown on the bottom of the LCD display.
Finger Sleeve
Multi-directional
Button
LCD Display
Battery
Compartment
Signal Strength
Indicator
Pulse Rate
Blood Oxygen
Level
SpO2
Sensor Off Indicator: Appears when the finger has
been removed from the finger sleeve.
Weak Battery Symbol: Flashes when battery should
be replaced.
Pulse Rate: Shows the pulse rate per minute.
SpO2
SpO2Indicator: Shows the blood oxygen saturation
level value on a scale of 70 to 99%.
Calculating: Device is calculating blood oxygen
saturataion (SpO2%).
/
START
STOP
3
/
START
STOP
3
• Storage Pouch
• Lanyard
eCheck - elepho

AVISOS IMPORTANTES DEL PRODUCTO E
INSTRUCCIONES DE SEGURIDAD
• Si bien las lecturas obtenidas de este dispositivo deben tomarse a
modo de referencia solamente, Mayo Clinic (http://www.mayoclinic.
com/health/hypoxemia/MY00219) sugiere que, en la mayoría de las
circunstancias, las lecturas normales deben estar comprendidas entre
el 95% y el 100%. Las lecturas que se encuentran por debajo del 90%
se consideran bajas.
• Este es un producto de cuidado de la salud solamente para uso
doméstico y por lo tanto está diseñado únicamente para uso deportivo y
recreativo. No está diseñado para sustituir los consejos de un médico ni
de un profesional médico.
• Las lecturas de este oxímetro de pulso son únicamente para referencia.
Consulte a un profesional de la salud para conocer la interpretación de
las mediciones del oxímetro de pulso. Comuníquese con un médico si
tiene algún problema médico o sospecha que lo tiene. No cambie sus
medicinas sin el consejo de su médico o profesional de la salud.
• La pantalla de pulso no es adecuada para verificar la frecuencia de
marcapasos.
• Use el oxímetro de pulso solamente con el objetivo para el cual fue
diseñado.
• Mantenga este dispositivo fuera del alcance de los niños. Las piezas
pequeñas, como la batería y la tapa del compartimiento de la batería,
podrían ser peligrosas si se tragan.
• El cordón podría provocar estrangulamiento si se enrosca alrededor del
cuello.
• Este oxímetro de pulso no debe usarse donde se requieren alarmas
cuando se toman mediciones.
• Para obtener la mayor precisión en la medición del nivel de oxígeno en
la sangre, espere 10 minutos después de hacer ejercicio, bañarse, comer,
consumir bebidas con alcohol o cafeína, o fumar.
• Use solamente baterías de litio “
½
AA” de 3,6 V como fuente de energía.
• No use teléfonos celulares ni otros dispositivos que producen
radiofrecuencia cerca del dispositivo en funcionamiento, ya que puede
interferir con el funcionamiento correcto del oxímetro de pulso.
• Este producto no es apto para ser usado por personas menores de 18
años.
CUIDADO, MANTENIMIENTO Y LIMPIEZA
• Use un hisopo de algodón con solución de alcohol isopropílico
(70%) para limpiar el interior del manguito para el dedo o la parte
exterior de la unidad.
• NO use ningún otro líquido o aerosol en el oxímetro para limpiarlo.
• En condiciones de uso normal, este dispositivo no necesita
calibración ni mantenimiento técnico además del reemplazo poco
frecuente de la batería.
• Las baterías con pérdidas pueden dañar la unidad. Extraiga la
batería si la unidad no se va a utilizar por un período prolongado.
• Este producto debe usarse únicamente en los dedos.
• NO desarme este dispositivo. Si necesita reparación, consulte la
sección de la garantía de este manual.
• NO use el producto si el manguito para el dedo cambia de color o
no queda ajustado al dedo.
• NO exponga este dispositivo a golpes extremos (no lo deje caer al
suelo).
• NO lo deje caer ni inserte ningún objeto en ninguna abertura.
• NO sumerja la unidad en agua ya que puede dañarla.
• NO exponga este dispositivo a temperaturas extremas, humedad o
a la luz solar directa. Protéjalo del polvo.
• Si la unidad se guarda cerca de lugares fríos, permita que se
adapte a la temperatura ambiente antes de usarla.
• Este monitor puede no cumplir con sus especificaciones de
funcionamiento si se guarda o se utiliza fuera de los siguientes
rangos de temperatura y humedad:
DIAGNÓSTICO Y RESOLUCIÓN DE PROBLEMAS
Si aparece alguna anomalía durante el uso, verifique los siguientes puntos:
ACERCA DE LOS OXÍMETROS DE PULSO
Este oxímetro de pulso utiliza la tecnología patentada, que utiliza la
tecnología revolucionaria de sensor óptico para medir los niveles de
saturación del oxígeno en la sangre (SpO2%) y el pulso. Al colocar
el dedo dentro del manguito y presionar un botón una vez, este
dispositivo enviará luces rojas e infrarrojas a la piel para recopilar
datos y mostrar el nivel de oxígeno en la sangre y la frecuencia
cardíaca.
Other Accessories Included:
• 1 batería de litio “½AA”
(incluida en la unidad)
• Bolsa para guardado
• Cordón
EXPLICACIONES DE LA PANTALLA
SÍNTOMAS CAUSAS
POSIBLES SOLUCIÓN
No aparece el
pulso ni SpO2.La posición del
dedo no es
correcta.
Vuelva a colocar el dedo en
la posición correcta y mida
nuevamente.
El oxímetro de
pulso no se
enciende.
Se ha agotado
la batería. Reemplace la batería por una
batería de litio “½AA” de 3,6 V.
La orientación
de la pantalla
está invertida.
Es necesario
ajustar el
ángulo de
visualización.
Presione el Botón
Multidireccional durante
un máximo de 2 segundos y la
pantalla girará 180°.
REEMPLAZO DE LA BATERÍA
1. El compartimiento de la batería está ubicado
en la parte superior de la unidad. Retire la tapa
del compartimiento de la batería presionando
hacia abajo y deslizándola. (Fig. 1)
2. Coloque o reemplace la batería según el
indicador de polaridad ubicado en el interior
del compartimiento. Use solamente baterías
de litio tamaño “½AA” de 3,6 V. (Fig. 2)
3. Vuelva a colocar la tapa del compartimiento
de la batería insertándola nuevamente en su
lugar. (Fig. 3)
Reemplace la batería si:
• El símbolo de batería baja aparece en la
pantalla.
• No aparece nada en la pantalla después de
que se introduce el dedo dentro del manguito
y se presiona el botón.
Nota: Las baterías son desechos peligrosos. No
las deseche junto con la basura del hogar.
Fig. 2
Fig. 3
Fig. 1
PROCEDIMIENTO DE MEDICIÓN
Si usted está usando este pulsioxímetro por
primera vez, retire la película protectora de la
pantalla y quite la lengüeta que se encuentra en
la puerta del compartimiento de la batería.
1. Sostenga el oxímetro de pulso de manera
que la imagen de la uña del dedo en el
manguito mire hacia arriba.
2. Coloque suavemente cualquier dedo
dentro del manguito como se muestra en
el diagrama (Fig. A). Presione levemente
los costados del manguito para ayudar a
introducir el dedo.
3. Dé vuelta la mano para que la pantalla
LCD quede ahora mirando hacia usted y el
dedo apunte hacia arriba (Fig. B).
4. Presione el Botón Multidireccional
para iniciar las lecturas (Fig. C).
5.
Mantenga el oxímetro de pulso en posición
vertical para permitir las lecturas.
6. Para cambiar la dirección de la
pantalla LCD 180°, presione el Botón
Multidireccional durante un máximo
de dos (2) segundos.
Nota:
• La intensidad de la señal debe ser mayor
que una barra para indicar una lectura
correcta (Fig. D).
• En caso de intensidad de señal débil,
cambie de dedo y/o de mano y vuelva a
intentar.
• Para obtener la mayor precisión, limite
el movimiento de la mano durante la
medición.
• Cuando se retire el dedo del manguito, el
oxímetro de pulso se apagará después de
10 segundos.
Fig. A
Fig.B
Fig.C
Fig.D
ESPECIFICACIONES DEL PRODUCTO
Effective Measuring Range
Saturación 70 a 99%
Pulso 40 a 250 bpm
Resolución 1 dígito
Precisión
Saturación (70% a 99%) ±2% o ±2 dígitos
Pulso ±3% o ±3 dígitos
Pantalla
Saturación 2 caracteres
Pulso 3 caracteres
Indicaciones de señal: Ícono de corazón parpadea, sensor
desactivado e intensidad de señal,
indicación de batería casi agotada
Requisitos de energía
Batería de litio tamaño “
½
AA” de 3,6 V
Vida útil de la batería Hasta 300 horas
Pieza aplicada tipo BF Detener medición sin alarmas
Oxímetro de Pulso de Lujo
Ambiente para guardar
Temperatura
-20°C a 70°C
(-4°°F a 158°°F)
Humedad: menos de 95%
sin condensación
Ambiente de funcionamiento
Temperatura
4°C a 42°C
(39°°F a 107°°F)
Humedad: menos de 95%
sin condensación
SpO2
Nota: Si cambia la orientación de la pantalla, la frecuencia del pulso
se mostrará en la parte superior cerca del icono de la frecuencia
del pulso y el nivel de oxígeno en la sangre se mostrará en la parte
inferior de la pantalla LCD.
Manguito Para el
Dedo
Botón
Multidireccional
Pantalla LCD
Compartimiento
de la batería
Indicador de
Intensidad de
Señal
Frecuencia
cardíaca
Nivel de
Oxígeno en
la Sangre
SpO2
Indicador de Sensor Desactivado: Aparece cuando se
ha retirado el dedo del manguito para el dedo.
Símbolo de Batería Baja: Destella cuando se debe
reemplazar la batería.
Frecuencia Cardíaca: Muestra la frecuencia cardíaca
por minuto.
SpO2
Indicador de SpO2: Indica el valor correspondiente
al nivel de saturación de oxígeno en sangre en una
escala del 70 % al 99 %.
Calcular: El dispositivo está midiendo la cantidad de
oxígeno en la sangre (SpO2%).
/
START
STOP
3
/
START
STOP
3
eCheck - elepho
NOMBRE/FUNCIÓN DE CADA PIEZA
Table of contents
Languages:
Other elepho Medical Equipment manuals
Popular Medical Equipment manuals by other brands
Invacare
Invacare 6631 Assembly, installation and operating instructions
LEISTUNG
LEISTUNG LUFT 3 AP user manual
Centromed
Centromed Mattress Variator instruction manual
Nasco
Nasco Life/form Airway Larry instruction manual
Mangar
Mangar Snowdon AB0509 Fitting and User Instructions
Amico
Amico Diagnostic Station Instructions for use
