elero AstroTec User manual

elero GmbH
Antriebstechnik
Linsenhofer Str.59–63
D-72660 Beuren
info@elero.de
www.elero.com
Nr. 18 100.3201/0604
AstroTec
309022 00
elero
Bedienungsanleitung
Bitte bewahren Sie die Bedienungsanleitung auf!
Uhr ist voreingestellt
Operating instructions
Please keep these instructions in a safe place!
Timer is preprogrammed
Instructions d’utilisation
Veuillez conserver les présentes instructions d’utilisation !
L’heure est preréglée
DE
GB
FR

Contents
DE-2
Contents
GB-1
GB
Safety instructions ........................................ GB- 3
Explanation of displays and buttons ..................... GB- 4
General information ....................................... GB- 5
Designated use ............................................ GB- 5
Installation/Connection ................................... GB- 6
Connection as a drive controllert .................... GB- 6
Connection as a group controller..................... GB- 7
Initial operation ........................................... GB- 8
Factory settings ........................................... GB- 8
Light sensors ............................................... GB- 9
Explanation of functions
Manual/Automatic sliding switch, Alarm signal
control light, Group control, Operating mode ....... GB- 9
Buttons ................................................. GB- 9
Time/date .............................................. GB-10
Programme ............................................ GB-11
Astro, Astro evening, Individual....................... GB-12
Week, Block, Individual, Idle period, Switching time,
Offset .................................................. GB-13
Settings menu
Holiday function, End limit ........................... GB-15
Intermediate position,Ventilation/Reverse ......... GB-16
Language selection, Astro shift, City selection,
Automatic summer/winter time changeover........ GB-17
Function menu
Drive controller/ group controller .................... GB-18
External switch inputs, Expert mode ................. GB-18
Programming menu
Overview of menu .................................... GB-19
Date and time settings ............................... GB-19
Astro function for week/block/individual + Idle
period vb ............................................. GB-20
Astro evening function for week/block/individual +
switching time vand idle period b.................. GB-21
Individual switching times vbin PROG 1 for
week/block/individual ................................ GB-23
Individual switching times vbin PROG 2 for
week/block/individual ................................ GB-24
Evening DOWN control command into
ventilation position.................................... GB-26
Holiday function, Sun /twilight function ............ GB-27
Position programming 1 (intermediate/ventilation/
reverse/end limit position)............................ GB-28
Position programming 2 (intermediate/ventilation/
end limit position) .................................... GB-29
Language selection, Astro shift....................... GB-30
City selection, Expert mode (longitude, latitude,
time zone) ............................................. GB-31
Automatic summer/winter time changeover ....... GB-32
Function (for qualified staff only!)
Venetian blind/shutter selection, Drive/group
controller, Running time .............................. GB-33
External switching inputs, Processing of external
alarm signals .......................................... GB-34
Technical data .............................................. GB-36
Troubleshooting ........................................... GB-37
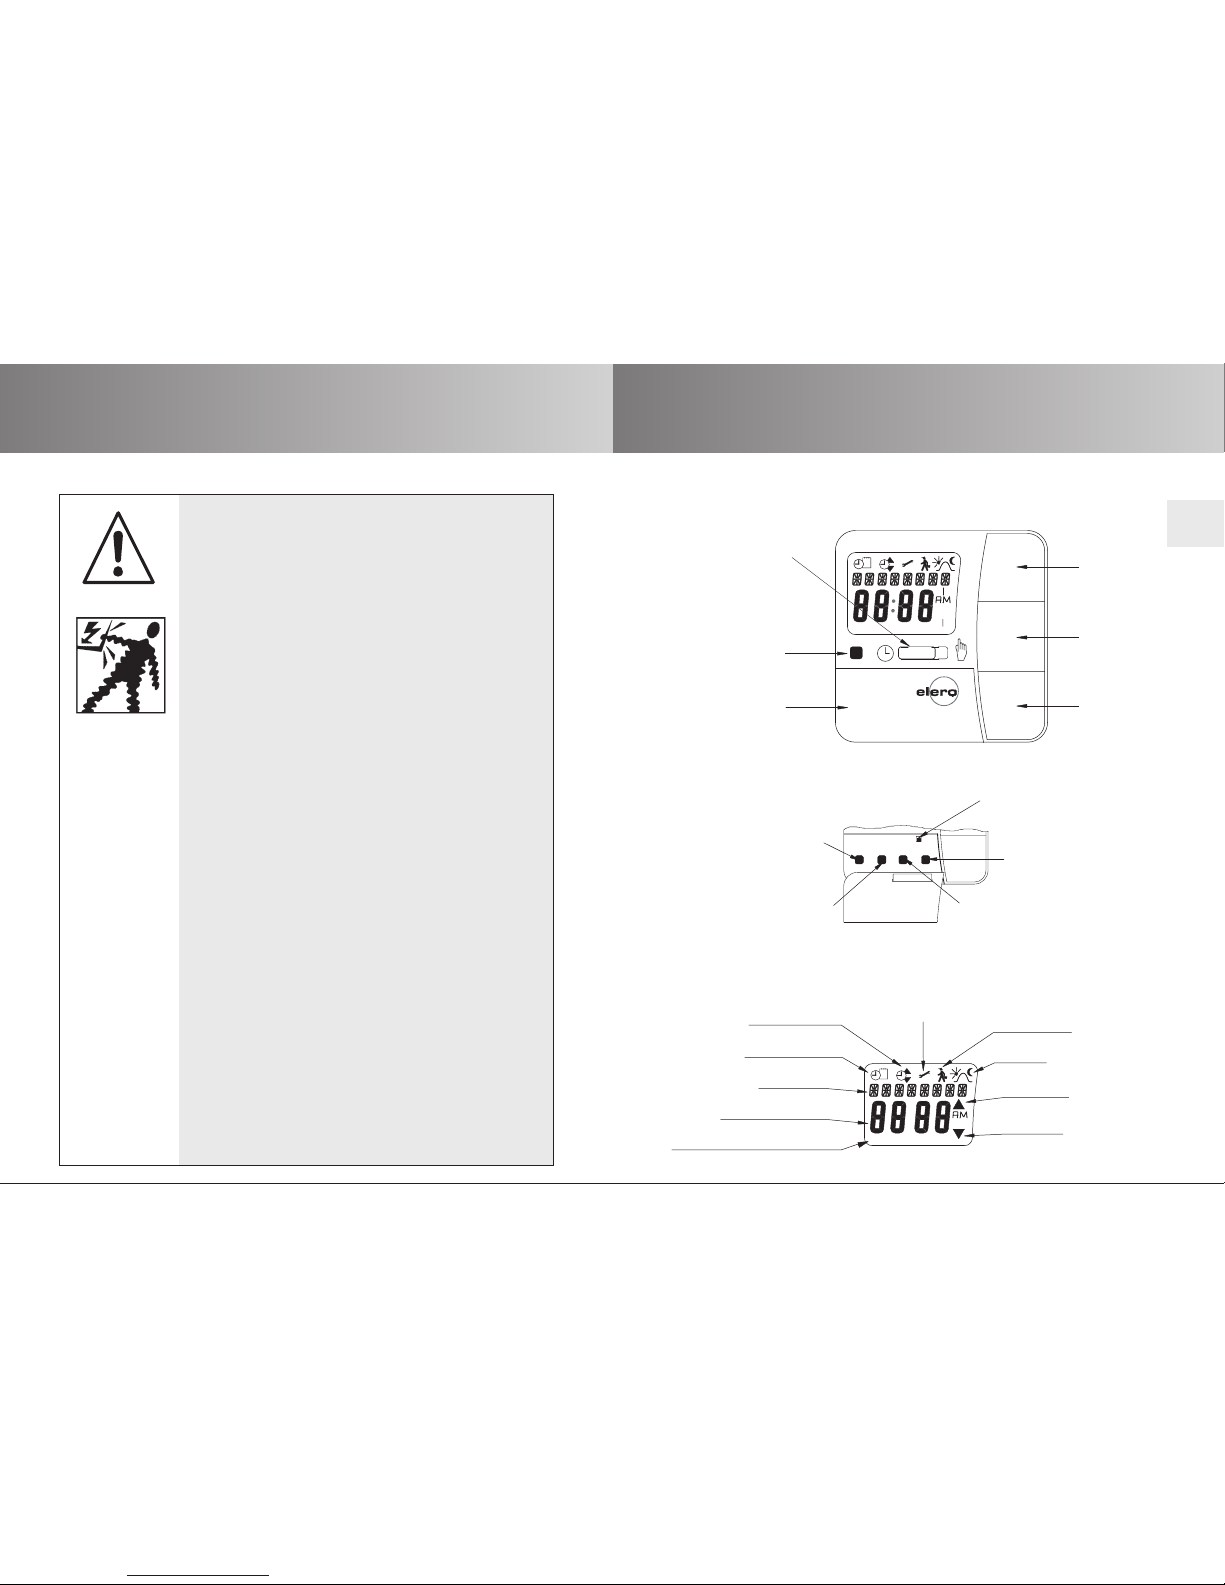
Safety instructions
GB-3 GB-4
Explanation of displays and buttons
GB
Important safety instructions!
Always observe the following instructions.
Risk of injury by electric shock.
• All terminal connections to a 230 V network must
be made by an authorised electrician.
• Before installation,always disconnect the mains
lead from the power supply.
•The provisions of the local public utilities and
stipulations for wet and damp rooms in
accordance withVDE 100 must be observed for
system installation.
• For use in dry rooms only.
• Use unmodified elero original parts only.
• Keep persons away from the systems guide track.
• Keep children away from controls.
• Always comply with national stipulations.
• Dispose of used batteries properly.
Replace batteries with identical type (CR 2032)
only.
• If the system is controlled by one or more
devices,the system guide track must be visible
during operation.
• Only cables with sufficient electric strength may
be used to connect control cables (protective low
voltages).
•The equipment contains small parts that could
be swallowed.
Warning!
Function
Astro
UP
DOWN
Digital display
Days (Mon.-Sun.) min
Programme
Time/date
Text line
Setting
31
AstroTec
MENU
Reset
OK OK button
+button
–button
MENU button – +
Reset button
Explanation of displays and buttons
Buttons under the cover
Display symbols
Alarm signal
control light
Cover
Manual / automatic
sliding switch
DOWN button
STOP button
UP button
31
min
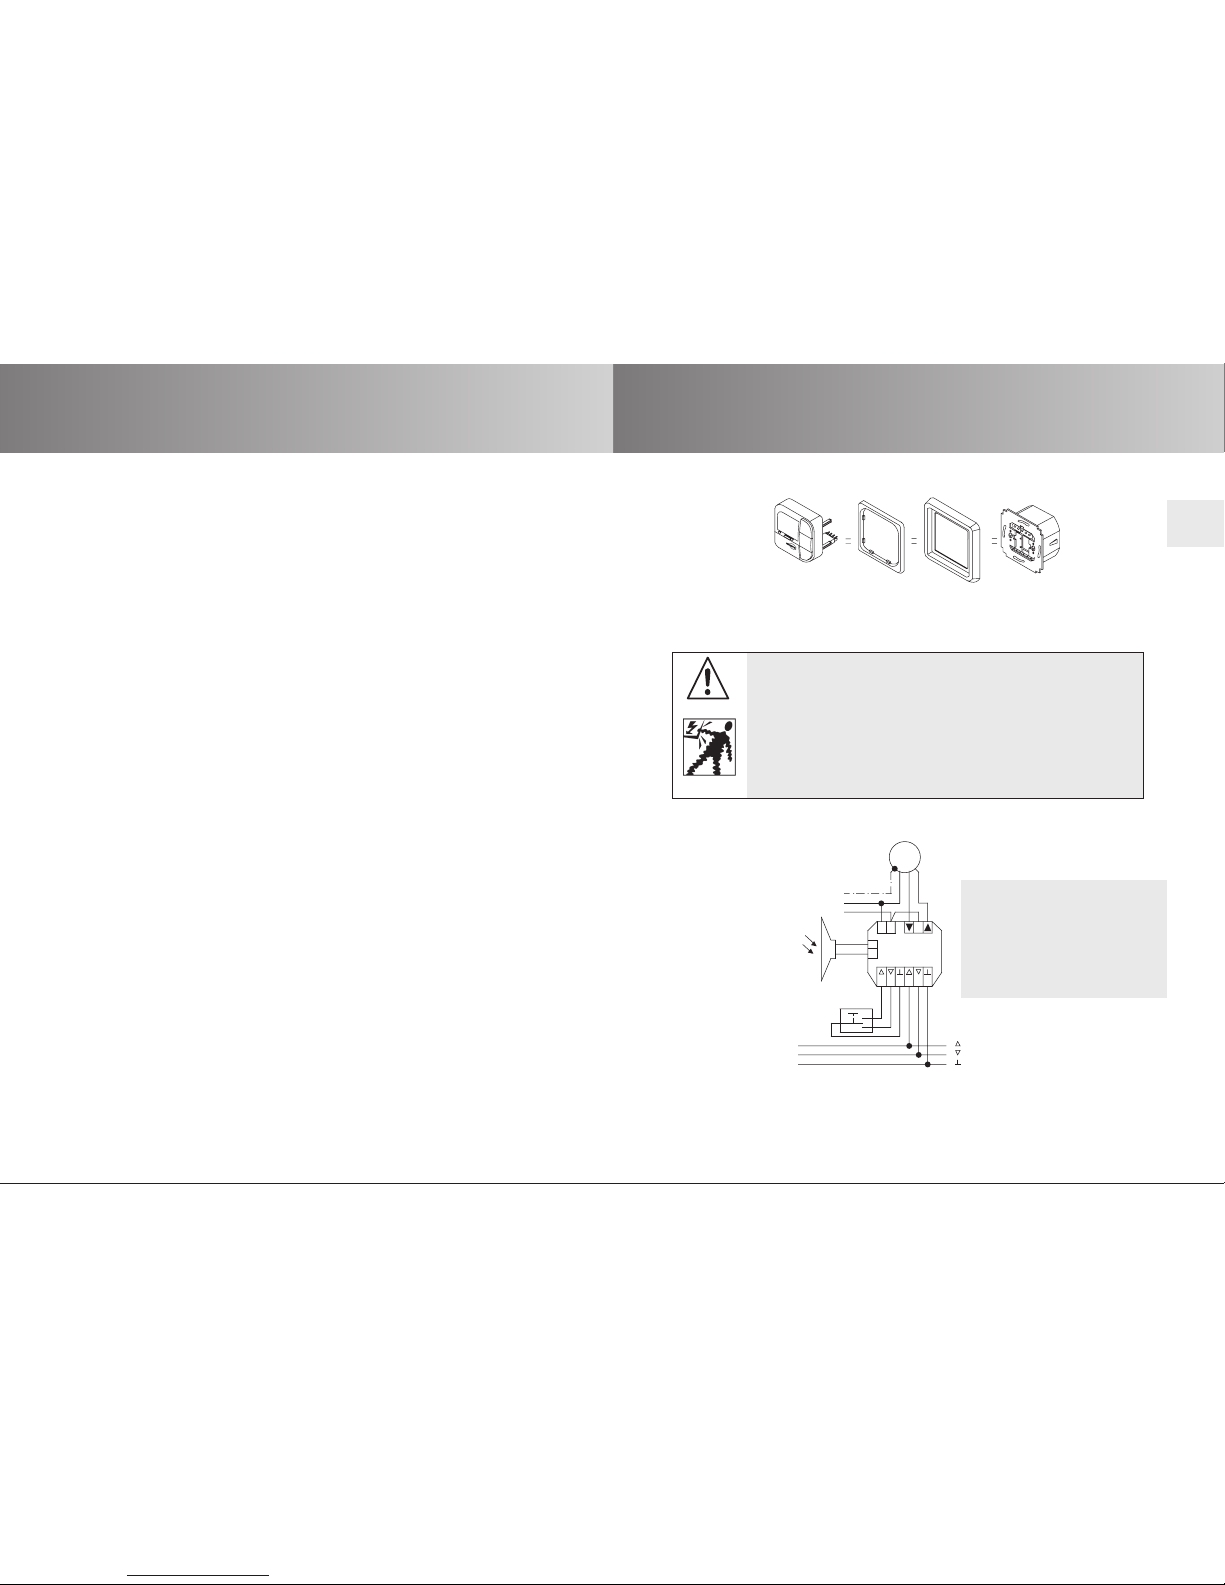
Installation/connection
GB-6
General/Designated use
GB-5
GB
InstallationGeneral
The AstroTec, delivered from the factory with current date and time
settings (GMT),automatically controls the drive at the astro times
(sunrise and sundown).
The AstroTec can be operated manually at any time.
The easy-to-install light sensor allows the AstroTec to be extended
to include a convenient sunshade function (shading plants and
furniture).
Designated use
The AstroTec may only be used to control roller shutter and venetian
blind systems.
Connection of other devices must be carried out in consultation
with specialised dealers.
M
Blind
pushbutton
CentralIndividual
2
Lumo
1 643 5
N
1~
AstroTec
N
L
L
PE
Mains
C
To other
control devices
astrotec
230 V/50 Hz
3. Replace the protective caps on the power supply unit.
4. Secure the power supply unit in the box.
5. Insert the operating device into the frame and insert it into
the power supply unit.
Connection as a drive controller
For details on suitable control systems,please refer to the control
product catalogue.
Warning!
Risk of injury by electric shock!
•Terminal connections must be carried out by an
authorised electrician!
• If more than one drive is operated using the AstroTec,
the drives must be decoupled by relay controls.
•The switched current of the device must be observed
at all times!.
1. Remove the protective caps.
2. Connect.
Note:
Always use a shielded
control wire . .. *0.8 mm l
or telephone line
JY-ST . ..*0.6 mm l.

Initial operation/Factory settings
GB-8
Connection
GB-7
Initial operation
To activate the AstroTec timer,touch any button on the device.To
select the language required use the +/- buttons and confirm your
selection with the OK button.The AstroTec is now in automatic
operating mode.
Factory settings
TIME/DATE: – Current GMT and current date
PROGRAMME: – ASTRO WBLOCK WIDLE PERIOD (1-5)
v06:30 HRS
bNo default idle period
IDLE PERIOD (6,7)
v08:00 HRS
bNo default idle period
SETTING: – HOLIDAY OFF
– light sensor SUN 05 sunlight value
(if light sensor is connected)
– END LIMIT, location
– SUMMER/WINTER ON
FUNCTION: – ROLLER SHUTTER,DRIVE CONTROLLER,EXTERNAL
SWITCH,ALARM SIGNAL ON,EXPERT MODE OFF
Note! Press the RESET button (with a ballpoint pen or similar
object) to restore the factory settings of the AstroTec.
Exception: Function menu,language selection and city
selection.
GB
pushbutton
Blind
CentralIndividual
21 643 5
N
AstroTec
L C
L
N
Mains
Output
Input
To other
control devices
To other
control devices
3. Replace the protective caps on the power supply unit.
4. Secure the power supply unit in the box.
Insert the operating device into the frame and insert it into
the power supply unit.
Connection as a group controller
For details on suitable control systems,please refer to the control
product catalogue.
Warning!
Risk of injury by electric shock!
•Terminal connections must be carried out by an
authorised electrician!
1. Remove the protective caps.
2. Connect.
Note:
Always use a shielded
control wire . .. *0.8 mm l
or telephone line
JY-ST . ..*0.6 mm l.

Explanation of functions
GB-10
Light sensors/Explanation of functions
GB-9
GB
+/- buttons
The following operations are possible using the +and -buttons:
Light sensors
Note: If you wish to connect a light sensor to the AstroTec, the
instructions provided with the light sensor must be followed.
Explanation of functions
MAN/AUTO sliding switch
In the“MAN ”sliding switch setting,only manual command con-
trols and alarm signals are executed.
In the“AUTO ”sliding switch setting,manual and automatic
command controls are carried out (e.g. shade function, time,astro
function,...)
Alarm signal control light
When the alarm signal control light is illuminated, this indicates an
alarm signal.A continuous switching signal at the group or
individual control inputs for more than 5 seconds signifies an alarm
signal.
Group control
Group control refers to the control of several drives at the same
time.The chosen group is controlled by executing a control
command.
Operating mode
The time is shown in the display.
OK button
When the OK button is pressed, the values currently displayed are
saved.
MENU button
By pressing the MENU button, you can see an overview of the
menu or the operating mode.
The values currently displayed are not saved.
RESET button
When the RESET button is pressed (with a ballpoint pen or
similar object), the AstroTec reverts to the default setting.
Exceptions: Function,language and city menu levels.
Time/date
TIME/DATE
This menu is used to set the time and the date.
•Menu Wchange value
•Automode Wrequest information
• + button Wnext automatic switching time v
• – button Wnext automatic switching time b
+button and OK button Wastro time v
–button and OK button Wastro time b

Explanation of functions
GB-11
Explanation of functions
GB-12
ASTRO
The AstroTec automatically controls your roller shutters or
blinds at the pre-set sunrise and sunset times.These times are
used as guidelines.
Programme
PROGRAMME
The PROGRAMME menu allows you to set various switching times:
1.PROG1
• Astro ,astro evening,individual
o Week (1-7)
o Block 1/2 (1-5 and 6,7)
o Individual (1,2, 3,4, 5, 6,7)
2.PROG 2 (e.g. lunch break)
• Individual
o Week (1-7)
oBlock 1/2 (1-5 and 6,7)
o Individual (1,2, 3,4, 5, 6,7)
• OFFSET
09:00 Time
07:00 Time
05:00 Time
Close
19:00 Time
22:00 Time
16:00 Time
Dec. Jan. Feb. Mar. Apr. Jun
May Jul. Aug. Sept. Oct. Nov. Dec.
Sunset
Sunrise
Astro
function
Winter time Summer time Summer time Winter time
Winter time
Summer timeSummer time
Winter time
09:00 Time
07:00 Time
05:00 Time
Close
19:00 Time
22:00 Time
16:00 Time
Sunset
UP
switching
time
Astro
evening
Winter time Summer time Winter time
Summer time
Summer time
Winter time Summer time Winter time
Dec. Jan. Feb. Mar. Apr. Jun
May Jul. Aug. Sept. Oct. Nov. Dec.
ASTRO EVENING
Shutters are raised according to the set switching time.
Shutters are lowered according to the astro function.
INDIVIDUAL
Triggers the up and down control commands according to the
switching times you have set.
GB
Explanation of functions
GB-13
Explanation of functions
GB-14
SWITCHING TIME
Automatic switching times for roller shutters and blinds to be rai-
sed and lowered.
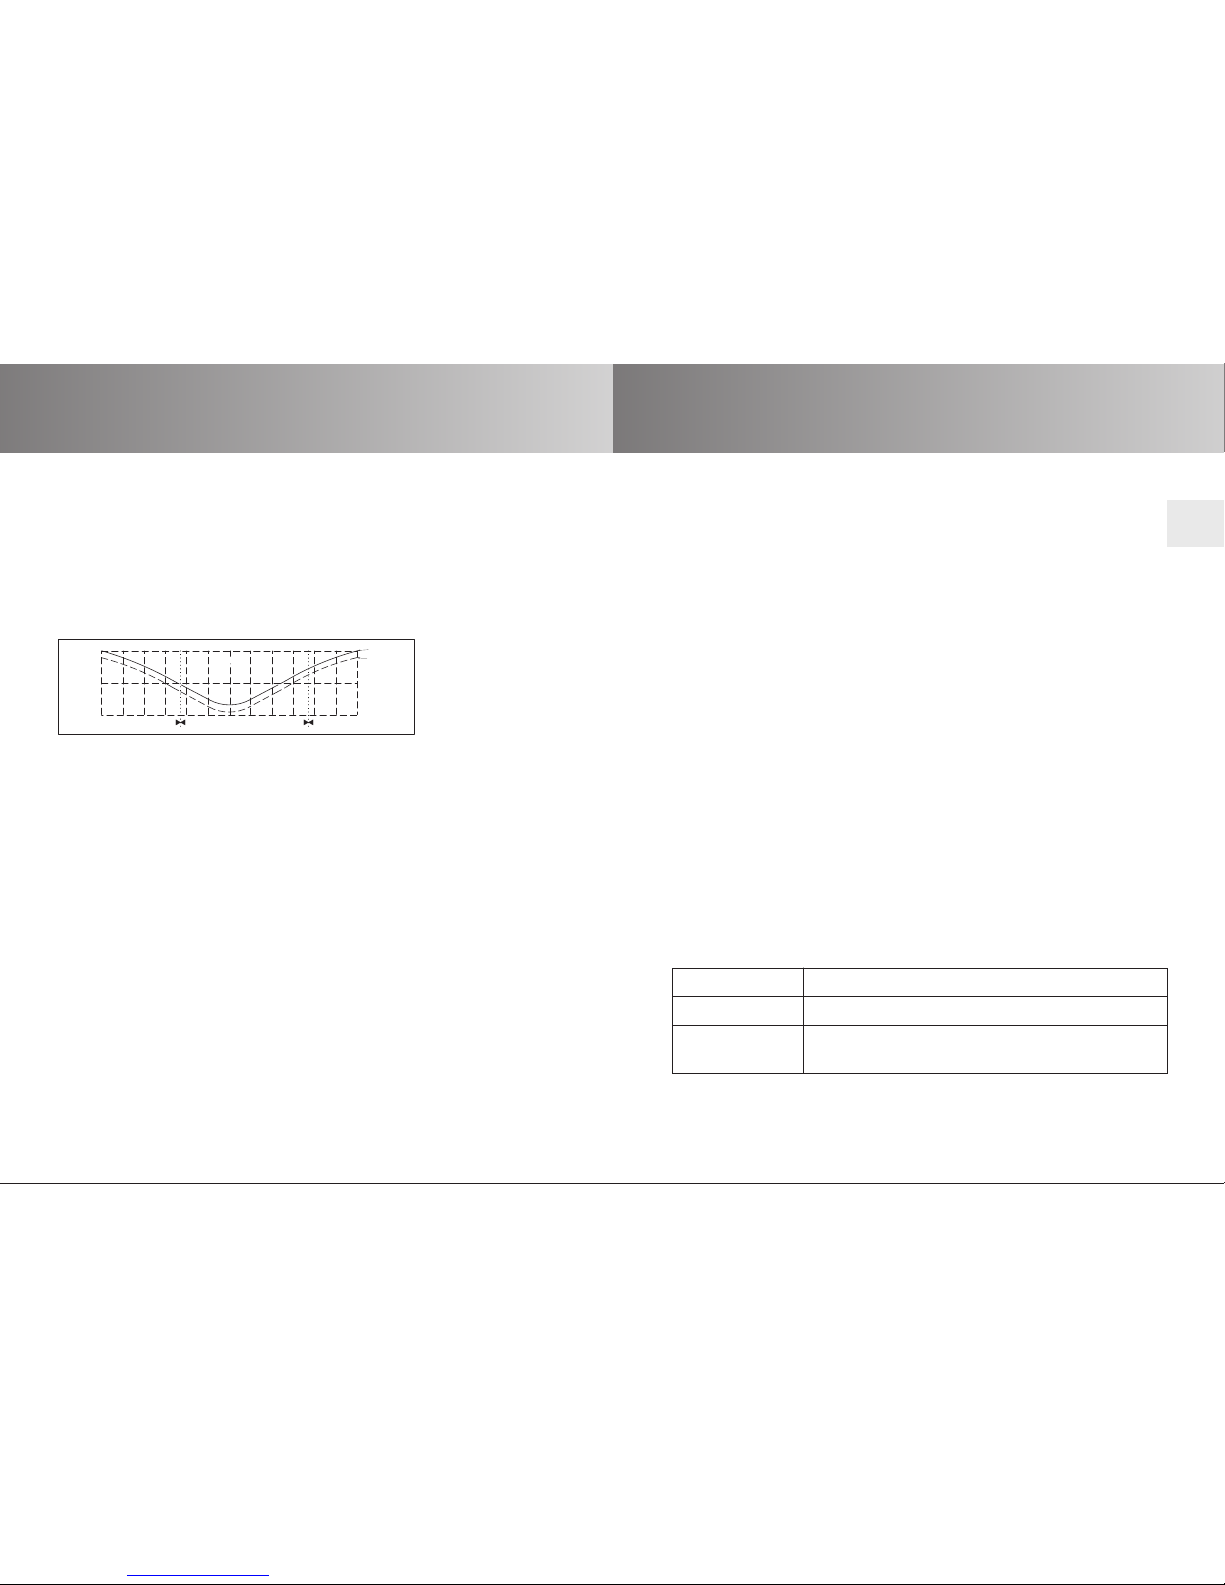
OFFSET
An additional switching time bcan be programmed using the
OFFSET menu.This depends on the PROG 1 switching time b
(max. +/- 240 mins.).
For example:
astro time b:20:00
Offset b:+60 mins.
The roller shutter moves to the intermediate position at 20.00 hrs
and to the lower end limit at 21.00 hrs.
WEEK
Using the WEEK menu, you can set the same switching times from
Monday – Sunday (1-7).
BLOCK
Using the BLOCK menu, you can set two blocks.
Block 1:sets the switching times for Monday – Friday (1-5).
Block 2: sets the switching times for Saturday and Sunday (6,7).
INDIVIDUAL
Using the INDIVIDUAL menu, you can set separate switching times
for every day of the week.
IDLE PERIOD
Prevents the roller shutter from moving up or down too early
because of the astro function.
For example:
Astro time v:5:30
Idle period v:6:30
The roller shutter does not move up before 6:30.
Astro time b:17:00
Idle period b:19:30
The roller shutter does not move down before 19:30.
09:00 Time
07:00 Time
05:00 Time
19:00 Time
22:00 Time
16:00 Time
Sunset
Sunrise
Idle period
Idle period for opening
Idle period for closing
Close
Dec. Jan. Feb. Mar. Apr. Jun
May Jul. Aug. Sept. Oct. Nov. Dec.
GB
Close
19:00 Time
22:00 Time
16:00 Time
Sunset
Offset + 60
Astro
Winter time
Summer timeSummer time
Winter time

SETTING
The SETTING menu gives you the following options:
• HOLIDAY
• SUN (when sensor is connected)
• TWILIGHT SETTING (when sensor is connected)
• INTERMEDIATE POSITION
• VENTILATION/REVERSE
• PROG 1 (END LIMIT, INTERMEDIATE POSITION,
VENTILATION/REVERSE)
• PROG 2 (END LIMIT, INTERMEDIATE POSITION,
VENTILATION/REVERSE)
• TEST MODE
• Language (ENGLISH GB)
• ASTRO SHIFT v
• ASTRO SHIFT b
• City (LONDON)
• LONGITUDE
• LATITUDE
• TIME ZONE
• SO/WI (Automatische Sommer-/Winterzeitumstellung)
To set a function, press the OK button until you come to the
required menu level.
HOLIDAY SETTING
The holiday setting simulates an occupied house while you are on
holiday.
If the function is activated (ON),the roller shutter/blind varies
randomly from the programmed times (max.+ 30 mins.).
END LIMIT
The end limit is the point where the roller shutter/blind is in the
upper or lower position.
Explanation of functions
GB-15
Explanation of functions
GB-16
INTERMEDIATE POSITION
The intermediate position is a position of the roller shutter/blind
between the upper and lower limits that can be freely selected.
This position can also be reached from the upper position after
programming.
Press the DOWN button twice in rapid succession to move to the
intermediate position.
When the system is in venetian blind mode,it is also possible to pro-
gramme a reverse position.In this case, this command will be auto-
matically executed following the intermediate position command.
VENTILATION/REVERSE
The ventilation/reverse position is a position of the roller
shutter/blind between the upper and lower limits that can be freely
selected. Using this function,you can raise the shutter from the lower
end limit until the ventilation slits are open.The slats of the blind will
be turned.
Press the UP button twice in rapid succession to move to the ventila-
tion/reverse position.
PROG 1/PROG 2
PROG 1 END LIMIT/PROG 2 END LIMIT
With the setting PROG 1 END LIMIT/PROG 2,the drive moves into the
lower limit position according to an automatic control command b
executed via the menu level PROG.1 / PROG. 2 END LIMIT.
INTERMEDIATE POSITION
With the setting PROG 1/PROG 2 INTERMEDIATE POSITION,the drive
moves into the pre-set intermediate position according to an
automatic control command b.
VENTILATION/REVERSE
With the setting PROG 1/PROG 2 VENTILATION/REVERSE POSITION,
the drive first moves into the lower limit position and then into the
ventilation/reverse position according to an automatic control
command b.
Only when EXPERT
MODE is ON.
k
GB
Explanation of functions
GB-17
Explanation of functions
GB-18
Language (ENGLISH GB)
You can select your national language..
ASTRO SHIFT
With the astro shift setting, the astro time vand astro time b
can be shifted independently of one another (max. +/- 120 mins.).
City (LONDON when the language is set to ENGLISH GB)
This allows you to precisely adapt the astro function to your
location.
It is important to select a city for the astro function.Select the
city nearest to where you are located.
LONGITUDE/LATITUDE/TIME ZONE
(only when EXPERT MODE is ON)
You can find out your coordinates,for example,with the aid of an
atlas.
SUMMER/WINTER
SUMMER/WINTER describes the automatic clock adjustment for
daylight saving changes.If the default setting is ON, the AstroTec
timer adjusts itself automatically.
EXTERNAL OFF/ EXTERNAL ON/ EXTERNAL SWITCH
EXTERNAL OFF group inputs are always switched off.
EXTERNAL ON group inputs are always switched on.
EXTERNAL group inputs are switched on in auto mode,
SWITCH switched off in manual mode.
GB
EXPERT MODE
If selecting the city (EXPERT MODE OFF) is not precise enough,you
can make a fine adjustment by setting the degrees of longitude and
latitude (EXPERT MODE ON).
FUNCTION
This mode is only intended for qualified electricians!
(Will only appear when the operating device is disconnected)
The FUNCTION menu gives you the option of setting the following
functions:
• ROLLER SHUTTER/BLIND (select either shutter or blind)
• DRIVE CONTROLLER/GROUP CONTROLLER
• RUNNING TIME
• EXTERNAL (SWITCH/OFF/ON)
(Switches external group inputs)
• ALARM SIGNAL
• EXPERT MODE
• INITIAL OPERATION (for service purposes)
• RELAY (for service purposes)
• TOTAL RUNNING TIME (for service purposes)
DRIVE CONTROLLER
The drive is connected directly to the AstroTec.
GROUP CONTROLLER
The AstroTec controls a group.
Close
19:00 Time
22:00 Time
16:00 Time
Sunset
Offset + 60 Min.
Astro
Winter time
Summer time
Summer time
Winter time
Programming
GB-19
Programming
GB-20
Main menu (Overview of the menu)
1. Press the MENU button until TIME/DATE appears.
2. To select further menus,press the +/- buttons.
3. Press the MENU button to switch to operating mode.
PROGRAMME
PROG 1/ASTROWEEK (Astro function for week + idle period vb)
PROG 1/ASTRO BLOCK (Astro function for block1/2 + idle period vb)
PROG 1/ASTRO INDIVIDUAL (Astro function for individual + idle
period vb)
/-
++
Operating mode
FUNCTIONSETTINGPROGRAMM
TIME/DATE
PROG1 PROG2
+/– +/– +/–
+/–
MENU
TIME/DATE (to set the time and date)
1. Press the MENU button until TIME/DATE appears.
2. By pressing OK,you get to the time menu level.
3. Now set the current time using the +/- buttons.
4. If the time is set correctly,confirm by pressing OK.
5. Repeat the above procedure for the settings YEAR,MONTH and
DAY. TIME/DATE appears.
6. Press the MENU button to switch to operating mode.
KO
OK
/-
TIME/DATE
TIME YEAR
MONTH
DAY
OK OK OK OK
OK
+/– +/– +/– +/–
TIME/DATE
GB
OK
+/-
OK
PROGRAMME
PROG 1
ASTRO WEEK IDLE PERIOD v
PROGRAMME
OK
OK OK OK OK
OK
+/– +/– +/– +/–
IDLE PERIOD b
1. Press the MENU button.
2. To select the PROGAMME menu,press the + button until
PROGAMME appears.
3. Confirm by pressing OK.PROG1 appears.
4. Confirm by pressing OK.
5. Press the +button until the ASTRO menu appears.
6. Confirm by pressing OK.
7. Now select the PROG1 ASTRO function you require using the +/-
buttons:
BLOCK
Press +/- for the BLOCK menu level (BLOCK 1 (1-5),
BLOCK 2 (6,7)).All further entries now refer to BLOCK 1 (1-5) and
BLOCK 2 (6,7).
Confirm by pressing OK.
INDIVIDUAL
Press +/- for the INDIVIDUAL menu level (1,2,3,4,5,6,7).
All further entries now refer to each individual day of the week.
Confirm by pressing OK.

Programming
GB-21
WEEK
Press +/- for the WEEK menu level (1-7). All further entries now refer
to every day of the week.
Confirm by pressing OK.
8. 8.Now set the IDLE PERIOD vand IDLE PERIOD busing the +/- but-
tons.
9. Confirm each entry by pressing OK.
10.Press the MENU button to switch to operating mode.
PROGRAMME
PROG 1/ASTRO EVENING WEEK
(Astro function evening for week + switching time vidle period b)
PROG 1/ASTRO EVENING BLOCK
(Astro function evening for block 1/2 + switching time v+ idle period b)
PROG 1/ASTRO EVENING INDIVIDUAL
(Astro function evening for individual + switching time vidle period b)
Programming
GB-22
OK +/-
OKOK
v
OK
PROGRAMME
PROG 1
ASTRO
EVENING WEEK SWITCHING
IDLE PERIOD b
PROGRAMME
OK
OK OK OK
OK
OK
+/–
1. Press the MENU button.
2. To select the PROGAMME menu,press the +button until
PROGAMME appears.
3. Confirm by pressing OK.PROG1 appears.
GB
4. Confirm by pressing OK.ASTRO EVENING appears.
5. Confirm by pressing OK.
6. Now select the PROG1 ASTRO function you require using +/- :
WEEK
Press OK for the WEEK menu level (1-7). All further entries now
refer to every day of the week.
Confirm by pressing OK.
BLOCK
Press OK for the BLOCK menu level (BLOCK 1 (1-5),
BLOCK 2 (6,7)).All further entries now refer to BLOCK 1 (1-5) and
BLOCK 2 (6,7).
Confirm by pressing OK.
INDIVIDUAL
Press OK for the INDIVIDUAL menu level (1,2,3,4,5,6,7).
All further entries now refer to each individual day of the week.
Confirm by pressing OK.
7. Now set the SWITCHING TIME vusing the +/- buttons.
8. Confirm your entry by pressing OK.
9. Now set the IDLE PERIOD busing the +/- buttons.
10.Confirm your entry by pressing OK.
11. Press the MENU button to switch to operating mode.

Programming
GB-24
Programming
GB-23
PROGRAMME
PROG 1/INDIVIDUELL WEEK (Individual switching time vbfor week)
PROG 1/INDIVIDUELL BLOCK (Individual switching time vbfor block1/2)
PROG 1/INDIVIDUELL INDIVIDUAL (Individual switching time vbfor
individual day)
+/-+/-
K
b
v
PROGRAMME
PROG 1
INDIVIDUAL WEEK SWITCHING SWITCHING
PROGRAMME
OK
OK OK OK OK OK
+/–
+/–
1. Press the MENU button.
2. To select the PROGAMME menu,press the +button until
PROGAMME appears
3. Confirm by pressing OK.PROG1 will appear.
4. Confirm by pressing OK.
5. Press the +button until INDIVIDUAL appears.
6. Confirm by pressing OK.
7. Now select the PROG1 INDIVIDUAL function you require using the
+/- buttons:
WEEK
Press +/- for the WEEK menu level (1-7). All further entries now
refer to every day of the week.
Confirm by pressing OK.
BLOCK
Press +/- for the BLOCK menu level (BLOCK 1 (1-5),
BLOCK 2 (6,7)).All further entries now refer to BLOCK 1 (1-5) and
BLOCK 2 (6,7).
Confirm by pressing OK.
INDIVIDUAL
Press +/- for the INDIVIDUAL menu level (1,2,3,4,5,6,7).
All further entries now refer to every individual day of the week.
Confirm by pressing OK.
8. Now set the SWITCHING TIME vand the SWITCHING TIME b
using the +/- buttons.
Confirm your entry by pressing OK.
9. Press the MENU button to switch to operating mode.
GB
PROGRAMME
PROG 2/INDIVIDUELL WEEK (Individual switching time bvfor week)
PROG 2/INDIVIDUELL BLOCK (Individual switching timebvfor block 1/2)
PROG 2/INDIVIDUELL INDIVIDUAL (Individual switching time bvfor
individual day)
+/-+/-
K
b
v
PROGRAMME
PROG 1
INDIVIDUAL WEEK SWITCHING SWITCHING
PROGRAMME
OK
OK OK OK OK OK
+/–
+/–
1. Press the MENU button.
2. To select the PROGAMME menu,press the +button until
PROGAMME appears.
3. Confirm by pressing OK.PROG2 appears.
4. Confirm by pressing OK.
5. Press the + button until INDIVIDUAL appears.
6. Confirm by pressing OK.

Programming
GB-25 GB-26
Programming
7. Now select the PROG2 INDIVIDUAL function you require using
the +/- buttons:
BLOCK
Press +/- for the BLOCK menu level (BLOCK 1 (1-5),
BLOCK 2 (6,7)).All further entries now refer to BLOCK 1 (1-5) and
BLOCK 2 (6,7).
Confirm by pressing OK.
INDIVIDUAL:
Press +/- for the INDIVIDUAL menu level (1,2,3,4,5,6,7).
All further entries now refer to every individual day of the week.
Confirm by pressing OK.
WEEK:
Press +/- for the WEEK menu level (1-7). All further entries now
refer to every day of the week.
Confirm by pressing OK.
8. Now set the SWITCHING TIME vand the SWITCHING TIME b
using the +/- buttons.
Confirm your entry by pressing OK.
9. Press the MENU button to switch to operating mode.
PROGRAMME
PROG 2/OFFSET (e.g.shutters are lowered to ventilation position in
the evening)
GB
OK
OKOK
PROGRAMME
PROG 2
OFFSET OFFSET
min b
PROGRAMME
OK
OK OK OK
+/–
1. Press the MENU button.
2. To select the PROGAMME menu,press the +button until
PROGAMME appears.
3. Confirm by pressing OK.
4. Press the +button until PROG2 appears.
5. Confirm by pressing OK.
6. Press the +button until the OFFSET menu appears.
7. Confirm by pressing OK.
8. You can set the time for the DOWN control command to be
triggered separately using the +/- button (max. +/- 240 mins,
depending on PROG1 SWITCHING TIME b).
Confirm by pressing OK.
9. Press the MENU button to switch to operating mode.
Note: Using the SETTING menu level,you must enter the switching
time of the intermediate position and select PROG 2
VENTILATION for the position of the end limits.

Programming
GB-28
Programming
GB-27
SETTING
HOLIDAY,LIGHT SENSOR (Holiday OFF/ON,sun/twilight setting)
SETTING HOLIDAY OFF
HOLIDAY ON
LIGHT
SENSOR
CONNECTED ?
SUN
TWILIGHT
OK
OK
OK
+/–
+/–
+/–
OK
see
next page
1. Press the MENU button.
2. To select the SETTING menu, press the +button until SETTING
appears.
3. Confirm by pressing OK.HOLIDAY ON/OFF will appear.
4. You can set the holiday function to ON or OFF by pressing
the +/- button.
5. Confirm your selection by pressing OK.
Note: This dialog window will only be displayed if a light sensor is
connected to the device.
You have confirmed the holiday function.SUN will appear.
The value set is displayed.
6. You can reset the sunlight setting by pressing the +/- button.
(The two digits at the left of the display show the current light
value)
7. Confirm your entry by pressing OK.
To set the TWILIGHT SETTING, follow the same procedure as for
SUN.
The function SUN/TWILIGHT SETTING has now been set.
Please read on for further programming options using the
SETTING menu.
SETTING
INTERMEDIATE POSITION,VENTILATION/REVERSE,PROG 1 END LIMIT
(Time/ position programming)
See
previous page INTERMEDIATE
POSITITION VENTILATION
(REVERSE) PROG1
END LIMIT
OK
PROG1
INTERMEDIATE
POSITION
PROG1
VENTILATION
See
next page
OK OK
+/– +/– +/–
+/–
OK
OK
You have confirmed the HOLIDAY/
LIGHT SENSOR menu levels.
INTERMEDIATE POSITION will appear.
1. You can set the switching time to move to the INTERMEDIATE
POSITION using the +/- button.The switching time is indicated in
a few seconds or you can move to the INTERMEDIATE POSITION
from the upper end limit using the UP/DOWN button.
2. Confirm by pressing OK.
3. You can set the switching time to move to VENTILATION/REVERSE
using the +/- button.The switching time is indicated in a few
seconds or you can move to the VENTILATION/REVERSE from the
lower end limit using the UP/DOWN button.
4. Confirm by pressing OK.PROG1 END LIMIT appears.
5. You can select PROG 1 END LIMIT, PROG 1 INTERMEDIATE POSITION
and PROG 1 VENTILATION/REVERSE using the +/- button.
6. Confirm your selection by pressing OK.
The function PROG1 END LIMIT has now been set.
Please read on for further programming options using the
SETTING menu.
GB

Programming
GB-30
Programming
GB-29
SETTING
ENGLISH GB/ASTRO SHIFT vb
(Language,astro shift)
SETTING
PROG 2 END LIMIT (Time/position programming)
See
previous page See
next page
PROG2
END LIMIT
PROG2
INTERMEDIATE
POSITION
PROG2
VENTILATION
OK
OK
OK
+/–
+/–
Note: This dialog window will only be displayed if a time is set in
PROG2.
You have confirmed the PROG1 END LIMIT menu level.
PROG2 END LIMIT will appear.
1. You can select PROG 2 END LIMIT,PROG 2 INTERMEDIATE
POSITION and PROG 2VENTILATION/REVERSE using the +/-
button
2. Confirm your selection by pressing OK.
The function PROG2 POSITION has now been set.
Please read on for further programming options using the
SETTING menu.
GB
See
previous page TEST MODE
ON/OFF ENGLISH GB ASTRO
SHIFT v
OK
See
next page
OK OK
+/– +/– +/–
OK
+/–
ASTRO
SHIFT b
Note: The TEST MODE menu level will only be displayed if a light
sensor is connected to the device.
You have confirmed the PROG2 END LIMIT menu level.
TEST MODE ON/OFF will appear.
1. You can activate or deactivate theTEST MODE (ON/OFF) using the
+/- button.
2. Confirm by pressing OK.ENGLISH GB will appear.
Note: To exit from TEST MODE,press the OK button in operating
mode.
3. You can set the language required using the +/- button.
4. Confirm the language selected by pressing OK.
ASTRO SHIFT vwill appear.
5. You can set the required astro shift v(max. +/- 120 mins.) using
the +/- button.
6. Confirm by pressing OK.ASTROSHIFT bwill appear.
Programming
GB-32
Programming
GB-31
7. You can set the required astro shift b(max. +/- 120 mins.) using
the +/- button.
8. Confirm by pressing OK.
The function ASTRO SHIFT bhas now been set.
Please read on for further programming options using the
SETTING menu
GB
SETTING
(City,EXPERT MODE (LONGITUDE, LATITUDE,TIME ZONE))
LONDON EXPERT
MODE
ON/OFF
LONGITUDE
LATITUDE
TIME
See
next page
See
previous page
OK
+/–
OK
OK
OK
+/–
+/–
OK
You have confirmed the function ASTRO SHIFT b.
The city selected (LONDON) will appear.
1. You can set the nearest town using the +/- button.
2. Confirm by pressing OK.LONGITUDE will appear.
(If you prefer to define your location more precisely,you can do so
by setting the degrees longitude and latitude.)
Note: These dialog windows (LONGITUDE,LATITUDE,TIME ZONE)
are only displayed when the EXPERT MODE in the function
menu is ON.
3. You can set the degrees LONGITUDE using the +/- button.
4. Confirm by pressing OK.LATITUDE will appear.
5. You can set the degrees LATITUDE using the +/- button.
6. Confirm by pressing OK.TIME ZONE will appear.
7. You can set the TIME ZONE you are in using the +/- button.
Confirm by pressing OK.
The TIME ZONE function has now been set.
Please read on for further programming options using the
SETTING menu.
SETTING
SUMMER/WINTER (Automatic clock adjustment for daylight saving
changes)
See
previous page SUMMER/
WINTER
SUMMER/
WINTER
OFF
Operating mode
OK
+/–
OK
You have confirmed the TIME ZONE function.
SUMMER/WINTER will appear.
1. You can switch SUMMER/WINTER on or off using the +/- button.
2. Confirm your selection by pressing OK.
3. Press the MENU button to switch to operating mode.
Programming
GB-33
Programming
GB-34
FUNCTION (only when the operating device is disconnected, only for
qualified electricians)
EXTERNAL ON/OFF/SWITCH, ALARM SIGNAL ON/OFF
(Processing external signals,processing alarm signals)
FUNCTION (only when the operating device is disconnected, only for
qualified electricians)
ROLLER SHUTTER/BLIND,DRIVE CONTROLLER/GROUP CONTROLLER,
RUNNING TIME
(Selection of shutter/blind, selection of the drive controller/ group
controller,running time of the roller shutter/blind)
+
+/-
OK
See
next page
FUNCTION ROLLER
SHUTTER/
DRIVE
CONTROLLER/
GROUP
CONTROLLER RUNNING
OK OK OK OK
+/– +/– +/–
1. Press the MENU button.
2. To select the FUNCTION menu,press the +button until
FUNCTION appears.
3. Confirm by pressing OK.ROLLER SHUTTER/BLIND will appear.
4. You can select either roller shutter or blind using the +/- button.
5. Confirm by pressing OK.DRIVECONROL DEVICE/GROUP
CONTROLLER will appear.
6. You can select the control device required using the +/- button
(DRIVE CONROL DEVICE/GROUP CONTROLLER).
7. Confirm by pressing OK.RUNNINGTIME will appear.
8. You can set the required running time using the +/- button.
(Default setting:120 seconds).
9.Confirm by pressing OK.
The RUNNING TIME function has now been set.
Please read on for further programming options using the
FUNCTION menu.
GB
K
See
previous page EXTERNAL ON
EXTERNAL OFF
EXTERNAL ➞
SWITCH
Drive controller ?
ALARM SIGNAL ON
ALARM SIGNAL OFF
See
next page
OK
+/–
OK
OK
+/–
OK
OK
OK
+/–
+/–
You have confirmed the RUNNING TIME function.
EXTERNAL ON will appear.
(EXTERNAL ON/ OFF/ SWITCH describes the external control
signals.Default setting is EXTERNAL SWITCH)
1. You can select the required setting for the control inputs using
the +/- button.
2. Confirm your selection by pressing OK.
Note: The following dialog window will only be displayed if you
have selected DRIVE CONTROLLER.
ALARM SIGNAL ON will appear. (The default setting is ALARM
SIGNAL ON.).
3. You can switch the ALARM SIGNAL to ON or OFF using the +/-
button.
4. Confirm by pressing OK.
The function ALARM SIGNAL ON/OFF has now been set.
Please read on for further programming options using the
FUNCTION menu.

Programming
GB-35
Technical data/Battery replacement/Cleaning
GB-36
FUNCTION (only when the operating device is disconnected, only for
qualified electricians)
INITIAL OPERATION,RELAY,TOTAL RUNNING TIME
(Date of initial operation,relay switching rate,total running time)
OK OK
See
previous page EXPERT
MODE
OFF / ON
INITIAL
OPERATION RELAY
TOTAL
MAIN MENU
OK
OK OK
OK
+/—
You have confirmed the ALARM SIGNAL ON/OFF.
EXPERT MODE OFF/ON will appear.
1. You can select the required setting using the +/- button.
2. Confirm your selection by pressing OK.
INITIAL OPERATION will appear.
3. Confirm by pressing OK.RELAY will appear.
(RELAY denotes the relay switching rate.)
4. Confirm by pressing OK.TOTAL RUNNING TIME will appear.
(TOTAL RUNNING TIME denotes the overall running time of the
timer.)
5. Confirm your selection by pressing OK.
6. Press the MENU button to switch to operating mode.
GB
Nominal voltage 230-240 V AC / 50-60 Hz
Switched current 5 A /250V AC for cos j=1
Battery type CR 2032
System of protection IP 20
The protection class II is guaranteed only after a correct
installation.
Permissible ambient temperature 0 to +55 °C
Type of installation Concealed l58 mm
wall-mounted
Exposed in appropriate
exposed casing
Technical data
Battery replacement 1. Disconnect the operating device.
2. Remove the battery.
3. Insert the new battery properly.
4.Reset the time.
CR2032
Note: The values set are still
saved.
Cleaning
Clean the device with a damp cloth only.Do not use a cleansing
agent since this could damage the plastic.

The company elero GmbH hereby declares that the AstroTec is in
conformity with the basic requirements and other relevant provi-
sions of the Directive 1999/5/EC.
Troubleshooting
GB-37
General declaration of conformity
GB-38
Troubleshooting
Problem Cause Remedy
Drive is not Faulty connection. Check the connection.
functioning.
Drive moves is wrong Faulty connection. Exchange Vand B
direction. wires in the power
supply unit.
Astro programme 1.Date is incorrect. 1. Set correct date.
doesn’t function 2.Wrong city or wrong 2.Set correct city
properly. latitude/longitude or exact degrees
setting. latitude / longitude.
3.Holiday function is 3.Switch holiday
switched on. function off.
4.Astro shift is set. 4.Adjust astro shift.
The AstroTec does not The sliding switch Move the sliding
carry out the is set to“HAND ”. switch to“AUTO ”.
switching commands.
The AstroTec does not Holiday function is Switch holiday
carry out the switched on. function off.
switching commands
precisely.
The sun and twilight No light sensor is Check the light
parameters cannot be connected or the light sensor, connecting
changed and/or sensor and/or the cable and
are not displayed. connecting cable is connector plug.
faulty.
Roller shutter does 1.The set running time 1. Adjust the running
not move to the end is not long enough. time in the function
limit. menu.
2.No end limit position 2. Set the end limit
is set. position using
the setting menu
PROG1/2.
GB
Table of contents
Popular Gate Opener manuals by other brands


Nice
Nice MhouseKit SL1S Instructions and warnings for installation and use

Life
Life OPTIMO OP 2 24 UNI Instructions and warning for installation, use & maintenance

GFA
GFA ELEKTROMAT SE 6.80 FU-25,40 installation instructions

RIB
RIB JOLLY ONE instructions

PowerTech
PowerTech PL300E user manual

Erreka
Erreka VULCAN Installer manual