GR 100 Series User manual

SWIN
G
GATE
S
OPER
ATOR
GR 100 12-220V
1

SAFETY
Our compliments for your excellent choice. Your new
electromechanical gear motor has been produced according to a high
quality and a strict reliability, that's why it will assure you long-lasting
performances.
This booklet will offer you all the pieces of information you may need to
install your gear motor and to safeguard your safety.
However, the caut on s unquest onably nd spensable and
noth ng s better than prevent ng acc dents.
ll our products have been made in conformity with the regulations in
force.
WARNING: any repair or adjustment of the working machinery is
strictly prohibited unless all the necessary precautions (electrical
supply disconnected and motor off) have been taken in order to avoid
possible accidents.
WARNING: any repair must be carried out by qualified people.
ll moving mechanisms must be provided with suitable protections.
WARNING: Keep the automatic controls out of the reach of childrens.
The controls must be installed at a minimum high of 1,5 mt. from the
ground surface and out of the work of mobile parts.
WARNING: command pulses must be given from positions where the
gate is visible.
WARNING: use the transmitters only if you can see the gate.
WARNING: GR Srl is not responsible for possible damages or injuries
to people, objects or animals, caused by any unauthorised modification
of the product.
Keep scrupulously this booklet in a suitable place well known by all the
interested people.
In order to make the automation work efficiently; the gate to automate
must have the following characteristics:
- it must be balanced;
- it must oscillate fluently;
- you have to carry out the manual closing and opening the gate
without any effort;
- remember that the motorization has been planned in order to help you
use the gate. This means that it does not resolve the problems caused
by an inadequate installation or by a poor upkeep of the gate.
SAFETY RULES
During the installation and the use of the automation, you have to pay
attention to the following safety rules:
- Security distance!
- Mechanism in movement!
- Do not install the automation in places with presence of iniammable
gasses!
- Electric shock!
- Use the gloves!
- Use glasses for welding!
- Keep the protection carter!
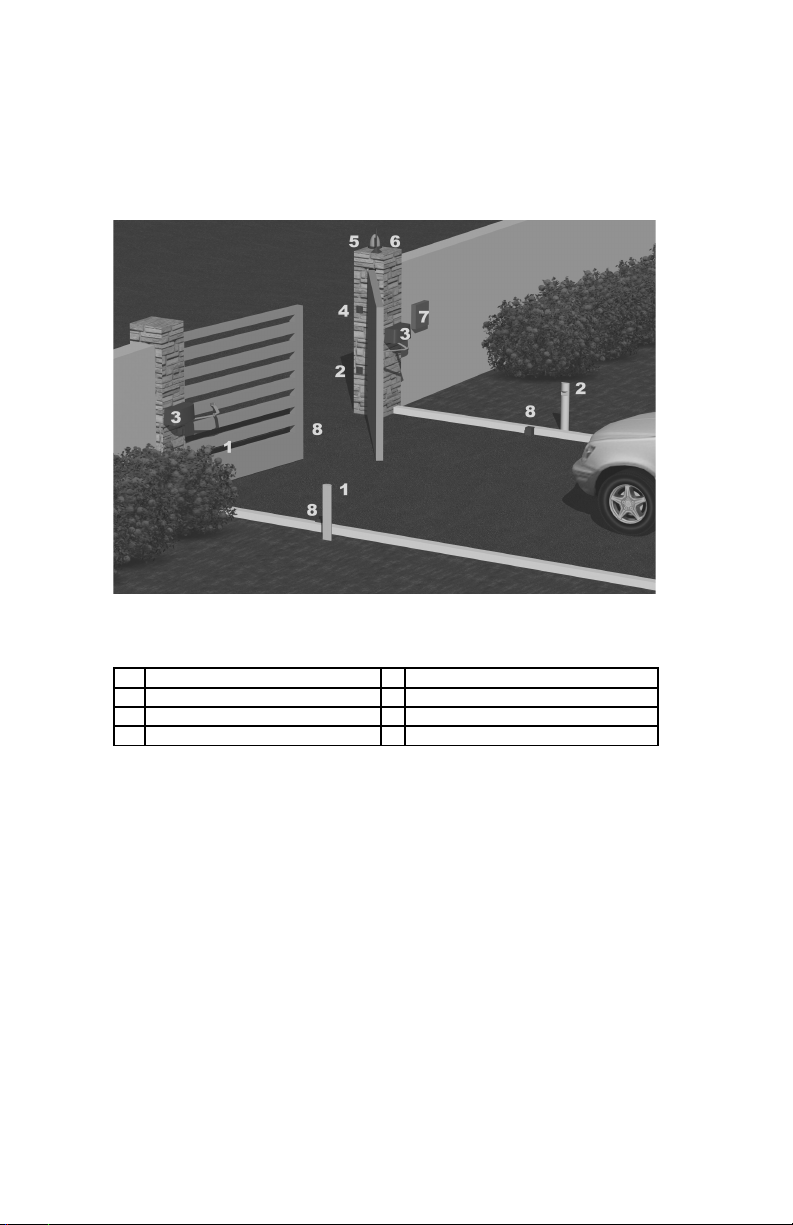
EQUIPMENT
In order to install the automation you have to provide yourself with
keys, screwdriver, metre, slope detector (water level), saw, drilling
machine and welding machine.

SPECIFICATIONS
DEMOLITION
You have to operate the elimination of the materials in conformity with
the regulations in force. ll materials must be divided by type (copper,
aluminium, plastic, electrical parts, etc)
DISMANTLING
In order to move away the automation, follow these instructions:
1 - cut off the power supply and disconnect the electrical installation;
2 - dismantle the control console and all the other components of the
installation.
If you have noticed that some components have been damaged, you
have to replace them.
USE OF THE AUTOMATION
Motor GR 100IL12_E GR 100IL220_E
Max. wing lenght 1,8 m 2,5 m
Max wing weight 200kg 250kg
Power supply 12 V 220/230 V
Motor capacity 48 W 350 W
Power absorbed 4,0 1,5
rpm 1600 900
Starting thrust 250 N/m 500 N/m
Working temp. -25°C +75°C -25°C +75°C
Weight 5,5 Kg 6 Kg
Opening time 10 sec. 12 sec.
Thermal prot. - 150ºC
Lubrication grease grease
Dimensions 380x180x155 380x180x155
Dimensioni of the plate 380x175x80 380x175x80

The gear motors GR 100 have been planned and built in order to open
all those gates as above mentioned. GR Srl is not responsible for any
abnormal and/or different use of the gear motors GR 100. s the
automation can be controlled from distance through a remote control,
you must always check the full efficiency of all the safety devices. We
recommend inspecting periodically (every 6 months) the adjustment of
the electronic friction.
PRELIMINARY CHECKS
1 - Read carefully the instructions enclosed in this manual.
2 - Make sure that the gate has a rather solid structure and that there is
no friction points in its movement.
3 - Make sure that the wing is suitably balanced, even after the
installation of the gear motor.
4 - Check that the electrical installation is in accordance with the
characteristic required by the gear motor.
INSTALLATION
To operate a good installation of the gear motors GR 100, follow these
instructions:
1- Open the box and take out gear motor. Make sure that it has
not been damaged during the transport.
2- Make sure that the wing of the gate is perfectly horizontal.
3- Place the basement plate of the motor in according to parameters
of table1, being sure that the wing completely open doesn’t
interfere with the motor
Fig.1
Table 1
1 = W ng
2 = Wall-p llar
3 = basement plate of
motor
A = Vert cal d stance
between the w ng h nge
and the basement plate.
B = hor zontal d stance
between motor shaft
centre and the h nge of
w ng

4- Fix the motor on the basement plate with the screws like in the
fig.2
Fig.2
A B Alfa A B Alfa
0 cm 16-20cm 90° 15 cm 16-20cm 90°
0 cm 20-35cm 120° 15 cm 20-25cm 100°
5 cm 16-20cm 90° 15 cm 25-30cm 90°
5 cm 20-25cm 120° 15 cm 30-35cm 100°
5 cm 25-35cm 110° 15 cm 35 cm 90°
10 cm 16-20cm 90° 20 cm 16-35cm 90°
10 cm 20-25cm 110° 25 cm 16-30cm 90°
10 cm 25-30cm 90° 30 cm 20cm 90°
10 cm 30-35cm 100° 35 cm 20cm 90°

5- ssemble the articulated arm and fix it to the motor shaft like in
fig. 2-3
Fig.2 Fig.3
6- Unclamp the motor turning right or left the key A to hear the first
“click” (fig.4)
Fig.4
7- Moving the articulated arm, locate and the bracket A on the wing,
doing in the manner that the angulations between the two
element of the articulated arm is not higher than the one indicated
A
A

on fig. 5-6. Fix the bracket A verifying that the distance between
the centre of the motor shaft and the centre of the bracket A is
NOT more than 74 cm.
Fig.5-6
7- Do a complete movement of the wing verifying the correct
movement of the articulated arm.
8- Verify the fixings and proceed with the electrical connections
9- djust the end run cams(A-B) in according to how indicated on
the manual of your control box. (Fig.7)
Fig.7
10- Place the cap.
11- Install the mechanical stops
MAAINTENANCE :
Per od cal.
Check the closing of articulated arm bolts, taking care to cut of the electrical
alimentation, remove the protection carter and look the motor conditions,
eventually clean it.
Extraord nary.
To all eventual operations on the motor, out of the ordinary, please call a
specialized technician.
CONFORMITY DECLARATION:
A-B

It’s in accordance with Machine Directive 39/89/CE and following modify.
It’s in accordance with the following directive CE:
Electromagnetic compatibility Directive 89/336/CEE and following modify.
Low tension Directive 73/23/CEE and following modify.
PLANT COMPONENTS:
1Photocells RX/TX 5Flashing light
2Photocells TX/RX 6erial
3Motor 7Control box
4Key switch 8Mechanical stop
ELECTRICAL CONNECTIONS

N° Descr pt on Cable
1limentation line 220V 2x1,5 + T
2TX Photocells 2x1
3Well -
4Control box -
5RX Photocells 4x1
6Key switch 2x1
7erial / Flashing light RG59 / 2x1
8Motor 220 / 12V 3x1,5 + T / 2x2,5
9RX Photocells 2x1
10 Motor 220 / 12V 3x1,5 + T / 2x2,5
11 TX Photocells 2x1
EMERGENCY MANOEUVRE
Remove the cap on the carter, put in the unblocking key and turn
it left or right to hear the first “click”
GR SISTEMI AUTOMATICI DI APERTURA s.r.l.
Via E. Mattei 9
46043 Castiglione delle Stiviere (Mn) Italy
e.mail [email protected]
Web- www.gritalia.it
Fax- +39 0376 671033
Tel. +390376670007
This manual suits for next models
2
Table of contents
Other GR Gate Opener manuals
Popular Gate Opener manuals by other brands

Chamberlain
Chamberlain LiftMaster Professional SW420 Installation and maintenance instructions

Allmatic
Allmatic PLUS 24V manual

CAME
CAME FROG series manual

Comunello Automation
Comunello Automation LIWIN instruction manual

GDS
GDS GDS 550P Series Installation and maintenance manual

BYOU
BYOU FREEDOM Instructions and Recommendations for installation and use