1
2
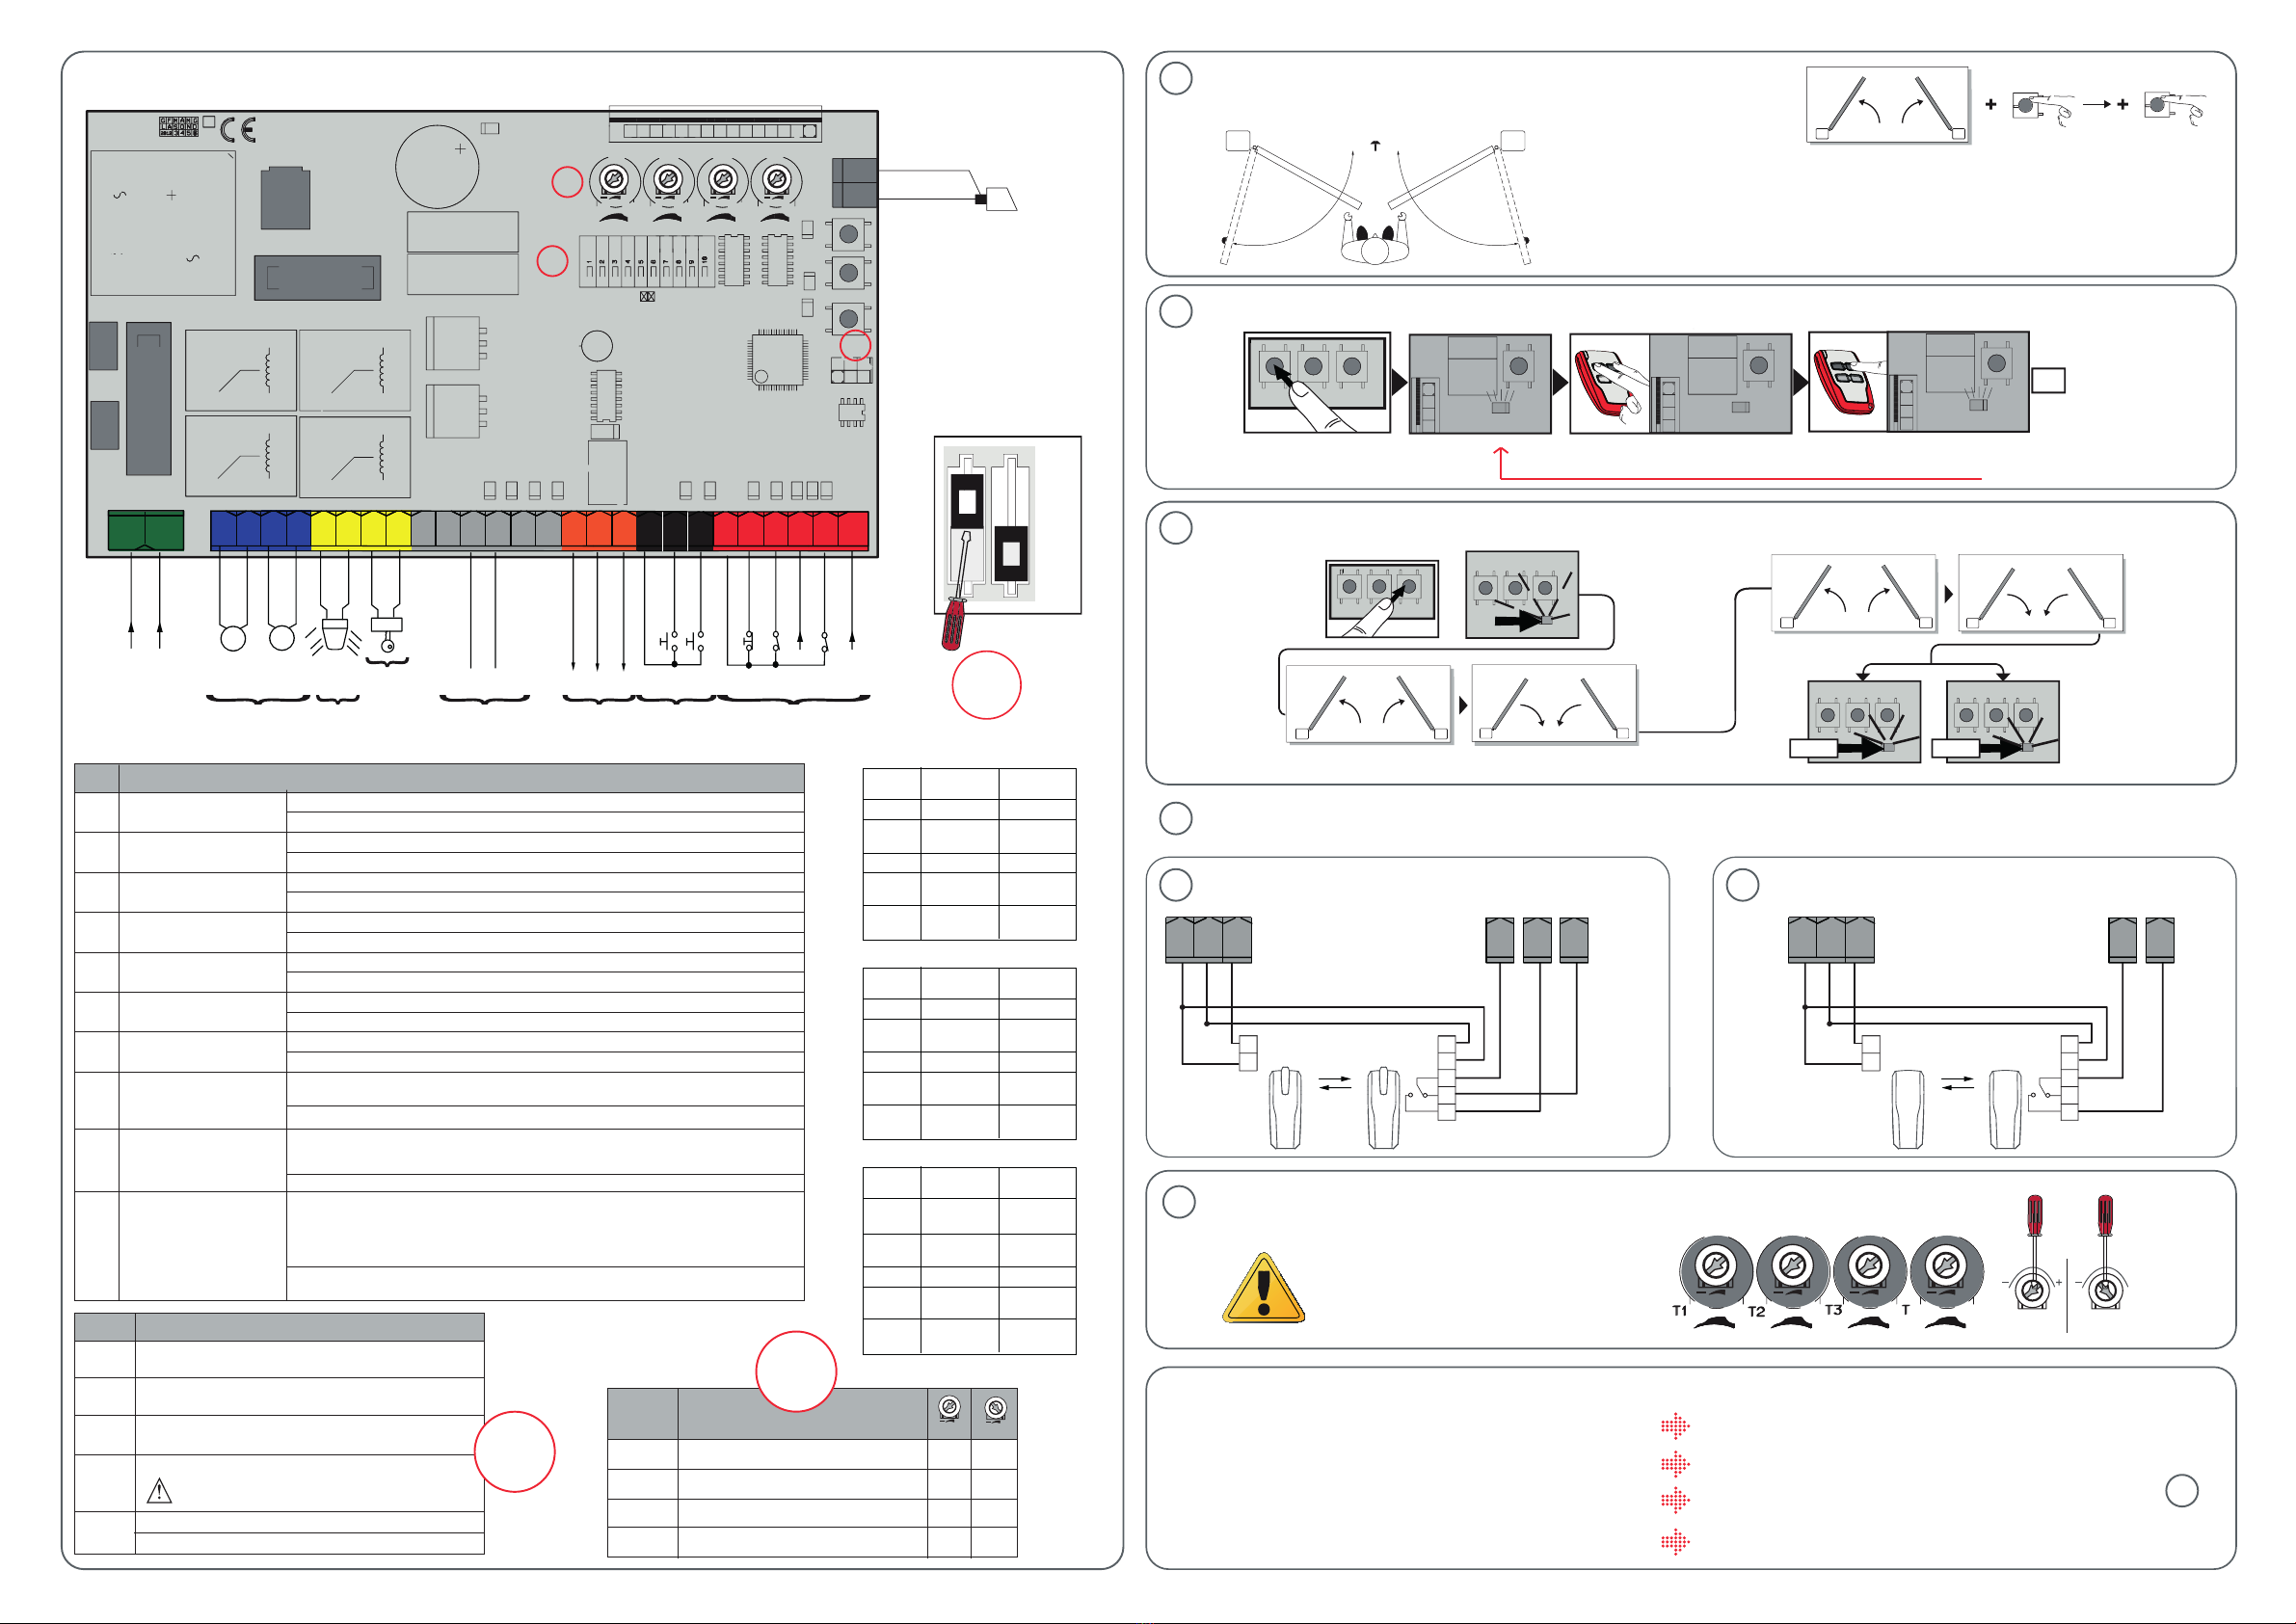
How to programme the remote control
How to perform an open/close test by using the remote control.
If they close, switch wiring:
Left Right
M1 : 10&11 / M2 : 14&15
M1 closes second.
3Start an autoset, gate closed.
LED RADIO
FLASHES RADIO
START
x1
S1 S2 S3 S1 S1 OK
Choose the key
LED RADIO
FLASHES
S1
DIP
Function
1Transmitter programming
Selection of sensing bars.
Check photocells.
Secure entry check.
Photocells during closing
ON: Memorise the commands/copy via remote controls already recorded.
OFF : Disables memorizing of transmitters
ON : Input for resistive edge 8K2.
OFF: Entry for sensitive lintel.
ON : Enable safety check
OFF: Deactivate the cell check.
ON : Enable safety check
OFF: Deactivate the sensing check.
ON: Invert the movement during the closure phase only.
OFF: Active on opening and closing; invert the movement during the closure phase.
2
3
4
5
Sets the automation type of operation:
ON = Apartment building
OFF = Residential
ON : Safety edge with active reversal only when closing, when opening the movement stops
OFF : Safety edge with active reversal in both directions
Rapid closure.
ON : Closes 3 seconds after the photocells are cleared
OFF: Rapid closure deactivated.
7
Safety edge input operation
6
Residential / apartment
building operation
8
OFF : Logic not enabled
Hammer during opening
9
Closing limit
switch pressure
10
*factory pre-parameterised
S3 X1
START
S3 X1
STOP
START
=
5s
S1 S S3
S1 S2 S3
SET
SET SET
OK KO
AUTO OPEN AUTO CLOSE
AUTO OPEN AUTO CLOSE
S1 S2 S3 S1 S2 S3
4
mini maxi
+++ +
4
2
1ON
OFF
1
Zara Control board
ELS
Y #
F2 4 AT
F1 1.25 AT
(220-230V)
F1 2.5 AT (120V)
ANT.
ANT
SHIELD
T1 T2 T3 T4
NORWP
FLT2
FLT1
PHOT
STOP
OPEN
START
SW02
SW01
SWC2
SWC1
BAR
10 11
M1
14 15 20 21 28 29 40 41 42 43 44 45 50 51 52 60 61 62 70 71 72 73 74 75
M2
24V
24V -
24V +
24 VSafe+
COM
NO
NO
NC
NC
NC
SW2
-
+
-
+
SW1
JP5 JP2
JP4 +
+
+
+
L N
LN
220-230V ~
*
START
OPEN
COM
PHOT
STOP
FAULT 1
BAR
FAULT 2
S1 S2 S3
RADIO
EER
SET
Safety
devices
Commands
Limit switch
inputs Accessories
power supply
Blinker
Motor
1
2
3
ZARA
24V
2
1TX1 2
1
RX1
4
5
3
50 51 52
70 72 73
DIP3=ON
5
6Fine-tune the adjustments. Motor functions using the potentiometers (T1, T2, T3, T4).
Remember to check
by pressing S2 for 5 sec.
24V
2
1TX1 2
1
RX1
4
5
3
50 51 52
70 72
DIP3=OFF
6
As an option, to go further....
1 - I wish to deactivate the photocells during opening:
3 - I wish to activate pedestrian opening:
Place dipswitch 5 in the ON position.
4 - I wish to adjust the time difference between M1 & M2: This is done by regulating the T4 potentiometer.
2 - I wish to activate and adjust automatic closure:
This is done by regulating the T1 potentiometer.
2
Solenoid
lock
ON : Before opening completely, the gate pushes for approx. 2 seconds as it closes.
This allows the solenoid lock to be released more easily.
IMPORTANT - Do not use this function if suitable mechanical stops are not in place.
ON : Use when there is a mechanical stop in closed position.This function allows leaves
to press against the mechanical stop without the Amperostop sensor interpreting this
as an obstacle. Thus the rod continues its stroke for a few seconds after meeting the
closing limit switch or as far as the mechanical stop. In this way, the leaves come to rest
perfectly against the stop by allowing the closing limit switches to trip slightly earlier.
OFF : Movement is stopped only when the closing limit switch trips: in this case, the
tripping of the closing limit switch must be adjusted accurately
Apartment
building
Residential
Reaction to the START input (wired or radio):
CLOSED Opens
Stops
Opens
Opens Opens
OPEN Closes Closes
Opens
WHILE
CLOSING
STOPS+TCA No effect
WHILE
OPENING
AFTER
STOP
Apartment
building
Residential
Reaction to the OPEN input (wired):
CLOSED Opens
Opens
Opens
Opens Opens
OPEN
Opens
WHILE
CLOSING
Keeps it
open Keeps it
open
No effectNo effect
WHILE
OPENING
AFTER
STOP
Closes Closes
STOPS+TCA No effect
Apartment
building
Residential
Reaction to the PEDESTRIAN input (radio):
CLOSED Opens
partially Opens
partially
Opens
partially Opens
partially
Stops Opens
partially
OPEN
WHILE
CLOSING
WHILE
OPENING
AFTER
STOP
S2
>5s
S1+ S2
>10s
KEYS
Description
S1
S2
S3
Add Start Key
associates the desired key with the Start command.
Add Pedestrian Key
associates the desired key with the pedestrian command.
Confirms the changes made
to parameter settings and operating
Erase List
WARNING! Erases all memorized transmitters
from the receiver’s memory.
Pressed BRIEFLY, it gives the START command.
HELD DOWN (>5 sec.), it activates the AUTOSET function.
2
TRIMMER
Function
T1
T2
Waiting time before automatic closing. 0 120
5 50
0 25
10 100
% Force exerted by leaf
% Slow-down speed
Motor 1 closing delay time [s]
T3
T4
+
mini. +
maxi
3
Testing the direction of opening - running / stop: apply power, motor
engaged and at stroke centre.
Checking the direction of rotation. I press S3, my two motors must open.
Wire the THEA photocells. Wire the DESME photocells.
Please refer to the remote control programming
by pressing S2.
Press the 2 top keys simultaneously
(hidden key). The LED remains fixed


