Elgento E12011N Mounting instructions

www.elgento.co
1.5 LITRE
JUG BLENDER
MODEL E12011N
YOUR SAFETY &
INSTRUCTION MANUAL
PLEASE READ CAREFULLY

2
CUSTOMER SUPPORT TEAM: +44 (0) 333 220 6057
TECHNICAL DATA
Description: 1.5 Litre Jug Blender
Model: E12011N
Rated Voltage: 220-240V
Frequency: ~ 50/60Hz
Power consumption: 500W
DOCUMENTATION
We declare that this product conforms to the following product legislation in accordance with the
following directive(s):
2014/30/EU Electromagnetic Compatibility Directive.
2014/35/EU Low Voltage Directive.
2011/65/EU Restriction of Hazardous Substances Directive.
1935/2004/EC Materials & Articles in Contact With Food (LFGB section 30 & 31).
2009/125/EC Eco-Design of Energy Related Products.
RK Wholesale LTD Quality Assurance, United Kingdom
WARRANTY
This product is guaranteed for 12 months from the date of original purchase. If any defect arises due
to faulty materials of workmanship, the faulty products must be returned to the place of purchase.
Refund or replacement is at the discretion of the retailer.
The following conditions apply:
• The product must be returned to the retailer with proof of purchase.
• The product must be installed and used in accordance with the instructions contained in this
instruction guide.
• It must be used only for domestic purposes.
• It does not cover wear and tear, damage, misuse or consumable parts.
• RK Wholesale LTD has limited liability for incidental or consequential loss or damage.
• This guarantee is only Valid in the UK and Eire Only.
An extended warranty is available for this appliance.
See back page for details.

3
www.elgento.co
WIRING SAFETY FOR UK USE ONLY
IMPORTANT
As the colours in the
mains lead of this
appliance may not
correspond with the
coloured markings
identifying the terminals
in your plug, please
proceed as follows:
The wires in the mains lead are coloured in
accordance with the following code:
Blue neutral [N] Brown live [L]
Plug Fitting Details (Where Applicable).
The wire coloured blue is the neutral and must be
connected to the terminal marked [N] or coloured
black.
The wire coloured brown is the live wire and
must be connected to the terminal marked [L] or
coloured red.
On no account must either the brown or the blue
wire be connected to the [EARTH] terminal .
Always ensure that the cord grip is fastened
correctly.
The plug must be tted with a fuse of the same
rating already tted and conforming to BS 1362
and be ASTA approved.
If in doubt consult a qualied electrician who will
be pleased to do this for you.
Non-Rewireable Mains Plug
If your appliance is supplied with a non-rewireable
plug tted to the mains lead and should the fuse
need replacing, you must use an ASTA approved
one (conforming to BS 1362 of the same rating).
If in doubt, consult a qualied electrician who will
be pleased to do this for you.
If you need to remove the plug – disconnect it
from the mains – and then cut it o of the mains
lead and immediately dispose of it in a safe
manner. Never attempt to reuse the plug or insert
it into a socket outlet as there is a danger of an
electric shock.
WARNING:
This appliance is double insulated. Do not connect any wire to the earth terminal.

4
CUSTOMER SUPPORT TEAM: +44 (0) 333 220 6057
• Check that the voltage of the
main circuit corresponds with
the rating of the appliance before
operating.
• Please ensure that the appliance
is used on a stable, level, and
heat resistant surface.
• DO NOT immerse cords, plugs or
any part of the appliance in water
or any other liquid.
• DO NOT leave the appliance
unattended while it is operating.
• Close supervision is necessary
when any appliance is used by or
near children.
• Take care when any appliance is
used near pets.
• This appliance can be used by
children aged from 8 years and
above and persons with reduced
physical, sensory or mental
capabilities or lack of experience
and knowledge if they have been
given supervision or instruction
concerning use of the appliance
in a safe way and understand the
hazards involved.
• Children should not play with the
appliance.
• Cleaning and user maintenance
should not be undertaken by
children without supervision.
• Switch o at the wall socket
then remove the plug from the
socket when not in use or before
cleaning.
• If the supply cord or appliance
is damaged, stop using the
appliance immediately and seek
advice from the manufacturer,
its service agent or a similarly
qualied person.
• DO NOT let the cord hang over
the edge of a table or counter or
let it come into contact with any
hot surfaces.
• The use of accessory
attachments other than those
supplied is not recommended.
• DO NOT pull the plug out by the
cord as this may damage the
plug and/or the cable.
• DO NOT use this product for
anything other than its intended
use.
• This appliance is for household
use only.
• DO NOT carry the appliance by
the power cord.
• DO NOT use any extension cord
with this appliance.
• DO NOT use the appliance
outdoors.
PRODUCT SAFETY
When using any electrical appliance, basic safety precautions should
always be followed including the following:

5
www.elgento.co
• Switch o and unplug before
tting or removing tools/
attachments, after use and
before cleaning.
• Avoid contact with moving parts.
Keep hands and utensils out
of the appliance while blending
to prevent personal injury or
damage to the blender.
• The blade is sharp. Handle with
care.
• Never let the power unit, cord or
plug get wet.
• Never exceed the maximum
capacity.
• DO NOT attempt to bypass the
interlock system that powers the
unit on.
• Always operate on a at surface.
• Unplug the blender when not in
use, before taking o or putting
on parts and before cleaning.
• CAUTION! Ensure the gasket
seal is correctly seated in the
blade assembly recess prior to
axing the jug. Failure to do so
could result in the seal coming
into contact with the blades
resulting in damage.
• WARNING! The appliance may
emit a small amount of smoke
when it is rst turned on. This is
due to manufacturing oils and/
or residue left on the motor.
There is no need for alarm and is
considered normal. The smoke
will eventually lessen once the oil
and/or residue disappears.
• In the unlikely event the appliance
develops a fault, stop using it
immediately and seek advice
from the Customer Support
Team.
HIGH VOLTAGE ROTATING PARTS

6
CUSTOMER SUPPORT TEAM: +44 (0) 333 220 6057
WHAT’S IN THE BOX
Instruction Manual
Jug Blender
1. Locking jug lid
2. Blender jug
3. Stainless steel multi-blade
designed for crushing ice
4. Motor unit
5. 2 speed control plus pulse function
6. Non-slip feet
3
4
1
2
5
6
BEFORE YOUR FIRST USE:
1. Before using the unit for the rst time, carefully clean the unit and all items that will come into
contact with food.
2. Do not use any aggressive detergents, brushes with metal or nylon
bristles or sharp objects such as knives or spatulas for cleaning
the appliance and accessories, use a sponge or cloth dampened in warm water to avoid
damage.
3. Dispose of packaging in a responsible manner.
4. It’s a good idea to keep the outer box for storage purposes.
Dispose of the packaging in a responsible manner.

7
www.elgento.co
USING YOUR APPLIANCE
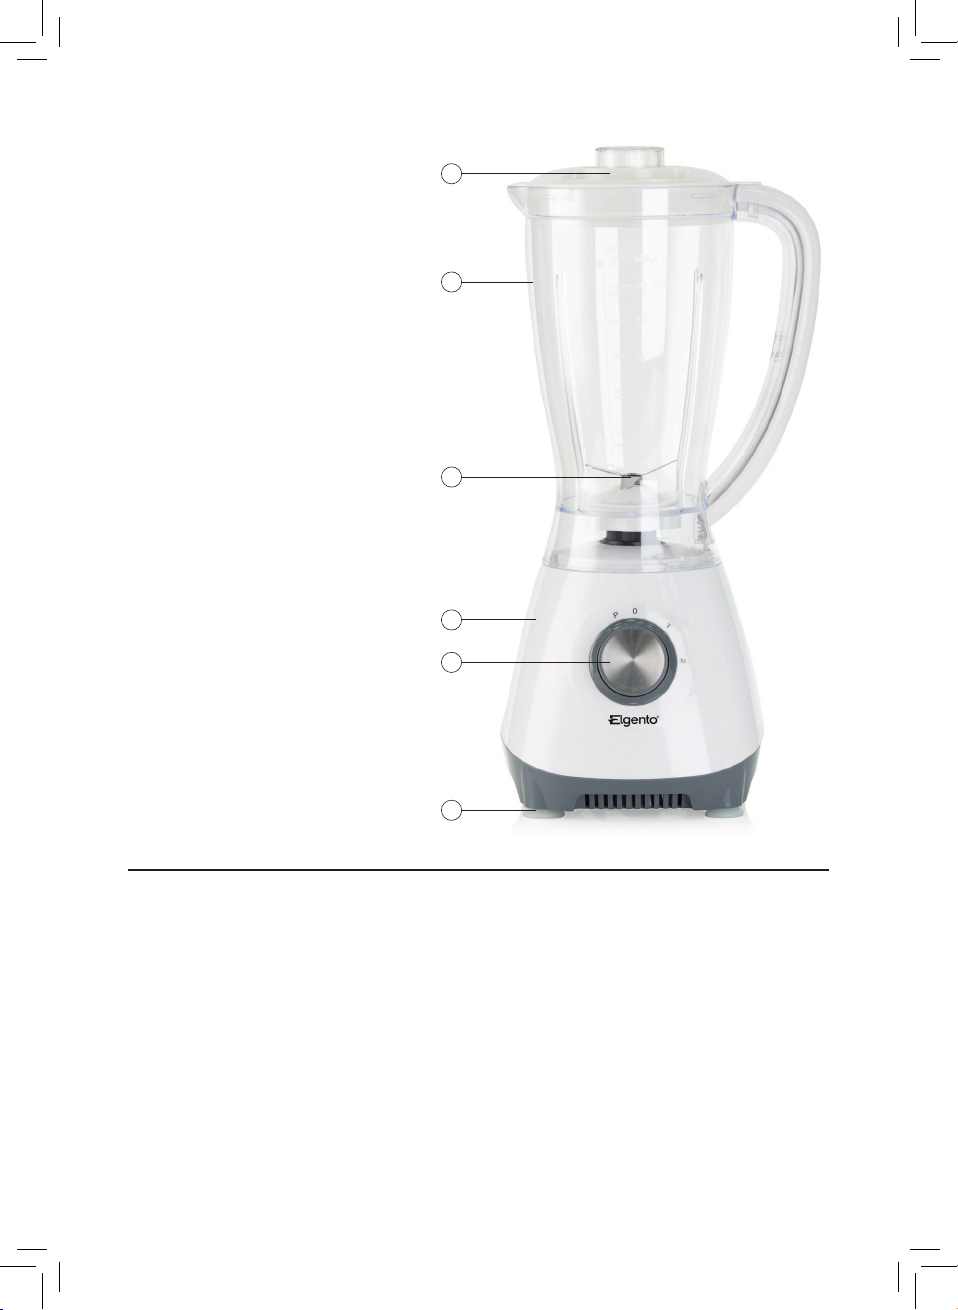
Assembling/Operating Your Blender
1. Place the power cord through the cord
slot and place the motor base on a at,
dry surface. Ensure that the blender is
switched o at the power outlet and the
power plug is unplugged from the power
outlet.
2. Place the blender jug onto the motor
base. Ensure that the blender jug is
securely positioned.
3. Add food or liquid to the blender jug.
Place the lid on the blender, and push
down to seal. Insert the inner cap into the
hole of the blender jug lid.
4. Plug the power cord into a power outlet
and switch on at the power point.
5. Turn the speed control clockwise
dial for the 1 to 2 speed settings and
counterclockwise to use the Pulse setting.
The speed can be changed at any time
during the blending process. Ideally, start
blending on ‘1’ speed and then increase
to a ‘2’ speed if necessary to blend until
desired consistency is reached. For
ingredients that require short burst of
power, use the pulse speed. This is ideal
for thick liquids, ice or nuts.
6. To stop the blending at any time (general
operate 1-2 min.), turn the speed control
dial to ‘0’.
7. After use, ensure the blender is switched
o by turning the speed control dial to the
‘0’ position, then switch o at the power
outlet and remove the power cord. Allow
the blender to cool before storing.
NOTE:
During the blending process,
ingredients may stick to the sides of the
blender jug. To push the food back on the
blades, turn the speed control dial to ‘0’ and
switch the power o at the power outlet and
remove the power cord. Remove the lid and
use a plastic spatula to scrape down the sides
of the jug. Replace lid before recommencing
blending.
Hints and Tips
• Ensure the maximum level on the blender
jug is not exceeded. Ensure the lid ts
securely and the inner cap is on.
• When crushing ice cubes in the blender,
always use the pulse setting and ensure
the blender jug is completely dry.
• Use “1” for a lower speed for dressings,
marinades and foods that require blending
until just combined.
• Use the “2” speed setting for puréeing
smoothie or cocktail making.
• Use “P” for mixtures that require short
bursts of power such as thick liquids, ice
or chopping nuts.
• Ensure all removable parts have been
thoroughly washed and dried before
assembly.
• Ensure the blender is correctly assembled
before operating.
• Ensure the blender is used on a clean and
dry surface.
• Place liquids into blender jug before solid
ingredients except where specied in
recipes.
• Cut all food into small cubes (approx 2-3
cm square) to achieve an even result.

8
CUSTOMER SUPPORT TEAM: +44 (0) 333 220 6057
• If mixing hard and soft foods together,
begin with the hard foods and then add
soft foods. Continue blending until you
have reached the desired consistency and
even texture.
• To add ingredients during blending,
remove the inner cap on the lid and drop
solid ingredients or pour liquids through
the lid opening. Use a container with a
pouring lip, such as a measuring cup,
when adding liquids.
• Place one hand on top of the blender lid
and hold it down when blending large
quantities of thin liquids. This will prevent
the lid from popping o due to excessive
pressure.
NOTE: Do not blend dry, thick or heavy
mixtures for more than 1 minute without
switching o the blender and stirring the
ingredients with a plastic spatula, and then
continuing blending.
• For simple blending tasks, for example,
mayonnaise, salad dressings etc., do not
operate for longer than 1 minute at one
single time.
• Do not use the blender to store food.
• Do not use the blender to beat egg whites
as it will not incorporate air.
• Do not use the blender to mash potatoes.
• Do not use the blender to knead dough or
other heavy mixtures.
• Do not place large pieces of solid or
frozen foods into the blender jug. Always
break pieces before blending.
• Do not remove the blender jug or lid while
the blender is operating. Always switch
o at the power outlet and unplug at the
power point before removing the blender
jug.
• Do not overll by exceeding the maximum
mark on the blender jug. Some mixtures
increase in volume during blending.
• Do not overload the blender with more
than specied amounts. Overloading
could cause the motor to stall.
• Do not process boiling liquids or hot
ingredients. Allow hot ingredients to cool
before placing them into the blender jug.
• Do not expose the glass jug to sudden
temperature changes (i.e. immersing the
jug into hot water directly after immersing
it into cold water or vice versa).

9
www.elgento.co
CLEANING AND CARE
• Remove plug from the mains socket and
allow the appliance to cool down before
cleaning.
• Do not immerse the base unit of the
appliance in water and ensure no water
enters the appliance.
• Clean the base unit by wiping it with a
damp cloth. A little detergent can be
added if needed.
• Do not use scouring pads, steel wool,
any form of strong solvents or abrasive
cleaning agents to clean the appliance,
they may damage the outside surfaces of
the appliance.
• Clean all accessories in warm soapy
water.
• Do not use any scouring pads, steel wool,
any strong solvents or abrasive cleaning
agents when cleaning accessories.
NOTE:
Do not place any part of the blender in
the dishwasher.
IMPORTANT!
After cleaning allow to dry fully before using
again.
Do not use the appliance if damp. Ensure the
appliance is completely clean and dry before
storing.
STORAGE
To store your appliance:
1. Unplug power cord from the power outlet
and clean as above.
2. Allow the appliance to dry fully.
3. Store on a at, dry level surface out of
reach of children.
4. Do not store anything on top of the
appliance.
WARNING:
DO NOT IMMERSE ANY ELECTRICAL PART
OF THE APPLIANCE IN WATER SUCH AS
MOTOR UNITS OR PLUGS.
PLEASE SEE CLEANING SECTION FOR
FURTHER INSTRUCTIONS.
DISPOSAL OF THE UNIT
Appliances bearing the symbol shown here
may not be disposed of in domestic rubbish.
You are required to dispose of old electrical
and electronic appliances like this separately.
Please visit www.recycle-more.co.uk or
www.recyclenow.co.uk
for access to information about the recycling
of electrical items.
Please visit www.weeeireland.ie for access to
information about the recycling of electrical
items purchased in Ireland.
The WEEE directive, introduced in August
2006, states that all electrical items must be
recycled, rather than taken to landll.
Please arrange to take this appliance to your
local Civic Amenity site for recycling, once it
has reached the end of its life.

10
CUSTOMER SUPPORT TEAM: +44 (0) 333 220 6057
NOTES

11
www.elgento.co
NOTES

We hope you enjoy your appliance for many years.
As a thank you for purchasing one of our fantastic products,
we are oering you an extra 1 year peace of mind.
*To receive your extra guarantee period, register your appliance online
within 28 days of purchase by visiting:
www.elgento.co
Make sure to retain your original receipt.
Should you have a problem
with your appliance or need any spare parts please call our
Customer Support Team on:
+44 (0) 333 220 6057
Distributed throughout the UK by RK Wholesale LTD
0218.V4
Table of contents
Other Elgento Blender manuals