Elite Platinum EFP-7730A User manual

12 CUP FOOD PROCESSOR
Model: EFP-7730A
INSTRUCTION MANUAL
Before operating your new appliance, please read all instructions carefully and keep
for future reference.

IMPORTANT
SAFEGUARDS
When using electrical appliances, basic safety precautions should always be followed, including the
following:
1. Read all instructions.
2. To protect against risk of electrical shock do not immerse cord, plugs or appliance in water or
other liquid.
3. Close supervision is necessary when any appliance is used by or near children.
4. Unplug from outlet when not in use, before putting on or taking off parts and before cleaning.
5. Avoid contacting moving parts.
6. Do not operate any appliance with a damaged cord or plug or after the appliance
malfunctions, or is dropped damaged in any manner. Return appliance to the nearest
authorized service facility for examination, repair or electrical or mechanical adjustment. Or,
call the appropriate toll-free number listed on this sheet.
7. The use of attachments, including canning jars, not recommended by the manufacturer may
cause fire, electric shock or injury.
8. Do not use outdoors.
9. Do not let cord hang over edge of table or counter.
10. Keep hands and utensils away from moving blades or discs while processing food to reduce
the risk of severe injury to persons or damage to the food processor. A scraper may be used,
but must be used only when the food processor is not running.
11. Blade is sharp. Handle carefully.
12. To reduce the risk of injury, never place cutting blade or discs on base without first putting
bowl properly in place.
13. Be certain cover is securely locked in place before operating appliance.
14. Never feed food by hand. Always use food pusher.
15. Do not attempt to defeat the cover interlock mechanism.
16. Do not lift or carry the processor by the handle - or the handle may break resulting in injury.
17. Always remove the knife blade before pouring contents from the bowl.
18. Keep hands and utensils out of the processor bowl while connected to the power supply.
19. Switch off and unplug:
a. Before fitting or removing parts.
b. After use.
c. Before cleaning.
20. Before removing the lid from the bowl from the power unit:
a. Switch off.
b. Wait until the attachment/blades have completely stopped.
21. Do not use the lid to operate the processor, always use the on/off speed control.
22. This machine will be damaged and may cause injury if the interlock mechanism is subjected to
excessive force.
23. Never use an unauthorized attachment.
24. Never leave the machine on unattended.
25. Never let the power unit, cord or plug get wet.
26. Do not exceed the maximum capacities stated.
www.maxi-matic.com
1

IMPORTANT
SAFEGUARDS (CONT.)
27. This appliance is not intended for use by persons (including children) with reduced physical,
sensory or mental capabilities, or lack of experience and knowledge, unless they have been
given supervision or instruction concerning use of the appliance by a person responsible for
their safety.
28. Only use the appliance for its intended domestic use.
29. Before plugging in, make sure your electricity supply is the same as the one shown on the
underside of your machine.
SAVE THESE INSTRUCTIONS.
This product is for household use only.
www.maxi-matic.com
2

SHORT CORD
PURPOSE
NOTE: A short power cord is provided to reduce the risk of personal injury resulting from becoming
entangled in or tripping over a longer cord.
Longer power-supply cords or extension cords are available and may be used if care is exercised in
their use.
If an extension cord is used: (1) the marked electrical rating of the extension cord should be at least
as great as the electrical rating of the product; (2) the extension cord should be arranged so that it
will not drape over the countertop or tabletop where it can unintentionally be pulled on or tripped
over by children or pets
POLARIZED
PLUG
If this appliance is equipped with a polarized plug (one blade is wider than the other), please follow
the below instructions:
To reduce the risk of electrical shock, this plug is intended to fit into a polarized outlet only one
way. If you are unable to fit the plug into the electrical outlet, try reversing the plug. If the plug
still does not fit, contact a qualified electrician. Never use the plug with an extension cord unless
the plug can be fully inserted into the extension cord. Do not alter the plug of the product or any
extension cord being used with this product. Do not attempt to defeat the safety purpose of the
polarized plug.
TAMPER-RESISTANT SCREW
Warning: This appliance is equipped with a tamper-resistant screw to prevent removal of the outer
cover. to reduce the risk of fire or electric shock, do not attempt to remove the outer cover. There are
no user-serviceable parts inside. Repair should be done only by authorized service personnel.
www.maxi-matic.com
3

PARTS
IDENTIFICATION
Processor
1. Main base
2. Center post
3. Workbowl
4. Cover
5. Feed Chute
6. Food Pusher
7. Locking mechanism
8. Control Knob
Attachments
9. Kneading dough blade
10. Chopping blade
11. Reversible thick slicing/coarse
shredding disc
12. Citrus juice press
13. Accessory holder
14. Emulsifier
9
10
11
12
13
14
www.maxi-matic.com
4

CONTROL PANEL
The controls are located on the front of the base (1). Turn dial to P, 1 or 2 in order to select a
function (see directions under "How to Use").
OFF CONTROL
Processor should be stored in OFF position (0) and unplugged when not in use.
PULSE CONTROL
Use PULSE (P) for short processing tasks. This lets you control the size and uniformity of foods being
chopped.
The dial must be turned to the P position and held for the appliance to operate in PULSE
mode. When released, the dial will return to the 0 position and the function will end.
The motor of the processor will run as long as the PULSE position is held. Hold the dial in the
PULSE position and then release to allow the blade to stop running and the food to fall to the
bottom of the workbowl.
Pulsing gives better control when chopping, mincing, mixing and blending foods. You can
control the size of the foods, from coarse to fine.
SPEED 1 and 2 CONTROL
This food processor has two speeds. Turn the dial to the appropriate speed when the food is ready
to be processed. When turned to one of these speeds, the processor will continue to run until the
dial is returned to the OFF (0) position.
BEFORE
FIRST USE
Remove all packing material and any stickers from the product.
Important: Handle chopping blade and slicing and shredding disc carefully. They are very sharp.
Wash all removable parts as instructed in CARE AND CLEANING section of this manual.
Select a level, dry countertop where the appliance is to be used, allowing air space on all sides
to provide proper ventilation for the motor.
www.maxi-matic.com
5

HOW TO USE YOUR
FOOD PROCESSOR
ASSEMBLING THE PROCESSOR
HOW TO INSERT AND REMOVE THE CENTER POST
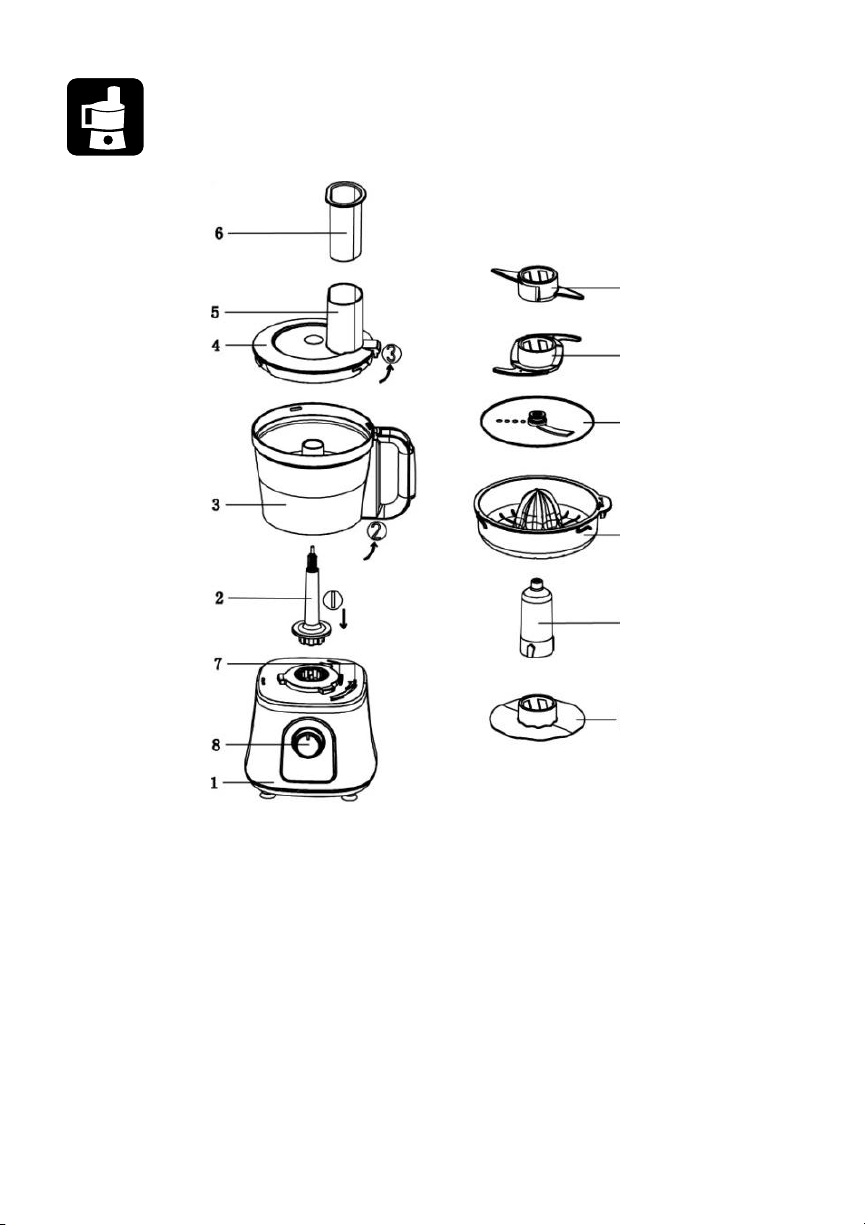
The center post (2) is removable. When you are ready to use the food processor, place the center
post into the smaller opening in the main base (1).
HOW TO LOCK THE WORKBOWL INTO POSITION
1. Attach center post to workbowl (3). Place the workbowl on the base with handle turned to the
right of the locking mechanism (7) over the unlock symbol.
2. Hold handle and rotate workbowl counter-clockwise toward the until it clicks firmly into place.
NOTE: Be sure to lock the workbowl in place before attaching the chopping blade or any other
attachment and the cover.
NOTE: Always fit the bowl and attachment onto the machine before adding ingredients.
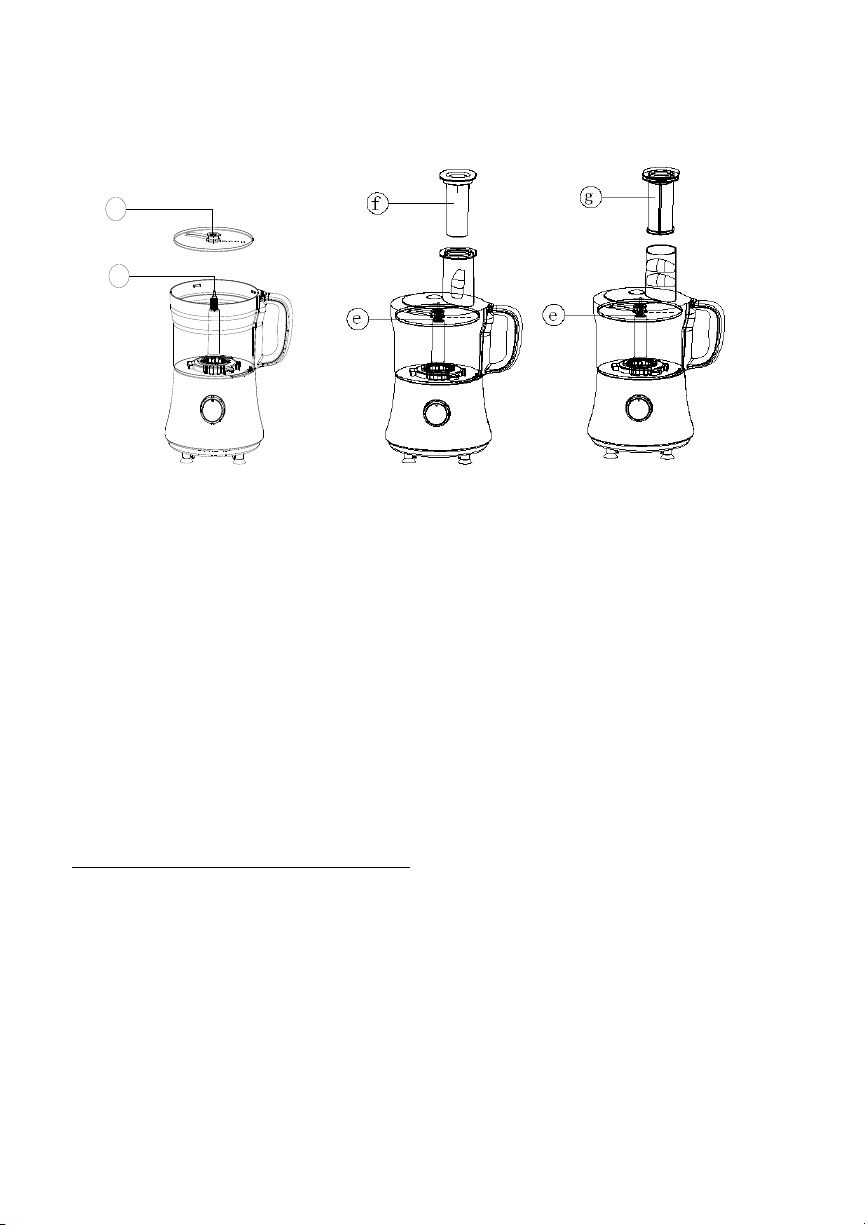
3. Fit the Cover (4) ensuring the top of the center post locates into the center of the lid.
NOTE: Do not use the cover to operate the processor; always use the on/off control.
4. Switch on and select a speed.
NOTE: The processor won't work if the bowl and lid are fitted incorrectly.
NOTE: Use pulse (P) for short bursts. Pulse will operate for as long as the control is held in
position.
5. Reverse the above procedure to remove the cover, attachments and bowl.
NOTE: Always switch off before removing the cover.
IMPORTANT: Your processor is not suitable for crushing or grinding coffee beans, or
converting granulated sugar to caster sugar. When adding almond essence or flavoring to
mixtures avoid contact with the plastic as this may result in permanent marking.
HOW TO USE THE CHOPPING BLADE IN THE WORKBOWL
The chopping blade (10) is used to coarsely or finely chop, mince, mix, and puree foods to a
smooth consistency.
1. Lock workbowl into position.
2. Hold chopping blade by center shaft and insert onto center post.
CAUTION: The chopping blade is very sharp. Use caution when handling and storing.
3. Place food in workbowl.
4. Place cover on workbowl and lock into place by rotating counterclockwise.
5. Place the food pusher (6) in place.
IMPORTANT: Never use your fingers to direct food through the feed chute (5).
6. Select your desired speed (PULSE, 1 or 2).
NOTE: Process foods for no more than a few seconds at a time. Pulsing produces excellent
results and offers greater control.
IMPORTANT: Make sure the chopping blade has completely stopped spinning before
removing cover from processing bowl.
Return the dial to the OFF (0) position and allow the chopping blade to stop revolving before
removing cover. Twist cover toward (clockwise) to remove.
IMPORTANT: Unlock lid first before removing workbowl.
7. Unlock workbowl by turning it counterclockwise and lift off base.
www.maxi-matic.com
6

NOTE: Remove workbowl from appliance before removing the chopping blade to prevent
food from leaking through the center opening of the workbowl.
Carefully remove the chopping blade.
Unplug appliance when not in use.
HELPFUL TIPS FOR CHOPPING
Watch carefully to avoid over-processing foods.
The PULSE position offers the best control.
For best results, process foods that are about the same size.
Do not overload the workbowl.
Never walk away from the processor while it is on.
You may use hot but not boiling liquids.
Do not process more 3 cups of liquid in the workbowl at any given time.
To process meat, use no more than 2 cups of ¾-inch cubes. Process using PULSE in 5-second
intervals.
Insert a funnel into the feed chute when adding ingredients such as oil, flour and sugar.
Cut food such as meat, bread, vegetables into cubes approximately 2cm before processing
Biscuits should be broken into pieces and added down the feed tube while the machine is
running.
When making pastry use fat straight from the fridge, cut into 2cm cubes. Take care not to
over-process.
The chopping blade is the most versatile of all the attachments. The length of the processing time
will determine the texture achieved. For coarser textures use the pulse control. Use the chopping
blade for cake and pastry making, chopping raw and cooked meat, vegetables, nuts, pate, dips,
pureeing soups and to also make crumbs from biscuits and bread. It can also be used for yeasted
dough mixes if the dough tool is not supplied. Use the dough tool for yeasted mixes.
HOW TO LOCK THE COVER
1. Place cover over workbowl with the small latch to the left of the workbowl’s handle.
2. Hold feed chute of workbowl cover and rotate cover counterclockwise until cover locks into
place.
IMPORTANT: For your protection this appliance has an interlock system. The processor will not
operate unless the processing workbowl and cover are properly locked in place.
Insert the food pusher into the feed chute.
NOTE: The food pusher is used to guide foods through the feed chute and can be removed
when adding liquid or additional foods while the processor is running.
www.maxi-matic.com
7

HOW TO SLICE OR SHRED IN THE WORKBOWL
1. Lock workbowl into position.
2. Carefully place reversible slicing and shredding disc on top of center post with appropriate
side up (depending on work to be done). (See d & e).
CAUTION: The slicing and shredding disc is very sharp. Use caution when handling and storing.
3. Place cover on workbowl and lock into place by rotating cover counterclockwise.
4. Fill feed chute with food. Position food pusher over food. (See f & e).
5. Turn dial to PULSE, 1 or 2 position; press firmly on food pusher to guide food through feed
chute, but do not force it. (See g & e).
NOTE: Heavy pressure on the pusher does not speed the work; use the pusher only as a guide.
Let the processor do the work.
6. When finished, return dial to OFF (0) position and wait for disc to stop rotating before
removing cover. Twist cover toward clockwise to remove.
IMPORTANT: Make sure the slicing and shredding disc has completely stopped spinning before
removing cover from processing bowl.
IMPORTANT: Unlock lid first before removing workbowl.
7. Carefully remove the slicing and shredding disc. Unlock workbowl by turning it clockwise and
lifting it off the base.
8. Unplug appliance when not in use.
HELPFUL TIPS WHEN SLICING AND SHREDDING
Before slicing fruits and vegetables in the processor, cut a thin slice from the bottom of the
food to make it flat.
Place the food cut side down in feed chute.
Remove seeds and pits before processing.
Select foods that are firm and not overripe.
Remove the core from hard vegetables such as cabbage.
When slicing thinner vegetables, cut them just short of the length of the feed chute and stand
them vertically in feed chute so they are solidly packed and cannot turn or tilt.
Shred hard cheeses at room temperature.
Chill soft and semi-hard cheeses before shredding.
e
d
www.maxi-matic.com
8

After food has been processed, remove the cover and invert on countertop. Remove the
slicing and shredding disc before removing the workbowl from the processor. Place the disc
on top of the inverted workbowl cover.
HOW TO USE THE KNEADING/DOUGH BLADE
1. Lock workbowl into position.
2. Place dry ingredients in the workbowl and add liquid down the feed chute while the machine
is running.
3. Process until a smooth elastic ball of dough is formed, this will take 30-90 seconds.
4. Re-knead by hand only on a flat surface. Re-kneading in the bowl is not recommended as it
may cause the processor to become unstable.
HOW TO USE THE EMULSIFYING DISC
1. Lock workbowl into position.
2. Place the accessory holder into the center of workbowl.
3. Place the emulsifying disc onto the accessory holder.
4. Place ingredients into the workbowl.
5. Place cover on workbowl and lock into place by rotating cover counterclockwise.
6. Slowly pour ingredients into the feed chute.
7. Select the speed to process until all ingredients are thoroughly combined.
HOW TO USE THE CITRUS JUICE PRESS
1. Lock workbowl into position.
2. Place the accessory holder into the center of workbowl.
3. Place the citrus juice press onto the accessory holder.
4. Slice orange/lemon/lime in half and place cut side-down onto the press.
5. Gently hold the fruit in place with one hand while selecting a speed to process.
www.maxi-matic.com
9

SPEED
GUIDE
Tool/Attachment
Function
Speed
Maximum Capacities
Chopping Blade
Chop onions, nuts, meta, parmesan
cheese
2
500g meat
Kneading/Dough
Blade
Knead yeast dough for bread and pizzas
2
500g flour + 320g
water
Slicing/Shredding
Disc
Slice carrots, cucumbers or salami.
Shred cheese, cucumber, carrot or
potatoes
1-2
Emulsifying Disc
Whipped cream, whisk egg whites, make
mayonnaise or sponge cake mix
1-2
Citrus Juice Press
Extract juice from oranges/lemons/limes
1
CARE AND
CLEANING
NOTE: Do not attempt to sharpen the cutting edges of the chopping blade or slicing and shredding
disc. They are permanently sharpened at the factory and will be ruined if sharpened.
CLEANING
NOTE: Before cleaning, be sure unit is turned off and cord is unplugged.
Completely disassemble processor parts before washing.
Rinse parts immediately after processing for easy cleanup.
CAUTION: The slicing and shredding disc is very sharp. Use caution when handling and storing.
Wipe base and feet with a damp cloth and dry thoroughly. Stubborn spots can be removed by
rubbing with a damp cloth and a mild, nonabrasive cleaner. Do not immerse base in liquid.
All removable parts can be washed by hand or in a dishwasher. Hand washing of plastic parts
will help to maintain the food processor’s appearance.
If washing by hand, fill workbowl with hot soapy water and rapidly raise and lower the
chopping blade or slicing and shredding disc up and down on the center shaft.
CAUTION: The slicing and shredding disc is very sharp. Use caution when handling and storing.
www.maxi-matic.com
10

If washing in a dishwasher, place removable parts on top rack only –not in or near utensil
basket.
Some staining of parts may occur. If so, make a paste of 2 tablespoons of baking soda and 1
tablespoon of water. Apply to stains and let stand overnight. Rinse and dry.
Do not use rough scouring pads or cleansers on any plastic or metal parts to clean.
Do not allow chopping blade or slicing and shredding disc to soak in water for long periods of
time.
Remember to clean the internal shaft of the chopping blade; use a baby bottle brush to
remove any clogged food particles.
If you are having trouble closing the cover over the workbowl, apply a small amount o
vegetable oil to the rim of the cover and workbowl. This should make the pieces work
smoother when attaching the cover to the workbowl.
Some foods may discolor the plastic. This is perfectly normal and won't harm the plastic or
affect the flavor of your food. Rub with a cloth dipped in vegetable oil to remove the
discoloration.
www.maxi-matic.com
11

LIMITED WARRANTY*
ONE (1) YEAR
WARRANTY IS ONLY VALID WITH A DATED PROOF OF PURCHASE
1. Your small kitchen appliance is built with precision, inspected and tested before leaving our factory.
2. It is warranted, to the original purchaser to be free from any manufacturing defects under normal use
and conditions for one (1) year, cord excluded. This Warranty applies only to the original purchaser of
this product.
3. If you need to exchange the unit, please return it in its original carton, with a sales receipt, to the store
where you purchased it. If you are past the stores allowed return policy period, please see the enclosed
Warranty.
4. If you use your appliance for household use and according to instructions, it should give you years of
satisfactory service.
5. During the one-year warranty period, a product with a defect will be either repaired or replaced with a
new or reconditioned comparable model (at our option) when the product is returned to our Service
Center. (See the “Returns” section below).
6. The repaired or replacement product will be in warranty for the remaining balance of the one-year
warranty period and an additional one-month period.
7. This limited warranty covers appliances purchased and used within the 50 contiguous states plus the
District of Columbia and does NOT cover:
- Damages caused by unreasonable use, neglect, normal wear and tear, commercial use, improper assembly or
installation of product.
- Damages caused in shipping.
- Damages caused by replacement or resetting of house fuses or circuit breakers.
- Defects other than manufacturing defects.
- Breakage caused by misuse, abuse, accident, alteration, lack of proper care and maintenance, or incorrect
current or voltage.
- Lost or missing parts of the product. Parts will need to be purchased separately.
- Damages of parts that are not electrical; for example: cracked or broken plastic or glass.
- Damage from service or repair by unauthorized personnel.
- Extended warranties purchased via a separate company or reseller.
- Consumer’s remorse is not an acceptable reason to return a product to our Service Center.
*One Year Limited Warranty valid only in the 50 contiguous states plus the District of Columbia, excluding
Puerto Rico and the Virgin Islands.
This warranty is effective only if the product is purchased and operated in the USA; product usage which is in
violation of the written instructions provided with the unit will void this warranty.
For international warranty, please contact the local distributor.
**Any instruction or policy included in this manual may be subject to change at any time.
MAXI-MATIC, USA
18401 E. Arenth Ave. City of Industry, CA 91748
Customer Service Dept: (800) 365-6133 Ext: 120/107 MON-FRI 8am-5pm PST
Website: www.maxi-matic.com email: info@maxi-matic.com
www.maxi-matic.com
12

RETURN INSTRUCTIONS
RETURNS:
A. Any return of defective merchandise to the manufacturer must be processed accordingly by first
contacting customer service (contact information shown below) to obtain an RA # (Return Authorization
Number). We will not accept any returns of merchandise without an applicable RA #.
B. IMPORTANT RETURN INSTRUCTIONS. Your Warranty depends on your following these instructions if you
are returning the unit to Maxi-Matic USA:
1. Carefully pack the item in its original carton or other suitable box to avoid damage in
shipping.
2. Before packing your unit for return, be sure to enclose:
a) Your name, full address with zip code, daytime telephone number, and RA#,
b) A dated sales receipt or PROOF OF PURCHASE,
c) The model number of the unit and the problem you are having (Enclose in an
envelope and tape directly to the unit before the box is sealed), and
d) Any parts or accessories related to the problem.
3. Maxi-Matic USA recommends you ship the package U.P.S ground service for tracking
purposes. We cannot assume responsibility for lost or damaged products returned to us
during incoming shipment. For your protection, always carefully package the product for
shipment and insure it with the carrier. C.O.D shipments cannot be accepted.
4. All return shipping charges must be prepaid by you.
5. Mark the outside of your package:
MAXI-MATIC USA
18401 E. ARENTH AVE.
CITY OF INDUSTRY, CA 91748
6. Once your return has been received by our warehouse, Maxi-Matic USA will repair or replace
the product if it is defective in material or workmanship, subject to the conditions in
paragraph B.
7. Maxi-Matic will pay the shipping charges to ship the repaired or replacement product back to
you.
www.maxi-matic.com
13
Table of contents