Elk ELK-319DWM User manual

ELK-319DWM Wireless Door/Window Mini Sensor
Description
The ELK-319DWM is a Supervised, Wireless Door Sensor
that detects the opening and closing of doors or windows. The
small and low prole sensor and magnet are mounted using
screws (included) or double-sided adhesive tape (included).
As the door is opened or closed, the sensor transmits an
open (trip) or close (restore) signal to the panel. Additionally
transmitted signals include: tamper, hourly supervisory, and
low battery (as needed). The sensor is powered by two (2)
replaceable 3VDC, lithium coin-cell batteries.
This sensor is compatible with Elk’s 319MHz Receivers/Panels
as well as many other panels that operate on the 319.5MHz
Frequency and adhere to the ITI/Interlogix protocol.
Specications
RF frequency: 319.5 MHz
Compatibility: ELK-319 Receivers/Panels & other panels
that operate on the 319.5MHz Freq. and
adhere to the ITI/Interlogix protocol
Battery type: Two (2) 3VDC lithium coin-cell
(Panasonic or Varta Model CR2032)
Operating
Temp Range: 32 to 120°F (0 to 49°C)
Storage
Temp Range: -30 to 140°F (-34 to 60°C)
Relative
Humidity: 95% non-condensing
Dimensions 2.25” L x .1.0 x 0.50” in. (L x W x D)
Programming (Enrollment)
The following is a general guideline for programming (enrolling)
a sensor into the receiver or panel. For more extensive
instructions please refer to the receiver or panel instructions.
1. Place the panel into the Program mode.
2. Proceed to the WIRELESS SETUP menu.
3. Select the appropriate zone/sensor location number.
4. When prompted by the panel to trip the sensor for learning:
• Remove the sensor cover
• If present pull the battery pull tab out to power the sensor
• The panel should acknowledge the sensor has been learned
by keypad display and/or audio alert (depending on the
panel). If enrollment fails to occur repeat the process
but remove and reinstall the battery OR try pressing and
releasing the tamper plunger.
5. Repeat the above process for any additional wireless
sensors. Proceed to the zone programming to assign each
sensor’s zone denition.
6. Exit programming mode when nished.
Mount Sensor on the jamb of the
door or window directly opposit
the magnet.
Mount Magnet on the moveable
portion of the door or windoe di-
rectly opposite the top right corner
of the Sensor.
Installation Guidelines and Mounting
• Sensor should be temporarily attached at the desired
location and successfully tested with the panel/receiver
prior to drilling any holes or permanently mounting.
• Mounting this sensor on metal can negatively aect the
transmitting range and magnet gap performance.
• Install the sensor within 100 ft. of the receiver or panel.
• Mount the sensor on the non-moving frame surface and
the magnet on the actual moving door. If one sensor is to
be used for a double acting door then mount the sensor on
the least used gate/door.
• Mount sensors at least 5 inches above the oor to avoid
damaging them.
• The sensor can be attached to wood, vinyl, and some
metallic surfaces if pre-installation test are positive.
• Align the magnet directly across from the top right edge of
the sensor with a gap of no more than 5/16” (8 mm) for wood
surfaces and no more than a 1/4” (6 mm) gap for non-wood
surfaces.
• Based on the magnet location, spacing, direction of
operation and the material of the mounting surface, the gap
for opening will vary between 1/8” (3 mm) and 1 ¾” (44 mm).
Desired operation should be checked before permanent
installation.
• After mounting is completed, retest the sensor using the
procedure described.
TM Interlogix is a registered trademark belonging to United Technologies.
For Additional Tamper Security
1. Punch out the tamper cover on the bottom of the sensor,
and using the small screw secure it to the mounting location,
when the sensor is removed “tampered” the tab remains
providing a tamper condition.
FCC AND IC COMPLIANCE STATEMENT:
This equipment has been tested and found to comply with the limits
for a Class B digital device, pursuant to Part 15 of the FCC Rules.
These limits are designed to provide reasonable protection against
harmful interference in a residential installation.
This equipment generates, uses and can radiate radio frequency
energy and, if not installed and used in accordance with
the instructions, may cause harmful interference to radio
communications. However, there is no guarantee that interference
will not occur in a particular installation.
If this equipment does cause harmful interference to radio or
television reception, which can be determined by turning the
equipment o and on, the user is encouraged to try to correct the
interference by one or more of the following measures:
• Reorient or relocate the receiving antenna.
• Increase the separation between the equipment and receiver.
• Connect the equipment into an outlet on a circuit dierent from
that to which the receiver is connected.
Elk Products, Inc.- 3266 Hwy 70 - Connelly Springs, NC 28612 http://www.elkproducts.com 11/19/2018
Limited Warranty
THIS WIRELESS SENSOR IS WARRANTED TO BE FREE FROM
DEFECTS AND WORKMANSHIP FOR A PERIOD OF 2 YEARS
FROM DATE OF MANUFACTURE EXCLUDING BATTERIES.
BATTERIES USED WITH WIRELESS DEVICES ARE NOT
WARRANTED.
MANUFACTURER HEREBY DISCLAIMS ANY AND ALL OTHER
WARRANTIESAND REPRESENTATIONS, WHETHER EXPRESS,
IMPLIED, STATUTORY OR OTHERWISE INCLUDING (BUT NOT
LIMITED TO) ANY WARRANTIES OF MERCHANTABILITY OR
FITNESS FOR A PARTICULAR PURPOSE WITH RESPECT
TO THESE PRODUCTS AND ANY RELATED SOFTWARE.
MANUFACTURER FURTHER DISCLAIMS ANY OTHER IMPLIED
WARRANTY UNDER THE UNIFORM COMPUTER INFORMATION
TRANSACTIONS ACT OR SIMILAR LAW AS ENACTED BY
ANY STATE. (USA only) SOME STATES DO NOT ALLOW THE
EXCLUSION OF IMPLIED WARRANTIES, SO THE ABOVE
EXCLUSION MAY NOT APPLY TO YOU. THIS WARRANTY GIVES
YOU SPECIFIC LEGAL RIGHTS AND YOU MAY ALSO HAVE
OTHER LEGAL RIGHTS THAT VARY FROM STATE TO STATE.
MANUFACTURER MAKES NO REPRESENTATION, WARRANTY,
COVENANT OR PROMISE THAT ITS ALARM PRODUCTS
AND/OR RELATED SOFTWARE (I) WILL NOT BE HACKED,
COMPROMISED AND/OR CIRCUMVENTED; (II) WILL PREVENT,
OR PROVIDE ADEQUATE WARNING OR PROTECTION FROM,
BREAK-INS, BURGLARY, ROBBERY, FIRE; OR (III) WILL WORK
PROPERLY IN ALL ENVIRONMENTS & APPLICATIONS.
NOTE: Elk Products is not responsible for any changes
or modications not expressly approved by the party
responsible for compliance. Such modications could
void the user’s authority to operate the equipment.
Testing the Sensor
It is recommend that all wireless sensors be thoroughly walk
tested after installation and programming.
1. Place the panel into the Walk Test mode.
2. Monitor the keypad display as each sensor is tripped. Refer
to the receiver or panel for complete instructions. In some
cases there may be a signal strength indication.
3. Exit Walk Test mode when nished.
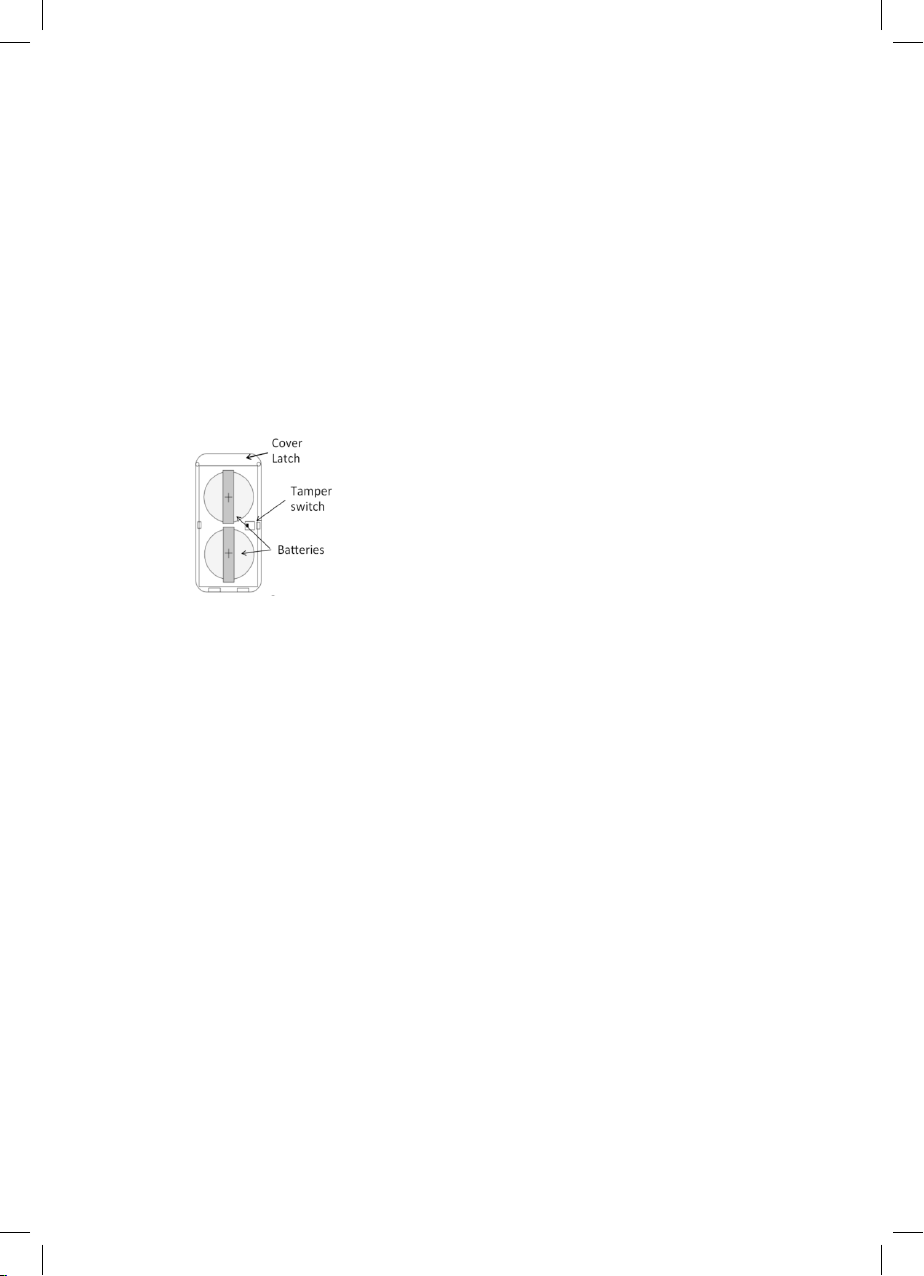
Battery Replacement
Low Battery trouble will be transmitted when the sensor battery
needs to be replaced.
NOTE: Replace both (2) batteries within 7 days following
a low battery trouble indication.
• Remove the cover from the sensor.
• Carefully slide out the old batteries.
• Insert the two (2) new batteries into the battery holder
slots.
• Observe Polarity shown on the lithium coin-cell battery.
CAUTION: Use only approved 3.0VDC Lithium
Battery: Panasonic or Varta model CR2032
• Replace the cover on the sensor test activate the
device at least ve times.
BATTERY WARNING:
Risk of re, explosion and burns. Do not attempt to
recharge or disassemble. Do not incinerate or expose
to heat above 212° F (100° C). Dispose of used batteries
properly. Keep away from children.
•Consult the dealer or an experienced radio/TV technician for help.
This device complies with Industry Canada license-exempt RSS
standard(s). Operation is subject to the following two conditions:
(1) this device may not cause interference, and (2) this device must
accept any interference, including interference that may cause
undesired operation of the device.
Cet appareil est conforme avec Industrie Canada exempts de
licence standard RSS (s). Son fonctionnement est soumis aux
deux conditions suivantes: (1) cet appareil ne doit pas provoquer
d’interférences et (2) cet appareil doit accepter toute interférence,
y compris celles pouvant causer un mauvais fonctionnement de
l’appareil.
In accordance with FCC requirements of human exposure to radio
frequency elds, the radiating element shall be installed such that
a minimum separation distance of 20 cm is maintained from the
general population.
FCC ID: 2ABBZ-RF-CMDWS-319
IC: 11817A-RFCMDWS319
This device complies with Part 15 of the FCC Rules. Operation
is subject to the following two conditions: (1) This device may
not cause harmful interference, and (2) this device must accept
any interference received, including interference that may cause
undesired operation. Changes or modifications not expressly
approved by the party responsible for compliance could void the
user’s authority to operate the equipment.
This Class B digital apparatus complies with Canadian ICES-3B.
Cet appareil numérique de la classe B est conforme à la norme
NMB-003 du Canada.
Other Elk Accessories manuals


Popular Accessories manuals by other brands

SBG Systems
SBG Systems IG-500A user manual

Rohde & Schwarz
Rohde & Schwarz R&S NRQ6 user manual

Echo
Echo KICK GUARD X7503202102 Installation and use

Omron
Omron F3SG-PG Series Quick installation manual

Digical Reasures
Digical Reasures PowerFlask user guide

FRIEDLAND
FRIEDLAND D942S Libra+ instruction manual


