Elko Smart Smoke Alarm Battery User manual

ELKO - Smart Smoke Alarm Battery
Device user guide
Information about features and functionality of the devices
11/2022
www.elko.no

Legal Information
The ELKO brand and any trademarks of ELKO AS and its subsidiaries referred to in
this guide are the property of ELKO AS or its subsidiaries. All other brands may be
trademarks of their respective owners.
This guide and its content are protected under applicable copyright laws and
furnished for informational use only. No part of this guide may be reproduced or
transmitted in any form or by any means (electronic, mechanical, photocopying,
recording, or otherwise), for any purpose, without the prior written permission of
ELKO.
ELKO does not grant any right or license for commercial use of the guide or its
content, except for a non-exclusive and personal license to consult it on an "as
is" basis. ELKO products and equipment should be installed, operated,
serviced, and maintained only by qualified personnel.
As standards, specifications, and designs change from time to time, information
contained in this guide may be subject to change without notice.
To the extent permitted by applicable law, no responsibility or liability is assumed by
ELKO and its subsidiaries for any errors or omissions in the informational content of
this material or consequences arising out of or resulting from the use of the
information contained herein.

Table of Contents
Safety information.......................................................................................4
ELKO - Smart Smoke Alarm Battery........................................................5
For your safety ...........................................................................................5
About the device.........................................................................................5
Installing the device ....................................................................................7
Pairing the device .......................................................................................7
Pairing device manually.........................................................................7
Pairing device with auto scan.................................................................9
Setting up connection without ELKO system .................................................9
Interconnecting devices without ELKO SmartHUB...................................9
Disconnecting a slave device ...............................................................10
Testing the device..................................................................................... 11
Testing the individual device ................................................................ 11
Testing the interconnected device(s) ....................................................12
Configuring the device ..............................................................................12
Changing the device icon ....................................................................12
Renaming the device ..........................................................................13
Changing the device location ...............................................................13
Removing the device from the app .............................................................14
Resetting the device manually ...................................................................14
Using the device.......................................................................................15
Checking the device history .................................................................15
Setting LED brightness........................................................................16
Test alarm reminder ............................................................................17
Silencing the device ............................................................................18
Snoozing the device alerts...................................................................19
False alarm ........................................................................................19
Creating an automation .......................................................................20
Maintenance and cleaning.........................................................................25
LED Indications ........................................................................................26
Troubleshooting .......................................................................................27
Technical Data .........................................................................................27
DUG_Smart Smoke Alarm DC_ELKO-01 3

Safety information
Safety information
Important information
Read these instructions carefully and look at the equipment to become familiar
with the device before trying to install, operate, service, or maintain it. The
following special messages may appear throughout this manual or on the
equipment to warn of potential hazards or to call attention to information that
clarifies or simplifies a procedure.
The addition of either symbol to a “Danger” or “Warning” safety label indicates
that an electrical hazard exists which will result in personal injury if the
instructions are not followed.
This is the safety alert symbol. It is used to alert you to potential personal injury
hazards. Obey all safety messages that accompany this symbol to avoid possible
injury or death.
DANGER
DANGER indicates a hazardous situation which, if not avoided, will result in
death or serious injury.
Failure to follow these instructions will result in death or serious injury.
WARNING
WARNING indicates a hazardous situation which, if not avoided, could result
in death or serious injury.
CAUTION
CAUTION indicates a hazardous situation which, if not avoided, could result in
minor or moderate injury.
NOTICE
NOTICE is used to address practices not related to physical injury.
4 DUG_Smart Smoke Alarm DC_ELKO-01

ELKO - Smart Smoke Alarm Battery
ELKO - Smart Smoke Alarm Battery
EKO09761
For your safety
NOTICE
EQUIPMENT INSTALLATION HAZARD
• Always operate the product in compliance with the specified technical data.
• Keep the installation instruction for the life of the product.
Failure to follow these instructions can result in equipment damage.
WARNING
SEALED BATTERY HAZARD
Do not recharge, disassemble or incinerate the battery.
Failure to follow these instructions can result in death, serious injury, or
equipment damage.
About the device
The Smart Smoke Alarm Battery (device) uses a photoelectric sensor to detect
smoke generated by fire. It also includes a temperature sensor that detects heat
caused by rapid increase in temperature. When connected to the ELKO system
the device sends the notifications via the ELKO app.
DUG_Smart Smoke Alarm DC_ELKO-01 5

ELKO - Smart Smoke Alarm Battery
Operating elements
A. Status LED (Amber, Green and Red LED)
B. Standby LED (Red LED)
C. Test/Hush button
D. Power switch
E. Setup/Reset button
DO NOT PAINT
PUSH TO TEST / HUSH
BC
A
OFF/AUTO
ON
OFF/AUTO
ON
D
E
Installation location
• Smoke Alarm can be installed on a flat/inclined ceiling, or on the wall.
• Do not install smoke alarms near windows, doors, or ducts.
• Avoid paint, stickers, or other decorations.
0.5 m min. /
1.5 m max.
0.3 m min.
≤ 12 m
M
> 1 m
> 0.3 m
=
=
6 DUG_Smart Smoke Alarm DC_ELKO-01
ELKO - Smart Smoke Alarm Battery
Installing the device
Refer to the installation instruction supplied with this product.
See Smart Smoke Alarm Battery.
Pairing the device
Using the ELKO app, pair your device with the ELKO SmartHUB to access and
control the device. You can either add the device manually or do an auto-scan to
pair it.
IMPORTANT: Do not mount the device before the pairing. The Setup/Reset
button (Zigbee) and power switch are located on the rear side of the device.
NOTE: When multiple smoke alarms are paired with same ELKO SmartHUB,
an 868MHz radio frequency (RF) interconnection is automatically created
between smoke alarms.
Pairing device manually
To pair devices manually:
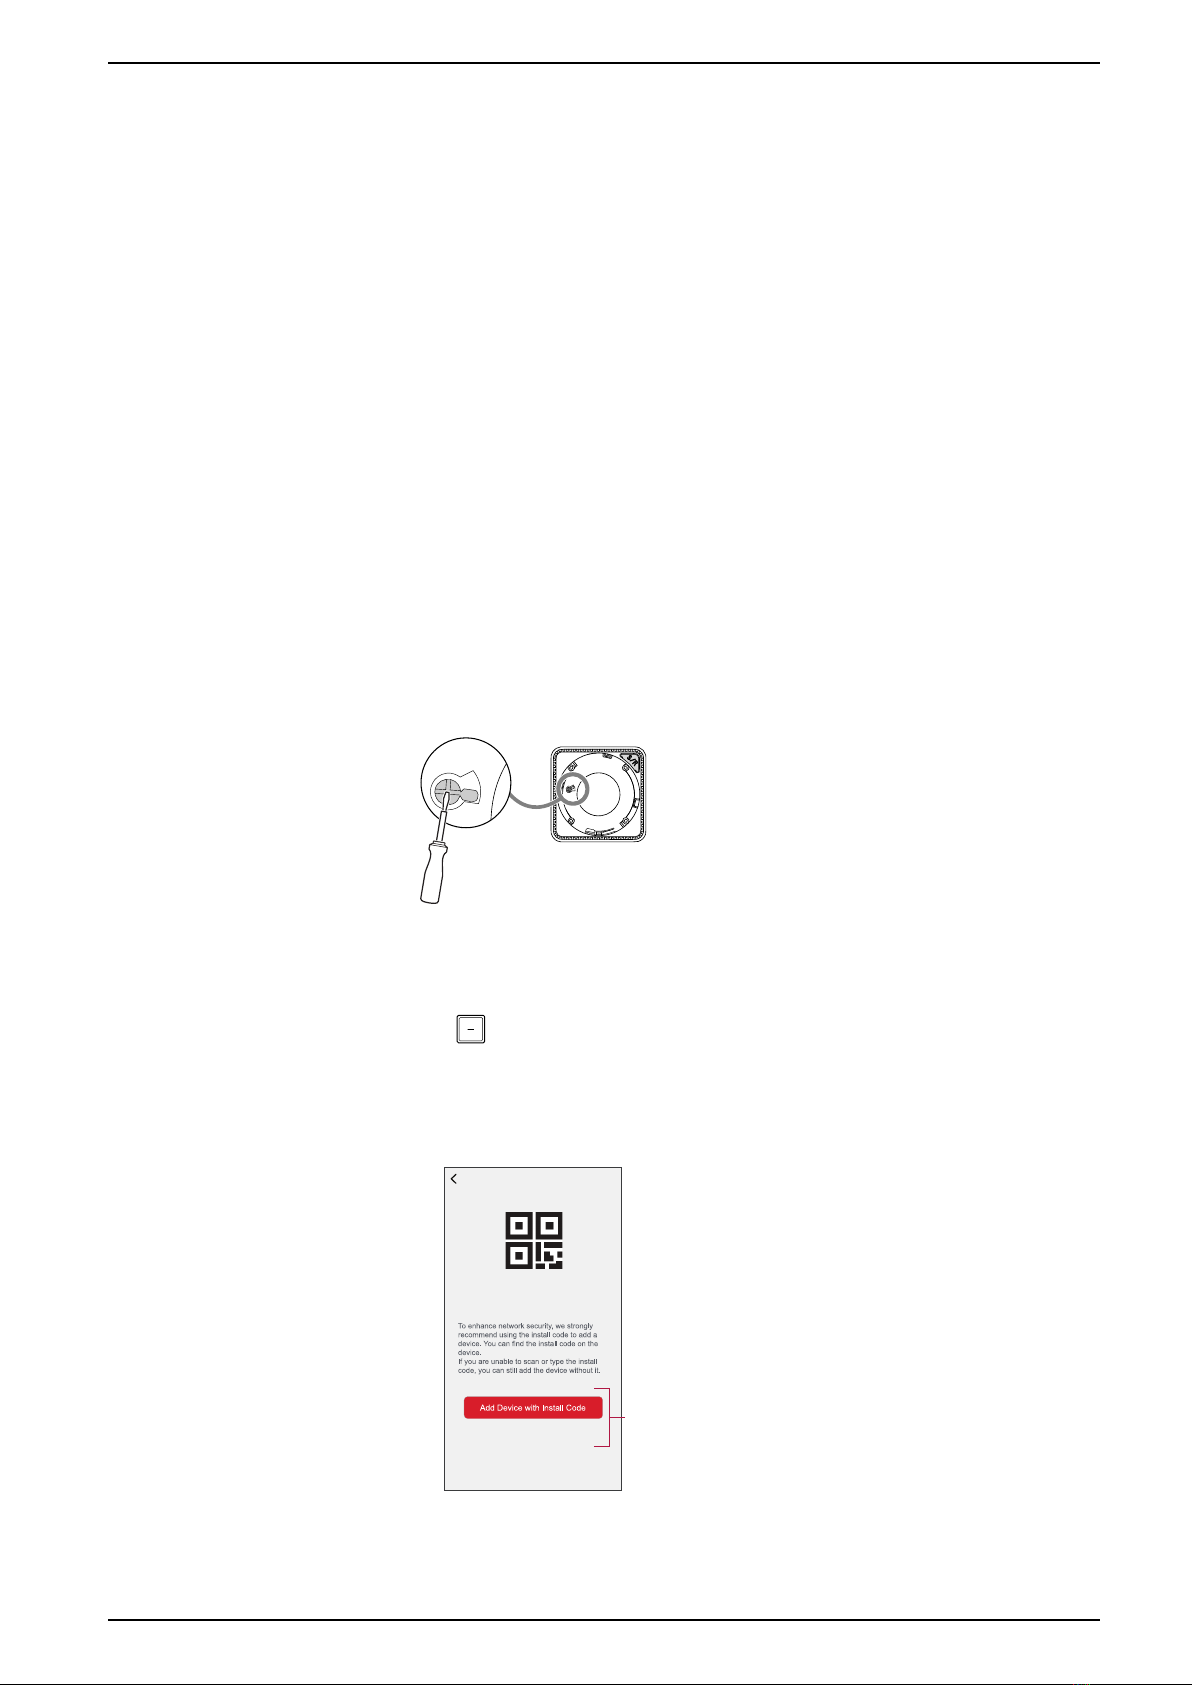
1. Locate the power switch on the rear side of the device. Use a screwdriver to
turn the power switch to ON position.
OFF/AUTO
ON
OFF/AUTO
ON
NOTE: When mounted on wall or the ceiling, the device is automatically
turned ON.
2. In ELKO Smart app Home page, tap +.
3. Tap and select the required ELKO SmartHUB on the slide-up menu.
4. Select any one of the options to add device (A):
–Add Device with Install Code
–Add Device without Install Code
Add Device
Install Code is Recommended
Add Device without Install Code
A
DUG_Smart Smoke Alarm DC_ELKO-01 7

ELKO - Smart Smoke Alarm Battery
5. To pair the device with an install code,, tap Add Device with Install Code to
display the slide-up menu. Select any one of the options (B):
–Scan Install Code - You can scan the device for the an install code.
–Enter Install Code Manually - You can manually enter the install code
from the device
After pairing the device with an install code, proceed to Step 7.
Add Device
Install Code is Recommended
Add Device without Install Code
Add Device
Install Code is Recommended
B
TIP: It is highly recommended to pair the device with Install code.
6. To pair the device without install code, tap Add Device without Install Code.
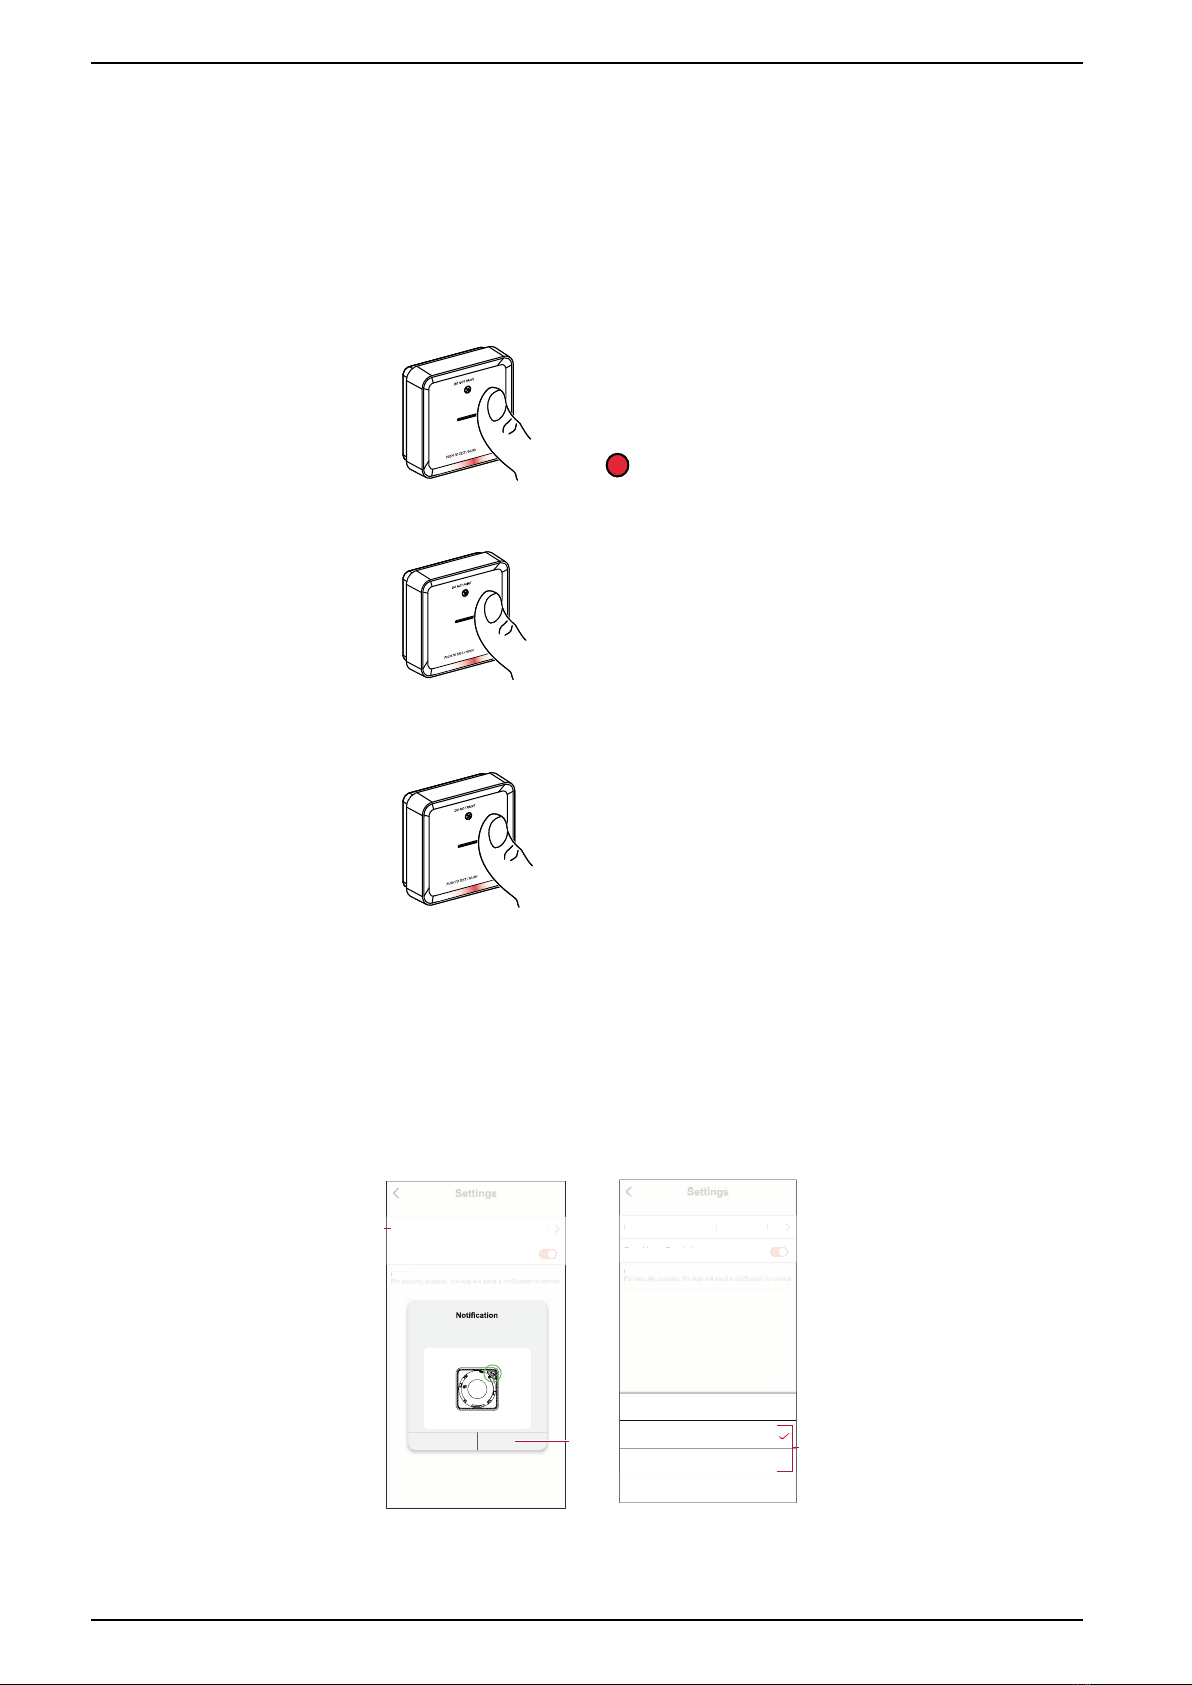
7. Once the device is On, press Set/Reset button 3 times.
3× < 2 s
↓
OFF/AUTO
ON
The LED blinks yellow.
8. In the app, select LED is blinking yellow and tap Start Configuration (C).
Cancel
LED is blinking yellow
DO NOT PAINT
PUSH TOTEST / HUSH
OFF/AUTO
ON
1. Turn the Power switch located at the rear
side of the device to ON position.
2. Tap Set/Reset button for 3 times.
Note: Use a screwdriver to turn the switch.
How to pair device
C
9. After a few seconds, a solid green LED indicates that the device has been
successfully paired.
DO NOT PAINT
PUSH TO TEST / HUSH
10. Once the device is paired in the app, tap Done.
8 DUG_Smart Smoke Alarm DC_ELKO-01

ELKO - Smart Smoke Alarm Battery
Pairing device with auto scan
Pairing the device with auto scan automatically discovers the device when the
corresponding device is powered on.
Follow the steps to pair the device:
1. Locate the power switch on the rear side of the device. Use a screwdriver to
turn the power switch to ON position.
2. On the Home page, tap +.
3. Tap Auto scan and than tap Confirm.
4. If you have multiple hubs, do Step 4 or proceed to Step 5.
5. Tap Select hub and select an ELKO SmartHUB from the slide-up menu.
6. Press the Set/Reset button 3 times within 2 s.
NOTE:
• The LED blinks yellow.
• Wait for a few seconds until the device search is complete.
TIP: If you want to pair multiple devices at once, perform step 5 on each
device and wait for a few seconds for them to be detected.
7. Select Smoke Alarm and tap Next (A).
Auto Scan
Available devices found
Smoke
Alarm
Next A
8. Once the device is added successfully, tap Done.
Setting up connection without ELKO system
Interconnecting devices without ELKO SmartHUB
The smoke alarms (devices) can be connected directly to each other via RF
connections even without a ELKO SmartHUB network.
IMPORTANT: Turn the power switch to ON position on all the devices.
1. Identify a device and mark it as Master with a label supplied. Other devices
are considered as Slave.
DUG_Smart Smoke Alarm DC_ELKO-01 9
ELKO - Smart Smoke Alarm Battery
2. Short press the Test/Hush button 3 times within 2 s on the primary device.
3× < 2 s
↓
The Standby LED turns on for 30 s once it is in pairing mode.
3. Identify a Slave device and short press the Test/Hush button 3 times within 2
s.
The Standby LED blinks 3 times on both Master and devices indicating a
successful RF connection. Than on the Master device, the Standby LED
again turns on for 30 s
3× < 2 s
↓
Repeat the step 3 on all Slave devices.
NOTE: To exit from pairing mode, short press (< 0,5 s) the Test/Hush button 3
times on the Master device. The Standby LED turns off indicating that the
Master device is not in pairing mode.
Disconnecting a slave device
Remove a Slave device from the mounting base (See "Removing a device from
the mounting base in the instruction manual").
NOTE:
• Do not remove the Master device.
• Read the following steps before disconnecting a Slave device.
1. Make sure that the power switch is in OFF/AUTO position.
OFF/AUTO
ON
OFF/AUTO
ON
2. Press and hold the Test/Hush button and simultaneously turn the power
switch to ON position.
↓↓
....3 s
+
OFF/AUTO
ON
OFF/AUTO
ON
The Standby LED turns on for 3 s.
10 DUG_Smart Smoke Alarm DC_ELKO-01

ELKO - Smart Smoke Alarm Battery
3. Continue to hold the Test/Hush button until the Standby LED turns off. Then
release the Test/Hush button.
4. Short press the Test/Hush button when the Standby LED is on for 3 s.
1× < 5 s
↓
1× < 5 s
↓
The Standby LED blinks for 5 s indicating disconnecting of RF
interconnection also the Status LED blinks green for 7 times.
IMPORTANT: When the Slave device is successfully disconnected, make
sure to turn the power switch to OFF/ AUTO position.
Testing the device
The device has a test mode that helps ensure the proper operation of the device.
It is recommended to test the device once a month. If the device is installed in a
mobile home, it is recommended to test the device weekly and before every
journey.
NOTE: Using ELKO Smart app you can set the monthly reminder for test
alarm in settings, page 17.
Testing the individual device
IMPORTANT:
• Test the device once a month to ensure proper operation.
• If the smoke alarm is installed in a mobile home, test weekly and before
every journey.
Press the Test/Hush button on each device for more than 3 s until an alarm goes
off. If the alarm does not go off, either the battery is low or there may be other
technical issues. Refer troubleshooting smoke alarm battery, page 27.
DUG_Smart Smoke Alarm DC_ELKO-01 11
ELKO - Smart Smoke Alarm Battery
Testing the interconnected device(s)
It is possible to test all the devices simultaneously in an interconnected network
with one operation.
1. Select any interconnected device.
2. Press and hold the Test/Hush button for more than 10 s until an alarm goes
off on all interconnected devices.
DO NOT PAINT
PUSH TO TEST / HU
1× > 10 s
3. If there is no alarm triggered on the interconnected devices, check if the
distance between each device is within the specification. Also check that the
device is On and working properly. Refer troubleshooting smoke alarm
battery, page 27.
Configuring the device
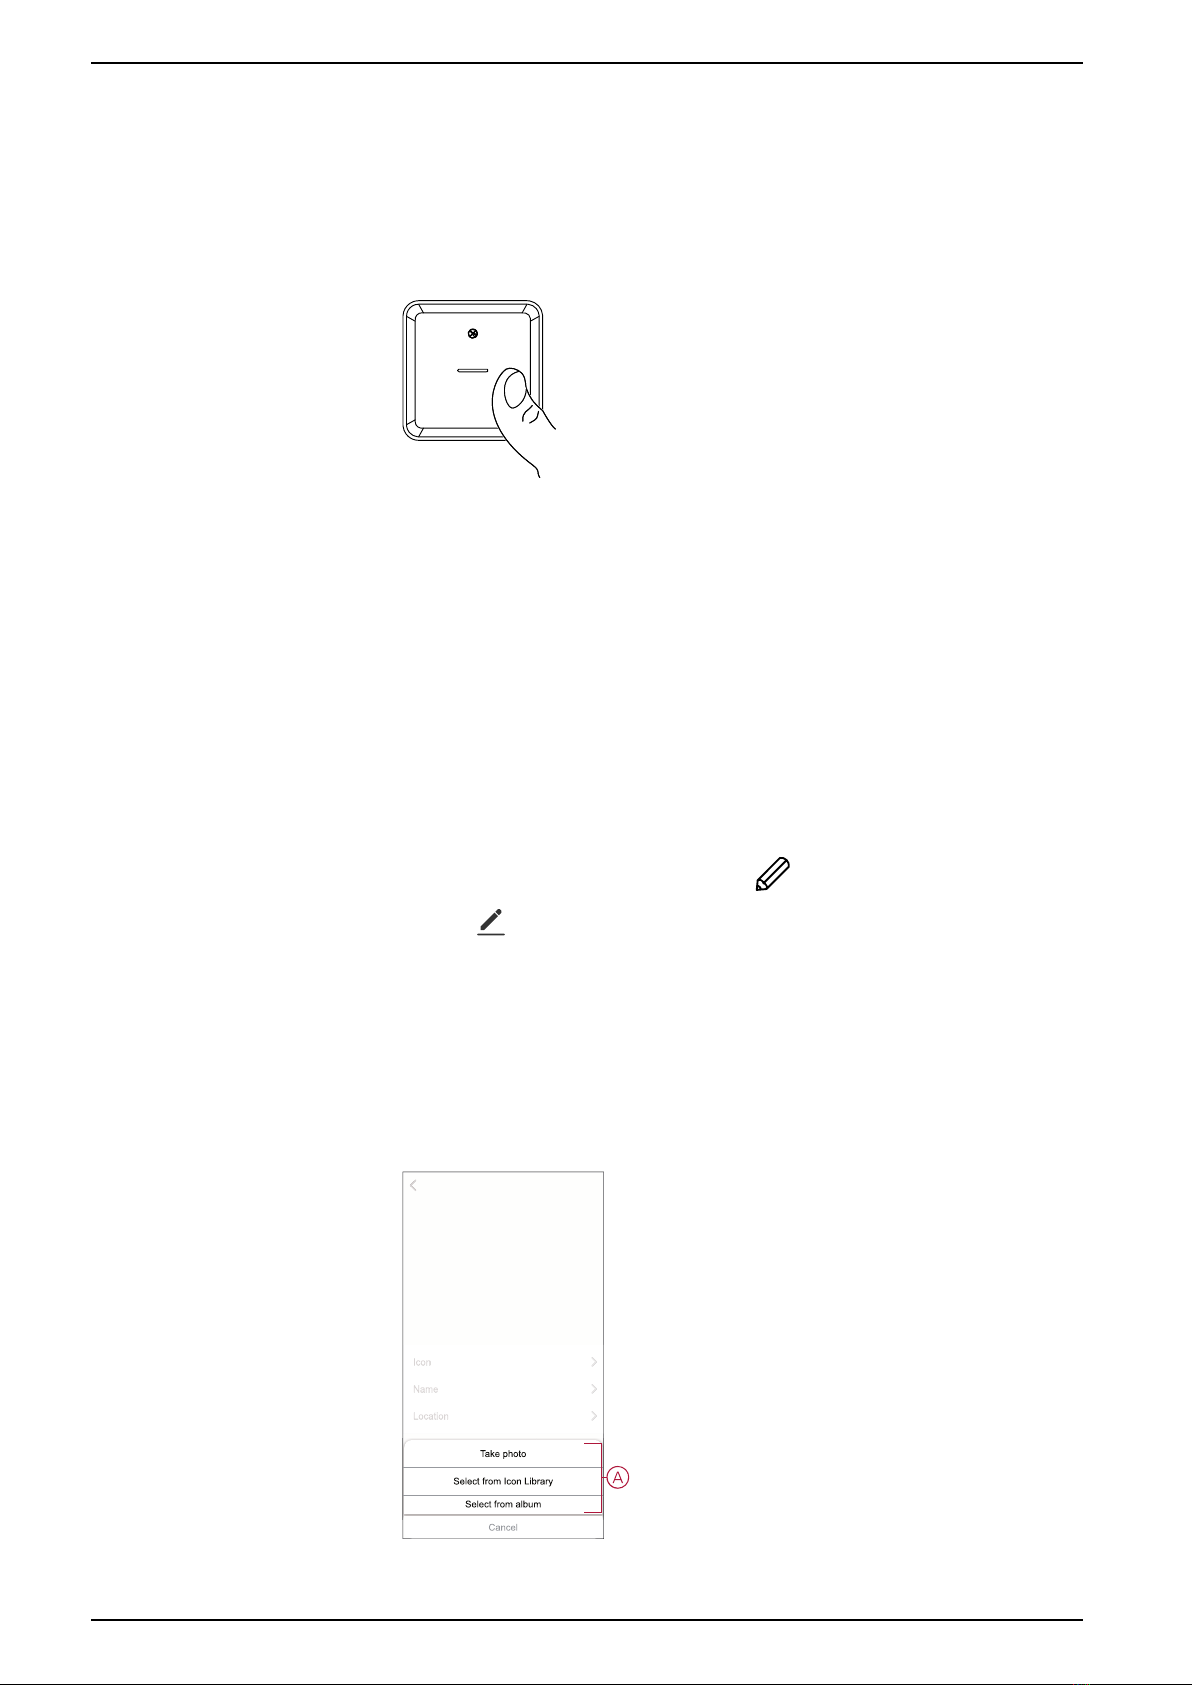
Changing the device icon
You can change the device icon using the ELKO Smart app.
1. On the Home page, select the device for which you wish to change the icon.
2. At the top-right corner of the screen, tap .
3. Tap edit next to the device name.
4. Tap Icon to view the menu.
5. In the slide-up menu, select any one of the following (A) to change the device
icon:
–Take photo - allows you to click a photo from the mobile camera.
–Select from Icon Library - allows you to select an icon from the app
library.
–Select from Album - allows you to select a photo from the mobile gallery.
12 DUG_Smart Smoke Alarm DC_ELKO-01

ELKO - Smart Smoke Alarm Battery
Renaming the device
You can rename the device using the ELKO Smart app.
1. On the Home page, select the device for which you wish to rename.
2. At the top-right corner of the screen, tap .
3. Tap edit next to the device name.
4. Tap Name, enter the new name (A) and then tap Save.
Name
Name
Save
Rename
A
Changing the device location
You can change the device location using the ELKO Smart app.
1. On the Home page, select the device for which you wish to change the
location.
2. At the top-right corner of the screen, tap .
3. Tap edit next to the device name.
4. Tap Location.
5. Select the desired location from the list (A) and then tap Save.
Device location Save
Living Room
Dining Room
Kids Room
Study Room
Master Bedroom
A
DUG_Smart Smoke Alarm DC_ELKO-01 13
ELKO - Smart Smoke Alarm Battery
Removing the device from the app
You can remove a device from the device list using the ELKO Smart app,
To remove the device:
1. On the Home page, tap All devices >Smoke Alarm.
2. Tap to display more details.
3. Tap Remove and Factory Reset Device (A) and tap Confirm.
More
Device information
Remove and Factory Reset Device
Others
Moment and Automation
FAQ & Feedback
Add to home Screen
No updates available.
Smoke Alarm
Room: Sensors
A
TIP: Alternatively, you can tap and hold on theSmoke Alarm on the
Home page to remove the device.
NOTE: By removing the device, you will reset the device. If you still have
a problem with the reset, then refer to resetting the device, page 14.
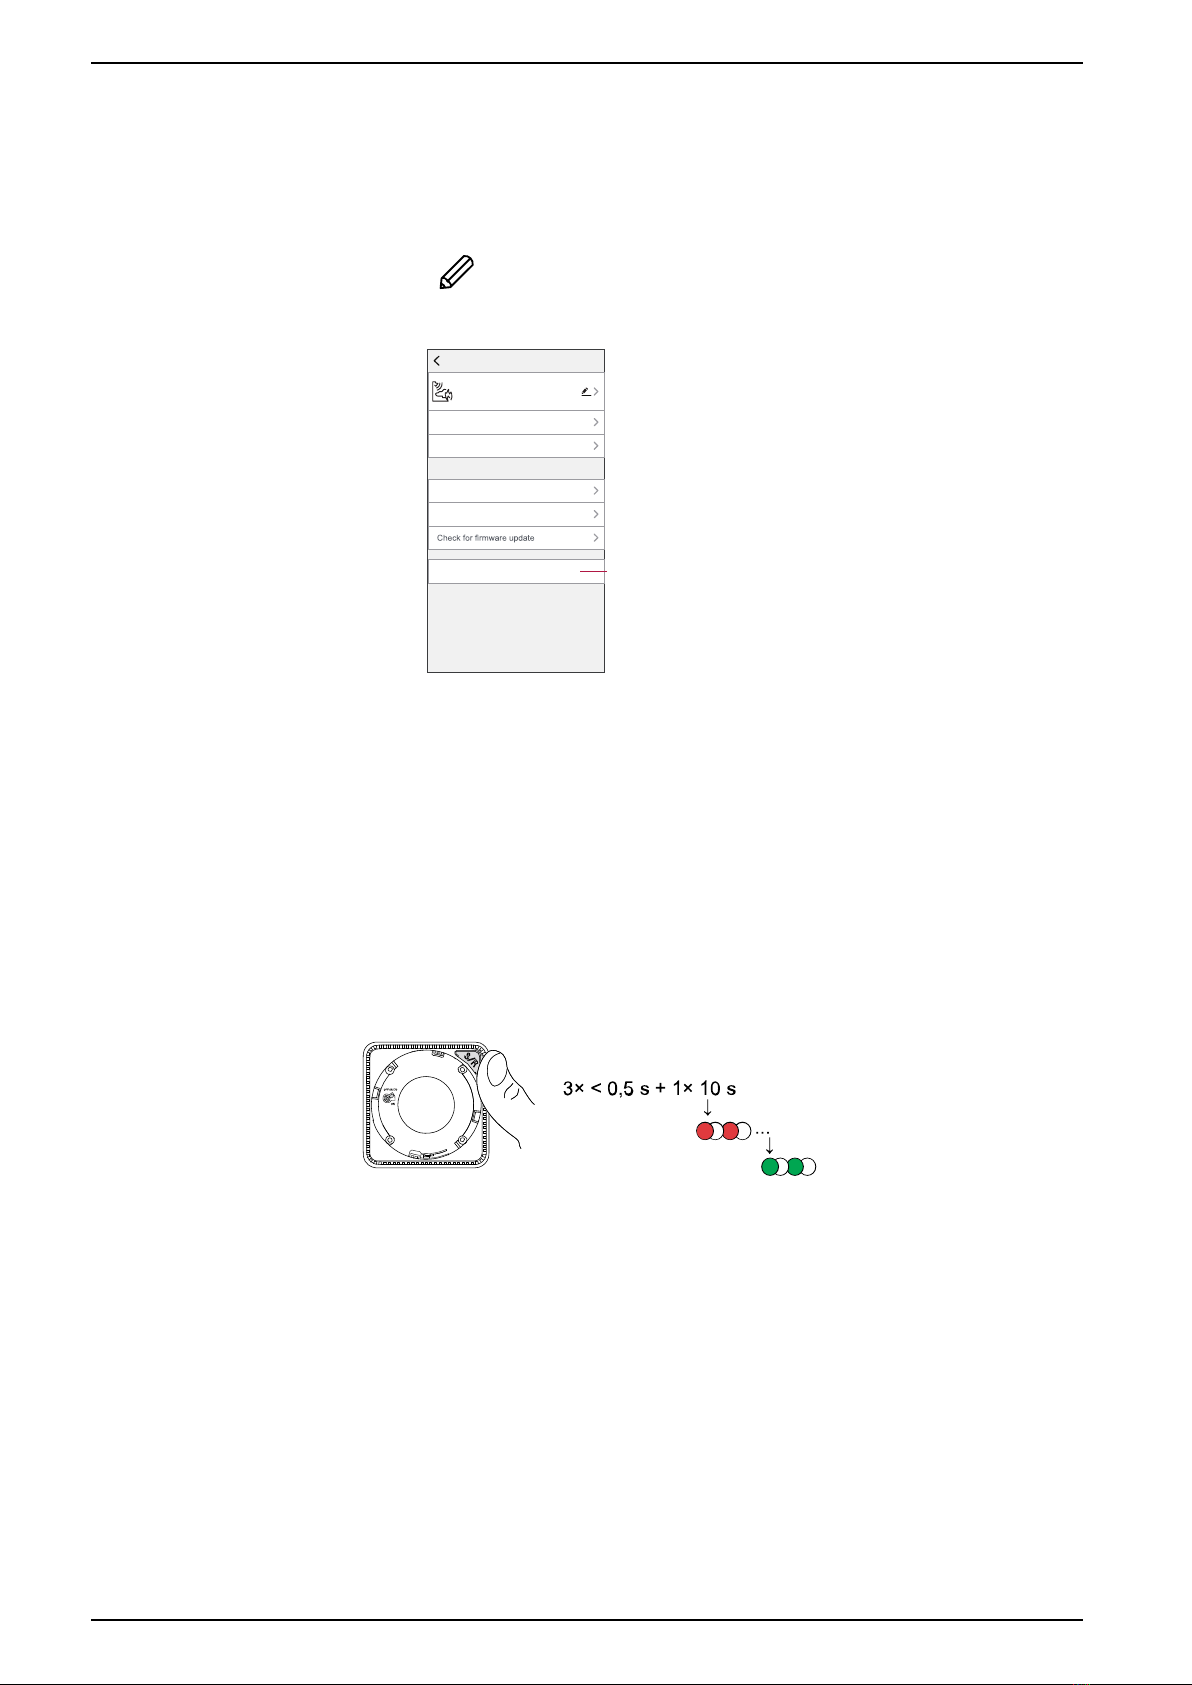
Resetting the device manually
Short press (< 0,5 s) the Setup/Reset button 3 times and then long press the
Setup/Reset button once for >10 s to reset the device to factory default mode.
IMPORTANT: All configuration data, user data and network data are deleted.
14 DUG_Smart Smoke Alarm DC_ELKO-01

ELKO - Smart Smoke Alarm Battery
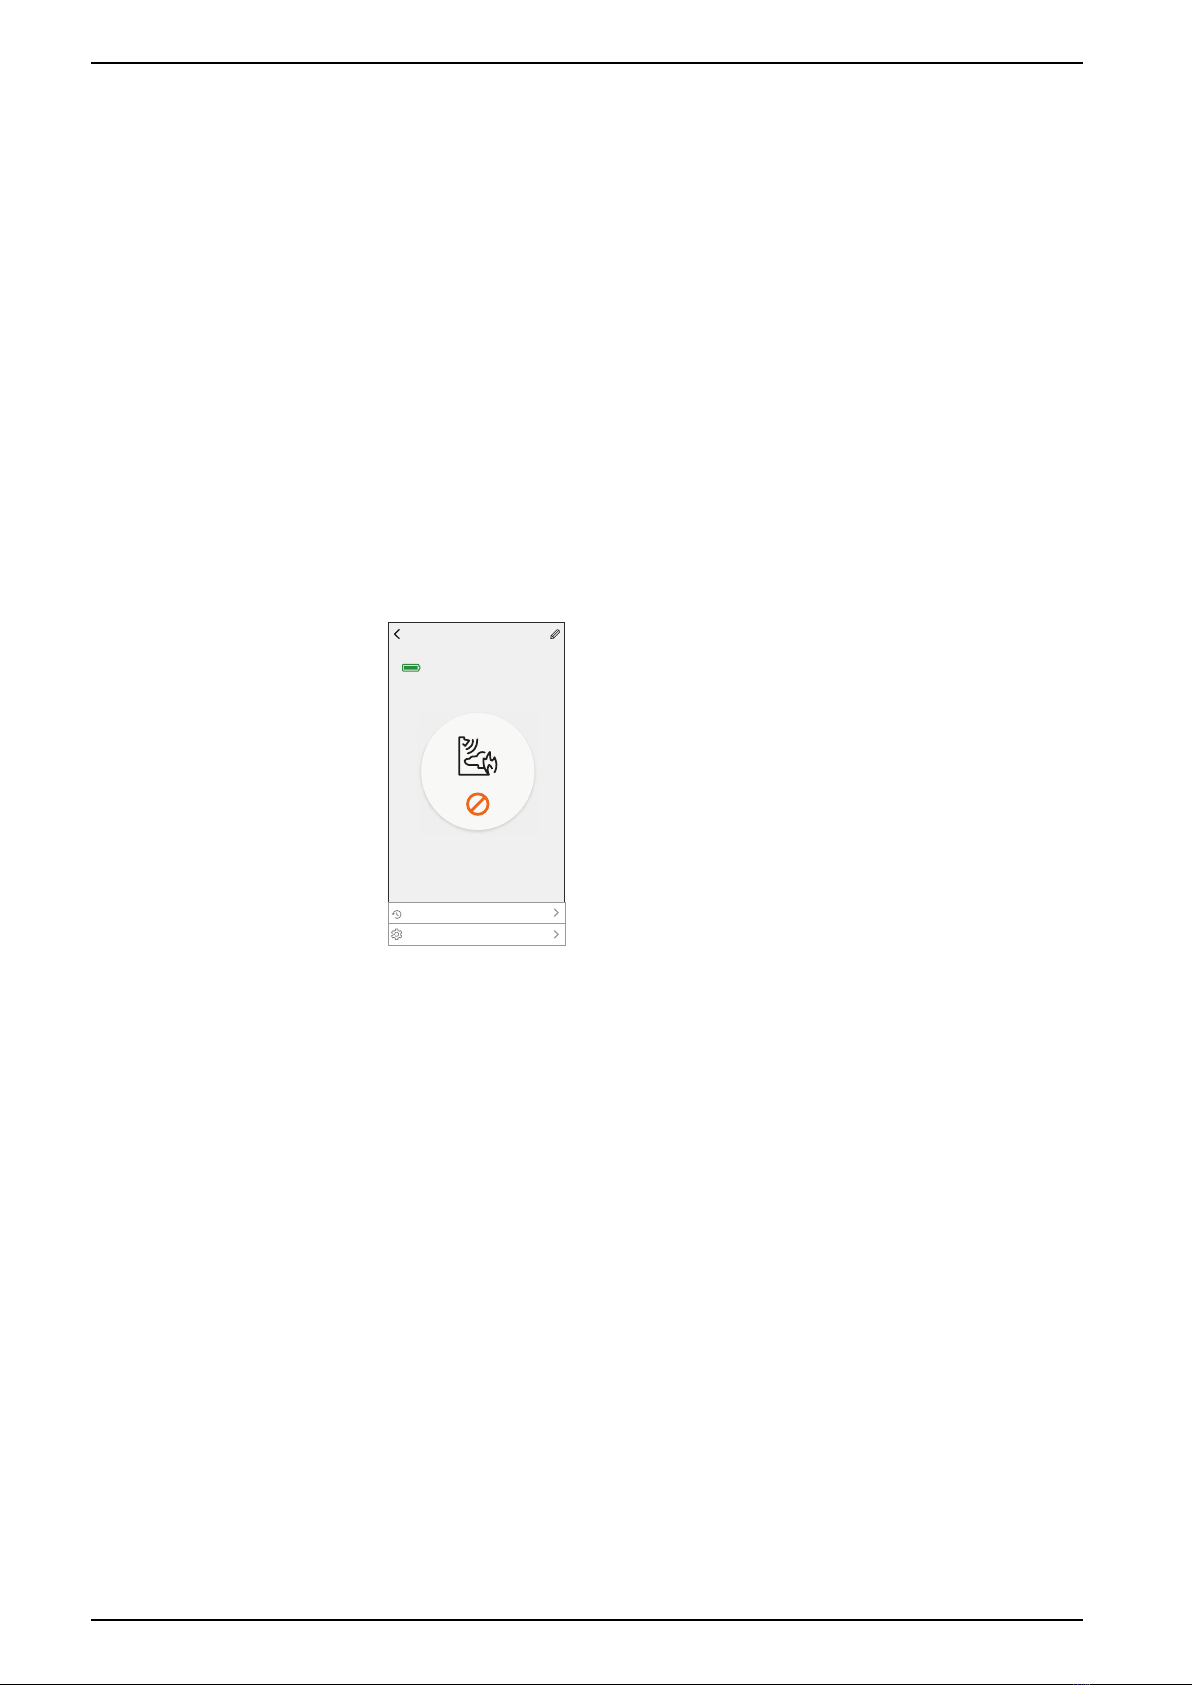
Using the device
The Control Panel of the smoke alarm allows you to view the current state of the
device and allow you access the history and settings.
On the Home page, tap All devices >Smoke Alarm to access the control panel.
On the Smoke Alarm control panel page, you can see the following:
• Battery level (A)
• Current state of the device (B)
•History, page 15 (C)
• Settings (D) : LED brightness settings, page 16,Test alarm reminder, page
17.
History
Settings
C
D
Smoke Alarm
No Alarm
A
B
Checking the device history
Using the ELKO Smart app, you can monitor the smoke detection by accessing
the device history.
To see the device history:
1. On the Home page, tap All devices >Smoke Alarm.
2. On the device control panel page, tap History.
3. In the History page, you can see the date, time, and type of alarm detected.
History
The history supports record checking for 7 days in maximum.
04 February
Smoke Alarm
19:46:02 I The Smoke Alarm occured
Test Alarm
19:41:37 I The Test Alarm occured
Test Alarm
19:41:22 I The Test Alarm occured
04
February
NOTE: The history supports record checking for 7 days maximum.
DUG_Smart Smoke Alarm DC_ELKO-01 15
ELKO - Smart Smoke Alarm Battery
Setting LED brightness
You can change the LED brightness level between minimum and maximum
manually or by using ELKO app.
Changing the LED brightness manually
1. When the device is in standby mode, short press the test/hush button 3 times
within 2 s.
3× < 2 s
↓↓
2. When the Red LED is On, short press the Test/Hush button to switch between
Min. and Max. LED brightness.
1× < 0,5 s
3. Again short press the Test/Hush button 3 times within 2 s to store the adjusted
brightness level. Otherwise, you can wait 30s for the standby LED to turn off,
then the brightness level will be saved.
3× < 2 s
Changing the LED brightness using app
1. On the Home page, tap All devices >Smoke Alarm.
2. On the device control panel page, tap Settings.
3. Tap on LED Indicator Light Level (A).
4. Follow the settings mentioned in the pop-up notification, then tap Ok (B).
5. Select Min or Max indicator level (C).
Settings
LED Indicator Light Level
Test Alarm Reminder
Min
Settings
Notice:
you to take alarm test in every month if this function is on.
LED Indicator Li
g
ht Leve
l
Tes
t
Ala
rm
Re
m
i
n
der
Min
S
ettin
gs
Settings
N
o
ti
ce
:
y
ou to take alarm test in ever
y
month i
f
this
f
unction is on
.
OkCancel
Please press “Reset” key on the device
to wake it up before applying the
settings.
B
A
OFF/AUTO
ON
Settings
LED Indicator Light Level
Test Alarm Reminder
Min
Settings
Notice:
you to take the alarm test in every month if this function is on.
LED Indicator Light Level
Test Alarm Reminder
Min
Settings
Settings
Notice:
you to take the alarm test in every month if this function is on.
Cancel
Max
Min
LED Indicator Light Level
C
16 DUG_Smart Smoke Alarm DC_ELKO-01

ELKO - Smart Smoke Alarm Battery
Test alarm reminder
You can set the reminder for test alarm in the ELKO app.
1. On the Home page, tap All devices >Smoke Alarm.
2. On the device control panel page, tap Settings.
3. Tap the Test Alarm Reminder toggle switch (A) to turn on the reminder.
Settings
LED Indicator Light Level
Test Alarm Reminder
Max
Settings
Notice:
you to take the alarm test in every month if this function is on.
A
NOTE: The app will send a notification to remind you to take the alarm
test in every month if this function is on.
DUG_Smart Smoke Alarm DC_ELKO-01 17
ELKO - Smart Smoke Alarm Battery
Silencing the device
Hush feature
During an alarm event, identify the device(s) which is/are blinking Red LEDs then
short press the Test/Hush button on the device to stop the alarm.
NOTE: In hush mode, the device will not detect smoke/high temperature for
10 minutes. After this time the device resumes to normal operation. During this
time, the Standby LED blinks once every 8 s.
For instance, if smoke is detected and the device is set to hush mode, high-
temperature detection will still be active.
In the event that smoke and high temperature are both detected at the same
time, and the device is set to hush mode, then both smoke and high
temperature detection will not work for the next 10 minutes.
In an interconnected group, if more than one device has blinking Red LEDs and
an active alarm, short press the Test/Hush button on all devices. All
interconnected devices stop alarming within 5 to 10 s.
NOTE: Wait for 10 minutes before performing any test to avoid malfunctioning
of the device.
Once the device is set to Hush Mode the status can be checked in ELKO app.
History
Settings
Smoke Alarm
The device is in Hush Mode - it will
not detect smoke temporarily.
Hush Mode
18 DUG_Smart Smoke Alarm DC_ELKO-01

ELKO - Smart Smoke Alarm Battery
Temporarily disabling smoke detection
To temporarily disable the smoke detection of a device, short press the Test/Hush
button once when the device is in Standby mode. The device will not detect smoke
for 10 minutes. During this mode the Standby LED blinks once every 8 s.
NOTE: The temperature sensor remains active even when the smoke
detection is disabled.
Snoozing the device alerts
Low Battery
When the battery is low, the Standby LED blinks every 48 s, together with a beep.
You can snooze the low battery indication for 10 hours by short pressing the Test/
Hush button once.
IMPORTANT: The user must replace the device within 30 days after the first
alert.
NOTE: You can always check the current battery level in the control panel.
Fault detection
When a device fault is detected, 2 beeps occur every 48 s together with blinking
Standby LED. You can snooze the indication for 10 hours by short pressing the
Test/Hush button once.
Alarm memory
In an interconnected group, the Standby LED on the triggered device blinks once
every 2 s for 72 hours after the alarm has stopped. This allows the user to identify
the device that was triggered by smoke/high temperature. Short press the Test/
Hush button once to snooze the blinking LED for 10 hours.
False alarm
In an event of a false alarm in an interconnected group, it is recommended to
identify the triggering device(s). These devices must be cleaned, serviced or
replaced if necessary.
DUG_Smart Smoke Alarm DC_ELKO-01 19
ELKO - Smart Smoke Alarm Battery
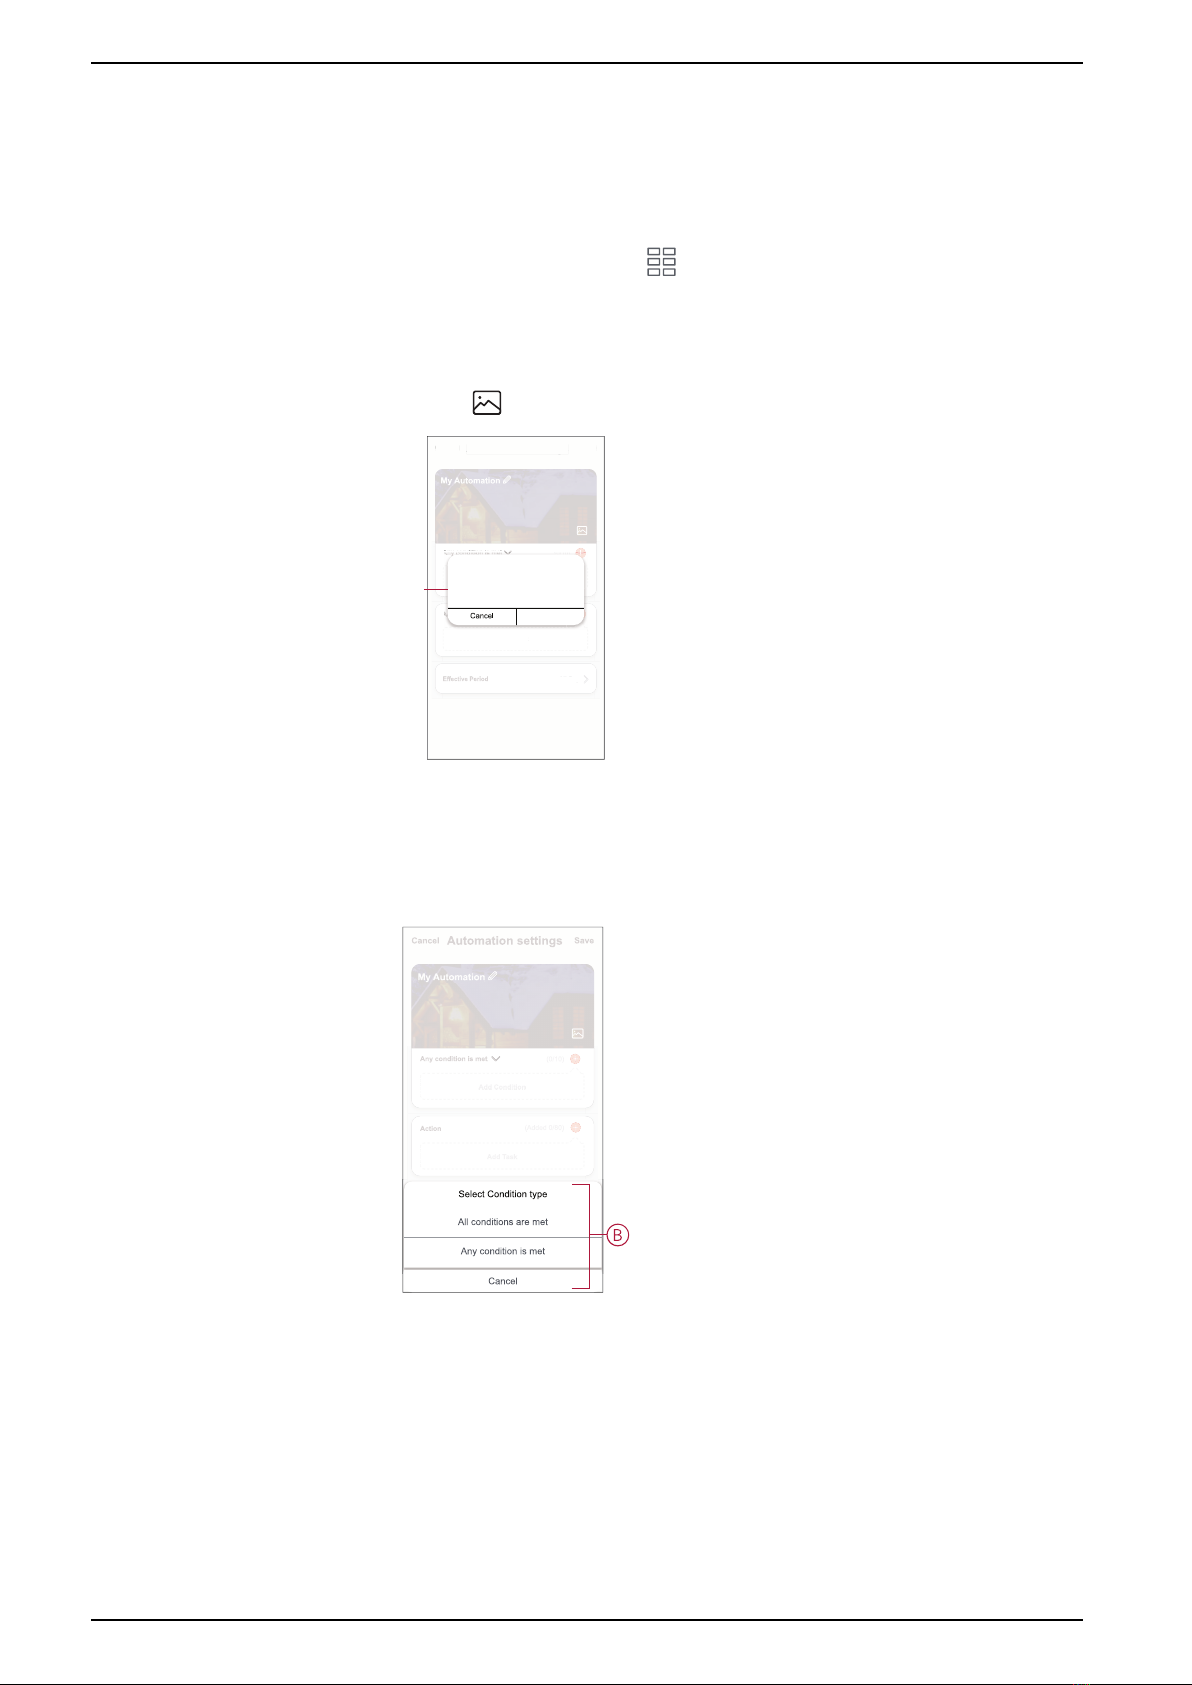
Creating an automation
Automation allows you to group multiple actions that are usually done together,
triggered automatically or at scheduled times. Using the ELKO Smart app, you
can create automations based on your needs.
To create an automation:
1. On the Home page, tap the .
2. Go to Automation >+to create an automation.
3. Tap Edit name, enter the name of the automation (A) and tap Save.
TIP: You can choose the cover image that represents your automation by
tapping .
Automation settings
Cancel Save
Any condition is met
Add Condition
Action
Add Task
All-Day
(0/10)
(Added 0/80)
My Automation
Automation settings
Cancel
Save
Any condition is met
Action
Add Task
All-Day
(0/10)
Edit name
Save
A
4. Tap Any condition is met to select any one of the condition type (B):
–All conditions are met- The automation is triggered when all the
conditions are met.
–Any condition is met- The automation is triggered when at least one
condition is met.
5. Tap Add Condition to display the slide-up menu.
20 DUG_Smart Smoke Alarm DC_ELKO-01
This manual suits for next models
1
Table of contents
Other Elko Smoke Alarm manuals


Popular Smoke Alarm manuals by other brands

System Sensor
System Sensor DNRA Installation and maintenance instructions

aguilera
aguilera AE/SA-OPZ user manual

biosystems
biosystems PhD Ultra Reference manual

x-sense
x-sense XS01-W user manual

GE Security
GE Security FireShield FS302 Technical reference manual

BASETech
BASETech KD-133A operating instructions


