ELLAI MT-25005B User manual

MODEL #
Smart Toilet
Español p.
1
Español p.
Questions, problems, missing parts? Before returning to your retailer, call our customer
service department at 1-877-804-5504, 8:30 a.m. - 5 p.m., EST, Monday - Friday.
ATTACH YOUR RECEIPT HERE
MT-25005B
2
FUNCTION INTRODUCTION
TABLE OF CONTENTS
FUNCTION
Rear Wash
Moving Wash
Front Wash
Moving Front Wash
Spray Tip Position Adjustment
Temperature Adjustment
Cleansing Water Pressure Adjustable
Sit-Down Sensing
Dry With Warm Air
Dry While Moving
Warm Air Temperature Adjustment
Warm Air Outlet Position Adjustment
Deodorization
Power
Eco
Night Lamp
Clean Spray Tips
Seat Soft Closing
Automatic Flush
Smart Remote
Flush In Case Of Power Outage
Automatic Lid
DESCRIPTION
Posterior wash
The rear wash spray tip moves back and forth to wash
Gentle wash special for women
The spray tip special for women moves back and forth to wash gently
Move the spray tip back and forth to wash
May adjust seat and cleansing water temperature
May adjust cleansing water pressure as per needs
All functions will be ready once you sit on the seat
Blow out warm air to dry washed areas
The air outlet moves back and forth to blow warm air to dry the washed parts more quickly
Adjust temperature of the air used to dry
Adjust air outlet position
Used to remove unpleasant odor
Turn on or off toilet power supply
Conserve energy and be environment-friendly
Indicate the toilet location in the night or low light conditions
Spray tips spray water to self-clean before wash
The toilet seat closes slowly as there is a damper inside
Automatically flush the bowl when you leave the seat
May use the remote to set and control the toilet
In case of power outage, press side buttons to flush the bowl
The lid automatically opens when someone approaches and closes when leaving
Function Introduction.......................................................................................................................2
Parts Diagram..................................................................................................................................3
Package Contents............................................................................................................................3
Hardware Contents..........................................................................................................................4
Safety Precautions..........................................................................................................................5
Warning...........................................................................................................................................5
Caution...........................................................................................................................7
Preparation.............................................................................................................................8
Before Installation............................................................................................................................8
Precautions For Installation and Use................................................................................................9
Installation .......................................................................................................................................9
Remote Control - Basic Functions.................................................................................................13
Troubleshooting...........................................................................................................17
Service and Clean..........................................................................................................................17
Inlet Water Strainer Cleaning.........................................................................................................18
Replace the Remote Control Battery..............................................................................................19
Replace the Back-Up Battery.......................................................................................................20
Warranty...............................................................................................................20
Specifications...................................................................................................21
Page 2

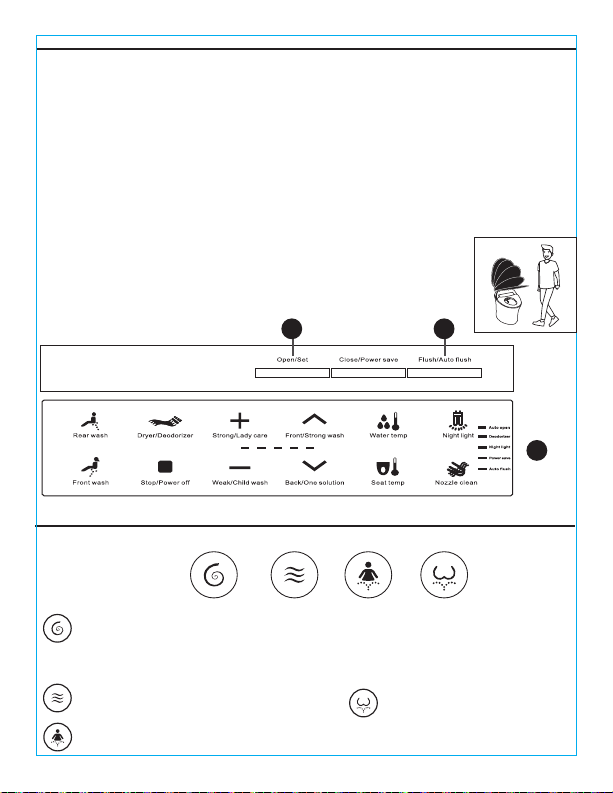
PARTS DIAGRAM
Side Buttons On Toilet
This product is designed to be operated
mainly by the remote. The buttons on
the side are used only when necessary
PACKAGE CONTENTS
3
Included with Remote: Docking Station and Double Side Adhesive Tape
This manual describes items including but not limited to product
materials, process, function features, etc., which may be different with
the actual product due to process improvement or product upgrade. LED
lamp brightness will automatically change with the ambient light.
A
BRemote Control
Toilet
Flush/Power
On/Off
Dryer Front
Wash
Rear
Wash
Power
Plug
Lid
Side Operation
Panel
Ambient Light
Sensor
Heated
Seat
Toilet
Bowl
Warm Air Outlet
Sit-Down
Sensing Area
Nozzle
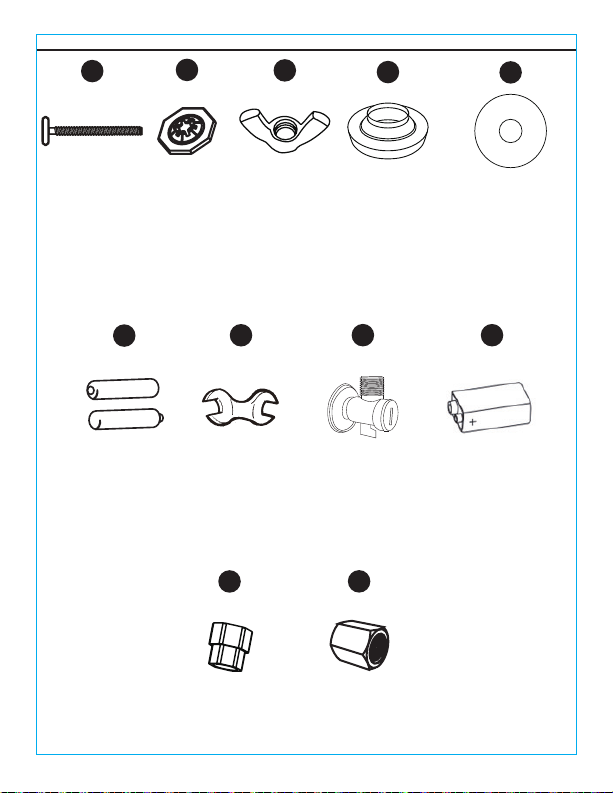
HARDWARE CONTENTS
4
Qty. 2 Qty. 2 Qty. 2 Qty. 1
Qty. 1
Qty. 2 Qty. 1
Qty. 2
Qty. 1
Qty. 1 Qty. 1
AA BB CC DD EE
FF GG HH II
JJ KK
T-Bolt Flat Washer Wing Nut Wax Ring
9V - Seat Cover Battery
AAA Batteries
-
+
-
+
Wrench Angle Valve
Flat Metal Washer
15/16-in Connector
(OPTIONAL)
1/2-in Connector
(OPTIONAL)

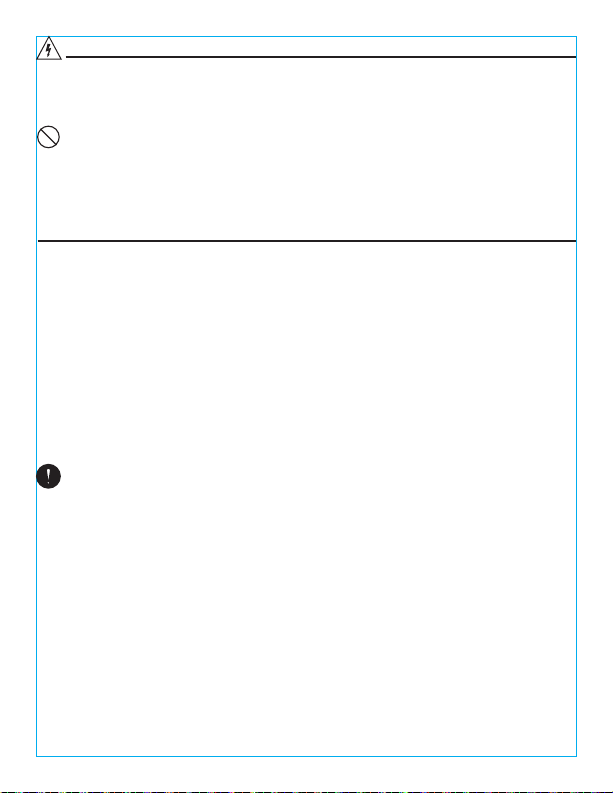
SAFETY PRECAUTIONS
To prevent harm to users and others, as well as prevent property damage, please read and follow the
Warnings and Cautions.
WARNING:
Means incorrect operation. Results of ignoring this sign could lead to
severe injury.
CAUTION:
Means incorrect operation. Results of ignoring this sign could lead to
personal injury or property loss.
Forbidden actions
Mandatory actions
5
•
Persons with a cardiac pacemaker are forbidden to use the remote supplied with this
product. Risk for severe injury may occur (as there are strong magnetic beads inside).
•
Please do NOT pull or insert power plugs with wet hands or electric shock may occur.
•
Please do NOT pour water, hot water or detergents onto the product or power plug. Doing
so may cause fire, electric shock, heat, or short circuit resulting in injury or indoor water
leakage due to product damage.
•
It is strictly forbidden to disassemble, repair, or alter this product by yourself. Otherwise fire,
electric shock, heat or short circuit may occur.
•
Please do NOT install this product on vehicles,
ships or other movable objects. Otherwise
fire, electric shock, heat or short circuit may occur or the seat, lid, or toilet body may come
off, fall and get damaged.
•
Please stop using this product immediately in the event of any fault listed below. In the event
of any one of the following faults, please disconnect the power supply in the distribution box and
turn off the inlet angle valve to stop water supply.
• Water leakage from inside the pipe or product
• Any crack or breakage in the product
• Abnormal noise or smell
• Smoke from the product
• Abnormal heat
• Toilet blockage
• Buffer gasket coming off
•
If you ignore such faults and continue to use, fire, electric shock, heat, short circuit, injury, or
indoor water leakage may occur.
•
Please do NOT use sea water or water other than tap water or drinkable well water or skin
irritation or product faults may occur.
•
Please do NOT touch the power plug if there is a lightning strike. Otherwise electric shock
may occur.
•
Please do NOT allow the inlet water hose to come in contact with the power plug or electrical
outlet. Otherwise electric shock may occur.
WARNING
Failure to adhere to the warnings and attentions documented in this Instruction Manual may void the warranty.
Page 5
• Caution: Low temperature burns. If not used properly, heated seats may cause low
temperature burns. Therefore, if sitting on the seat for a long period of time, please set the
seat temperature adjustment to “off”.
• For the persons or circumstances below, please set temperature adjustment of both the seat
and the warm air to “off”.
• Children, the elderly, or others who cannot adjust temperature to an appropriate level.
• The sick, disabled or others with restricted mobility.
• Lethargic people who have taken medicines with hypnotic effects (such as sleeping pills
and medicine for colds), intoxicated or fatigued.
• As this is an electrical product, please do NOT install it at any place exposed to water splash
or with high humidity.
• If it is used in a bathroom, please install a ventilation fan to maintain good indoor ventilation,
otherwise fire or electric shock may occur.
• This product must be connected to a cold-water pipe. Otherwise personal burns or product
failure may occur.
• Please ensure correct grounding. If product is not properly grounded, electric shock may
occur.
• Proper grounding is ground resistance below 100Ω and copper wire over 1.5mm in diameter
as the distribution panel grounding wire. (*Please ask an installation professional to install
the grounding wire.)
• Make sure the power outlet used is correctly grounded (triplex receptacle outlet). Otherwise
electric shock may occur due to faults or short circuit.
• Outlets for power supply wiring must be configured as follows: Otherwise fire or electric
shock may occur.
• 1. Please use high sensitivity and rapid type residual current circuit breakers (with rated
induction current below 15mA) or insulated transformers (above 1.5kVA, below 3kVA) in the
socket circuit for protection.
• 2. According to relevant national regulations, ensure socket fitting location in advance and
make it as far away from the bathtub as possible.
• *Please make sure wiring work in the above 1. and 2. is finished, or please ask a
professional contractor to perform the wiring.
• Please make sure to insert the power plug firmly into the outlet. Otherwise, fire, heat or short
circuit may occur.
• When pulling out the power plug, please hold the power plug not the cord. (Please do NOT
pull out the power plug by grabbing the cord). Otherwise, fire or heat may occur due to
power cord damage.
6
WARNING
• Please do NOT damage the power cord or plug.
• Please do NOT forcefully throw, stretch, twist, bend, machine, heat, process, bind, or clamp
power cords or inlet water hoses or put heavy things on them.
• Please use power outlets and wiring tools within the defined scope. Heat and fire may result
if wiring outside the defined scope of the power outlet.
• Please do NOT use any power supply other than those designated (AC 120V, 50-60Hz), or
fire or heat may be caused.
• Please do NOT put fingers or other objects into the warm air outlet or block it.
• Please do NOT cover the air outlet with any object or clothes, or burns, electric shock or
parts burn-out may occur.
• Please do NOT approach the product with cigarettes or other kindling, as fire may occur.

7
WARNING
• The power cord, if damaged, must be replaced by professionals from the manufacturer’s
service department or similar departments.
• Please make sure the distribution box power supply is turned off during service or inspection.
Otherwise, electric shock or damage to parts may occur. *Exclude when “Spray Tip
Cleaning” function is activated.
• Persons disabled or lack of experience (including children) are required to use this product
under supervision. Otherwise, personal burns, electric shock, fire, or injury may occur.
• Please do NOT allow children to play with this product. Otherwise, personal burns, electric
shock, fire, or injury may occur.
• Please do NOT throw lighted cigarettes or other inflames into the bowl. Doing so may result
in a fire.
CAUTION
• Please do NOT use toilet if it is loose. Otherwise, the toilet may come off or fall, and cause
personal injury.
• Never touch a damaged area, or injuries may occur. Please replace a damaged part as soon
as possible.
• Please do NOT shock the product, put heavy objects on it, or let any person stand on it.
Otherwise product could become damaged, and personal injury or water leakage may occur.
• Do NOT lift up this product by grabbing the seat or lid.
• Do NOT lift on the seat or lid when there is any object on the toilet. Otherwise damage may
occur which may lead to injuries.
• When cleaning the plastic parts (such as the toilet seat and lid) and water inlet hoses, please
use kitchen detergents (neutral) and never use bathroom detergents, household detergents,
gasoline, banana oil, cleaning powder, nylon brushes, etc. Otherwise, the plastic parts may
become damaged or cracked, and cause personal injury, and water inlet hoses may become
damaged and cause water leakage.
• To avoid sudden water leakage, please never remove the water inlet strainer with the angle
valve opened.(Please refer to the water inlet strainer cleaning procedures).
• Please do NOT bend or damage water inlet hoses or water leakage may occur.
• Please use the new hose assembly supplied with the tools. Old hose assembly can NOT be
reused, or water leakage may occur.
• Please do NOT pour hot water into the bowl, or the bowl may break and cause injuries or
indoor water leakage.
• Please do NOT flush anything other than feces, urine, or tissues in the bowl, for example, a
lot of tissues. or the bowl may break and cause injuries or indoor water leakage.
• Please do NOT lean on the lid when using the toilet, or the lid may be damaged.
• In the event of water leakage, please make sure to close the water inlet angle valve.
• When the ambient temperature is below, 32°F, please take freeze protection measures to
prevent damage to pipes or hoses.
• When the hose is frozen, the toilet or pipes may become damaged and cause water leakage.
• Please adjust indoor temperature properly to avoid damages to the toilet or hoses due to
freezing under cold conditions.
• Please drain water from the toilet inlet hose and turn off the distribution box power supply if
unit will be out of service for an extended period of time.
• After installation, please flush toilet several times to clean out any old or stagnant water from
the lines. Otherwise, skin irritation may occur.
• Heat or fire may result if the toilet is always powered on.

Before beginning assembly of product, make sure all parts are present. Compare parts with package
contents list and hardware contents list. If any part is missing or damaged, do not attempt to
assemble the product.
Estimated Assembly Time: 45 minutes
1. Before installation, bathroom walls and floor tiles should be built, with a sewage draining exit, and
water and electricity routes preserved.
2. Confirm the distance between the sewage draining exit and wall matches with the toilet bought.
3. Confirm the inlet water pressure is between 14.5 PSI (static) and 108.8 PSI (dynamic), and
inlet water flow is above 4.76 GPF/minute. If not, toilet performance may be affected.
4. Confirm the inlet water temperature is between 41°F and 95°F. If not, the toilet may not function
properly.
PREPARATION
BEFORE INSTALLATION
INSTALLATION ENVIRONMENT CHECK
1. Before installing a toilet, install HH angle valve (special) from the supplied accessories onto the tap
water pipe: (NOTE: If there is already an ordinary angle valve, you must replace it with the one
provided).
2. With an empty bucket near by open the HH angle valve and drain dirty water off the tap water pipe,
until clear water flows out. Clean up any excess water off the floor that could further create any
additional safety hazards.
INLET WATER VALVE INSTALLATION
8
• When installing the water inlet strainer, please make sure it is correctly tightened. If not, water
leakage may occur.
• If the bowl becomes blocked, please trip the distribution panel breaker, then remove the
blockage. Otherwise, sewage may spill out because of the automatic flush.
• Use plungers bought on the market to remove any blockages.
• Please flush after each use, including urination. Otherwise, indoor water leakage may occur
due to poor cleaning, bowl blockage, or sewage spill.
• Be sure to wipe off urine, dew, detergent, or water that has splashed on to the floor with a
damp rag. Otherwise, floor stains or corrosion may occur.
CAUTION
Distance
Angle Valve (Special)
15/16-in Connector
OR
Sewage Draining Pipe
JJ
1/2-in Connector KK HH
1. When installing the toilet, please do NOT pour cement mortar into any cavity in front of the toilet or
elsewhere, to avoid cement setting and expanding to crack the toilet bottom.
2. Please do NOT discard into the toilet newspaper, diapers, sanitary pads, or other items that are
likely to block it.
3. Please do NOT use the toilet when the ambient temperature is below 32°F, or the water will freeze
and expand resulting in cracks to the ceramic body.
4. Please do NOT impact the ceramic body with hard objects, to avoid breakage or water leakage.
5. Please use a nylon brush and soap water or neutral detergents to clean the ceramic surface, it is
strictly forbidden to use wire or highly corrosive solvents, to avoid damaging glaze and corroding
pipes. Secure locking caps onto bolts.
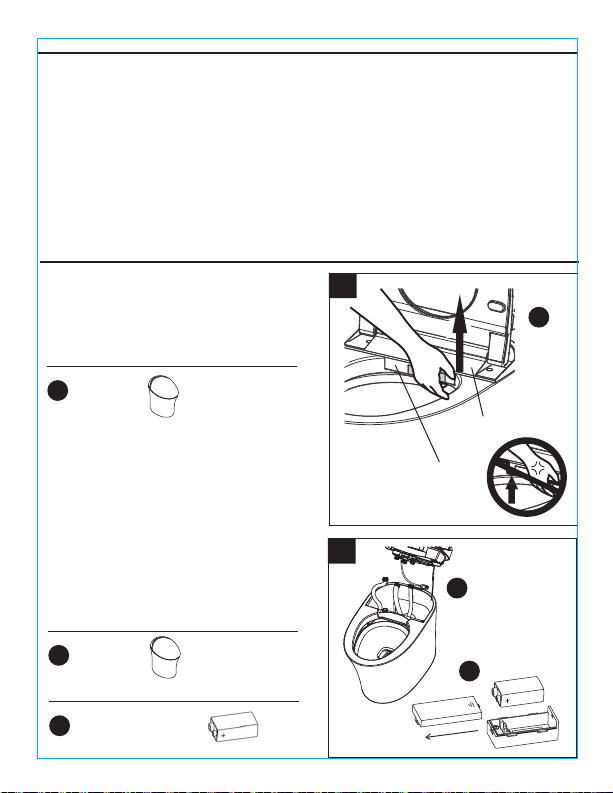
2. TOILET INSTALLATION
1. Lift up on the toilet seat on the inside back right.
NOTE: Avoid excessive pulling on the toilet
seats cover.
Parts Used
A
A
A
II
Toilet
1
PRECAUTIONS FOR INSTALLATION AND USE
1.
9
x 1
x 1
x 1
Toilet Seat Cover
Lift Up
Toilet Seat
2. Once the seat is removed, disconnect the
water connection hoses from the toilet seat and
install the 9V seat cover battery. For reference,
note the diagram below as well as "replacing your
back up battery" stated in this instruction manual.
Parts Used
AToilet
Hardware Used
II 9V Seat Cover Battery
2
Push to open battery box
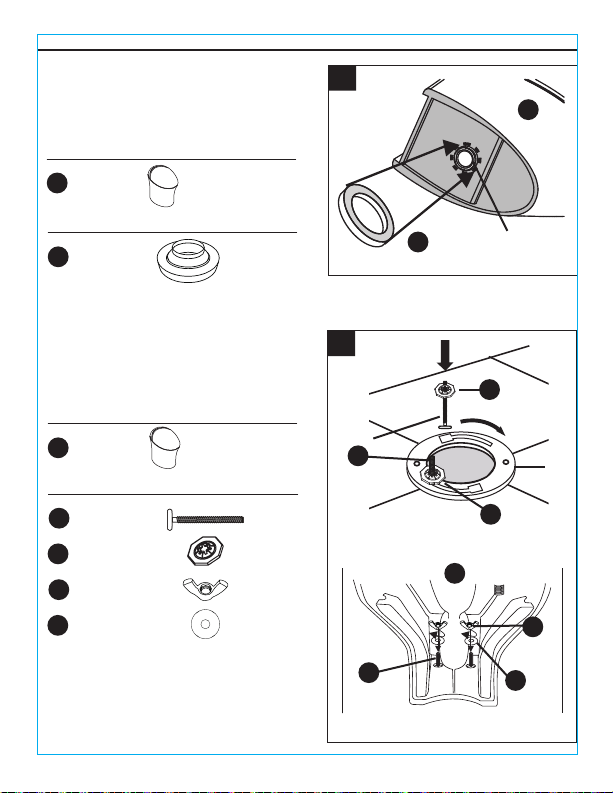
3. Place the wax ring under the toilet.
Parts Used
A
A
DD
A
AA
Toilet
3
TOILET INSTALLATION
2.
10
x 1
x 1
x 2
4. Install the floor bolts onto floor flange.
Position the toilet onto the floor flange. Make
sure the fixing bolts are aligned with the toilet
holes. Tighten the wing nuts onto bolts.
Parts Used
AToilet
Hardware Used
AA T-Bolt
4
x 2
BB Flat Washer
x 1
Hardware Used
DD Wax Ring
Sewage Outlet
Floor
Flange
BB
x 2
CC Wing Nuts
x 2
EE Flat Metal Washer CC
EE
AA
BB
5. Reconnect the water connection hoses on
the toilet seat.
Parts Used
A
A
A
Toilet
5
TOILET INSTALLATION
2.
11
x 1
A
x 1
Hardware Used
HH Angle Valve
1. Connect the toilet water inlet hose with
the angle valve.
2. Open the angle valve to check for water
leakage at connection points.
Parts Used
A
A
HH
Toilet
WATER SUPPLY INSTALLATION
3.
x 1
6. Reconnect the toilet seat.
Parts Used
AToilet
6
x 1
Toilet Water
Inlet Port
Water
Inlet Hose
(Pre-install)
Constant
Valve
Angle Valve
(Special)
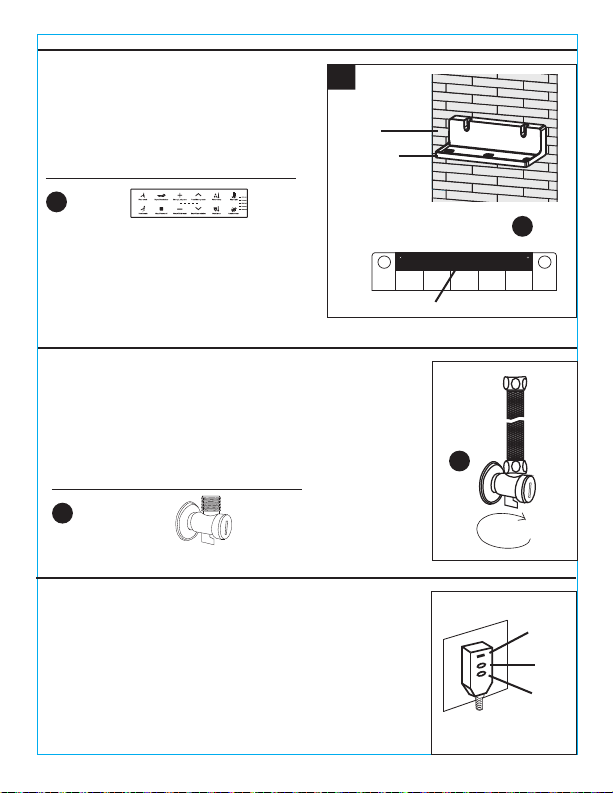
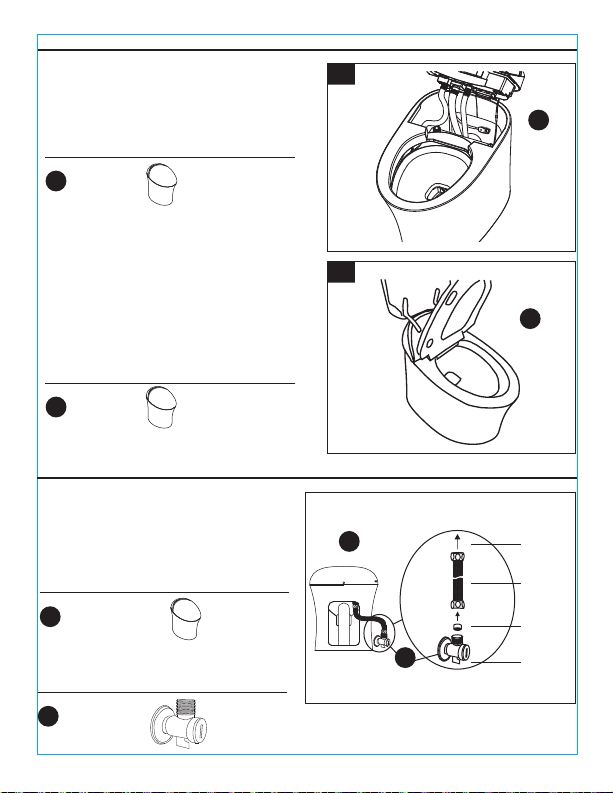
1. Tear the paper of the double-sided tape on the
back of the bracket, stick the bracket on the wall.
NOTE: Clean the installation position before
pasting. Strongly and evenly press the tape when
pasting. Ready for use after 15 minutes.
Parts Used
B
B
HH
Remote
1
REMOTE CONTROLLER INSTALLATION
4.
TURN ON WATER
5.
12
x 1
x 1
Double Sided Tape
1. Turn the water on by turning the knob on the supply angle
valve counter-clockwise until the valve is fully open.
2. Check all connections carefully and make sure that there is
no water leakage from anyconnection.
NOTE: If there is leaking from a connection, re-tighten the connection.
Hardware Used
HH Angle Valve
LINK THE POWER
6.
1. Insert the power plug fully into the socket, and the power indication
lamp will turn on.
NOTE: When powering on for the first time, please press the test
button on the plug. If the power indicator goes out, it means current
leakage protection is working properly. Press the reset button
on the plug again. When the power indicator turns on, the power
supply to the toilet is resumed.
Wall
Remote
Controller
Bracket
Power
Indicator
Test
Button
Reset
Button

13
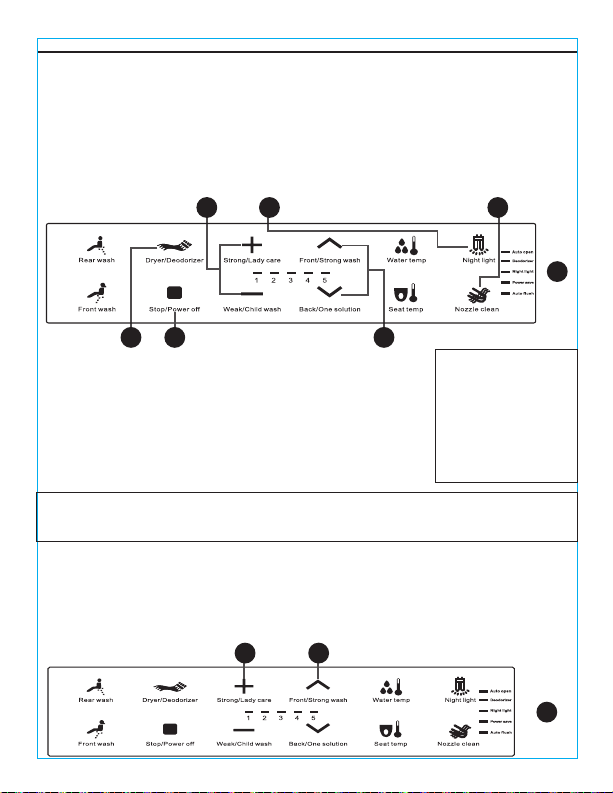
REMOTE CONTROL - BASIC FUNCTIONS
CHECK TOILET BUTTONS
7.
1. Confirm the power indicator on the side buttons light up.
NOTE: If the power indicator on the side buttons does
NOT light up, it means all functions are not working.
Please use the remote or side buttons to power on the toilet.
• Users must have their skin in contact with the sit-down sensor, to activate washing.
• If deodorization is set to on, deodorizing fans will automatically start after users sit down.
1. Stop
• Stop the current cleaning operation. If the stop button is not pressed, the rear washing/ front washing will stop
automatically after 2 minutes. Press and hold the stop button for 3 seconds to turn off.
2. Water pressure adjustment
• 4 settings to choose from. Adjust comfortable water pressure by pressing these buttons.
3. Nozzle position adjustment
• 5 settings available for adjusting to the desired satisfied position to clean.
NOTE: Under oscillating cleaning, the nozzle position adjustment is unavailable.
4. Rear wash
• Press the rear wash button and the nozzle extends out to work. Press the button again to change the rear oscillating
cleansing, the indicator #1 will blink on remote control, nozzle repeatedly swings back or front. Press again, to stop the
oscillating cleansing and to switch back to rear wash. Nozzle position adjustment
5. Front wash
• Press the front wash button and the nozzle extends reaches out to work. Press the button again to change the front
oscillating cleansing. The indicator #1 will blink on the remote control, and nozzle repeatedly swings back or front. Press
again to stop the oscillating cleansing and to switch back to front wash.
Side Button
Icons Light
Up After
Power-On
Ambient Light Sensor
1
45
B
2 3
NOTE:
• The number below the
remote-control indicator is
referenced only for
functional instructions and
actual remote does not
have this number.
14
REMOTE CONTROL - BASIC FUNCTIONS
B
B
NOTE:
• UV sterilization function
automatically turns on and
sterilizes for 3 minutes after the
toilet seat is not in-use for 12
seconds. It will sterilize again
every 4 hours. Attention: There
may be differences depending
on the configuration of the
toilet.
NOTE:
• Deodorizer will turn off when under drying function. The deodorizer will auto-open when drying is finished and will keep
working for 1.5 minutes after people leave the toilet seat.
6 7 8
911
6. Warm air temp adjustment
• 4 settings to choose from. Adjust warm air temperature by pressing these buttons.
7. Night light
• Press this button to turn on the light, press again to turn the light off. The corresponding light on the right will be on or off
simultaneously.
8. Nozzle clean
• Press this button to enter into nozzle cleaning mode. Water will flow out of the nozzle allowing you to clean it.
• Nozzle clean is only allowable when the seat is not occupied.
• The nozzle will automatically clean the exterior part of the nozzle before rear wash and front wash. Press this button again
to end the session, or session will automatically ends after cleaning for 2 minutes.
9. Dryer
• Press this button to start warm air drying. Press again to change to movable air drying
that swings back to front. Press this button again to stop.
10. Stop
• Turn off the drying function. Otherwise, the warm air will stop automatically after running
for 4 minutes.
11. Dryer position adjustment
• 4 settings to choose from. Adjust the dryer position by pressing these buttons.
Notice: Under movable drying, the dryer position adjustment is unavailable.
12. Lady care
• Press this button to enter lady care in idle mode. Set as the default, the nozzle extends reaches out, the water temp is set
to the highest level 102.2°F, and the water pressure is set to 2nd level.
13. Strong wash
• Press this button to enter the powerful washing mode in idle mode. The nozzle extends out and starts to discharge. Water
pressure is at the highest level. Press this button again to end session, or washing will end after 2 minutes.
10
12 13

15
NOTE:
• Idle mode means rear wash, front wash, dryer, flush, etc. will
not be actively working. Child wash, one solution,strong wash,
and lady care must be enabled in idle mode.
NOTE:
• Once the seat is powered back on, the, water temp, seat temp, automatic deodorization, automatic flushing, and other
parameters automatically return to the settings before the power was off.
NOTE:
• Working mode distinction:
1. Operation mode: It is in the working state of rear wash, front wash, drying, flushing, nozzle cleaning, etc.
2. Idle mode: refers to the idle waiting state in non-operating mode.
3. Standby mode: When press the power on the side of the remote control or side button, the machine enters a standby
state, and the power consumption is the lowest.
REMOTE CONTROL - BASIC FUNCTIONS
B
14
15 16 17 18
15. Deodorizer
• Press this button to start deodorizing and the indicator on the remote control will lights up. Press this button again to end.
16. Child wash
• Press this button to start the child wash mode. The nozzle extends out to and nozzle position is at the front (5 level). The
low water pressure is low, (1 level). and the water temp is at a mid-grade 96.8°F. After washing press this button again to
end the session, or it will automatically end after 30 seconds of use.
17. One solution
• Press this button to start in the idle mode. Session will consist of a rear wash for 40 seconds, oscillate wash for 20 seconds,
warm air dryer for 20 seconds, then end. In this mode press this button again to end session.
18. Seat temp
• Press this button to enter seat temp adjustment. There are 4 settings to choose from: Normal
temp, 1 Level, 2 Level, 3 Level.
Normal temp there is no heating.
1 level is 91.4°F,1 light on.
2 level is 96.8°F, 3 lights on.
3 level is 102.2°F, 5 lights on.
Each time you depress this button, the water temp will change to the next level. To prevent the low temp burning, the toilet
seat will automatically lower to below 95°F after a person sits on the seat for 10 minutes.
14. Water temp
• Press this button to enter water temp adjustment. There are 4 settings to choose from:
Normal temp, 1 Level, 2 Level, 3 Level.
Normal temp there is no heat.
1 level is 91.4°F,1 light on.
2 level is 96.8°F, 3 lights on.
3 level is 102.2°F, 5 lights on.
Each time you depress this button, the, water temp will increase change to the next level
16
B
REMOTE CONTROL - BASIC FUNCTIONS
SIDE BUTTONS - BASIC FUNCTIONS
19. Flush/Auto flush
• Press this button once to flush, and the corresponding indicator will blink on the remote control. Press and hold for 3
seconds to start auto-flush. After leaving the seat for 5 seconds, auto-flush will flush the toilet once. Press and hold this
button again to cancel auto flush.
Attention: When a person is sitting on the seat and flushes the toilet with the remote control or the side button, after leaving
the seat, auto-flushing will not work.
20. Open/Set - Auto Open
• Press this button to open the seat when the seat is closed. Press this button for 3 seconds to turn on the automatic seat
function. The seat will automatically open when the person is close to the toilet, and will automatically closed after a person
has left for two minutes. The automatic opening and/or closing of the seat will only operate if the automatic seat function has
been turned on. The sensor only detects the movement of the human body, and when standing still for a long time, it may
cause abnormal movement.
Note: During the electric opening and/or closing process, do not forcibly close the lid this will cause the toilet to malfunction.
• Once a person approaches the toilet within 31.5-in to 47.24-in, the lid will automatically open.
19
20
• This product is designed to be operated primarily by the remote. The buttons on the side are used
only when necessary.
Flush/Power ON/Off
Flush
When power is on, press this button to flush once. Power off: When power is on, press and hold this button for
over 3 seconds to power off the toilet and turn off the icon indicator. Power on: When power is off, press and hold
this button for over 3 seconds to power on the toilet and turn on the icon indicator. Outage flush: In case of power
outage, press this button to flush once. (Note: Back-up batteries must be installed.)
Dry
Press once to start drying, then press again to stop.
Dryer Front Wash Rear Wash
Front Wash
Press once to start front wash, then press again to stop.
Rear Wash
Press once to start rear wash, then press
again to stop.

BUZZER SOUNDS FROM TOILET
17
TROUBLESHOOTING
PROBLEM POSSIBLE CAUSE SOLUTION
Crashed
(Indicator light
not on)
1. The outlet is not connected with the power
supply, or the plug is not fully inserted.
2. The toilet is not powered on after accidental
power outage.
1. Check that power cord is plugged in.
Press the reset button until indication
light turns on.
2. Use the remote or side buttons to
power on.
Water does not spray or
Water pressure is weak
1. Angle valve not opened or slightly opened.
2. Water level is set to LOW.
3. Inlet water strainer blocked.
4. Spray tip hole blocked.
1. Open the angle valve or adjust openness.
2. Turn up water level to higher setting.
3. Clean the strainer.
4. Clean or replace the spray tip.
Water is not warm 1. Water level is set to Normal Temperature. 1. Re-adjust to turn up water level to higher
setting.
Seat temp. not warm 1. Seat temperature is set to Normal
Temperature or toilet is in Eco mode.
1. Re-adjust to turn up seat temp to higher
setting.
Lid loose 1. Loose bolts on the seat. 1. Re-tighten bolts.
Remote not working 1. Batteries in the remote no longer work. 1. Replace the batteries in the remote.
Buttons not working 1. The buttons are damaged. 1. Restart or call service for help.
Water leakage 1. Angle valve, inlet water pipe and water
distributor not properly connected.
1. Re-connect.
Outage flush not working 1. Back-up batteries not installed or the
batteries have failed.
1. Install or replace the back-up batteries.
SERVICE & CLEAN
Maintenance
• Before performing maintenance, please unplug the power source.
• Regular maintenance is required to ensure that the product operates at optimum efficiency.
• Please use soft wet cloth to clean the toilet housing and seat. Any dirt that is left on the seat will
need to cleaned promptly. A neutral detergent can be used if needed.
• The toilet buzzer is a sound generating device and serves as a medium for the toilet to indicate
the following:
• Buzz 1: Somebody on seat, may respond to all operations.
• Buzz 2: Nobody on seat, may respond to some operations.
• Buzz 3+: Product system faults.

SERVICE & CLEAN
1.
TURN OFF WATER SUPPLY
2.
REMOVE THE STRAINER
18
Spray Tip Cleaning and Servicing
• Press 'Nozzle Clean' button and water sprays out. Press the button again then the rear nozzle
extends, then press again and front nozzle extends too. Clean the nozzles with a non-abrasive
brush. It can be repeated switched.
NOTE: Don't forcefully pull or bend spray tips.
1. When you find that flush water pressure is not
enough or decreases, clean the strainer.
2. Please turn off inlet water valve to stop water
supply.
3. Turn the angle valve handle counter-clockwise
to close the angle valve.
NOTE: It is forbidden to remove the strainer when
the inlet water valve is not closed, otherwise water
may spray out.
1. Remove the strainer cover with a flat-head screwdriver and pull it out together with the strainer
inside. Please refer to pictures for detailed operations.
A
x 1
Hardware Used
HH Angle Valve
Parts Used
AToilet
Turn counter-clockwise of the strainer cover
x 1
HH
A
INLET WATER STRAINER CLEANING

19
REPLACE THE REMOTE CONTROL BATTERY
3.
CLEAN
4.
RE-INSTALL
1. Take out the strainer and remove the dirt from it.
Flush it with tap water and brush with a cleaning
toothbrush.
NOTE: Please do NOT use any detergent; just
water. Do NOT use too much force when
cleaning, or the strainer may become bent or
damaged.
When the battery is running out, the remote controller is sometimes insensitive and
sometimes out of control the batteries should be replaced at this point.
• The positive and negative poles of the battery must be placed correctly, and the compression
spring protrudes from the negative pole.
• New and old batteries cannot be mixed.
• Please use alkaline batteries.
1. Install the strainer back in the reverse order it was taken off.
NOTE: After mounting, open the valve and check for water leakage.
Remote control code matching instructions
1. The system is powered off and the remote control is on standby.
2. Press the " weak" and " rear " of the remote control at the same time until the gear indicator
flashes continuously and then release.
3. Power on the system within 5 seconds.
4. The indicator light of the remote control stops flashing and the code matching is completed.
NOTE: The code matching time of the remote control is 10 seconds, and the code matching will be
automatically exited after the time-out operation.
x 2
Hardware Used
FF AAA-Batterys
Parts Used
-+
-+
-+
-+
B
FF
BRemote x 1
WARRANTY
20
In accordance with the instructions and precautions for use, if a failure occurs after normal use within 1 year of purchase
date. Please contact customer service center. This warranty is void if any of the following conditions exist.
• Failures due to carelessness or negligence during use, and failures due to improper repair or modification.
• Failure or damage to the mobile installation location.
• Faults and damage caused by fire, earthquake, flood, lightning, and other natural disasters, pollution, or abnormal voltage.
• Failures and damage caused by the use of unspecified power sources (voltage,frequency).
• Used for purposes other than general domestic use.
Origin21 should not be liable for any loss caused by the fore said incorrect installation or use.
Printed in China
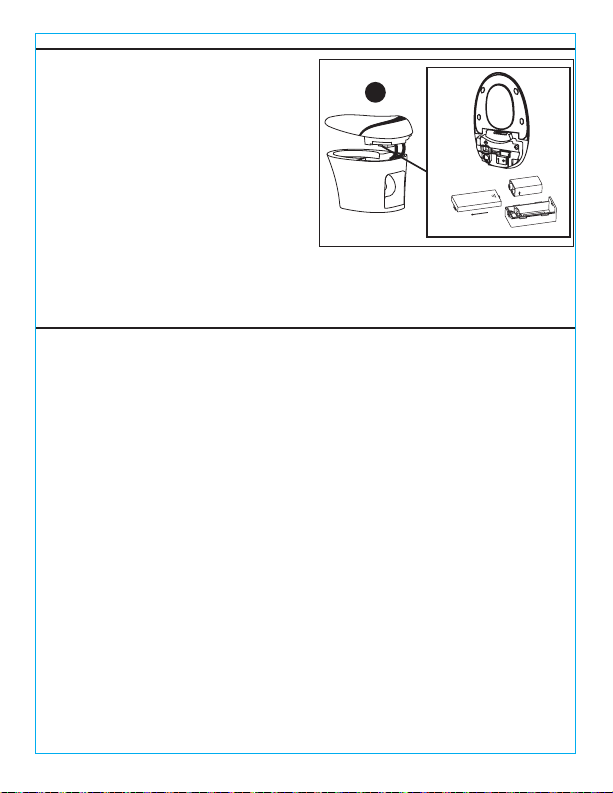
REPLACE THE BACK-UP BATTERY
1. Remove the power plug from the outlet.
2. Lift up the lid.
3. Open the battery back cover.
4. Replace batteries, with attention given to their
positive and negative positions.
5. Press the Flush button on the side of the toilet
to make sure the toilet flushes properly.
6. Replace the battery box and position the lid
back on.
7. Insert the power plug and power on.
NOTE: Back-up batteries must be 9V alkaline cells.
Please do NOT use batteries of other specifications.
Properly dispose of, or recycle replaced old batteries.
Push
battery box in
this direction.
Back-up
batteries
Battery box
A
Table of contents
Other ELLAI Toilet manuals

Popular Toilet manuals by other brands


Toto
Toto CW542HME5UNW1 installation guide

Meissen Keramik
Meissen Keramik GENERA Ultimate user manual

Kohler
Kohler Escale K-25089T-S installation instructions

Bischoff & Bischoff
Bischoff & Bischoff TSE-A / O instruction manual

PolyJohn
PolyJohn PH04 COMFORT XLT Series Product instructions

FV
FV E183 quick start guide

Axent
Axent AXENT.ONE user manual

LAFEME
LAFEME CRAWFORD ST21 instruction manual

Kohler
Kohler BARDON VITREOUS CHINA TOUCHLESS K-4915T-Y installation instructions

Reece
Reece LAUFEN New Classic 1813058 installation instructions

Porcelanosa
Porcelanosa Noken VITAE 100184342-N346779938 manual

Vetus
Vetus HATO12C Installation and user manual