manuals.online logo
Brands
  1. Home
  2. •
  3. Brands
  4. •
  5. Helvex
  6. •
  7. Toilet
  8. •
  9. Helvex WC MURANO 2P User manual

Helvex WC MURANO 2P User manual

General Installation / Instalación General
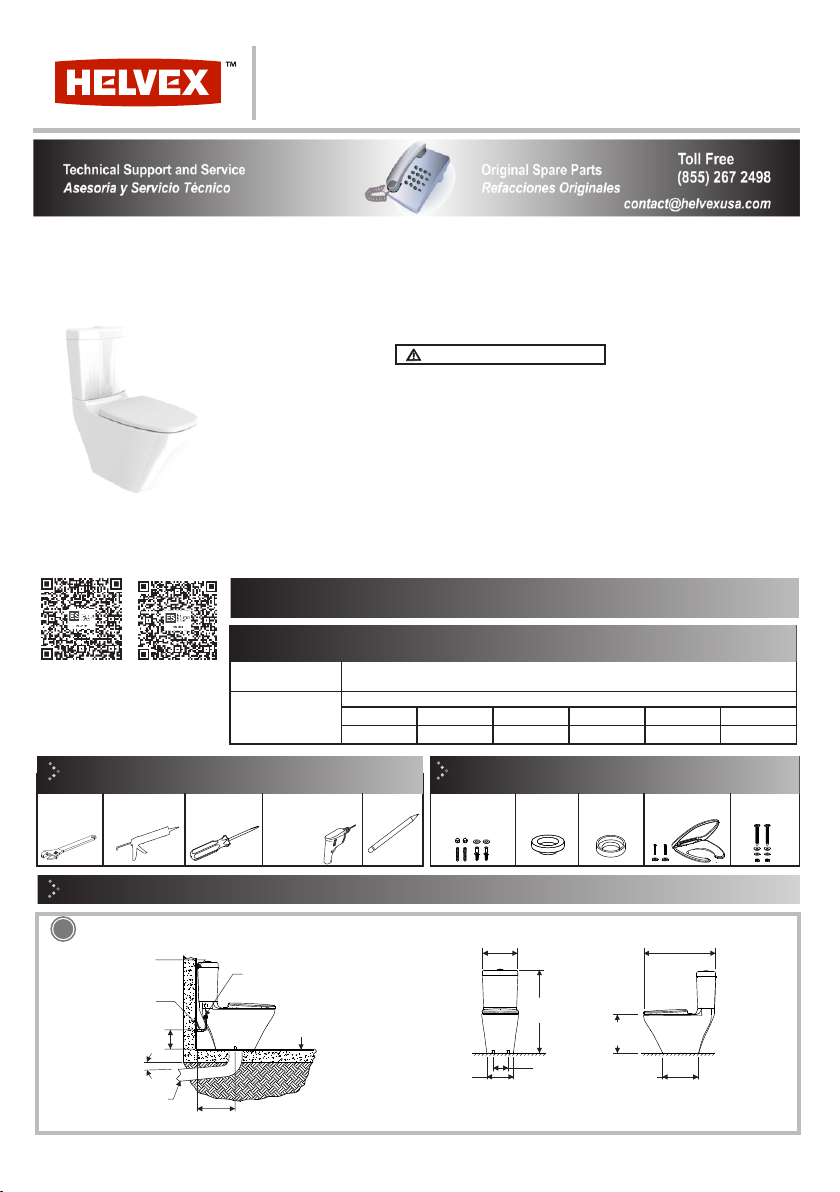
1Install the toilet according to the dimensions shown in the figure. / Instale el inodoro de acuerdo a las medidas que se muestran en la figura.
* 5,9” (15 cm)
tubería de PVC Ø 4”
Nivel de Piso Terminado
finished wall
pared con
acabado final manguera flexible
(no incluida)
válvula angular
(no incluida)
*12” (30,5 cm)
NPT
2%
anglular valve
(not included)
PVC pipe Ø 4 “
flexible hose
(not included)
Finished Floor Level
Recommended Tools and Materials / Items Included in the Product /
Artículos Incluidos en el Producto
kit de sujeción
tank to bowl
fixing kit
screwdriver
destornillador
drill with
Ø 3/8" drill bit
taladro con broca
de Ø 3/8”
pencil
lápiz
silicón anti-hongos
anti-fungus silicon
*Recommended Dimensions
*Medidas Recomendadas
toilet to floor fixing
kit
paquete de fijación
al piso
INSTALLATION
GUÍA DE INSTALACIÓN
GUIDE
cuello de cera
wax ring tank to bowl
gasket
empaque
esponjoso
asiento AT-3
AT-3 seat
FFL
Herramientas y Materiales Recomendados
14,0” (35,8 cm)
33,3”
(84,7 cm)
6”
(15,2 cm)
10,4”
(26,5 cm) (37,0 cm)14,5”
28,8” (73,3 cm)
15,9”(40,5 cm)
Front View / Vista Frontal
Side View / Vista Lateral
perico
adjustable
wrench
1,28 GPF 2 Piece Elongated Toilet
Inodoro Elongado de 2 Piezas 4,8 LPD
* “W” for White or “B” for Bone finishing.
*"W" para blanco o "B" para acabado Marfil.
S11700222E21
CAUTION: THIS PRODUCT IS FRAGILE.
TO AVOID BREAKAGE AND POSSIBLE
INJURY, HANDLE WITH CARE!.
PRECAUCIÓN: ESTE PRODUCTO ES
FRÁGIL. PARA EVITAR ROTURAS Y
POSIBLES LESIONES,¡MANÉJESE CON
CUIDADO!.
WC MURANO 2P
Requerimientos de Instalación
Installation Requirements
1,40
20 137,89
Requerimientos de Instalación
Installation Requirements
Model / Modelo
Minimum / Mínima Maximum / Máxima
kg/cm²
PSI kPa kg/cm²
PSI kPa
5,624
80 551,58
For the correct functioning of these products, the recommended water pressures is:
Para el correcto funcionamiento de estos productos, se recomiendan las siguientes presiones:
WC MURANO 2P
This Installation Guide Applies to the Product in any Finishing.
Esta Guía de Instalación Aplica al Producto en Cualquier Acabado.
The methylene blue substance is used in the quality assurance process of the product in order to ensure that
the product does not show any cracks or leaks. Isopropyl alcohol is used to clean methylene blue. These
substances are not harmful to human health.
La sustancia azul de metileno se utiliza en el proceso del aseguramiento de la calidad del producto con el
objetivo de asegurar que el producto no presente alguna grieta o fuga. El alcohol isopropílico se utiliza para
limpiar el azul de metileno. Estas sustancias no representan ningún daño para la salud del ser humano.
Thank you for choosing HELVEX products.
We are confident that the product reliably will exceed your highest expectations. This product's functionality,
aesthetics, durability, quality and support will grant you full satisfaction for years, thus reflecting Helvex's
commitment to quality, innovation and the environment.
Agradecemos su elección por los productos HELVEX.
Estamos seguros de que su confiabilidad por el producto excederá sus más altas expectativas, cuya
funcionalidad, estética, durabilidad, respaldo integral y alta calidad le otorgarán plena satisfacción por años,
reflejando el compromiso con la calidad, innovación y el medio ambiente que forman parte de Helvex.
To reduce the risk of injury or property damage, please read all instructions before installing the product.
Wear safety glasses. For any construction, installation, alteration, extension or repair, comply with your
local building codes. The product's illustration may vary in appearance to the actual product as result of
the continuous improvement process it is subject to.
Para disminuir el riesgo de lesiones o daños a la propiedad, lea todas las intrucciones antes de instalar el
producto. Utilice gafas de seguridad. En obras de construcción, instalación, modificación, ampliación y
reparación deben cumplir con el reglamento de construcción y obras de su localidad. El producto ilustrado
puede sufrir cambios de aspecto como resultado de la mejora continua a la que está sujeto.
WARNING / ADVERTENCIA
4
Bowl Installation / Instalación de la Taza
tubo de
drenaje
barreno
Turn the tank upside down on a soft surface, then place the tank to bowl gasket (included) into the bottom of the tank , screw the hose (not included) to
the fill valve. / Coloque el tanque acostado sobre su respaldo en una superficie suave, posteriormente coloque el empaque esponjoso (incluido) en la
parte inferior del tanque, enrosque la manguera (no incluida) a la válvula de admisión.
tuerca (incluida)
pija
(incluida)
pija con
tuerca
tubo de
drenaje
3
cuello de cera
(incluido)
desagüe
brida sanitaria
(no incuida)
Look thru these holes in order
to correctly place the bowl
drain
toilet flange
(not included)
Install the wax ring (nincluded) or toilet flange (not included) and place the bowl by pressing
down. / Instale el cuello de cera (incluido) o la brida sanitaria (no incluida) y coloque la taza
presionando hacia abajo.
drill hole
Insert the washers and screw the nut into
the bolt to fix the bowl. / Inserte la
rondana y enrosque la tuerca en la pija,
para fijar la taza.
drain
bolt with nut
nut (included)
bolt
(included)
drain
hose 15/16 "-14 NS-1 to ½-14 NPSM
15 3/4" long (not included)
manguera 15/16"-14 ns-1 a ½-14 NPSM
de 40 cm de largo (no incluida)
drain
Finished Wall
Top View
/ Vista Superior
90°
Acabado delMuro Terminado
2,7”
(7,0cm)
6,1”
(15,5 cm)
válvula angular (no incluida)
7,8”
(20 cm)
desagüe
angular valve (not included)
Trace lines as indicated. / Trace sus
líneas como se indica.
utilice las mirillas
para visualizar
la instalación
correcta
Use the bolts provided with the
product.
Utilice las pijas contenidas en el
producto.
wax ring
(included)
tank to bowl gasket
(included)
empaque
esponjoso
(incluido)
nut
tuerca
washer
rondana
Drill with Ø 3/8" concrete drill bit (not
included) and place the anchors
(includes) into the holes.
/ Barrene con broca de Ø 3/8” para
concreto (no incluida) y coloque los
taquetes (incluidos) en los barrenos.
taquetes
(incluidos)
anchors
(included)
2
12,0”
(30,5cm)
Note: You can use the
mounting drill holes that are aligned to the drain or the
ones displaced backwards.
Nota: Puede utilizar los barrenos para fijación que están
alineados a la descarga o los que se encuentran
desplazados hacia atrás.
Fill Valve 15/16 "-14 NS-1
Válvula de Admisión 15/16”-14 NS-1
Installation using Wax Ring
Instalación usando Cuello de Cera
Installation using Toilet Flange
Instalación usando Brida Sanitaria
3
2
5 6
7
1,57"
min.
(4 cm mín.)
Do not tighten the nuts more than necessary, to
prevent damaging your product. / No apriete las
tuercas más de lo necesario, para evitar daños a
su producto.
Manually screw the nuts into the bolts and
then screw the bolts into the anchors,
unscrew the nuts from the bolts. /
Manualmente enrosque las tuercas en las
pijas y después enrosque las pijas en los
taquetes, desenrosque las tuercas de las
pijas.
Insert the gaskets, lock washers and screws and screw the screws
alternately to the nuts until the tank is aligned and fixed. / Inserte
los empaques, rondanas y tornillos, enrosque los tornillos a las
tuercas alternadamente hasta que el tanque esté alineado y fijo.
Place the tank lid, verify the correct front
position. / Coloque la tapa del tanque,
verificando la posición frontal correcta.
Screw the hose to the angle valve.
/ Enrosque la manguera a la llave
angular.
válvula angular
angular valve
Before tightening, check that the tank is aligned with the bowl.
The tank installation is with traditional kit.
Antes de apretar, verifique que el tanque quede alineado con la taza. La
instalación del tanque es con kit tradicional.
tank lid
tapa
tank
tanque
hose (not incluided)
manguera
(no incluida)
tornillo
screw
gasket
empaque
Tank Internal Components / Componentes Internos del Tanque
1. Fill Valve / Válvula de Admisión
2. ValveFlush / Válvula de Descarga
3. loatF / Flotador
4. Float Screw / Tornillo del Flotador
5. Overflow / Rebosadero
6. Restrictor / Restrictor
7. Refill Hose / Manguera Refil
8. Flush Valve Gasket / Empaque Válvula Descarga
The components are installed and calibrated for maximum efficiency. /
Los componentes estan instalados y calibrados para una máxima eficiencia.
1
4
7
3
2
Place the tank on the bowl. / Coloque el tanque en la taza.
tank
tanque
bowl
taza
Apply anti-fungus silicone (not included)
around the toilet’s baseline. / Aplique
silicón anti-hongos (no incluido) en el
perímetro de la base del inodoro.
silicón anti-hongos
(no incluido)
anti-fungus silicone
(not included)
3
washer
rondana
tuerca
nut
89
10 11 12
13
8
Purge the supply line before connecting the hose.
Purgue la línea de alimentación antes de conectar la
manguera.
6
5
water level mark
marca del nivel
de agua
Operación / Operation
Verify that the button stud length is appropiate for optimal flush. / Verifique que la medida del espárrago del botón se ala indicada para una
óptima descarga.
button stud
espárrago
cubretornillos
screw cover caps
rondana
washer
tornillo
screw
Open the screw cover caps and place the seat on the toilet, place
the washer as shown and tighten the screw. / Abra los
cubretornillos y coloque el asiento en el inodoro, introduzca la
rondana como se muestra y apriete el tornillo.
screw cover caps
cubre tornillos
Close the screw cover caps. / Cierre los cubretornillos.
Seat Installation / Instalación del Asiento
*Recommended Dimensions
*Medidas Recomendadas
Operation / Operación
4
15
17
14
Open the supply line and push the flush button once. This toilet has a single-discharge cleaning system that operates with 1,28 gpf. / Abra la
línea de alimentación y oprima el botón de descarga una sola vez. El inodoro cuenta con un sistema de limpieza única que opera con 4,8 lpd.
single-discharge
flush button (1,28 gpf)
botón de descarga de
limpieza única (4,8 lpd)
angular valve
(not included)
válvula angular
(no incluida)
16
*3,2”
*(8,3 cm)
Adjust if necessary.
Ajuste si es necesario.
Do not press the flush button for more than 1 second to avoid water waste.
No presione el botón de descarga durante más de 1 segundo para evitar
el desperdicio de agua.
To open, lift the seat and to close just release the seat. / Para abrir levante la tapa y/o asiento y para cerrar sólo empuje el asiento o tapa hacia la
taza. /
To open / Para abrir To close / Para cerrar
Remove the filter. / Retire el filtro.
filter
filtro
fill valve
válvula de admisión
fill valve
válvula de admisión
filter
filtro
hose (not included)
manguera
(no incluida)
Seat Operation / Operación del Asiento
Filter Maintenance / Mantenimiento del Filtro
5
hose (not included)
manguera
(no incluida)
fill valve
válvula de admisión
Insert the filter and screw the hose (not included). / Inserte el
filtro y enrosque la manguera (no incluida).
18
19 20
21 22
filter
filtro
Close the supply line and unscrew the hose. / Cierre la línea de
alimentación y desenrosque la manguera.
Clean the filter with water and a soft brush. / Limpie el filtro con
agua y un cepillo suave.
Troubleshooting / Posibles Causas y Soluciones
6
Waste is not flushed properly . / No se
barren correctamente los
deperdicios.
Press the flush button firmly only once (page 4 " Operation). / Oprima una sola
vez con firmeza ( pág. 4 " Operación" ).
Water level in the tank is bellow level mark. / El nivel de agua
en el tanque está por debajo del marcado. Remove filter from the fill valve and clean it (page 5 " Filter Maintenance" ). /
Remueva el filtro de la válvula de admisión y proceda a limpiarlo (pag.
5 " Mantenimiento del filtro").
Solution / Solución
Debris in the flush valve gasket. / Impurezas del empaque
válvu a de descarga.
Water flushes constantly. / Se queda
tirando agua.
Check the flush valve gasket and clean it, if necessary replace it (page 3
"Internal Tank Components"). / Verifique el empaque de la válvula de descarga
y proceda a limpiarlo, si es necesario reemplácelo (página 3 " Componentes
Internos del Tanque" ).
Button stud shank is touching the flush valve. / El espárrago
del botón toca la válvula de descarga.
Water leaks from tank to bowl. / Fuga
de agua del tanque a la taza.
Verify that the button stud length is appropriate (Page 4 “Button adjustment"). /
Verifique que la medida del espárrago del botón sea la indicada (Pág. 4
Fill valve does not close. / Válvula de admisión no cierra. Verify the water level. / Verifique el nivel de agua
The flush button is not pressed properly. / El botón no es
oprimido correctamente.
Cause / Causa
Problem / Problema
COMPLIES WITH DEPT. OF ENERGY 10 CFR PART 429, 430 AND 431
CUMPLE CON EL DEPARTAMENTO DE ENERGÍA 10 CFR PARTE 429, 430 Y 431
Made in China
Hecho en China
The flush valve gasket is dirty or damaged. / El empaque de la
válvula de descarga está sucio o dañado. Clean the flush valve gasket or replace it. / Limpie el empaque
de la válvula de descarga o reemplácelo.
It is very important to follow the instructions below to preserve HELVEX products
finishings, shiny and in perfect conditions:
1. Use only water and a clean cloth.
2. Do not use fibers, powders, abrasives, or chemicals.
3. Do not use sharp objects to clean the finishings.
4. It is recommended to clean your device daily
Visit our website www.helvexusa.com
Es muy importante seguir las siguientes instrucciones para conservar los
acabados de los productos HELVEX, con brillo y en perfecto estado:
1. Utilice únicamente agua y un paño limpio.
2. No utilice fibras, polvos, abrasivos, ni productos químicos.
3. No utilice objetos punzo-cortantes para limpiar los acabados.
4. Se recomienda realizar la limpieza de su producto diariamente.
Visite nuestra página www.helvexusa.com
Cleaning Recommendations / Recomendaciones de Limpieza

Other Helvex Toilet manuals

Helvex WC BOLMEN User manual

Helvex

Helvex WC BOLMEN User manual

Helvex NAO W User manual

Helvex

Helvex NAO W User manual

Helvex WC MIURA 16 TCC User manual

Helvex

Helvex WC MIURA 16 TCC User manual

Helvex WC ULTRA 2P User manual

Helvex

Helvex WC ULTRA 2P User manual

Helvex WC-OPTION-AT2 User manual

Helvex

Helvex WC-OPTION-AT2 User manual

Helvex MG Ferry User manual

Helvex

Helvex MG Ferry User manual

Helvex AT-1 User manual

Helvex

Helvex AT-1 User manual

Helvex TZF NAO PARED User manual

Helvex

Helvex TZF NAO PARED User manual

Helvex ATM User manual

Helvex

Helvex ATM User manual

Helvex WC DRAKAR2 User manual

Helvex

Helvex WC DRAKAR2 User manual

Helvex OP RIVOLI PLUS User manual

Helvex

Helvex OP RIVOLI PLUS User manual

Helvex MG GOBI TDS User manual

Helvex

Helvex MG GOBI TDS User manual

Helvex WC 2.5 User manual

Helvex

Helvex WC 2.5 User manual

Helvex WC AUSTRAL User manual

Helvex

Helvex WC AUSTRAL User manual

Helvex WC MURANO User manual

Helvex

Helvex WC MURANO User manual

Helvex WC OPTION User manual

Helvex

Helvex WC OPTION User manual

Helvex WC MIURA16 User manual

Helvex

Helvex WC MIURA16 User manual

Helvex TZF NAO User manual

Helvex

Helvex TZF NAO User manual

Helvex WC MIURA User manual

Helvex

Helvex WC MIURA User manual

Helvex WC AUSTRAL L 2P User manual

Helvex

Helvex WC AUSTRAL L 2P User manual

Helvex MG-MOJAVE User manual

Helvex

Helvex MG-MOJAVE User manual

Helvex OP RIVOLI PLUS User manual

Helvex

Helvex OP RIVOLI PLUS User manual

Helvex UMG GOBI TDS User manual

Helvex

Helvex UMG GOBI TDS User manual

Helvex WC DRAKAR User manual

Helvex

Helvex WC DRAKAR User manual

Popular Toilet manuals by other brands

Kohler PANACHE K-18182T-2 installation instructions

Kohler

Kohler PANACHE K-18182T-2 installation instructions

YitaHome BFTLPT-0001 Assembly instructions

YitaHome

YitaHome BFTLPT-0001 Assembly instructions

Kohler OVE K-24719T-S2 installation instructions

Kohler

Kohler OVE K-24719T-S2 installation instructions

Watermark RAYMOR Original Suite 133575 Installation

Watermark

Watermark RAYMOR Original Suite 133575 Installation

Saniflo SANICOMPACT Eco installation instructions

Saniflo

Saniflo SANICOMPACT Eco installation instructions

Toto NEOREST LE instruction manual

Toto

Toto NEOREST LE instruction manual

BEMIS BIOBIDET SLIM TWO owner's manual

BEMIS

BEMIS BIOBIDET SLIM TWO owner's manual

IFO Sign manual

IFO

IFO Sign manual

bioBidet Discovery DLX owner's manual

bioBidet

bioBidet Discovery DLX owner's manual

Delta C41201 quick start guide

Delta

Delta C41201 quick start guide

Toto MS614114CEFG installation manual

Toto

Toto MS614114CEFG installation manual

Sun-Mar EXCEL NE quick start guide

Sun-Mar

Sun-Mar EXCEL NE quick start guide

Siamp 50 6189 00 Assembly instructions

Siamp

Siamp 50 6189 00 Assembly instructions

Dometic CT 4050 installation instructions

Dometic

Dometic CT 4050 installation instructions

AMTC HSM-801AJ Series Installation and operation manual

AMTC

AMTC HSM-801AJ Series Installation and operation manual

Kohler K-4917 Homeowner's guide

Kohler

Kohler K-4917 Homeowner's guide

Stagecaptain 2842-Quixie manual

Stagecaptain

Stagecaptain 2842-Quixie manual

Gordon Ellis WALTON COMMODE 6288 manual

Gordon Ellis

Gordon Ellis WALTON COMMODE 6288 manual

manuals.online logo
manuals.online logoBrands
  • About & Mission
  • Contact us
  • Privacy Policy
  • Terms and Conditions

Copyright 2025 Manuals.Online. All Rights Reserved.