ELMAC Galileo Pro Ticket Eater User manual

1
Firmware V.1.000 – 1.006
PATENTED
N.PD2007A000098
May 19
th
2007

2
SUMMARY:
DESCRIPTION ...................................................................................... 3
TECHNICAL
CHARACTERISTICS .........................................................................................................3
DIMENSIONS
AND
WEIGHT ..............................................................................................................3
INSTALLATION..................................................................................... 4
POSITIONING
AND
PRECAUTIONS....................................................................................................4
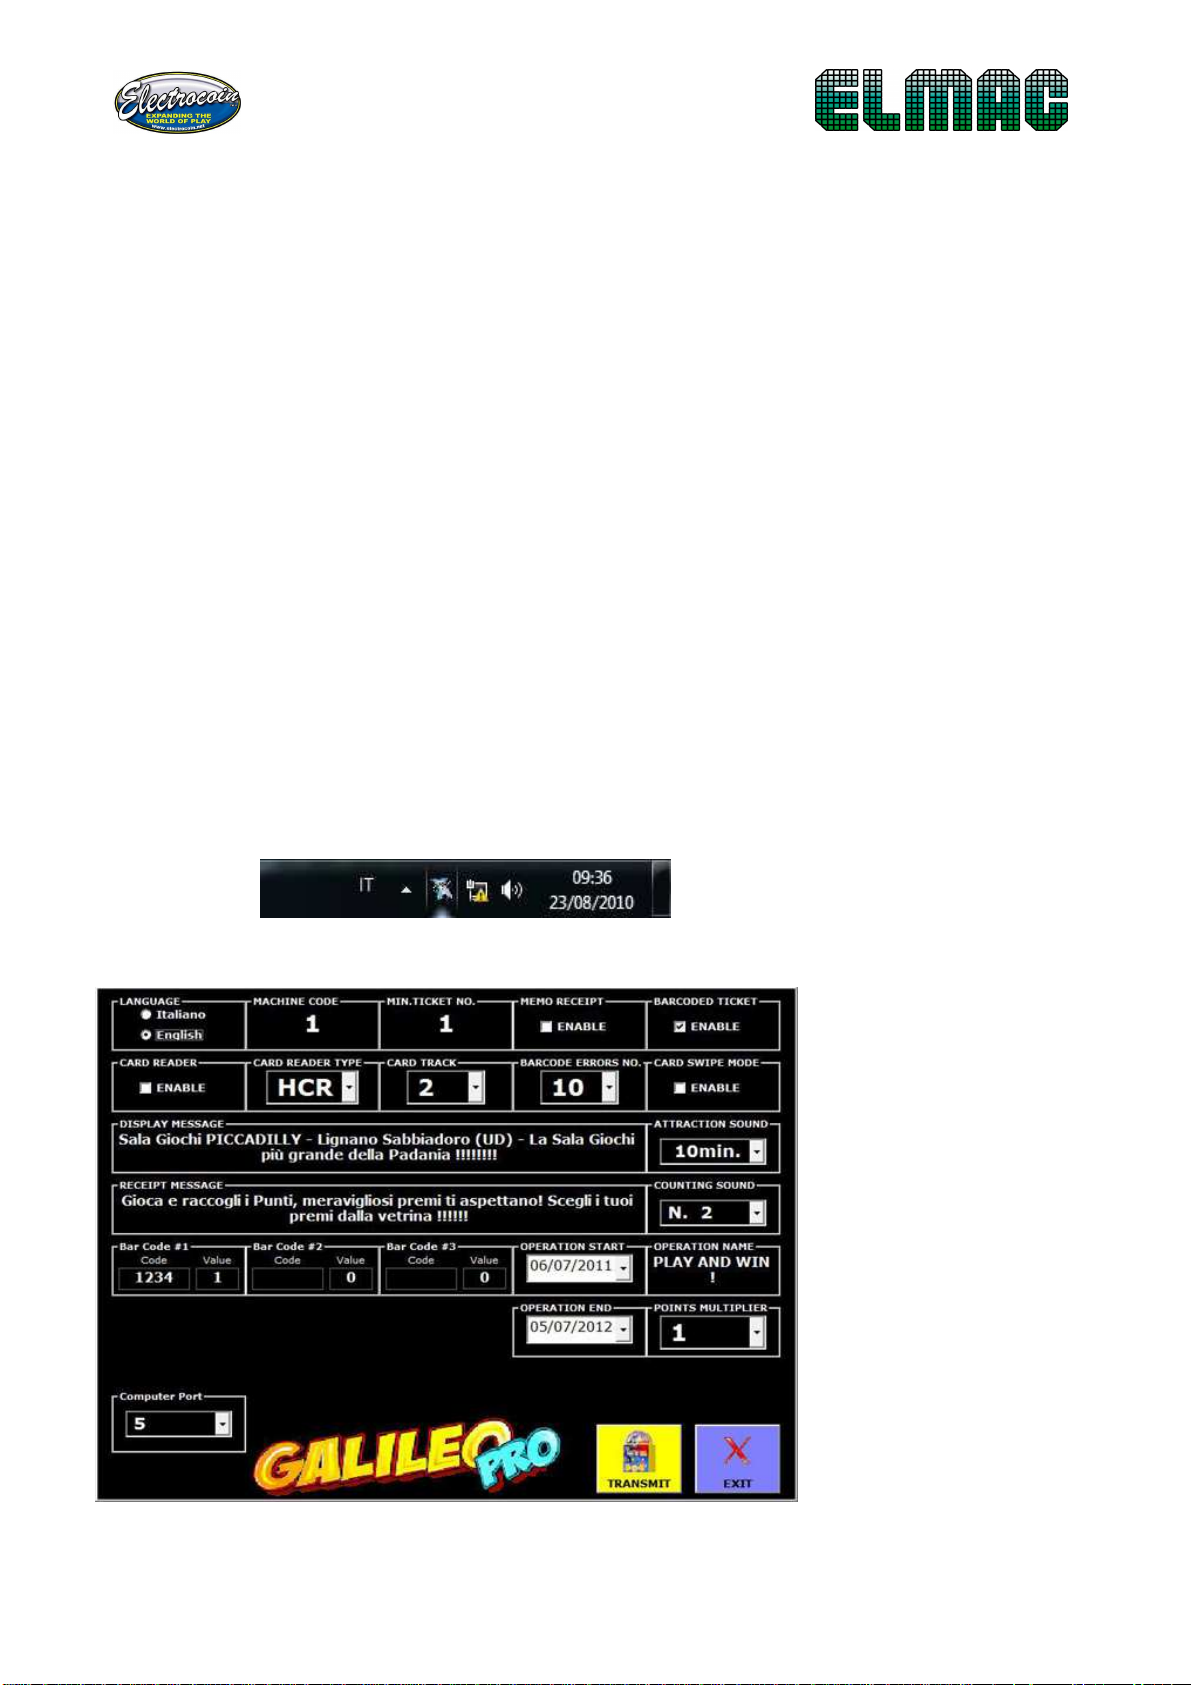
CONFIGURATION ................................................................................. 4
REMOTE
CONFIGURATION
THROUGH
PC ........................................................................................4
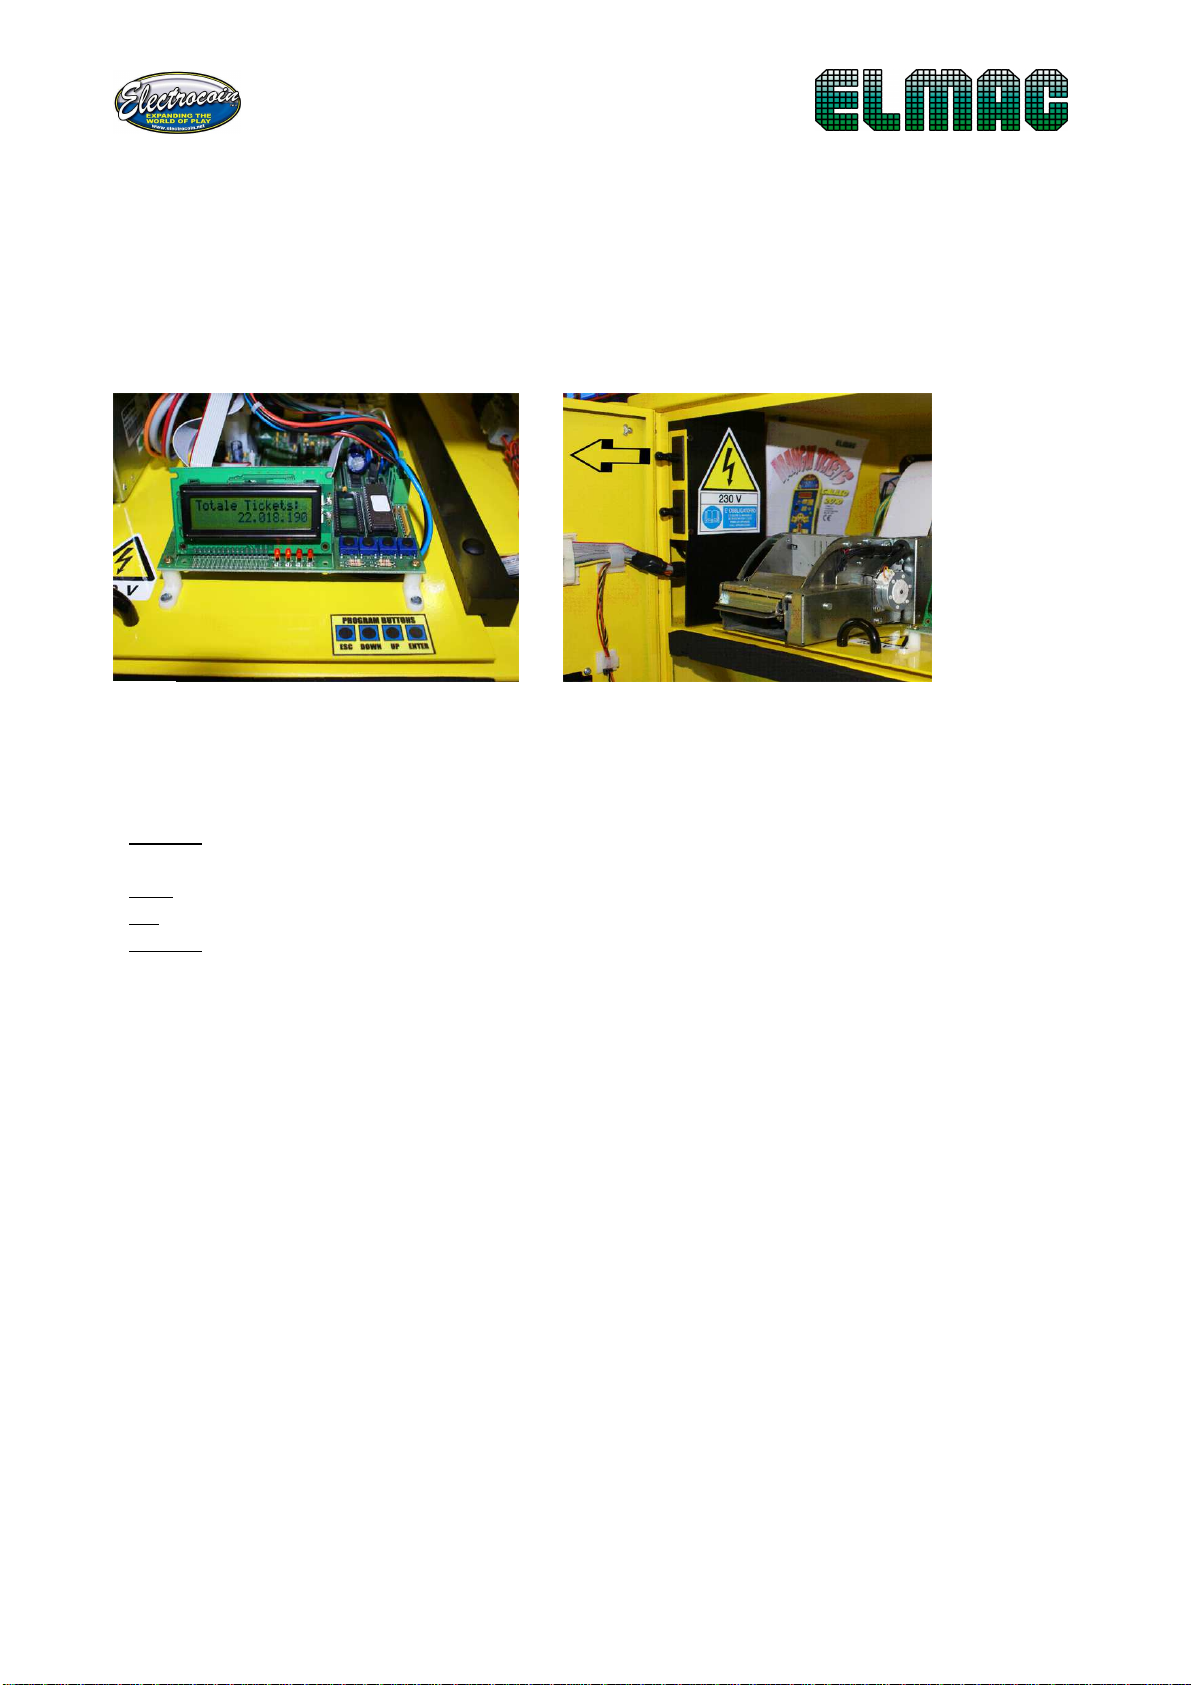
MANUAL
CONFIGURATION…………………………………………………………………………………………………………5
MENU
STRUCTURE ...........................................................................................................................6
LANGUAGE .......................................................................................................................................6
CLOCK
SET.........................................................................................................................................7
STARTING
AND
EXPIRING
DATE........................................................................................................7
OPERATION
NAME ...........................................................................................................................7
MACHINE
CODE................................................................................................................................7
LENGTH
SETUP .................................................................................................................................8
PC
CONNECTION...............................................................................................................................8
MINIMUM
NUMBER
OF
TICKETS
FOR
PRINTING
THE
RECEIPT.........................................................8
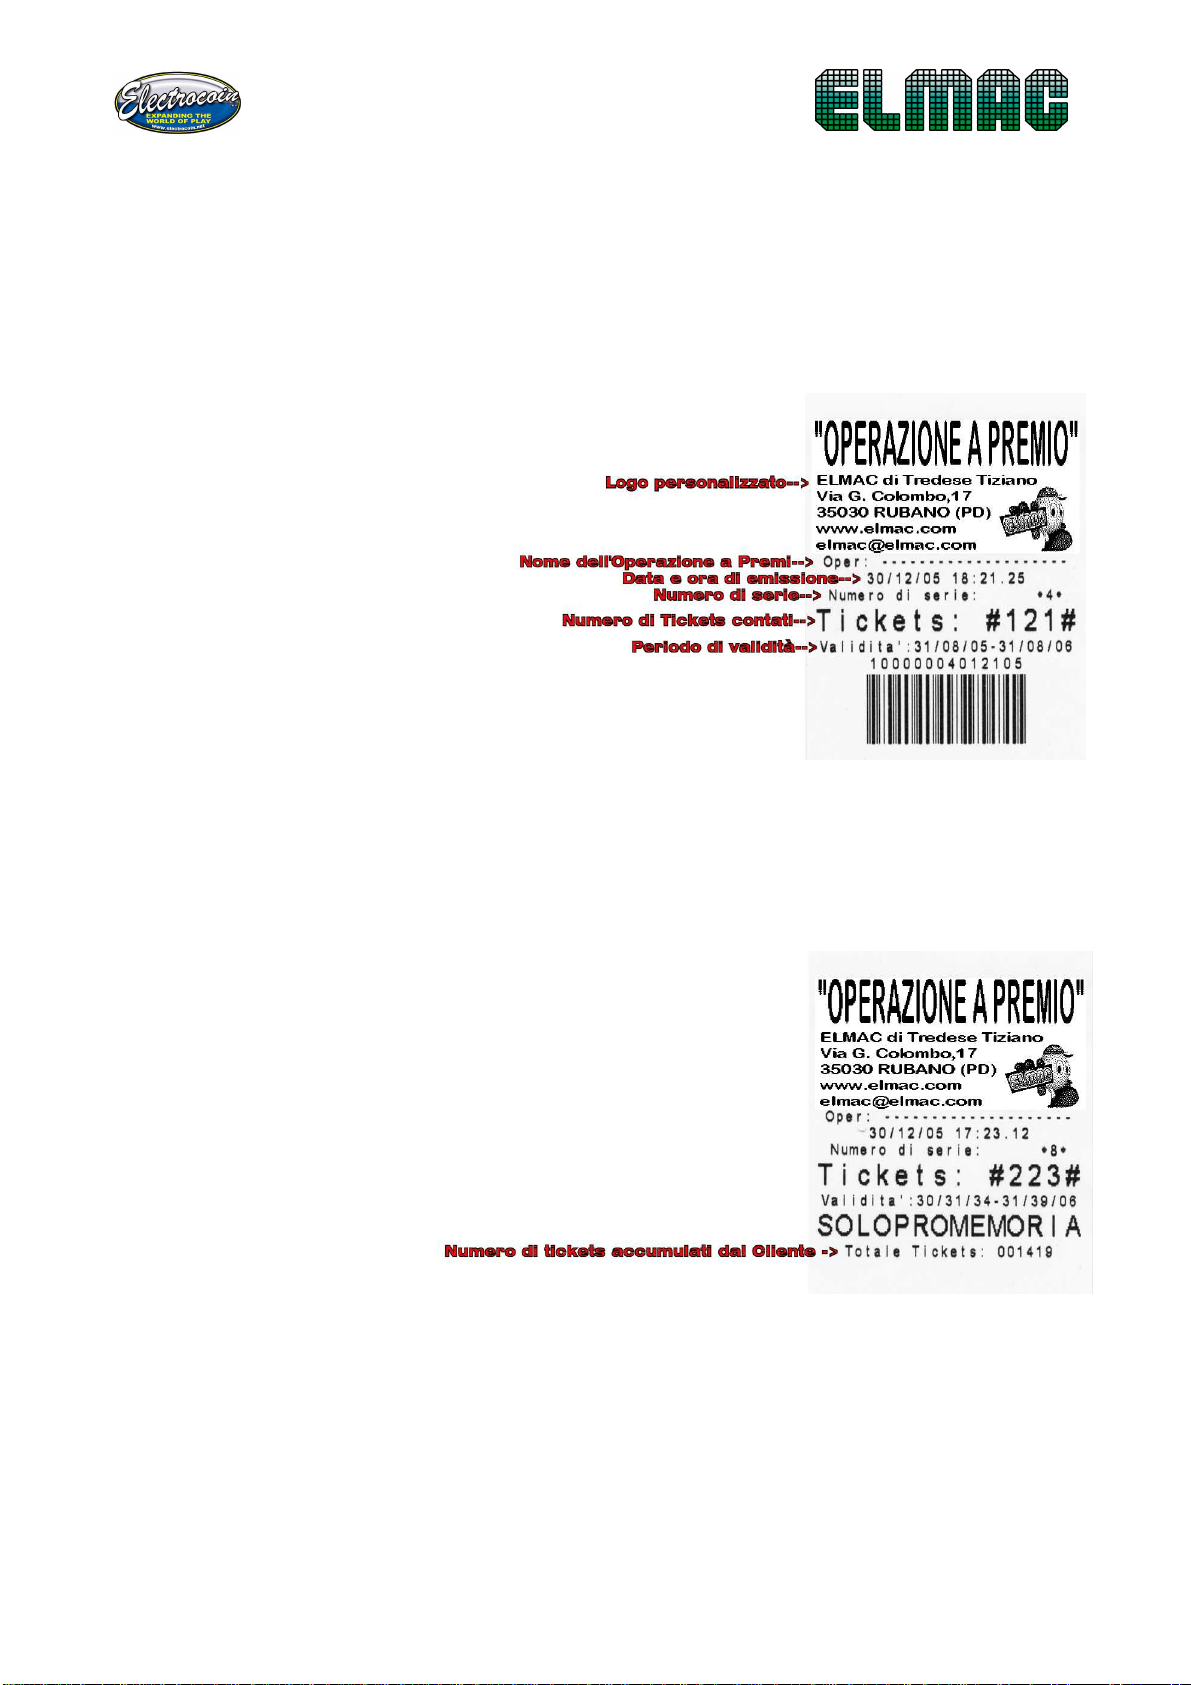
INFORMATION
RECEIPT....................................................................................................................9
BARCODE
PROGRAMMING ..............................................................................................................9
BARCODE
CANCELLATION ................................................................................................................9
BARCODE
ENABLE .......................................................................................................................... 0
CARD
READER
ENABLE ................................................................................................................... 0
CARD
READER
TYPE ........................................................................................................................ 0
CARD
TRACK ................................................................................................................................... 0
BARCODE
ERROR
NUMBER ............................................................................................................ 0
ATTRACTION
SOUND......................................................................................................................
COUNTING
SOUND.........................................................................................................................
PRINT
SOUND .................................................................................................................................
DISPLAY
MESSAGE..........................................................................................................................
RECEIPT
MESSAGE..........................................................................................................................
POINTS
MULTIPLIER ....................................................................................................................... 2
PRINTER
ENABLE ............................................................................................................................ 2
PRINTING
THE
HISTORY.................................................................................................................. 2
PRINTING
THE
RECEIPT................................................................................................................... 3
CANCELLATION
HISTORY ................................................................................................................ 3
CANCELLATION
TOTAL
COUNTER................................................................................................... 3
SOUND
TEST ................................................................................................................................... 3
DISPLAY
TEST .................................................................................................................................. 3
FUNCTIONING.................................................................................... 14
TICKETS
COUNTING ........................................................................................................................ 4
LAST
RECEIPT
AND
FRAUD
DISPLAY................................................................................................ 4
MAINTENANCE ................................................................................... 15

3
HOW
TO
PROGRAM
A
PERSONALIZED
LOGO ................................................................................. 5
REPLACING
THE
SACK ..................................................................................................................... 5
REPLACING
THE
PAPER
FOR
THE
PRINTER...................................................................................... 5
ELIMINATION
PAPER
BLOCKAGES .................................................................................................. 6
CLEANING
THE
DRAGGING
AND
CUTTING
UNIT............................................................................. 6
PROBLEMS
AND
SOLUTIONS .......................................................................................................... 8
WIRING
DIAGRAM……………………………………………………………………………………………………………………20
MIAN
PCB
CONNECTORS................................................................................................................2
DECLARATION OF CONFORMITY ..................................... 22
WEEE
MARK....................................................................................................................................23
Description
The Mangia Tickets mod. GALILEO is an automatic machine for counting and
destroying tickets. It is user friendly, and has a Dot Matrix dis lay which shows
the number of tickets counted by the machine.
If connected to a com uter, through “WinMT software” it offers a solution for
com lete automated management of PRIZE DESK OPERATIONS.
The internal rinter rints ersonalized recei ts, with logos and o erator
configurable notices/information e.g. ex iry dates for recei ts
TECHNICAL CHARACTERISTICS
Feeding tension: 230 Vca~50Hz
Absor tion: 250W
Counting s eed: ~ 640 tickets/min.
Sack ca acity: ~ 50.000 tickets
Printer: Custom TPTCM60
Thermal with auto-cutter and automatic ex ulsion
~ 2.400 recei ts with 130mm roll
Badge reader: Uniform Ind. 3 tracks ISO
Dis lay: Dot-gra hic matrix dis lay 48*8
Al hanumeric dis lay with 16*2 characters
Pc Interface: Serial Rs232, 9600 b s
Mechanic grou : S ecial atented mechanics mod. “GALILEO”
Mono- hase motor 220 Vac/0.6A
Ada ter in oil bath
Helical self-shar ening blades
DIMENSIONS AND WEIGHT
Height: 150 (176 cm with heading)
Width : 50 cm
De th: 40 cm
Weight (with em ty sack): 70 Kg

4
INSTALLATION
POSITIONING AND PRECAUTIONS
The machine is to be used in indoor laces and should be laced on a flat
surface and far away from sources of excessive heat and/or humidity, ensuring
sure that the connection to the “earth” is efficient. Any ossible maintenance,
exce t from the changing of the sack, should be carried out by qualified and
trained engineers and adhere to health and safety rocedures.
CONFIGURATION
REMOTE CONFIGURATION THROUGH PC
If your machine is connected to PC on which the rogram for the automatic
WinMT Prizes O eration management is installed, the configuration may be
executed directly by the PC, without using the machine. To access the
configuration window, you must click on the MTLink icon, on the right of the
Windows taskbar (a ticket that turns) and so choosing “Ticket Eater
Configuration” on menu.
The following window a ears:
MTLink manages the
connection with a
maximum of 5 Ticket
Eater, so choose the
one that you want to
rogram in the lower
left. Then set all the
o tions as desired
and ress SEND
button. At the end
ress EXIT. For
questions about
various
rogrammable
arameters, see the
relative aragra hs.

5
Fig.1
MANUAL CONFIGURATION
For the rogramming buttons and service dis lay on the motherboard are used (Fig.
1). O ening the door, the machine turns off and the inner service lights turn on.
To turn the machine ON, with the door o en, and roceed with the rogramming, you
need to ull the u er security switch out.
(Fig.2).
When the machine is ON, the service dis lay will show in sequence the total of
counted tickets, number of tickets counted in a day, hour and date. These are the
buttons and their functions:
•ENTER: enter in rogramming, enter the selected menu, stores the current data and
ass on the next data
•ESC: exit the rogramming, exit the selected submenu, go back to revious data.
•U : go to the following menu or submenu, increments the current arameter.
•DOWN: go back to the revious menu or submenu, decrements the current
arameter.
EXAMPLE:
Su ose you want to rogram to 10 the minimum number of ticket to rint the
recei ts. Follow these ste s:
1. O en the door (the machine turns OFF).
2. Pull the u er security switch (the machine turns ON).
3. Press the ENTER button (the dis lay will show “PROGRAMMING”).
4. Press the ENTER button (the dis lay will show “LANGUAGE”).
5. Press 8 times the UP button until you reach the submenu “MINIMUM FOR PRINT”
6. Press the ENTER button (the dis lay will show in the bottom line the number of
tickets currently rogrammed).
7. With the UP and DOWN buttons increment or decrement the number until you view
the desired value.
8. Press the ENTER button (the value is stored and you come back to the submenu
“MINIMUM FOR PRINT”.
9. Press the ESC button (you come back to the “PROGRAMMING” menu).
10. Press the ESC button (you exit the rogramming and return to normal o eration).
11. Push the u er security switch (the machine turns OFF).
12. Close the door (the machine turns ON).

6
LANGUAGE
*ITA ENG
MENU STRUCTURE
In red the menu’s voices that refers to the arameter to rogram.
The yellow items for rinting of
historical data and recei t of evidence
The blue items for testing the sound
and dis lay matrix
The green items for deletion of
historical datd and total counter
LANGUAGE
This arameter sets the language between Italian and
English. With the UP and DOWN buttons you move the
asterisk (*) on the desired value and ress ENTER to
save and exit.
TEST
SOUND TEST
DISPLAY TEST
PRINT
BOOKKEEPING PRINT
RECEIPT PRINT
DELETE
CLEAR BOOKKEEPING
CLEAR TOTAL
PROGRAMMING
LANGUAGE
CLOCK SET
STARTING DATE
EXPIRING DATE
OPERATION NAME
MACHINE CODE
LENGHT SETUP
PC CONNECTION
TCK MIN TO PRINT
MEMORANDUM REC.
BARCOD
E PROGRAM.
DELETE BARCODE
BARCODE ENABLE
CARD READER
ENABLE
CARD READER TYPE
CARD TRACK
BARCODE ERR. NO.
ATTRACTION SOUND
COUNTING SOUND
MESSAGE
POINTS MULTIPLIER
PRINTER ENABLE

7
10:53:28
23/08/10
STARTING DATE
23/08/10
EXPIRING DATE
23/08/11
***GIOCA E VINCI
***
MACHINE CODE
1
CLOCK SET
The clock set is not necessary if the Ticket Eater is connected to the PC,
because every WinMt rogram start, the internal clock is automatically
synchronized. For this ha en it’s necessary that the Ticket Eater is turned ON
before the WinMt start on the PC.
As you enter, the cursor will be laced on hours, with
the UP and DOWN buttons the value changes. With the
ENTER button to go to modify the minutes value and so
on until the year. With the ESC button you come back to the revious
arameter; ressing ENTER, with the cursor on the year value, you return to
the menu.
STARTING AND EXPIRING DATE
The starting and ex iring date regulation isn’t necessary if the Ticket Eater is
connected to the PC, because every WinMt rogram start, the dates are
regulated as set in rogramming OPTIONS. For this to ha en it’s necessary
that the Ticket Eater is turned ON before the WinMt start on the PC.
Initially the cursor is laced on “day”, with the UP and
DOWN buttons the value changes, with the ENTER
button you go to “month” and so on.
Pressing ENTER with the cursor on “year” you return to
the menu.
OPERATION NAME
This arameter sets the o eration name that will be
rinted on all the recei ts issued. The cursor initially
will be laced on the first character, with the UP and
DOWN buttons this character changes, with the ENTER button you go to the
following character and with the ESC button you go back to the revious
character. This is the list of characters selectable in sequence:
“ !”#$%&’()*+,-./0123456789:;<=>?@ABCDEFGHIJKLMNOPQRSTUVWXYZ”
MACHINE CODE
The machine code is the number that assigns the Ticket Eater in a given
de artment. It is used only if the machine is linked to
the Management Kit and if in the same are enabled the
“De artments”, see about the relative documents.

8
LENGHT SETUP
MIN=255 MAX=000
PC CONNECTION
OFF *ON
TCK MIN TO PRINT
01 Tickets
LENGTH SETUP
To avoid counting errors in case of fraud
attem ts by the users (tickets sto ed
during the counting, tickets ulled back…),
the system measures the tickets length
and acce t them as goods only if equal to
the sam le one. The sam le length has to
be saved during the machine installation
as the following rocedure:
•Be sure that the switch on the
sensor are in NORMAL osition
SW 1
SW 2
SW 3
SX 4
MODE
OFF OFF ON ON NORMAL
•Insert a row of tickets (the dis lay will show the minimum and maximum
measure and will return automatically to the menu
at the end of the measurement).
The values change in function of tickets used and ty e of mechanic mounted,
but if they’re not included between 80 and 100, there robably is a malfunction
that requires a maintenance o eration.
PC CONNECTION
This o tion allows you to s ecify the working mode. If the machine is
connected to the PC on which the WinMt rogram works, this o tion has to be
in ON mode (necessary connection). To work without the PC this voice has to
be rogrammed to OFF (blank connection). With the UP and DOWN buttons
you move the asterisk (*) and then ress ENTER.
MINIMUM NUMBER OF TICKETS FOR PRINTING THE RECEIPT
This o tion allows you to set a minimum number of tickets that have to be
counted before that the customer can rint the recei t, this is to avoid waste
of a er and to streamline reading recei ts o erations during rize
assignment.
With the UP e DOWN buttons you set the number
between 1 and 90, with ENTER you save it and exit to
the menu.

9
MEMORANDUM REC.
*OFF ON
BARCODE PROGRAM
*0000 0000 0000
BARCODE PROGRAM
INSERT TICKET
BARCODE PROGRAM
COD. 9451 VAL.01
BARCODE PROGRAM
****ERROR****
BARCODE PROGRAM
*9451 0000 0000
INFORMATION RECEIPT
This o tion allows you to enable (ON) or disable (OFF) the “ONLY
MEMORANDUM” recei t rinting for the customers rovided of magnetic card.
With the UP and DOWN buttons you move the asterisk
(*) and then ress ENTER.
BARCODE PROGRAMMING
To enable the identification of ticket with
barcode, you need to move the switches
on the sensor as shown in the table:
SW 1
SW 2
SW 3
SX 4
MODE
ON ON OFF OFF BARCODE
This o tion allows you to save the tickets
barcodes that will
then be acce ted.
The machine can recognize, maximum, 3 different
codes at the same time. With the UP and DOWN
buttons you select the osition, between the 3 ossible
solutions, in which you’d like to save the new code and
then ress ENTER.
As required from the message on the dis lay, insert a
barcode ticket to save. If the reading is not successful,
an error message will show, otherwise the read code
will be showed and you could set the ticket value with
the UP and DOWN buttons. At the end ress ENTER to
save and exit from the menu.
BARCODE CANCELLATION
To delete a code reviously saved: with the UP and
DOWN buttons, select the code that you want to
delete. Press ENTER to do the o eration and exit the
menu.

10
BARCODE ENABLE
*OFF ON
CARD READER ENAB
*OFF ON
CARD READER TYPE
MSR *HCR CRT
CARD TRACK
2
BARCODE ERR. NO.
10
BARCODE ENABLE
This o tion allows you to enable (ON) or disable (OFF)
the barcode identification on the tickets inserted. With
the UP e DOWN buttons you move the asterisk (*) and
ress ENTER. Setting this o tion ON the machine will acce t only tickets with
barcode equal to the saved one.
CARD READER ENABLE
This o tion allows you to enable (ON) or disable (OFF)
the card reader on the machine. With the UP and
DOWN buttons, move the asterisk (*) and ress
ENTER. If disabled, the card reader won’t be tested when the machine is
turned ON, and it could work even without the card reader.
CARD READER TYPE
This o tion allows you to rogram the ty e of card reader installed in the
machine, it is rogrammed in factory and does not need to be changed exce t
in case of a re lacement of the reader or the
motherboard. With the UP and DOWN buttons move
the asterisk (*) and ress ENTER.
CARD TRACK
This o tion selects, between the 3 ossible solutions, the magnetic track of the
card that will be used. With the UP and DOWN buttons
set the number and
ress ENTER.
Normally the track used is the number 2, it could be
changed only if the card used is also art of another information system that
used the same track.
BARCODE ERROR NUMBER
This o tion sets the number of consecutive errors of
tickets barcode reading before that the machine will
block itself and indicate the error. With the UP and
DOWN buttons, set the desired value and then ress ENTER.

11
ATTRACTION SOUND
05
COUNTING SOUND
01
* BIG BOWLING –
Play and Win
COUNTING SOUND
01
ATTENTION!
BOWLING cost £2
ATTRACTION SOUND
This o tion sets the number of minutes that ass
between an attraction sound and another one. With the
UP and DOWN buttons, select the desired range and
ress ENTER. The attraction sound can be disabled or re eat with ranges from
1 to 30 minutes.
COUNTING SOUND
This o tion allows you to disable or choose the sound
that the machine makes during the ticket counting.
With the UP and DOWN buttons, select the desired
sound and then ress ENTER.
PRINT SOUND
This o tion allows you to disable or choose the sound
that the machine after rinting the recei t. With the UP
and DOWN buttons, select the desired sound and then
ress ENTER.
DISPLAY MESSAGE
This o tion allows you to save a message (max 32
characters) that will be shown on the external dis lay
during the attraction. Use of buttons:
•ENTER: fix the current character and ass to the next one, if ke t
ressed for more than one second, the o eration ends, so save the
message and return to the menu.
•ESC: return to the revious character, if ke t ressed for more than one
second, the entire message will be deleted and the cursor will be laced
on the first character of the first row.
•UP: increments the current character.
•DOWN: decrements the current character.
These are the characters that can be set in order:
“ !”#$%&’()*+,-./0123456789:;<=>?@ABCDEFGHIJKLMNOPQRSTUVWXYZ”.
RECEIPT MESSAGE
This o tion allows you to save a message (max 32
characters) that will be rinted on each recei t.
Use revious instructions to store it.

12
POINTS MULTIP.
DISABLED
PRINTER ENABLE
*OFF ON
BOOKKEEPING PRINT
POINTS MULTIPLIER
This o tion allows you to set a division or multi lier
factor of tickets counted in res ect to their value in
oints. With the UP and DOWN buttons, select the
desired value and ress ENTER. This arameter can be disabled (1 ticket = 1
oints) or change between /100 (100 tickets = 1 oints) e *100 (1 ticket =
100 oints).
PRINTER ENABLE
This o tion allows you to enable (ON) or disable (OFF)
the rinter. With the UP and DOWN buttons, move the
asterisk (*) and ress ENTER. If the rinter is disabled
the machine will work in “CARD SWIPE” mode, used only in case of connection
with Management Systems of Prize O erations different from ELMAC WinMt for
which the machine was designed.
PRINTING THE HISTORY
This o tion is useful if the Ticket Eater is not linked to the PC. The machine
saves the number of tickets counted in the last 60 days, in order to get the
rint of this data and then ress ENTER.
A recei t with date and number of tickets for each day saved will be rinted, at
the end the total amount will be rinted.
If the history reset is not made (see the relative aragra h), the memory will
always count the data from the last 60 days, as new data will re lace the old
data.
Example of receipt with
the print of history.

13
RECEIPT PRINT
CLEAR BOOKKEEPING
*NO YES
CLEAR TOTAL
*NO YES
SOUND TEST
00
DISPLAY TEST
running...
PRINTING THE RECEIPT
Pressing ENTER a test recei t will be rinted in order to verify the ro er
working of the rinter, the correctness of the data
concerning the Prize O eration: o eration name and
validity and clock synchronization.
CANCELLATION HISTORY
This o tion allows you to delete the counting history.
With the UP and DOWN buttons, move the asterisk (*)
and then ress ENTER.
CANCELLATION TOTAL COUNTER
This o tion allows you to reset the total counter of
tickets IN. With the UP and DOWN buttons, move the
asterisk (*) and then ress ENTER.
SOUND TEST
This o tion allows you to lay the sound that the
system can generate in order to verify the audio or to
adjust the volume. With the UP and DOWN buttons,
choose the desired sound (from 00 to 15) and then ress ENTER.
DISPLAY TEST
This o tion allows you to verify the functioning of the
gra hic dis lay. Press ENTER to start the test, ESC to
finish.

14
FUNCTIONING
TICKETS COUNTING
Insert the tickets in the s ecial “mouth”, the motor will turn ON and the tickets
will be drawn in by the mechanism, assing under the hoto-cellules, they will
be counted and, at the
end, will be cut by the
helical blade. During the
counting, the dis lay will
show the number of
tickets destroyed. As the
last ticket is assed, the
motor will sto and the
PRINT button led will
light on.
If other tickets are
inserted, they will be
added to those already
counted.
When all the tickets are inserted, if the customer hasn’t got the VIP card, they
will ress the PRINT button. Instead, if they have a VIP card, they will have to
insert it into the card reader, res ecting the direction shown in the figure
laced next to the reader. In the first case the following recei t:
In the second case, the
recei t will bring the
same data, with the
adding of the warning:
“ONLY MEMORANDUM”
and the total number of
tickets accumulated by
the customer. Behind,
the barcode will not be
rinted.
LAST RECEIPT AND FRAUD DISPLAY
In case of a dis ute, on the external dis lay you can view the number of
tickets counted in the last o eration and deleted after the last fraud attem t,
in the following format: U.S.: 123 – UF: 45
To get the dis lay, ush and hold the PRINT button for 3 seconds.
The FRAUD ha ens when the tickets are ulled back, the first time the
countings sto s and a warning message a ears, the second time, after
another warning, the tickets counted u to that oint are deleted.

15
MAINTENANCE
HOW TO PROGRAM A PERSONALIZED LOGO
The logo that will be rinted on each recei t is saved in the rinter in a no-
volatile memory. To change it you need to have the LOGOMAKE rogram from
Custom Engineering this is available for download from their website:
www.custom.it. The logo has to be in .bm format, black-and-white and may
have the following dimensions: width 448 oints, height 585 oints. Instead,
the art of logo that will be rinted has to be of 448 x 182 oints, starting at
the to . The rinter has three banks in which the logos can be saved, the
Ticket Eater uses LOGO1.
REPLACING THE SACK
The tickets sack is laced in the lower door of the machine, fixed to the sliding
bracket. Pull out this bracket and withdraw the full sack. Fix the new sack on
the bracket and re-insert it fully in its lace. Replacement Ticket Sack
available from Electrocoin Aftersales (Part no 1ELMACBAG)
NB. The contents of the sack is recyclable material that is conferred in s ecial
container marked by CA brand ( a er).
REPLACING THE PAPER FOR THE PRINTER
The necessity to re lace the a er-roll is indicated by the message “PRINTER
ERROR”, even if remains a little bit unused a er. Proceed in this way:
•O en the lower door, the machine will turn OFF (any tickets counted will
not be lost).
•Pull off the late bracket to facilitate the o erations.
•Turn ON again the machine, ulling the u er security switch off (Fig.5).
•Move the green lever out for lifting the rint-head (Fig.6).
•Remove the remaining a er from behind.
•Bring the green lever again to its original osition (Fig.6).
•Release about 20 cm of a er from the new roll, be sure that the end of
a er is erfectly cut, without flaws, and that the cutting is er endicular
to the a er.
•Insert the a er into the rear slot, until the rinter charges it and cuts it
automatically.
•Place the roll in its roll-holder.
•Close the door.
Replacement rolls available from Electrocoin Aftersales
(Part no. large Roll 8ELMACLGE small roll 8ELMCSML)

16
ELIMINATION PAPER BLOCKAGES
Under normal conditions and with the new roll, the green and yellow LEDS of
the rinter have to be lighted on and stable. The red led, if lighted on,
indicates that it is nearing the end of a er ( rinting may continue unless
there is not enough a er). The blinking of yellow led indicates a malfunction
of rinter and in articular:
•The rint-head is lifted: lifting lever laced towards outside (Fig.6)
•Pa er is jammed
To clear the jam carry out the following:
•Lift the rint-head by ulling out the green lever (Fig.6)
•Remove the a er from behind, so reload it as in the revious section
•If the roblem ersists, check if there are ieces of a er remaining and
to do this, you need to act on the lower release lever (Fig. 6) and then
lift the front of the rinter (Fig. 7).
•Remove any ieces of a er in the ath
•Re-catch the front of the rinter.
•Proceed to the loading of a er as in the revious section
CLEANING THE DRAGGING AND CUTTING UNIT
De ending on the quantity of tickets treated, the drag-and-cut unit cleaning
should be done at least once a week.
•Turn OFF the machine.
•Remove the sensor board, unscrewing the fixing knobs (Fig.1).
•Clean, with a soft brush (or com ressed air) the inside of the assing
tickets hole on the sensor board (Fig.2).
•If necessary, remove the drag roller, lifting u wards and then outwards
the two lateral s rings (Fig.3).
•Remove any ieces of ticket blocked in the ticket cutter (Fig.4)
•Re lace the sensor board.
•Turn ON again the machine.

17
Figure 1
Figure 2
Figure 3
Figure 4
Figure 6
Figure 5

18
PROBLEMS AND SOLUTIONS
The machine indicates on both the dis lays any malfunction with the following
messages:
ERROR CODE MEANING
SENSOR ERROR Error sensor assembly:
•Clean the drag unit.
•Verify that the connection wire runs from the
motherboard CN1 connector.
If the error ersists, call Electrocoin Aftersales
PRINTER ERROR Printer error:
•Verify that there is a er into the rinter
•Verify that the block a er lever is in rint-
osition (Fig.6)
•Verify the connection from motherboard (CN5)
and rinter
•Verify the ower wire of the rinter (CN10)
If the error ersists, call Electrocoin Aftersales
Figure 7

19
CARD ERROR Error card reader:
•Verify there is nothing inside the reader
•Verify the connection with the motherboard
(CN5)
•Verify the connection to ower su ly of the
card reader (CN9)
•Verify that the reader installed coincides with
those rogrammed (see CARD READER TYPE
ag.10)
If the error ersists, call Electrocoin Aftersales
PC ERROR Error connection to PC:
Verify that the PC is ON and that the WinMt rogram is
working.
Verify the connection between the machine and PC
If the roblem ersists, it’s ossible to ensure that the
Ticket Eater continues to work without PC, setting to
“OFF” the arameter of connection to PC, as ex lained
in the section: PC CONNECTION (Pag.8)
BARCODE ERROR Some tickets have been inserted with a not-recognized
barcode. Tear any tickets resent in entry, turn OFF
and ON the machine.
FULL SACK Em ty the sack and release the discharge ath of
tickets from the cutter. If the errore ersists, verify
the sensor lace on the ath.
WIDTH ERROR Error in the measure of width ticket: have been
inserted a ticket too close (attem t of fraud).
The counting automatically restarts after few seconds.

20
SCHEMI
SCHEMA DI CABLAGGIO
WIRING DIAGRAM
Table of contents
Popular Arcade Game Machine manuals by other brands

Universal Space
Universal Space Pong Operation manual

Stern Pinball
Stern Pinball AUSTIN POWERS quick start guide

RS
RS RS#3 Wood user manual

Haruman's Customs
Haruman's Customs ULTIMATE WIDESCREEN BARTOP Assembly instructions

Panda Vending
Panda Vending TR5091 instruction manual

Sega
Sega bop it ARCADE quick start guide