Elmo HS-2 User manual

H
W
i
I
H
S-
i
reless
I
nst
2
Presen
t
ruc
t
t
ation
S
t
io
n
S
ystem
n
M
a
a
nu
a
a
l

1
■IMPORTANT SAFEGUARDS
■Read Instructions
All the safety and operating instructions should be read before the appliance is operated.
■Retain Instructions
The safety and operating instructions should be retained for future reference.
■Heed Warnings
All warnings on the product and in the operating instructions should be adhered to.
■Follow Instructions
All operating and use instructions should be followed.
■Cleaning
Unplug this product from the wall outlet before cleaning. Do not use liquid cleaners or aerosol
cleaners. Use a damp cloth for cleaning.
■Attachments
Do not use attachments not recommended by the product manufacturer as they may cause
hazards.
■Water and Moisture
Do not use this product near water - for example, near a bath tub, wash bowl, kitchen sink, or
laundry tub, in a wet basement, or near a swimming pool, and the like.
■Placement
Do not place this product on an unstable cart, stand, tripod, bracket, or table. The product may
fall, causing serious injury to a child or adult, and serious damage to the product. Use only with
a cart, stand, tripod, bracket, or table recommended by the manufacturer, or sold with the
product. Any mounting of the product should follow the manufacturer’s instructions, and should
use a mounting accessory recommended by the manufacturer.
Do not place the following items near the air exhaust vent on the bottom as warm air blows out
from the exhaust vent:
•Spray cans (Heat may increase the pressure inside the can and may cause an explosion.)
•Metals (They may become hot and may cause an accident or injury.)
•Houseplants and pets
•Items that are deformed or adversely affected by heat
■Ventilation
Slots and openings in the cabinet are provided for ventilation and to ensure reliable operation of
the product and to protect it from overheating, and these openings must not be blocked or
covered. The openings should never be blocked by placing the product on a bed, sofa, rug, or
other similar surface. This product should not be placed in a built-in installation such as a
bookcase or rack unless proper ventilation is provided or the manufacturer’s instructions have
been adhered to.
■During use and immediately after use, do not touch anywhere near the air exhaust vent on
the bottom as they may become hot and may cause burns.
■Power Sources
This product should be operated only from the type of power source indicated on the marking
label. If you are not sure of the type of power supply to your home consult your appliance dealer
or local power company.
Make sure to read the “IMPORTANT SAFEGUARDS” in this guide before
using this product.

2
■Grounding or Polarization
This product may be equipped with either a polarized 2-wire AC line plug (a plug having one
blade wider than the other) or a 3-wire grounding type plug, a plug having a third (grounding)
pin. If the 2-Wire polarized plug will not fit in the outlet, try reversing the plug. If the plug still
fails to fit, contact your electrician to replace your obsolete outlet. Do not defeat the safety
purpose of the polarized plug. The 3-wire grounding type plug will fit into a grounding type
power outlet.
This is a safety feature. If you are unable to insert the plug into the outlet, contact your
electrician to replace your obsolete outlet. Do not defeat the safety purpose of the grounding
type plug.
■Power-Cord Protection
Power-supply cords should be routed so that they are not likely to be walked on or pinched by
items placed upon or against them, paying particular attention to cords at plugs, convenience
receptacles, and the point where they exit from the product.
■Lightning
For added protection for this product during a lightning storm, or when it is left unattended and
unused for long periods of time, unplug it from the wall outlet and disconnect the antenna or
cable system. This will prevent damage to the product due to lightning and power-line surges.
■Overloading
Do not overload wall outlets, extension cords, or integral convenience receptacles as this can
result in a risk of fire or electric shock.
■A product and cart combination should be
moved with care. Quick stops, excessive
force, and uneven surfaces may cause the
product and cart combination to overturn.
■Object and Liquid Entry
Never push objects of any kind into this product through openings as they may touch dangerous
voltage points or short-out parts that could result in a fire or electric shock. Never spill liquid of
any kind on the product.
■Servicing
Do not attempt to service this product yourself as opening or removing covers may expose you
to dangerous voltage or other hazards. Refer all servicing to qualified service personnel.
■Damage Requiring Service
Unplug this product from the wall outlet and refer servicing to qualified service personnel under
the following conditions:
•When the power-supply cord or plug is damaged.
•If liquid has been spilled, or objects have fallen into the product.
•If the product has been exposed to rain or water.
•If the product does not operate normally by following the operating instructions. Adjust only
those controls that are covered by the operating instructions as an improper adjustment of other
controls may result in damage and will often require extensive work by a qualified technician to
restore the product to its normal operation.
•If the product has been dropped or damaged in any way.
•When the product exhibits a distinct change in performance - this indicates a need for
service.
■Replacement Parts

3
When replacement parts are required, be sure the service technician has used replacement
parts specified by the manufacturer or have the same characteristics as the original part.
Unauthorized substitutions may result in fire, electric shock or other hazards.
■Safety Check
Upon completion of any service or repairs to this product, ask the service technician to perform
safety checks to determine that the product is in proper operating condition.
■Heat
The product should be situated away from heat sources such as radiators, heat registers,
stoves, or other products (including amplifiers) that produce heat.
C
AUTION:
T
O REDUCE THE RISK OF
ELECTRIC SHOCK.DO NOT
REMOVE COVER(OR BACK).
NO USE
R
-SERVICING TO
QUALIFIED SERVICE
PERSONNEL.
RISK OF
ELECTRIC SHOCK
DO NOT OPEN
CAUTION
This symbol [crossed-out wheeled bin WEEE Annex IV] indicates
separate collection of waste electrical and electronic equipment in
the EU countries.
Please do not throw the equipment into the domestic refuse.
Please use the return and collection systems available in your
country for the disposal of this product.
SA 1966
SA 1965
The lightning flash with arrowhead symbol, within an
equilateral triangle, is intended to alert the user to the
presence of uninsulated “dangerous voltage” within the
productʼs enclosure that may be of sufficient magnitude
to constitute a risk of electric shock to persons.
The exclamation point within an equilateral triangle is
intended to alert the user to the presence of important
operating and maintenance (servicing) instructions in the
literature accompanying the product.
WARNING
TO REDUCE THE RISK OF FIRE OR ELECTRIC SHOCK, DO NOT EXPOSE THIS PRODUCT TO
RAIN OR MOISTURE.
The connection of a non-shielded equipment interface cable to this equipment will invalidate the
FCC Certification or Declaration of this device and may cause interference levels which exceed the
limits established by the FCC for this equipment. It is the responsibility of the user to obtain and
use a shielded equipment interface cable with this device. If this equipment has more than one
interface connector, do not leave cables connected to unused interfaces. Changes or modifications
not expressly approved by the manufacturer could void the userʼs authority to operate the
equipment.
FOR UNITED STATES USERS:
INFORMATION
This equipment has been tested and found to comply with the limits for a Class B digital device,
pursuant to Part 15 of the FCC Rules. These limits are designed to provide reasonable protection
against harmful interference when the equipment is operated in a commercial environment.
This equipment generates, uses, and can radiate radio frequency energy and, if not installed and
used in accordance with the instruction manual, may cause harmful interference to radio
communications. Operation of this equipment in a residential area is likely to cause harmful
interference in which case the user will be required to correct the interference at his own expense.
USER-INSTALLER
CAUTION:
Your authority to operate this FCC verified equipment could be voided if you make changes or
modifications not expressly approved by the party responsible for compliance to Part 15 of the
FCC rules.

4
■BEFORE YOU USE
■ Be sure to use the supplied power cord and the AC adapter.
■ The power cord and AC adapter that come with this product are for this product only. Do not use
them with another product.
■ Be sure to use the power cord applicable to your local power specifications. If the product was sold
in Japan, use the AC adapter sold with the product with 100 VAC and 50 or 60 Hz.
■ When storing the product, do not leave it under direct sunlight or by heaters. It may be discolored,
deformed, or damaged.
■ Do not place this product in any humid, dusty, salt bearing wind, or vibrating locations.
Use it under the following environmental conditions:
Temperature:0℃〜 40℃
Humidity:30%〜 85%(No condensation)
■ Use a soft, dry cloth for cleaning. Do not use any volatile solvent such as thinner or benzene.
■ Follow the guidelines below to prevent the unit from dropping or overturning.
・Use the product on a stable base, desk, or table. Do not place the product on an unstable base or
slanted location.
・Place or wire the product so as to prevent the cables from being pulled or drawn.
■ If this product is used for longer than the warranty period, its performance and quality may
deteriorate due to the lifetime of its parts. For parts replacement (on chargeable basis), consult the
dealer from whom you purchased this product or our branch/office near your location.
■ Battery precautions
・If this product is not going to be used for a long time, take the batteries out of the remote control.
・Do not use rechargeable batteries.
・Do not try to recharge or short-circuit the batteries.
・When disposing of used batteries, follow the instructions of your local government.
・Insert from one side and pay particular attention to the polarity (+/- directions).
・Children may ingest small batteries; always keep batteries safe and out of reach.
・If a battery is swallowed, consult a doctor immediately as this could result in asphyxiation or be an
obstacle to digestion, etc.
・If any liquid from a battery leaks onto your skin or clothes, flush the area with clean water
immediately. If it gets into your eye, flush immediately with clean water and then contact a doctor.
■ Copyright
Unless used for personal use, it is prohibited strictly under copyright law to use any photo files
without the prior consent of the copyright holder. Even if using for personal use, be careful that
there could be a situation where video or audio recording is restricted or illegal.
■ The contents of this document are subject to change without notice. The latest version is available
from the following official website:
https://www.elmousa.com
https://www.elmoeurope.com
■ It is prohibited under copyright law to use or copy any part or the whole of this document without
our prior written consent.
■ ELMO shall not be liable for any claim for damage or loss of earnings or any claim raised by a third
person due to the use, malfunction or repair of this product.

5
■TABLE OF CONTENTS
■IMPORTANT SAFEGUARDS ······································································· 1
■BEFORE YOU USE ··················································································· 4
■TABLE OF CONTENTS ·············································································· 5
❶PREPARATION························································································ 7
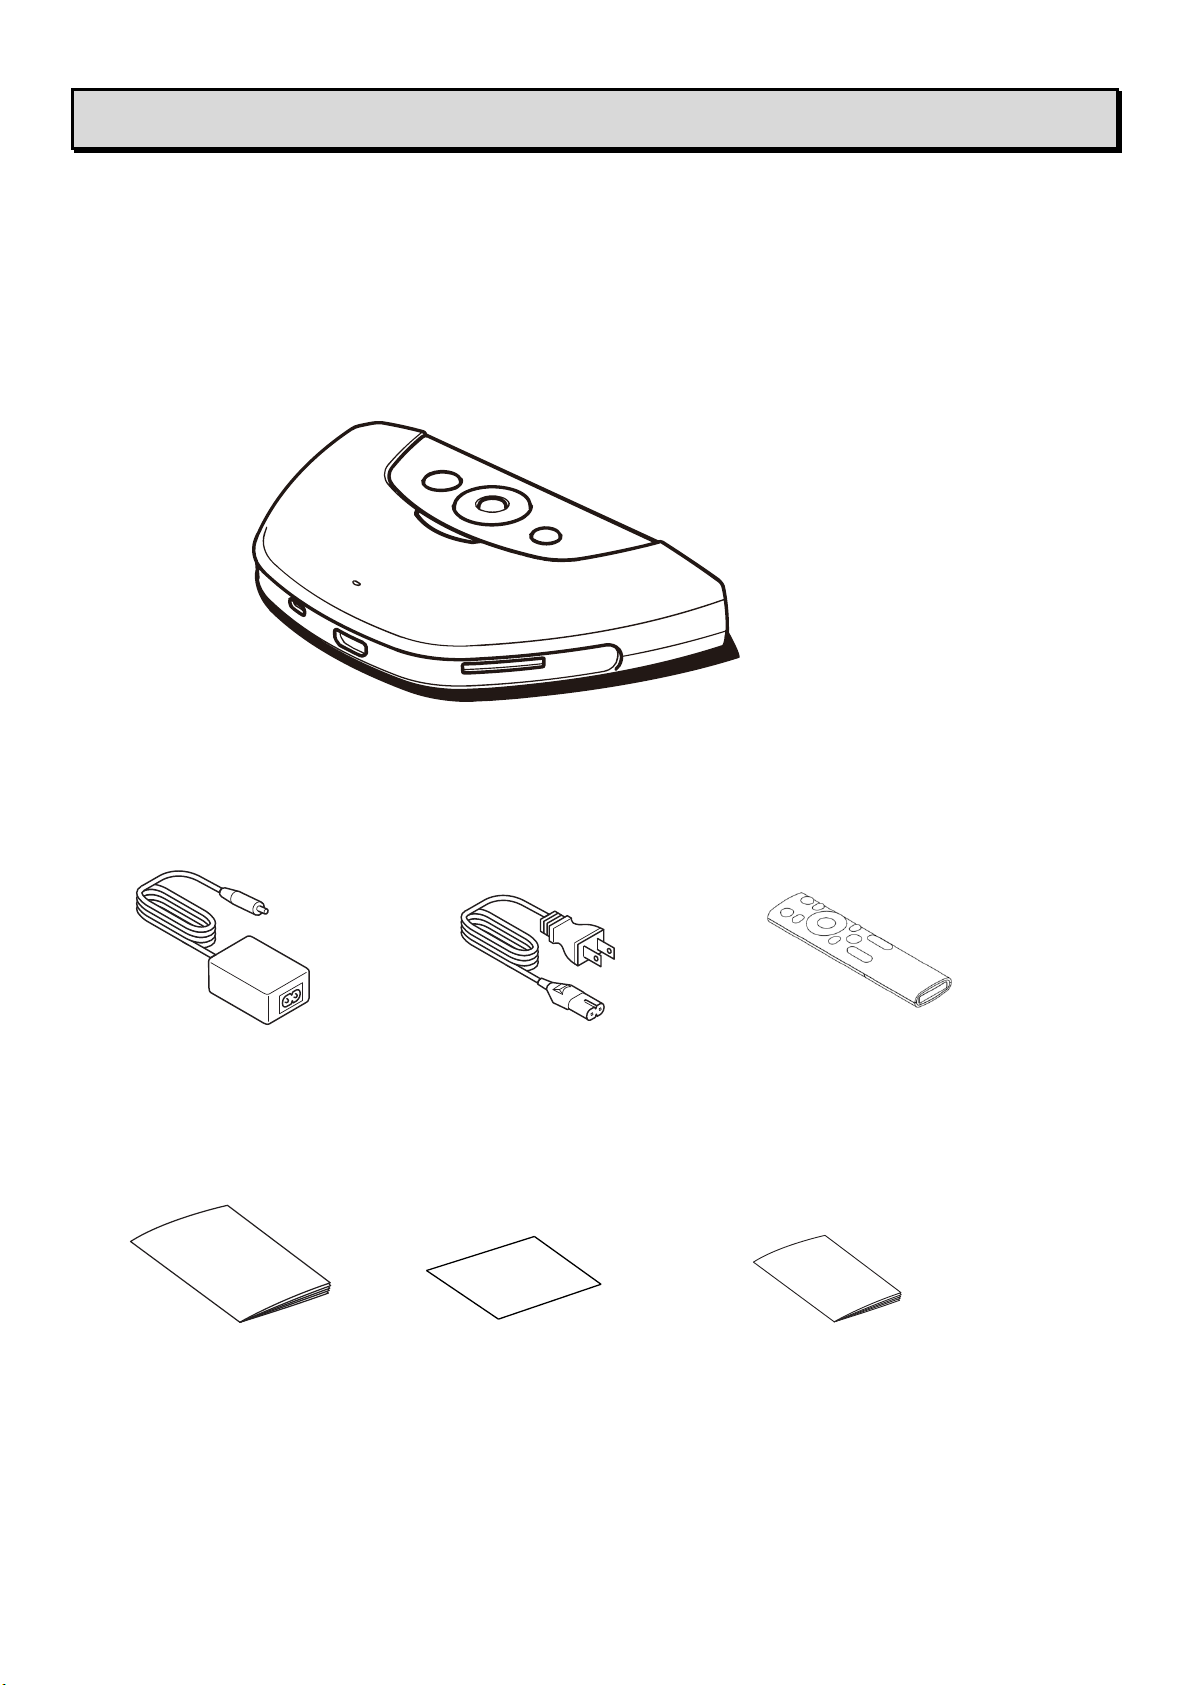
◆Package contents··················································································· 7
❷PART NAMES AND FUNCTIONS ································································ 8
◆Name of each part·················································································· 8
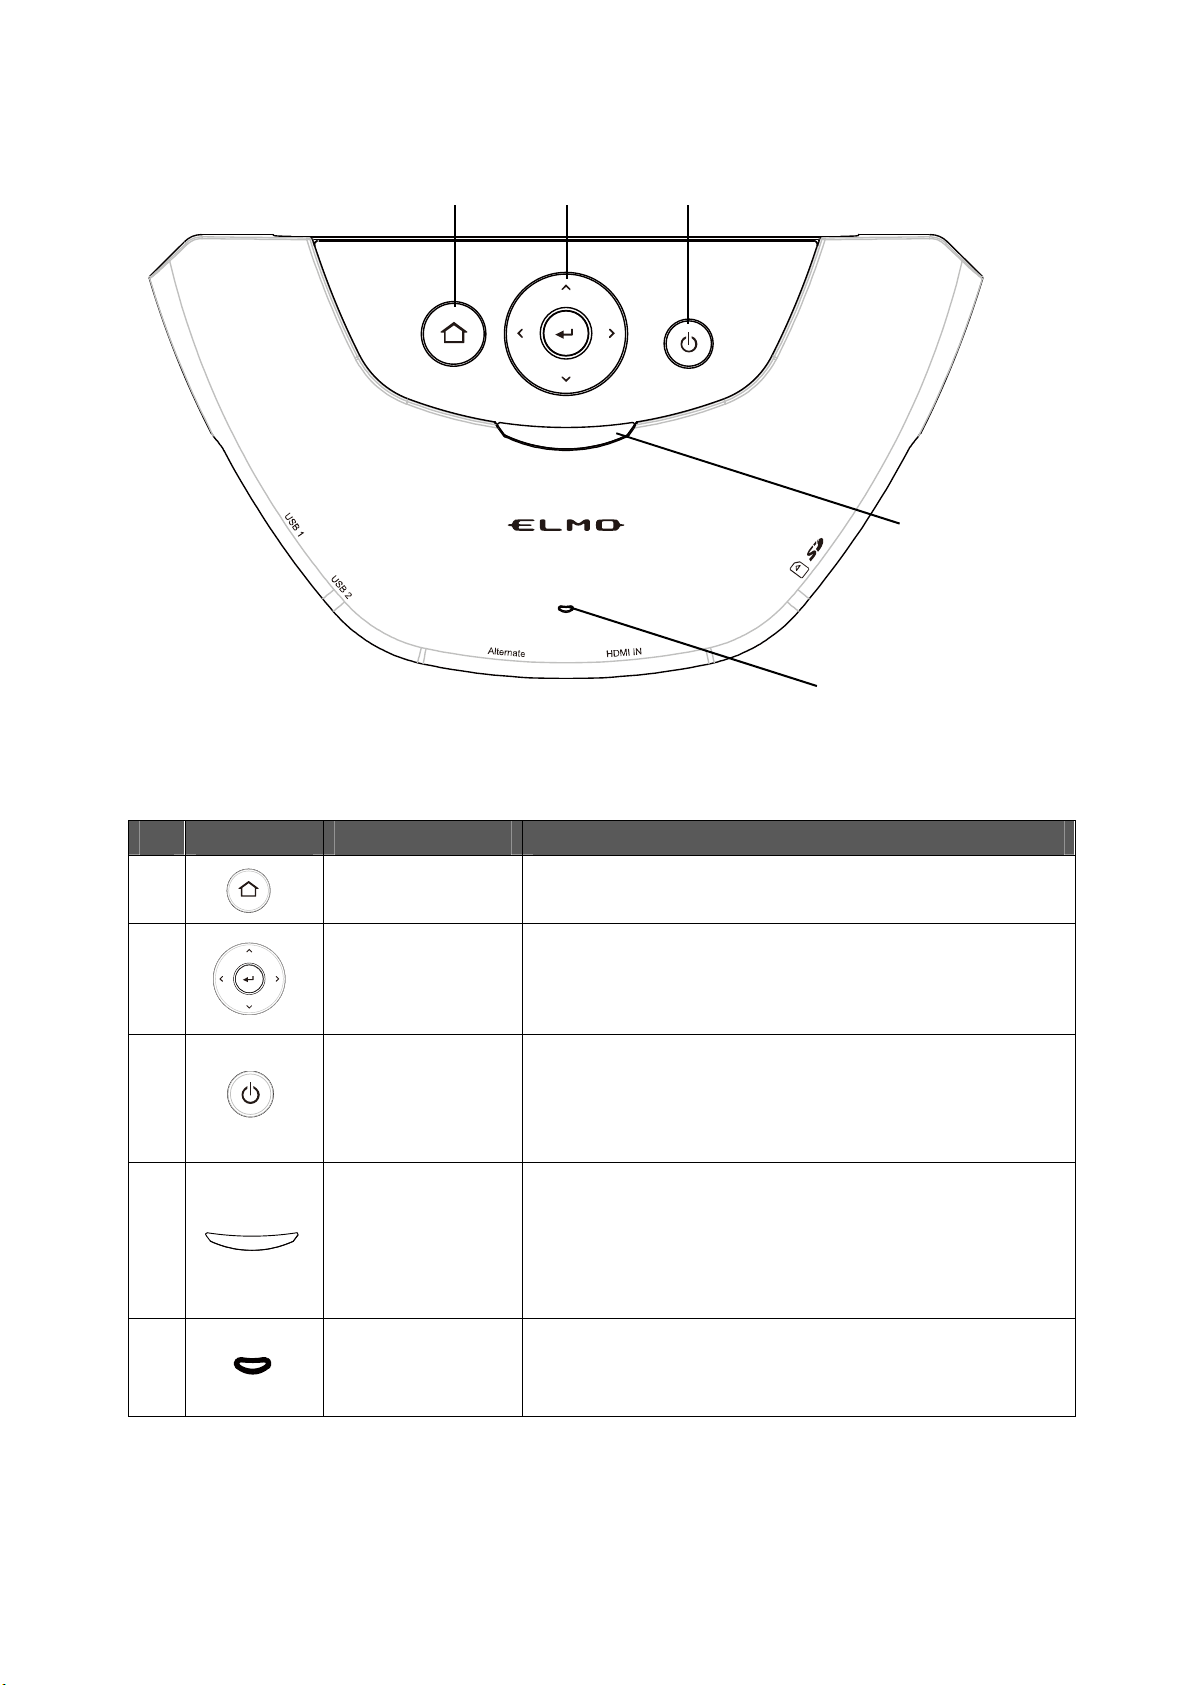
◆Operating panel ····················································································· 9
◆Front panel ·························································································· 10
◆Rear panel··························································································· 11
◆Remote control ·····················································································12
◆Fixing HS-2 to a desk·············································································13
◆About the FAN ······················································································13
❸BASIC OPERATIONS ··············································································14
◆Connecting to a projector or monitor··························································14
◆Connecting to a power source··································································14
◆Power on/off·························································································15
◆Setting the destination············································································15
◆Inserting batteries to the remote control ·····················································16
❹USING THE HS-2····················································································17
■Cast app(Display app)········································································· 17
◆Connecting ··························································································17
◆Displaying····························································································20
◆Operating the HS-2················································································22
◆Recording····························································································24
◆Audio output·························································································25
❺ADVANCED OPERATIONS ·······································································27
■PAINT ·································································································· 28
◆Drawing on the screen ··········································································· 29
■BROWSER ··························································································· 30
■FILE ···································································································· 31
◆Selecting the file ···················································································31
■EZT(Remote Meeting)········································································· 32
◆Operation of EZT (Starting a meeting) ·······················································32
●Startup······························································································32
●Scheduling a Meeting ··········································································33
●Starting a Scheduled Meeting································································ 34
●Starting a Meeting Immediately······························································35
●Joining a Meeting················································································ 35
●Configuring the Meeting Settings····························································36

6
◆Available Operations during the Meeting ····················································41
●Menu bar Operations ···········································································41
●Configuring the Security Settings····························································42
●Configuring the Participants Settings·······················································43
●Sharing the Screen··············································································44
●Viewing the Recorded Meeting ······························································46
■ELMO Play ··························································································· 47
◆Installing an app····················································································47
◆Uninstalling an app ················································································47
❻CONFIGURING THE SETTINGS································································48
◆Password screen ··················································································48
◆Settings screen·····················································································49
◆Changing the device name······································································53
◆Security setting ·····················································································54
◆Connecting to the network·······································································55
◆Network proxy settings ···········································································57
◆Pairing of the remote control····································································58
◆Resolution of the monitor ········································································59
◆Date and time settings············································································59
◆Keyboard selection ················································································60
◆Mic.&speaker settings ············································································61
◆App selection ·······················································································62
◆Installing the client certificate ···································································63
❼FAQ (Frequently asked questions and answers) ············································68
❽TROUBLESHOOTING ·············································································74
◆Symptoms and solutions·········································································74
❾SPECIFICATIONS···················································································76
◆Video input···························································································77
◆Video output·························································································78
◆Video recording·····················································································78
◆Still image recording ··············································································78
◆List of supported media types ··································································79
◆System requirements ·············································································79
■TRADEMARKS AND LICENSES ································································80

7
❶PREPARATION
◆PACKAGE CONTENTS
The items below are included with the product. If any item is missing, contact the dealer from whom you
purchased the product.
Remote control
Quick Start Guide Warranty Card
(For Japan/
North America only)
IMPORTANT SAFEGUARDS
A
C adapte
r
HS-2 (Main unit)
Power cable
※Batteries are not included in the package.
Please use AAA batteries.

❷
◆
❷
PA
R
◆
NAME
R
T N
A
OF EA
C
※The H
S
N
a
①O
p
②Fr
o
③R
e
④Fi
x
⑤Int
⑥E
x
②
⑥
④
A
ME
S
C
H PA
R
S
-2 has a b
u
a
me
p
erating pa
n
o
nt panel
e
ar panel
x
ing screw
h
ake vent
x
haust vent
S
AN
D
R
T
u
ilt-in cooli
n
n
el
h
oles
8
D
FUN
n
g fan.
CTIO
F
NS
unction
⇒P.9
⇒P.10
⇒P.11
⇒P.13
①
⑤
③
⑥
⑤

9
◆OPERATING PANEL
Mark Name Function
①Home button To display the Display selection screen.
②D-pad / Enter
button
Up/Down/Left/Right buttons:To move the cursor in
the direction of the arrow.
Enter button: To decide operation.
③Power button
To turn ON/OFF the HS-2.
Press once: To turn ON. (Power LED: lights up blue)
Press again: To turn OFF. (Power LED: lights up red)
④Power LED
To indicate the status of the HS-2.
Flashing red: Starting
Solid red: Standby
Solid blue: In operation
⑤Built-in
microphone
To be used as an audio source for recording and
EZT(video conference).
① ② ③
④
⑤

10
◆FRONT PANEL
Name Function
①USB2.0 ports [Type-A] To connect a USB device [USB2.0] such as a mouse,
USB flash drive, microphone, and speaker.
② USB Type-C Input port
[DisplayPort Alternate]
To connect a device with USB Type-C port (such as
Mac, Chromebook, and Windows that supports
DisplayPort Alternate (Alt) mode) for image input.
※Use a USB Type-C cable that supports DisplayPort
Alternate (Alt) mode.
③ HDMI Input port
[Type-A]
To connect a device with HDMI Type-A port (such as a
computer and document camera) for image input.
④ SD card slot To insert the SD card or SDHC card (Class 10 or higher)
for image recording or file playback.
① ② ③ ④

11
◆REAR PANEL
Name Function
① LAN port
[RJ45]
To connect a LAN cable to access the external network.
(For EZT,web browsing, displaying digital textbook,video
watching, etc.)
② HDMI Output port
[Type-A]
To connect a device with HDMI Type-A port (such as a
monitor and projector) for image output.
③ USB3.0 port
[Type-A]
To connect a USB device [USB3.0] such as a mouse, USB
flash drive, microphone, and speaker.
④ USB2.0 port
[Type-A]
To connect a USB device [USB2.0] such as a mouse, USB
flash drive, microphone, and speaker.
⑤ DC IN 12V To connect the supplied AC adapter.
⑥ Security slot To connect a security wire. Use this slot when installing in a
classroom to prevent theft.
① ② ③ ④ ⑤ ⑥

12
◆REMOTE CONTROL
Mark Name Function
① Power button To turn ON/OFF the HS-2.
②
Mute button
To turn ON/OFF the audio output.
You can switch between mute and unmute by pressing this
button.
③ Capture button To capture the current image.
※This function is available only on the Cast app or Paint app.
④
Cursor button
When this button is pressed the cursor appears. The cursor
disappears when this button is pressed again. Move the cursor
to an icon and press the Enter button to operate.
⑤
D-pad / Enter
button
Up/Down/Left/Right buttons:To move the cursor in the
direction of the arrow.
Enter button: To decide operation.
⑥ Return button To return to the previous screen.
⑦ EZT button To start EZT. If this button is pressed during the screen
sharing, the screen sharing will be cancelled.
⑧ Home button To go to the Display selection screen.
⑨
Volume button To adjust the volume. (+: increase -: decrease)
⑩
Channel button To switch the channel of the image to be input to HS-2.
① ②
③ ④
⑤
⑥ ⑦
⑧
⑨ ⑩

◆
W
m
◆
If
t
of
f
ch
F
M
◆
FIXIN
G
W
hen fixin
g
m
m from th
■Securin
■Dimensi
o
◆
ABOU
T
t
he built-in
f
f
the HS-2
b
arge.
Select a s
c
If the scre
w
(For exam
Note
ixing screw
h
M
4 screw
(Pitch: 0.5
m
G
HS-2
T
g
the HS-2
t
e bottom o
f
g unit
ons
T
THE
F
f
an fails, th
e
b
y clicking
t
c
rew that m
w
length is i
m
ple, if the d
e
h
ole
m
m / Depth:
T
O A D
E
t
o a desk, u
f
the main
u
F
AN
e
unit may
t
he “OK” b
u
atches the
t
nsufficient,
t
e
sk is 20 m
m
5mm)
E
S
K
se M4 scre
u
nit.
become h
o
u
tton and s
t
M
4
hickness of
t
he HS-2 c
a
m
thick, use
13
e
ws (pitch 0
o
t or unstab
t
op using t
h
4
screwx
2
the desk.
a
nnot be affi
x
25 mm scr
e
.5 mm) wit
h
le. If the “F
a
h
e unit. Re
q
2
x
ed properl
y
e
ws.)
h
a length t
h
a
n error” m
q
uest a rep
l
y
.
Fixing
s
M4 scr
e
(Pitch:
0
h
at allows
y
m
essage is
d
lacement a
s
crew hole
e
w
0
.5mm / De
p
y
ou to inser
t
d
isplayed, t
t
an additi
o
p
th: 5mm)
t
5
urn
o
nal

❸
◆
A
f
t
m
o
◆
C
o
T
h
T
h
❸
BA
S
◆
CONN
E
t
er connect
o
nito
r
or pr
o
◆
CONN
E
o
nnect the
p
h
en, conne
c
h
e power of
S
IC
O
E
CTIN
G
ing the HD
M
o
jector.
E
CTIN
G
p
ower cabl
e
c
t the powe
r
the HS-2
e
Monit
o
Wall o
u
O
PER
A
G
TO A
P
M
I cable to
G
TO A
P
e
and the A
C
r
cable to a
e
nters the s
t
or
HDMI ca
b
[
DC IN 1
2
u
tlet
A
TIO
N
P
ROJE
C
the HDMI
O
P
OWE
R
C
adapter.
C
wall outlet.
t
andby stat
e
H
Pro
j
ec
t
b
le
2
V
]
p
ort
14
N
S
C
TOR
O
O
utput port
R
SOU
R
C
onnect th
e
e
. (Power
L
H
DMI Out
pu
t
o
r
Powe
r
O
R MO
N
of the HS-
2
R
CE
e
AC adapt
e
L
ED: flashe
s
u
t
p
ort
r
cable
Pow
e
N
ITOR
2
, connect i
t
e
r to the D
C
s
red -> lig
h
A
C ad
a
r LED
t to the HD
M
C
IN 12V p
o
h
ts up red)
ap
te
r
M
I port of t
h
o
rt.
h
e

15
◆POWER ON/OFF
Press the Power button to turn on the power. (Power LED: lights up blue)
Press the Power button again to turn off the power. (Power LED: lights up red)
The image signal from the device connected via HDMI or USB Type-C is output from the HDMI Output
port. If a device is connected to the HS-2 with a cable and there is no image signal input from the device,
the Connection screen appears on the screen.
As shown in the picture, it is possible to do mirroring by connecting to the “Device Name” displayed on the
screen via Wi-Fi.
※Depending on your environment, it may take some time to startup or display Device Name and SSID.
◆SETTING THE DESTINATION
The Destination selection screen is displayed when the HS-2 is started for the first time or after
initialization. Select the country you want to use the HS-2 and press the Enter button [ ] on the
remote control to set the destination.
Connection destination

◆
R
e
◆
INSER
e
move the
c
Pay at
Batteri
Refer
t
for det
Not
e
TING B
c
over in th
e
tention to t
h
es are not
i
t
o “❻CON
F
t
ails of the
p
e
ATTER
e
back of th
e
h
e directio
n
i
ncluded in
F
IGURING
T
p
airing of th
I
ES TO
e
remote c
o
of the batt
e
the produc
t
T
HE SETT
I
e remote c
o
16
THE R
E
o
ntrol and i
n
e
ry.
t
.
I
NGS ◆Pa
o
ntrol.
E
MOTE
n
sert 2pcs
o
iring of th
e
CONT
R
o
f AA
A
batt
e
e
remote c
o
R
OL
er
ies.
o
ntrol(⇒P. 5
8
8
)”

17
❹USING THE HS-2
■Cast app(Display app)
The HS-2 supports wireless mirroring without installing a dedicated app or using a USB dongle
regardless of Windows, iOS, Android, or Chrome OS.
In addition, devices can be connected with cables using the HDMI Input port or USB Type-C port
[DisplayPort Alternate].
Up to 4 screens can be switched and displayed at the same time.
Immediately after startup, the Connection screen is displayed.
◆CONNECTING
■Connecting with a cable
The image from the device can be displayed by connecting to the HDMI Input port or USB Type-C port
[DisplayPort Alternate].
The image being input appears during startup when the device is connected to the HDMI Input port or
USB Type-C port.
(Input priority: HDMI Input > USB Type-C [DisplayPort Alternate])
HDMI In
p
ut
p
ort
USB Type-C port
[DisplayPort Alternate]
Compatible products
The L-12W, MA-1, and MO-2 support MiraCast.
Devices that have HDMI Output port can be connected to the HDMI Input port.
Note
You can use up to 4 units in total, wired and wireless. You can use up to 2 wireless units
when 2 wired units are connected, and up to 3 wireless units when 1 wired unit is
connected.
If you want to connect more than 5 devices, disconnect one of the connected devices.
Caution

■
C
T
C
※
t
h
▶
S
t
s
C
onnecting
T
he image
f
C
hrome(Go
o
※
When usi
h
e PIN for
w
▶
Mirroring
v
※For det
a
of the d
o
・When us
i
1. Turn o
n
2. Select
※The
m
※If the
3. Select
※It is
p
setti
n
・When us
i
1. Click t
h
2. Click t
h
3. Select
※It is
p
setti
n
※For Wi
n
1. Pre
s
sa
m
2. Sel
e
S
elect [Ca
s
t
he Display
s
ettings m
e
Dep
e
And
r
S
o
m
Cauti
o
wirelessly
f
rom the de
v
ogle)Cast)
ng with th
e
w
ireless co
n
v
ia MiraCa
s
a
ils of the
m
o
cument c
a
i
ng Android
n
the Wi-Fi
[Cast] in th
m
enu item
m
list does n
o
[HS-2_****
*
p
ossible to
c
n
g".
i
ng Windo
w
h
e Action C
h
e Connec
t
[HS-2_****
*
p
ossible to
c
n
g".
n
dows OS
s
s the Win
d
m
e time to o
e
ct [HS-2_*
s
t] in
e
nu.
e
ndin
g
on
r
oid devic
e
e
An
d
r
o
i
d
o
n
v
ice that s
u
can be mir
r
e
PIN settin
g
n
nection.
s
t
m
irroring via
a
mera.
OS
setting of
y
e settings
m
m
ay be diff
e
o
t appear,
e
*
*] from the
c
hange the
w
s OS(Wi
n
enter icon
[
t
icon [
]
*
*] from the
c
hange the
(Windows
1
d
ows logo
k
pen the co
n
*****] from
t
the devic
e
e
s do not
s
de
vi
ces
m
pports mirr
o
r
ored.
g
enabled,
MiraCast
w
y
our device.
m
enu of yo
u
e
rent depe
n
e
nable the
w
list.
name of th
e
n
dows10)
[
] in th
e
. ※If this i
c
list.
name of th
e
1
0), short
c
k
ey [ ] o
n
n
nection lis
t
t
he list.
e
the conn
e
upport th
e
may
n
o
t
be
18
r
oring (such
make sure
w
ith the do
c
.
u
r device.
n
ding on th
e
w
ireless dis
e
HS-2 to
b
e
task bar.
c
on is not
d
e
HS-2 to
b
c
ut keys ca
n
n the keyb
o
t
.
e
ction pro
c
e
touch ba
used
with
as MiraCa
that each
c
ument ca
m
e
device.
play settin
g
e displaye
d
d
isplayed, c
l
e displaye
d
n
also be u
s
o
ard of you
r
Sele
c
the li
s
c
edure m
a
ck control
th
e
H
S
-2
.
s
t, AirPlay,
d
evice is c
o
m
era, refer t
o
g
.
d
in the list
f
l
ick the Op
e
d
in the list
f
s
ed.
r
device an
d
c
t the devic
e
s
t.
a
y vary.
function.
.
and
o
nnected
b
o
the instru
f
rom "Devi
c
e
n icon.
f
rom "Devi
c
d
the K key
Select t
connec
t
list.
Enable
wireles
s
e
to conne
c
efore ente
r
ction manu
c
e name
c
e name
[ ] at th
he cast to
t
from the
the
s
display.
c
t from
r
ing
al
e

▶
▶
Mirroring
v
・When us
i
1. Turn o
n
to the
H
2. From t
3. Select
※It is
p
setti
n
Mirroring
v
・When usi
1. Co
n
([S
e
2. Tur
n
3. Op
e
4. Tap
5. Sel
e
※It i
s
e
S
e
No m
a
Chro
m
For d
e
the re
s
“Cast
select
When
opera
t
Cautio
n
v
ia AirPlay
i
ng iOS, iP
a
n
the Wi-Fi
H
S-2 via W
he Control
[HS-2_****
*
p
ossible to
c
n
g".
v
ia Chrome
(
ng Chrom
e
n
nect the H
S
e
ttings] > [
S
n
on the Wi
e
n the Chro
the icon [
e
ct [HS-2_*
s possible
t
e
tting".
e
lect “Scre
e
a
tter which
m
e browser.
e
tails of the
s
pective d
e
Desktop”
o
“Cast Tab”
recording
t
ing usage
e
n
a
d OS, or
M
setting of
y
i-Fi.
Center of y
o
*
*] from the
c
hange the
(
Google)C
a
e
OS, Wind
o
S
-2 to the e
x
S
ystem Set
t
-Fi setting
o
me browse
] on the t
o
*****] from
t
t
o change t
h
e
n Mirroring
”
OS is used
The pass
w
Wi-Fi conn
e
e
vices.
o
ption of C
h
option or u
Chrome(
G
e
nvironme
n
M
ac OS
y
our device
o
ur device,
list.
name of th
e
a
st
o
ws OS, or
x
ternal netw
o
t
ings] > [Ne
o
f your devi
r.
o
p right an
d
t
he list.
h
e name o
f
”
. Se
, you need
w
ord can b
e
e
ction and
m
h
rome(Goo
g
se AirPlay.
G
oogle)Ca
s
n
t.
19
and select
turn on th
e
e
HS-2 to
b
Mac OS
o
rk (Interne
t
e
twork and I
ce and sel
e
d
tap [Cast]
f
the HS-2 t
o
lect the de
v
to connect
e
entered w
i
mirroring o
p
g
le)Cast m
s
t, the vid
e
the SSID o
e
Screen Mi
e displaye
d
t
) via LAN o
nternet] > [
e
ct the SSI
D
.
o
be displa
y
v
ice (HS-2)
to the net
w
i
th the D-p
a
p
erations, r
e
a
y not be
u
e
o may b
e
f
the HS-2.
rroring [
d
in the list
f
r
Wi-Fi from
W
i-Fi]).
D
of the HS
y
ed in the li
to connect
ork when c
a
a
d on the r
e
e
fer to the i
n
u
sed on M
a
e
delayed
Then conn
].
f
rom "Devi
c
m
the Setting
-2.
i
st from "D
e
from the li
s
c
asting fro
m
e
mote contr
o
nstruction
m
a
c OS. In t
h
dependin
g
ect the dev
c
e name
s menu [
e
vice name
s
t.
the
o
l.
m
anual of
h
at case,
g
on the
ice
].
Other manuals for HS-2
2
Table of contents
Other Elmo Projector Accessories manuals
Popular Projector Accessories manuals by other brands

Progressive Marketing Products
Progressive Marketing Products PBM-123L installation instructions

Kindermann
Kindermann Klick & Show K-42U quick start guide

Sanyo
Sanyo PJ-Net Organizer POA-PN01 owner's manual

Christie
Christie One Assembling

Screen Innovations
Screen Innovations 5 Motorized Series quick start guide

Navitar
Navitar 487MCZ500 installation instructions