Elodie MONDO User manual

MONDO

4
15
6
5
11
1
2
3
14
13
12
10
98
7
1. HANDLEBAR
2. CANOPY
3. CANOPY EXTENSION
4. HANDLEBAR FOLD BUTTON
5. PARKING BRAKE
6. REAR WHEEL RELEASE BUTTON
7. REAR WHEEL
8. STORAGE BASKET
9. FRONT WHEEL
10. FRONT WHEEL RELEASE BUTTO
11. N SWIVEL/LOCK
12. FOOREST
13. HARNESS BUCKLE
14. HARNESS PADS
15. AUTO-LOCK
2

A B
C D
E F
3

J K
H I
G
4

L M
N O
0-6M 6M ↑
5
P
Q
0-6M
6

R S
T
V
W
U
click
7
XY-1
Y-2 Y-3
Y-4
8
Y-5 Y-6
9

Z-1 Z-2 Z-3
Z-4 Z-5 Z-6
Z-7 Z-8 Z-9
Z-10 Z-10
10

IMPORTANT - Keep these instructions for future reference.
Read these instructions carefully before use. Your child’s safety may be affected if you do not
follow these instructions.
STROLLER
• This stroller seats is for one passenger. NEVER allow more than one child at a time on this stroller.
• This seat unit is suitable from birth. Maximum weight is 22kg. For vehicles fitted with load carrying
accessories, details of the maximum weight permissible load 22 kg
• This stroller is not suitable for running, jogging, skating or rollerblading.
• Never leave your child unattended.
• Always use the restraint system.
• To avoid injury, ensure that your child is kept away when unfolding and folding this product.
• Do not let your child play with this product.
• Parcels or accessory items, or both, placed on the unit may cause the unit to become unstable.
• Any load attached to the handle affects the stability of the pushchair. Any load attached to the handle
and/or on the back of the backrest and /or on the sides of the vehicle will affect the stability of the
pushchair.
• Stroller is not meant to be used for transporting children up or down stairs or escalators. Damage
resulting to stroller will not be covered under warranty.
• This stroller does not replace a cot or a bed. Should your child need to sleep, then it should be placed
in a suitable pram body, cot, or bed.
• Accessories which are not approved by ELODIE DETAILS shall not be used.
• Watch out for cars - never assume that a driver can see you and your child.
• The passenger shall remain seated (no standing in the stroller).
• It may be unsafe to use replacement parts other than those supplied or approved by ELODIE DETAILS.
FRAME
A. Unpack the stroller frame from the box and set the wheels aside. Unlock the stroller by pulling the
auto-lock Lever.
B. Lift the footrest and seat away from the lower frame.
C.Then lift the handlebar away from the seat. The stroller will lock into place and you will hear a click.
D.Place the stroller in the upright position.
WARNING: Ensure that all the locking devices are engaged before use.
FRONT WHEEL
E & F. Installation
Lay stroller on its back so the handlebar is resting on the floor.
Attach the front wheel by sliding it into the front wheel mount until it clicks. Gently pull on the front wheel
to make sure it is properly attached.
Removal
While pressing the front wheel release button, gently slide the front wheel out of the front wheel mount.
SWIVEL FEATURE
G. Push the swivel lock button up to lock the front wheel to a fixed position. Press the swivel lock button
down to allow the front wheel assembly to swivel.
WARNING: When loading and unloading child, lock the front wheel in a fixed position. Although
the front wheel of your stroller locks, it is not intended for jogging or exercise purposes.
WARNING!
11

REAR WHEELS
H & I. Installation / Removal
Align the rear wheel axle with the wheel mount on the stroller frame and insert it into the wheel mount
until it locks into place. You will hear a click.
Gently pull on the rear wheel to make sure it is properly attached.
While pressing down on the wheel release button, gently slide the rear wheel out of the wheel mount.
BRAKE
J. To release the brakes: lift the brake lever up.
K. To lock the brakes: push the brake lever down to engage the brakes.
WARNING: Lock the brakes before loading and unloading your child and whenever the stroller is
not moving.
CANOPY
L. Pull forward to open canopy, push backwards to close canopy.
To use the canopy extension: Pull the extension out from under the canopy until it snaps into place, push
the extension under the main canopy to hide.
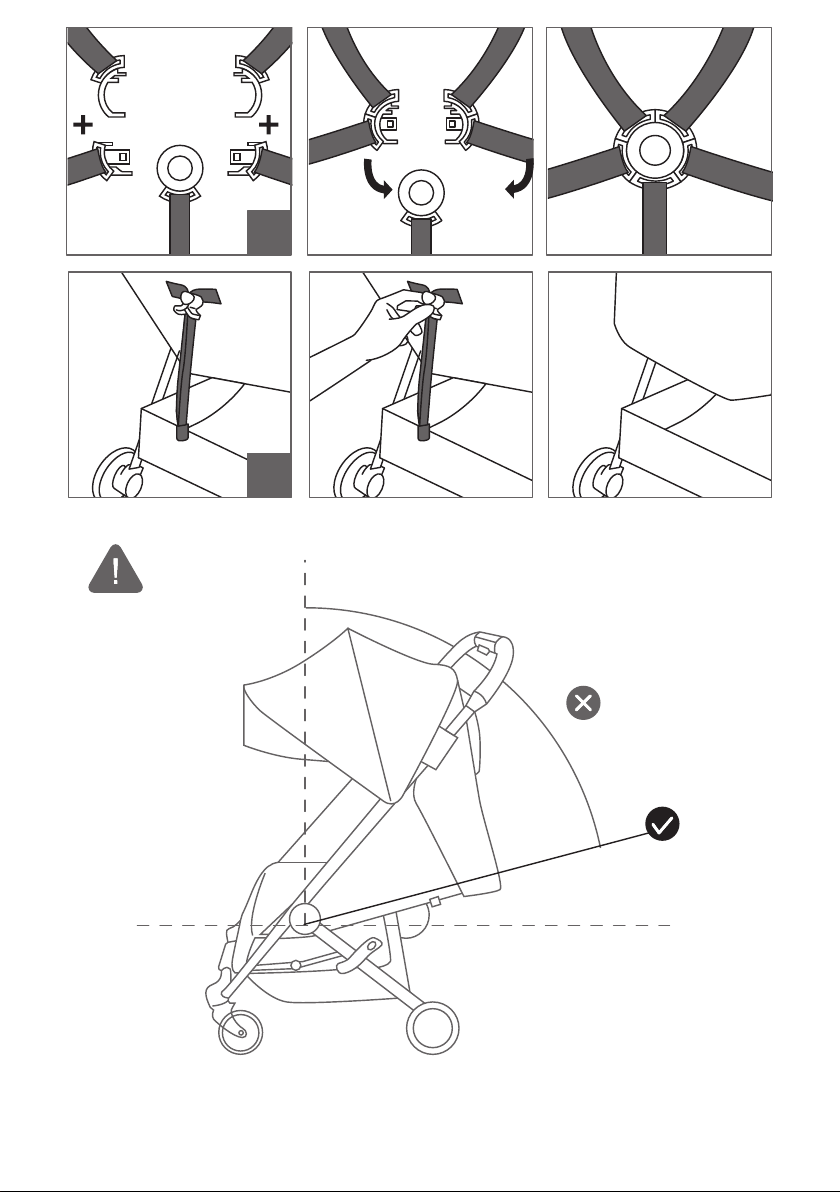
ADJUSTING SAFETY HARNESS
M.From the back of the seat, undo the fastening strip and open the pocket to locate the plastic square
stopper. Turn stopper and pass through the openings in the PE board and seat fabric.
Reinsert stopper at seat opening closest to child’s shoulders. Pass back through seat fabric and PE
board. Tug on strap to ensure stopper is locked. Repeat on both sides.
WARNING: Avoid serious injury from falling or sliding out. Always properly adjust and fasten
safety harness.
WARNING: Always use the crotch strap in combination with the shoulder straps and waist belt.
N.Slide the harness pads up to access plastic guide on strap.
O.Hold the plastic guide and pull strap to tighten or loosen.
USING SAFETY HARNESS
P. Insert side strap buckle into harness buckle on both sides.
Insert connected harness and side strap buckles into the sides of the crotch buckle.
Press button on crotch buckle to release.
RECLINE THE SEAT
Q. Pinch the clamp behind the seat, and slide it down to desired recline.
Pull seat down on both sides to match the clamp position. Reverse steps to return to the upright position.
WARNING: When making adjustments to the stoller seat, make sure child’s head, arms, and legs
are clear of moving seat parts and stroller frame.
ADJUSTING THE FOOTREST
R. To lower the footrest, use both lower buttons and push it down simultaneously.
S.To lift the footrest, simply pull it upwards and it shall automatically lock into position.
FOLDING
• Remove your child from the seat.
• Disengage front wheel swivel locks.
• Remove all attachments and all items from basket.
T. Squeeze the fold button on the handle bar and fold the frame forward. Pull up on the “Pull to Fold”
folding handle and let the frame colapse. 12

REAR WHEELS
H & I. Installation / Removal
Align the rear wheel axle with the wheel mount on the stroller frame and insert it into the wheel mount
until it locks into place. You will hear a click.
Gently pull on the rear wheel to make sure it is properly attached.
While pressing down on the wheel release button, gently slide the rear wheel out of the wheel mount.
BRAKE
J. To release the brakes: lift the brake lever up.
K. To lock the brakes: push the brake lever down to engage the brakes.
WARNING: Lock the brakes before loading and unloading your child and whenever the stroller is
not moving.
CANOPY
L. Pull forward to open canopy, push backwards to close canopy.
To use the canopy extension: Pull the extension out from under the canopy until it snaps into place, push
the extension under the main canopy to hide.
ADJUSTING SAFETY HARNESS
M.From the back of the seat, undo the fastening strip and open the pocket to locate the plastic square
stopper. Turn stopper and pass through the openings in the PE board and seat fabric.
Reinsert stopper at seat opening closest to child’s shoulders. Pass back through seat fabric and PE
board. Tug on strap to ensure stopper is locked. Repeat on both sides.
WARNING: Avoid serious injury from falling or sliding out. Always properly adjust and fasten
safety harness.
WARNING: Always use the crotch strap in combination with the shoulder straps and waist belt.
N.Slide the harness pads up to access plastic guide on strap.
O.Hold the plastic guide and pull strap to tighten or loosen.
USING SAFETY HARNESS
P. Insert side strap buckle into harness buckle on both sides.
Insert connected harness and side strap buckles into the sides of the crotch buckle.
Press button on crotch buckle to release.
RECLINE THE SEAT
Q. Pinch the clamp behind the seat, and slide it down to desired recline.
Pull seat down on both sides to match the clamp position. Reverse steps to return to the upright position.
WARNING: When making adjustments to the stoller seat, make sure child’s head, arms, and legs
are clear of moving seat parts and stroller frame.
ADJUSTING THE FOOTREST
R. To lower the footrest, use both lower buttons and push it down simultaneously.
S.To lift the footrest, simply pull it upwards and it shall automatically lock into position.
FOLDING
• Remove your child from the seat.
• Disengage front wheel swivel locks.
• Remove all attachments and all items from basket.
T. Squeeze the fold button on the handle bar and fold the frame forward. Pull up on the “Pull to Fold”
folding handle and let the frame colapse.
U. Folding handle to seat and let the frame colapse.
V. Make sure the auto-lock lever clicks into place.
OPTION
BUMPER BAR
W.The bumper bar can be opened on one side or completely removed; to open it, pull the lever and
remove it from its housing. To remove it, repeat the operation on the other side as well.
Warning: never attach the bumper bar in the direction opposite the one shown.
CANOPY
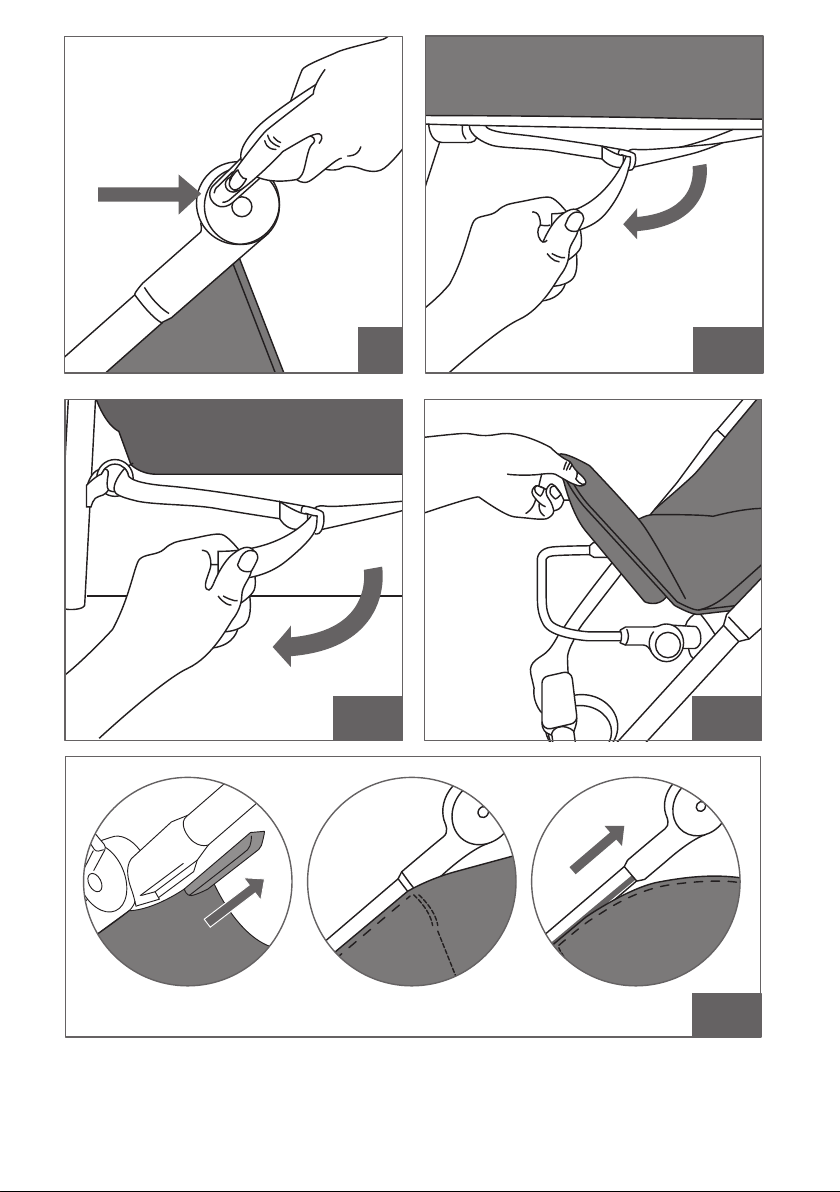
X. Remove canopy by press the buttons in the frame joint.
REMOVE SEAT
Y. Unsnap the seat fabric from the seat frame on both sides.
Y-1.From the underside of the seat, unfasten the hook-and-loop and slide the strap through the D-ring.
Y-2. Remove the “Pull to Fold” folding handle from the frame by unfastening the triangle carabiner hooks
and slide the straps through the seat.
Y-3. Remove the foot rest cover.
Y-4. Pull the seat fabric out of the channels in the frame.
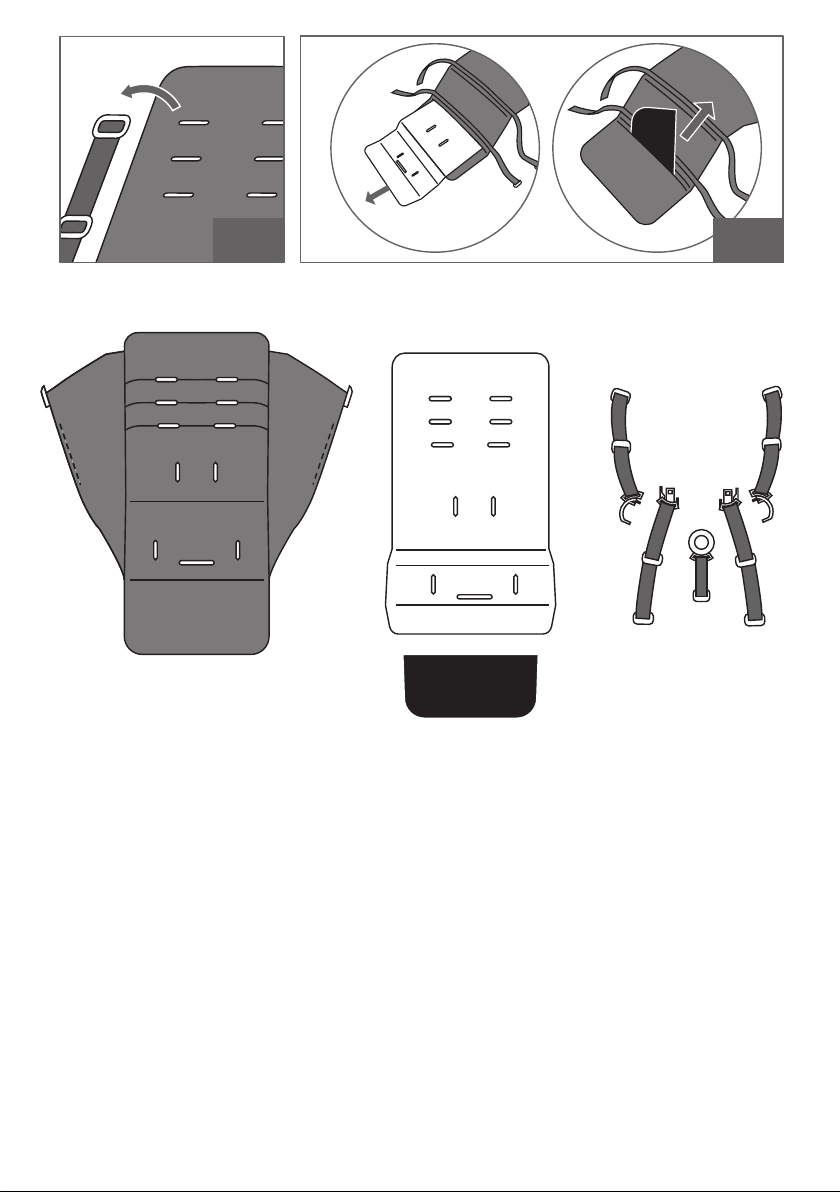
Y-5. Remove harness from the seat.
Y-6. Remove the back board & the foot rest board.
INSTALL SEAT
Z. Reverse the way of remove the seat.
CARE AND MAINTENANCE
To preserve the longevity of your stroller, it is important to perform simple, regular maintenance. From
time to time, make sure that the joints and folding areas are still in good condition. If you hear any
squeaking or feel tension, you can take your stroller to a local bike shop for added lubrication.
All repairs should only be carried out by an authorized dealer.
WASHING
Seat Fabric
• You can machine wash your stroller’s seat in cold water with a mild detergent.
• Be sure to remove the metal frame, safety harness, and PE boards from the seat before washing.
• Do not use solvents, caustic or abrasive cleaning materials.
• To minimize shrinkage, simply reattach the seat to the frame to dry.
• Do not press, iron, dry clean, tumble dry or wring the fabric.
• If the seat covers need to be replaced, only use parts from a Elodie Details Authorized Dealer. They are
the only ones that are guaranteed to have been safety tested and designed to fit this seat.
Plastic/Metal Parts
• Wipe clean using a mild soap and warm water.
• You must not remove, dismantle or alter any part of the seat folding mechanism or brakes.
Wheel Care
• The wheels can be cleaned using a damp cloth. They will need to be dried completely with a soft towel
or cloth. 13
STORING
• Sunshine can fade seat fabric and dry out tires, so storing your stroller indoors will prolong its good
looks.
• DO NOT store outside.
• Ensure that the stroller is dry before storing for prolonged periods.
• Always store the stroller in a dry environment.
• Store the stroller in a safe place when not in use (i.e. where children cannot play with it).
• DO NOT place heavy objects on top of the stroller.
• DO NOT store the stroller near a direct heat source such as a radiator or fire.
PT
IMPORTANTE - Guarde estas instruções para referência futura.
Leia estas instruções cuidadosamente antes de usar. A segurança de seu filho pode ser afetada se você
não seguir essas instruções.
CARRINHO DE BEBÊ
• O assento deste carrinho é para um passageiro. NUNCA permita mais de uma criança por vez neste
carrinho.
• Esta unidade de assento é adequada para bebês desde o nascimento. O peso máximo é 22kg. 1.
Para veículos equipados com acessórios de transporte de carga, o peso máximo permitido para a carga
é de 22 kg.
• Este carrinho não é adequado para ser usado enquanto corre, anda de skate ou de patins.
•Nunca deixe seu filho sem supervisão.
• Sempre use o sistema de cintos de segurança.
• Para evitar acidentes, certifique-se de que seu filho esteja longe ao desdobrar e dobrar este produto.
• Não deixe o seu filho brincar com este produto.
• Pacotes ou itens de acessórios, ou ambos, colocados na unidade podem causar a sua instabilidade.
• Qualquer carga presa à alça afeta a estabilidade do carrinho. Qualquer carga colocada na pega e/ou
na parte posterior do apoio para as costas e/ou nas laterais do veículo pode afetar a estabilidade do
carrinho de bebé.
• O carrinho não deve ser usado para transportar crianças ao subir ou descer escadas ou em escadas
rolantes. Os danos resultantes ao carrinho não serão cobertos pela garantia.
• Este carrinho não substitui um berço ou uma cama. Se o seu filho precisar dormir, ele deve ser
colocado em um moisés, berço ou cama adequados.
• Acessórios não aprovados pela ELODIE DETAILS não devem ser usados.
• Fique de olho nos carros - nunca suponha que um motorista pode ver você e seu filho.
• O passageiro deve permanecer sentado (sem ficar de pé no carrinho).
• Pode ser perigoso usar peças de reposição que não tenham sido fornecidas ou aprovadas pela
ELODIE DETAILS.
ARMAÇÃO
A. Retire da caixa o chassi do carrinho e coloque as rodas em um local separado. Destrave o carrinho
puxando a alavanca de travamento automático.
B. Levante o descanso para os pés e o assento para longe da estrutura inferior.
C.Em seguida, levante a barra da alça para longe do assento. O carrinho travará no lugar e você ouvirá
um clique.
D. Coloque o carrinho na posição vertical.
ATENÇÃO: Verifique se todos os dispositivos de travamento estão engatados antes do uso.

REAR WHEELS
H & I. Installation / Removal
Align the rear wheel axle with the wheel mount on the stroller frame and insert it into the wheel mount
until it locks into place. You will hear a click.
Gently pull on the rear wheel to make sure it is properly attached.
While pressing down on the wheel release button, gently slide the rear wheel out of the wheel mount.
BRAKE
J. To release the brakes: lift the brake lever up.
K. To lock the brakes: push the brake lever down to engage the brakes.
WARNING: Lock the brakes before loading and unloading your child and whenever the stroller is
not moving.
CANOPY
L. Pull forward to open canopy, push backwards to close canopy.
To use the canopy extension: Pull the extension out from under the canopy until it snaps into place, push
the extension under the main canopy to hide.
ADJUSTING SAFETY HARNESS
M.From the back of the seat, undo the fastening strip and open the pocket to locate the plastic square
stopper. Turn stopper and pass through the openings in the PE board and seat fabric.
Reinsert stopper at seat opening closest to child’s shoulders. Pass back through seat fabric and PE
board. Tug on strap to ensure stopper is locked. Repeat on both sides.
WARNING: Avoid serious injury from falling or sliding out. Always properly adjust and fasten
safety harness.
WARNING: Always use the crotch strap in combination with the shoulder straps and waist belt.
N.Slide the harness pads up to access plastic guide on strap.
O.Hold the plastic guide and pull strap to tighten or loosen.
USING SAFETY HARNESS
P. Insert side strap buckle into harness buckle on both sides.
Insert connected harness and side strap buckles into the sides of the crotch buckle.
Press button on crotch buckle to release.
RECLINE THE SEAT
Q. Pinch the clamp behind the seat, and slide it down to desired recline.
Pull seat down on both sides to match the clamp position. Reverse steps to return to the upright position.
WARNING: When making adjustments to the stoller seat, make sure child’s head, arms, and legs
are clear of moving seat parts and stroller frame.
ADJUSTING THE FOOTREST
R. To lower the footrest, use both lower buttons and push it down simultaneously.
S.To lift the footrest, simply pull it upwards and it shall automatically lock into position.
FOLDING
• Remove your child from the seat.
• Disengage front wheel swivel locks.
• Remove all attachments and all items from basket.
T. Squeeze the fold button on the handle bar and fold the frame forward. Pull up on the “Pull to Fold”
folding handle and let the frame colapse.
U. Folding handle to seat and let the frame colapse.
V. Make sure the auto-lock lever clicks into place.
OPTION
BUMPER BAR
W.The bumper bar can be opened on one side or completely removed; to open it, pull the lever and
remove it from its housing. To remove it, repeat the operation on the other side as well.
Warning: never attach the bumper bar in the direction opposite the one shown.
CANOPY
X. Remove canopy by press the buttons in the frame joint.
REMOVE SEAT
Y. Unsnap the seat fabric from the seat frame on both sides.
Y-1.From the underside of the seat, unfasten the hook-and-loop and slide the strap through the D-ring.
Y-2. Remove the “Pull to Fold” folding handle from the frame by unfastening the triangle carabiner hooks
and slide the straps through the seat.
Y-3. Remove the foot rest cover.
Y-4. Pull the seat fabric out of the channels in the frame.
Y-5. Remove harness from the seat.
Y-6. Remove the back board & the foot rest board.
INSTALL SEAT
Z. Reverse the way of remove the seat.
CARE AND MAINTENANCE
To preserve the longevity of your stroller, it is important to perform simple, regular maintenance. From
time to time, make sure that the joints and folding areas are still in good condition. If you hear any
squeaking or feel tension, you can take your stroller to a local bike shop for added lubrication.
All repairs should only be carried out by an authorized dealer.
WASHING
Seat Fabric
• You can machine wash your stroller’s seat in cold water with a mild detergent.
• Be sure to remove the metal frame, safety harness, and PE boards from the seat before washing.
• Do not use solvents, caustic or abrasive cleaning materials.
• To minimize shrinkage, simply reattach the seat to the frame to dry.
• Do not press, iron, dry clean, tumble dry or wring the fabric.
• If the seat covers need to be replaced, only use parts from a Elodie Details Authorized Dealer. They are
the only ones that are guaranteed to have been safety tested and designed to fit this seat.
Plastic/Metal Parts
• Wipe clean using a mild soap and warm water.
• You must not remove, dismantle or alter any part of the seat folding mechanism or brakes.
Wheel Care
• The wheels can be cleaned using a damp cloth. They will need to be dried completely with a soft towel
or cloth. 14
STORING
• Sunshine can fade seat fabric and dry out tires, so storing your stroller indoors will prolong its good
looks.
• DO NOT store outside.
• Ensure that the stroller is dry before storing for prolonged periods.
• Always store the stroller in a dry environment.
• Store the stroller in a safe place when not in use (i.e. where children cannot play with it).
• DO NOT place heavy objects on top of the stroller.
• DO NOT store the stroller near a direct heat source such as a radiator or fire.
PT
IMPORTANTE - Guarde estas instruções para referência futura.
Leia estas instruções cuidadosamente antes de usar. A segurança de seu filho pode ser afetada se você
não seguir essas instruções.
CARRINHO DE BEBÊ
• O assento deste carrinho é para um passageiro. NUNCA permita mais de uma criança por vez neste
carrinho.
• Esta unidade de assento é adequada para bebês desde o nascimento. O peso máximo é 22kg. 1.
Para veículos equipados com acessórios de transporte de carga, o peso máximo permitido para a carga
é de 22 kg.
• Este carrinho não é adequado para ser usado enquanto corre, anda de skate ou de patins.
•Nunca deixe seu filho sem supervisão.
• Sempre use o sistema de cintos de segurança.
• Para evitar acidentes, certifique-se de que seu filho esteja longe ao desdobrar e dobrar este produto.
• Não deixe o seu filho brincar com este produto.
• Pacotes ou itens de acessórios, ou ambos, colocados na unidade podem causar a sua instabilidade.
• Qualquer carga presa à alça afeta a estabilidade do carrinho. Qualquer carga colocada na pega e/ou
na parte posterior do apoio para as costas e/ou nas laterais do veículo pode afetar a estabilidade do
carrinho de bebé.
• O carrinho não deve ser usado para transportar crianças ao subir ou descer escadas ou em escadas
rolantes. Os danos resultantes ao carrinho não serão cobertos pela garantia.
• Este carrinho não substitui um berço ou uma cama. Se o seu filho precisar dormir, ele deve ser
colocado em um moisés, berço ou cama adequados.
• Acessórios não aprovados pela ELODIE DETAILS não devem ser usados.
• Fique de olho nos carros - nunca suponha que um motorista pode ver você e seu filho.
• O passageiro deve permanecer sentado (sem ficar de pé no carrinho).
• Pode ser perigoso usar peças de reposição que não tenham sido fornecidas ou aprovadas pela
ELODIE DETAILS.
ARMAÇÃO
A. Retire da caixa o chassi do carrinho e coloque as rodas em um local separado. Destrave o carrinho
puxando a alavanca de travamento automático.
B. Levante o descanso para os pés e o assento para longe da estrutura inferior.
C.Em seguida, levante a barra da alça para longe do assento. O carrinho travará no lugar e você ouvirá
um clique.
D. Coloque o carrinho na posição vertical.
ATENÇÃO: Verifique se todos os dispositivos de travamento estão engatados antes do uso.

RODA DIANTEIRA
E & F Instalação
Coloque o carrinho de costas de forma que a barra da alça fique apoiada no chão.
Prenda a roda dianteira deslizando-a em seu suporte até ouvir um clique. Puxe com cuidado a roda
dianteira para se assegurar de que ela esteja encaixada corretamente.
Remoção
Enquanto aperta o botão de liberação da roda dianteira, deslize a roda cuidadosamente para fora de
seu suporte.
RECURSO DE GIRO DA RODA
G. Pressione o botão de trava do giro da roda para cima, para travar a roda dianteira em uma posição
fixa. Pressione o botão de trava do giro da roda para baixo para permitir que o conjunto da roda
dianteira gire.
ATENÇÃO: Ao colocar e retirar uma criança do carrinho, trave a roda dianteira na posição fixa.
Embora a roda dianteira do seu carrinho trave, ela não deve ser usada enquanto você corre ou se
exercita.
RODAS TRASEIRAS
H & I. Instalação / Remoção
Alinhe o eixo da roda traseira com o suporte da roda no chassi do carrinho e insira-o no suporte da
roda até travar no lugar. Você ouvirá um clique.
Puxe com cuidado a roda dianteira para se assegurar de que ela esteja encaixada corretamente.
Enquanto aperta o botão de liberação da roda, deslize a roda traseira cuidadosamente para fora de
seu suporte.
FREIO
J. Para liberar os freios: levante a alavanca do freio.
K. Para travar os freios: pressione a alavanca do freio para baixo para engatá-los.
ATENÇÃO: Trave os freios antes de colocar e retirar o seu filho do carrinho e sempre que este não
estiver em movimento.
CAPOTA
L. Puxe para frente para abrir a capota, empurre para trás para fechá-la.
Para usar a extensão da capota: Puxe a extensão por baixo da capota até que ela se encaixe no lugar,
empurre a extensão sob a capota principal para ocultá-la.
AJUSTE DO CINTO DE SEGURANÇA
M. Da parte de trás do assento, solte a tira de fixação e abra o bolso para localizar o fixador quadrado
de plástico. Gire o fixador e passe-o pelas aberturas da placa de PE e do tecido do assento.
Reinsira o fixador na abertura do assento mais próxima dos ombros da criança. Passe-o de volta pelo
tecido do assento e pela placa de PE. Ajuste a alça para assegurar-se de que o fixador esteja travado.
Repita em ambos os lados.
ATENÇÃO: Evite acidentes graves causados por queda ou deslizamento. Sempre ajuste e aperte
corretamente o cinto de segurança.
ATENÇÃO: Sempre use a alça entrepernas juntamente com as alças dos ombros e da cintura.
N. Deslize as almofadas do cinto de segurança para poder acessar a guia de plástico na alça.
O. Segure a guia de plástico e puxe a alça para apertá-la ou afrouxá-la.
USO DO CINTO DE SEGURANÇA
P. Insira a fivela da alça lateral na fivela do cinto de segurança, em ambos os lados.
Insira o cinto de segurança já encaixado e as fivelas da alça lateral nas laterais da fivela entrepernas.
Pressione o botão na fivela entrepernas para soltar. 15

RECLINAÇÃO DO ASSENTO
Q. Aperte o engate atrás do assento e deslize-o para baixo até obter a reclinação desejada.
Puxe o assento para baixo em ambos os lados para ficar na mesma posição do engate. Inverta as etapas
para retornar à posição vertical.
ATENÇÃO: Ao fazer ajustes no assento do carrinho, verifique se a cabeça, os braços e as pernas da
criança estão afastados das partes móveis do assento e do chassi do carrinho.
AJUSTE DO DESCANSO PARA OS PÉS
R. Para abaixar o descanso para os pés, use os dois botões inferiores e pressione-os simultaneamente.
S. Para levantar o descanso para os pés, basta puxá-lo para cima e para que trave automaticamente em
sua posição.
DOBRA
• Retire o seu filho do assento.
• Desengate as travas do giro da roda dianteira.
• Remova todos os acessórios e itens da cesta.
T. Aperte o botão de dobra na barra da alça e dobre o chassi para frente. Puxe a alça dobrável com os
dizeres “Pull to Fold” e aguarde para que o chassi encolha.
U. Dobre a alça ao assento e aguarde para que o chassi encolha.
V. Verifique se a alavanca de travamento automático se encaixa ao fazer um clique.
opção
para-choque
W. O para-choque pode ser aberto de um lado ou completamente removido; para abri-lo, puxe a alavanca
e remova-a de seu compartimento. Para removê-lo, repita a operação também do outro lado.
Aviso: nunca prenda o para-choque na direção oposta à mostrada.
CAPOTA
X. Remova a capota apertando os botões na articulação do chassi.
REMOÇÃO DO ASSENTO
Y. Solte dos dois lados o tecido do assento de seu chassi.
Y-1. No lado de baixo do assento, abra os fechos de velcro e deslize a alça pelo anel D.
Y-2. Remova a alça dobrável com os dizeres “Pull to Fold” do chassi, soltando os ganchos triangulares do
mosquetão e, em seguida, deslize as alças pelo assento.
Y-3. Retire a cobertura do descanso para os pés.
Y-4. Puxe e retire o tecido do assento dos canais no chassi.
Y-5. Remova o cinto de segurança do assento.
Y-6. Remova a placa traseira e a placa do descanso para os pés.
INSTALAÇÃO DO ASSENTO
Z. Realize na ordem inversa as etapas para remover o assento.
CUIDADO E MANUTENÇÃO
Para preservar a longevidade do seu carrinho, é importante realizar uma manutenção simples e regular.
Periodicamente, verifique se as articulações e as áreas dobráveis ainda estão em boas condições. Caso
ouça qualquer barulho ou note alguma tensão, você pode levar o carrinho a uma loja de bicicletas para
que seja melhor lubrificado.
Todos os reparos só devem ser realizados por um revendedor autorizado.
16

LAVAGEM
Tecido do assento
• O assento do carrinho pode ser lavado na máquina, com água fria e um detergente suave.
• Não se esqueça de remover a estrutura metálica, o cinto de segurança e as placas de PE do assento
antes de lavá-lo.
• Não use solventes, materiais de limpeza cáusticos ou abrasivos.
• Para minimizar o encolhimento dos tecidos, basta recolocar o assento na estrutura para secar.
• Não utilize prensa, passe a ferro, limpe a seco, seque ou torça o tecido.
• Caso seja necessário substituir as capas do assento, use apenas peças obtidas de um revendedor
autorizado da Elodie Details. Elas são as únicas que têm garantia de que foram testadas e projetadas
para caber no assento.
Peças de plástico/metal
• Limpe-as com um pano umedecido em sabão neutro e água morna.
• Não remova, desmonte ou altere qualquer peça do mecanismo de dobra do assento ou dos freios.
Cuidados com rodas
• As rodas podem ser limpas com um pano úmido. Elas precisarão ser completamente secas com uma
toalha ou pano macio.
ARMAZENAGEM
• A luz do sol pode desbotar o tecido do assento e secar os pneus; por isso, guardar o carrinho dentro de
casa fará com que a sua aparência se conserve por mais tempo.
• NÃO guarde-o fora de casa.
• Assegure-se de que o carrinho está seco antes de guardá-lo por períodos prolongados.
• Guarde sempre o carrinho em um ambiente seco.
• Guarde o carrinho em um local seguro quando não estiver em uso (por exemplo, longe do alcance das
crianças).
• NÃO coloque objetos pesados sobre o carrinho.
• NÃO guarde o carrinho perto de uma fonte direta de calor, tal como um aquecedor ou fogo.
NL
BELANGRIJK - Bewaar deze instructies voor referentie in de toekomst.
Lees deze instructies voor gebruik zorgvuldig door. De veiligheid van uw kind kan in het gedrang komen
als u deze instructies niet opvolgt.
KINDERWAGEN
• Het stoeltje in deze kinderwagen is voor één kind. Laat NOOIT meer dan één kind tegelijkertijd in deze
kinderwagen zitten.
• Kinderen kunnen vanaf hun geboorte in deze kinderwagen zitten. Maximum gewicht is 22 kg. 1.
Voor voertuigen die zijn uitgerust met accessoires voor het dragen van een lading, gegevens over het
maximaal toegestane gewicht van 22 kg.
• Deze kinderwagen is niet geschikt voor hardlopen, joggen, skaten of rollerbladen.
• Laat uw kind nooit alleen.
• Gebruik altijd het veiligheidssysteem.
• Om verwondingen te voorkomen, moet u ervoor zorgen dat u dit product in- en uitklapt als uw kind niet
in de buurt is.
• Laat uw kind niet met dit product spelen.
• Pakketjes of accessoires, of beide, die onderin geplaatst worden, kunnen ervoor zorgen dat de kinder-
wagen onstabiel wordt.
• Iedere belasting die aan het handvat bevestigd wordt, is van invloed op de stabiliteit van de kinderwa-
gen. Elke lading die aan het handvat en/of aan de achterkant van de rugleuning en/of aan de zijkanten
van het voertuig is bevestigd, heeft invloed op de stabiliteit van de kinderwagen. 17

• De kinderwagen is niet bedoeld voor het vervoer van kinderen op een trap of een roltrap. Schade aan
de kinderwagen wordt niet gedekt onder de garantie.
• Deze kinderwagen is geen vervanging van een wieg of een bed. Als uw kind moet slapen, moet u hem
in een geschikte wandelwagen, wieg of bed leggen.
• Accessoires die niet zijn goedgekeurd door ELODIE DETAILS mogen niet gebruikt worden.
• Let op auto's - ga er nooit van uit dat een bestuurder u en uw kind kan zien.
• Het kind moet blijven zitten (hij mag niet staan in de kinderwagen).
• Het kan onveilig zijn andere reserveonderdelen te gebruiken dan die zijn goedgekeurd door ELODIE
DETAILS.
FRAME
A. Pak het frame van de kinderwagen uit de doos en leg de wielen apart. Ontgrendel de kinderwagen
door aan de automatische vergrendelingshendel te trekken.
B. Til de voetsteun en de zitting van het onderste frame.
C. Til vervolgens het handvat van de zitting. De kinderwagen wordt vergrendeld, en u hoort een klik.
D. Zet de kinderwagen rechtop neer.
WAARSCHUWING: Controleer of alle vergrendelingen zijn ingeschakeld voor gebruik.
VOORWIEL
E & F. Installatie.
Leg de kinderwagen op de achterkant zodat het handvat op de grond ligt.
Bevestig het voorwiel door het in de inrichting voor het voorwiel te schuiven tot u een klik hoort. Trek
voorzichtig aan het voorwiel om te controleren of het goed vastzit.
Verwijderen
Trek, terwijl u de ontgrendelingsknop voor het voorwiel indrukt, voorzichtig het voorwiel uit de inrichting.
DRAAIFUNCTIE
G. Druk de vergrendelingsknop voor de draaifunctie in om het voorwiel vast te zetten. Druk de vergren-
delingsknop naar beneden om de voorwielen te laten draaien.
WAARSCHUWING: als u uw kind in de wagen zet of hem eruit haalt, zet de voorwielen dan vast. Hoewel
de voorwielen van uw kinderwagen vastgezet kunnen worden, is hij niet bedoeld om mee te rennen of
joggen
ACHTERWIELEN
H & I. Installatie/verwijderen
Leg de as van het achterwiel langs de wielinrichting op het frame van de kinderwagen en steek hem in
de wielinrichting tot hij vergrendelt. U hoort een klik.
Trek voorzichtig aan het achterwiel om te controleren of het goed vastzit.
Trek, terwijl u de ontgrendelingsknop voor het wiel indrukt, voorzichtig het achterwiel uit de inrichting.
REMMEN
J. De remmen loslaten: de remhendel omhoog tillen.
K. De remmen vergrendelen: druk de remhendel naar beneden om te remmen.
WAARSCHUWING: vergrendel de remmen voordat u uw kind in de wagen zet of hem eruit haalt en als
de kinderwagen stil staat.
ZONNESCHERM
L. Naar voren trekken om het zonnescherm te gebruiken, terug duwen om in te klappen.
Het verlengstuk van het zonnescherm gebruiken: Trek het verlengstuk onder het zonnescherm uit tot het
op zijn plek klikt. Druk het verlengstuk onder het zonnescherm om het op te bergen.
18

DE VEILIGHEIDSGORDEL AFSTELLEN
M. Maak vanaf de achterkant van de zitting de bevestigingsstrip los en open het vak waar de plastic
vierkanten stopper in zit. Draai de stopper en haal hem door de opening in het PE-bord en de stof van
de zitting.
Plaats de stopper weer in de zittingopening die het dichtst bij de schouders van uw kind zit. Haal hem
weer terug door de stof van de zitting en het PE-bord. Trek aan de band om te controleren of de
stopper vast zit. Herhaal aan beide zijden.
WAARSCHUWING: voorkom ernstige verwondingen door vallen of uitglijden. Stel de veiligheidsgordel
altijd goed af en maak hem altijd vast.
WAARSCHUWING: gebruik altijd de band tussen de benen in combinatie met de schouderbanden en
tailleband.
N. Schuif de kussentjes naar boven om bij de plastic geleider op de band te kunnen.
O. Houd de plastic geleider vast en trek aan de band om hem strakker of losser te zetten.
DE VEILIGHEIDSGORDEL GEBRUIKEN
P. Schuif de gesp van de band aan beide zijkanten in de gesp van de gordel.
Schuif de gordel en de gespen van de banden aan de zijkant in de zijkanten van de gesp tussen de
benen.
Druk op de knop op de gesp tussen de benen om deze te openen.
DE ZITTING IN DE LIGSTAND PLAATSEN
Q. Druk de klem achter de zitting in en schuif naar de gewenste ligstand.
Trek aan beide zijden naar beneden tot naast de klem. Herhaal de stappen in omgekeerde volgorde
om weer terug te zetten.
WAARSCHUWING: als u de zitting van de kinderwagen afstelt, moet u zorgen dat het hoofd, de armen
en de benen van uw kind buiten bereik van bewegende onderdelen en het frame van de kinderwagen
zijn.
DE VOETSTEUN AFSTELLEN
R. Gebruik om de voetsteun lager te zetten beide onderste knoppen en druk ze tegelijkertijd in.
S. Om de voetsteun hoger te zetten, trekt u hem naar voren, dan klikt hij automatisch op zijn plek.
INKLAPPEN
• Haal uw kind uit de kinderwagen.
• Ontgrendel de remmen van de voorwielen.
• Haal alle accessoires los en haal al uw spullen uit de mand.
T. Druk de knop voor inklappen op de handgreep in en vouw het frame naar voren. Trek aan de
handgreep om het frame in te klappen.
U. Vouw het handvat in de zitting en laat het frame inklappen.
V. Zorg dat de automatische vergrendeling op zijn plek klikt.
optie
bumperbalk
W. De bumperbalk kan aan de ene kant geopend of volledig verwijderd worden. Om hem te openen
trekt u aan de hendel om hem eruit te pakken. Om hem te verwijderen, herhaalt u deze handeling aan
de andere zijde.
Waarschuwing: bevestig de bumperbalk nooit in tegengestelde richting als die is aangegeven.
ZONNESCHERM
X. Verwijder het zonnescherm door op de knoppen in het frame te drukken.
19

ZITTING VERWIJDEREN
Y. Maak aan beide zijden de stof van de zitting van het frame los.
Y-1: Maak vanaf de onderkant van de zitting de bevestiging los en schuif de band door de D-ring.
Y-2. Verwijder de inklaphendel van het frame door de driehoekige karabijnhaken los te maken en de
banden door de zitting te schuiven.
Y-3. Verwijder de afdekking van de voetsteun.
Y-4. Trek de stof van de zitting uit de geleiders op het frame.
Y-5. Verwijder de gordel uit de zitting.
Y-6. Verwijder het achterbord en het bord van de voetsteun.
ZITTING PLAATSEN
Z. Herhaal de procedure voor het plaatsen van de zitting in omgekeerde volgorde.
ONDERHOUD
Om te zorgen dat u uw kinderwagen lang kunt gebruiken, is het belangrijk het volgende eenvoudige,
reguliere onderhoud uit te voeren. Controleer van tijd tot tijd of de scharnierende framedelen en inklap-
pende onderdelen nog in goede conditie zijn. Als ze piepen of als u spanning voelt, kunt u uw kinderwa-
gen naar een fietsenmaker brengen om hem te laten smeren.
Reparaties mogen alleen door een bevoegde dealer uitgevoerd worden.
WASVOORSCHRIFTEN
Stof van de zitting
• U kunt de zitting van de kinderwagen schoonmaken in koud water met een mild schoonmaakmiddel.
• Verwijder voor het schoonmaken het metalen frame, de gordel en de PE-borden van de zitting.
• Gebruik geen oplosmiddelen, caustische of schurende schoonmaakmiddelen.
• Om krimpen te minimaliseren, bevestigt u de zitting in het frame om hem te laten drogen.
• De stof niet persen, strijken, stomen, uitwringen of in de droger drogen.
• Als de hoes van de zitting vervangen moet worden, gebruik dan alleen onderdelen van een bevoegde
Elodie Details-dealer. Dit zijn de enige plekken waar de onderdelen op veiligheid getest zijn en waar de
onderdelen gegarandeerd op de zitting passen.
Plastic/metalen onderdelen
• Schoonvegen met een milde zeep en warm water.
• U mag onderdelen van het inklapmechanisme van de zitting of de remmen niet verwijderen, uit elkaar
halen of veranderen.
Onderhoud van de wielen
• De wielen kunnen gereinigd worden met een vochtige doek. Ze moeten afgedroogd worden met een
zachte handdoek of doek.
OPBERGEN
• Door het licht van de zon kan de stof van de zitting verkleuren en kunnen de banden uitdrogen, dus
door uw kinderwagen binnen op te bergen, blijft hij langer mooi.
• NIET buiten laten staan.
• Zorg dat de kinderwagen droog is als u hem voor langere tijd opbergt.
• Bewaar de kinderwagen altijd in een droge omgeving.
• Bewaar de kinderwagen op een veilige plek als deze niet in gebruik is (dat wil zeggen op een plek waar
kinderen er niet meer kunnen spelen).
• Plaats GEEN zware objecten bovenop de kinderwagen.
• Zet de kinderwagen NIET in de buurt van een directe warmtebron zoals een radiator of een vuur.
20
Table of contents
Languages:


