Chicco CORSO FLEX User manual

Owner'sManual

2 3
WARNINGWARNING
Failure to follow all warnings and instructions may result in
serious injury or death. For your child's safety, read the labels
and owner's manual before using the product.
Failure to follow all warnings and instructions may result in
serious injury or death. For your child's safety, read the labels
and owner's manual before using the product.
• NEVER USE STROLLER ON STAIRS
or escalators. You may suddenly
lose control of the product and
your child may fall out. Also, use
extra care when going up or down
a step or curb.
• Before use, remove and dispose
of all plastic bags and packaging
materials and keep them out of
reach of children.
• Before assembly, check that the
product and all of its components
have not been damaged during
transportation.
• Do not use accessories, spare
parts, or any component not
supplied or approved by Chicco
as they may make the stroller
unsafe.
• Do not attempt to attach any
infant car seat to the stroller
other than the Chicco infant
car seat. Injury or death may
result when attempting to use
this stroller in conjunction with
infant car seats from other
manufacturers.
Using Chicco infant car seat with
stroller:
• Infant Car Seat Adapter must
be properly attached to use the
Chicco infant car seat.
• ONLY USE Chicco infant car seat
with this stroller.
• Only use this product to transport
infants that are within the size and
weight limitations of the infant car
seat.
• FALL HAZARD: Always check that
infant car seat is securely attached
to stroller frame by pulling up on
the infant car seat.
• ALWAYS SECURE your child with
the car seat harness. Always make
sure child is properly harnessed in
the car seat.
• Refer to your Chicco infant car
seat owner's manual for additional
warnings and use instructions
before using this product.
• PLEASE SAVE OWNER'S MANUAL
FOR FUTURE USE.
• ADULT ASSEMBLY REQUIRED.
• NEVER LEAVE CHILD
UNATTENDED. Always keep child
in view while in the stroller.
• AVOID SERIOUS INJURY from
falling or sliding out. Always use
seat belt. After fastening buckles,
adjust belts to get a snug fit around
your child.
• Seated child should be secured in
the youth seat at all times by the
seat belt.
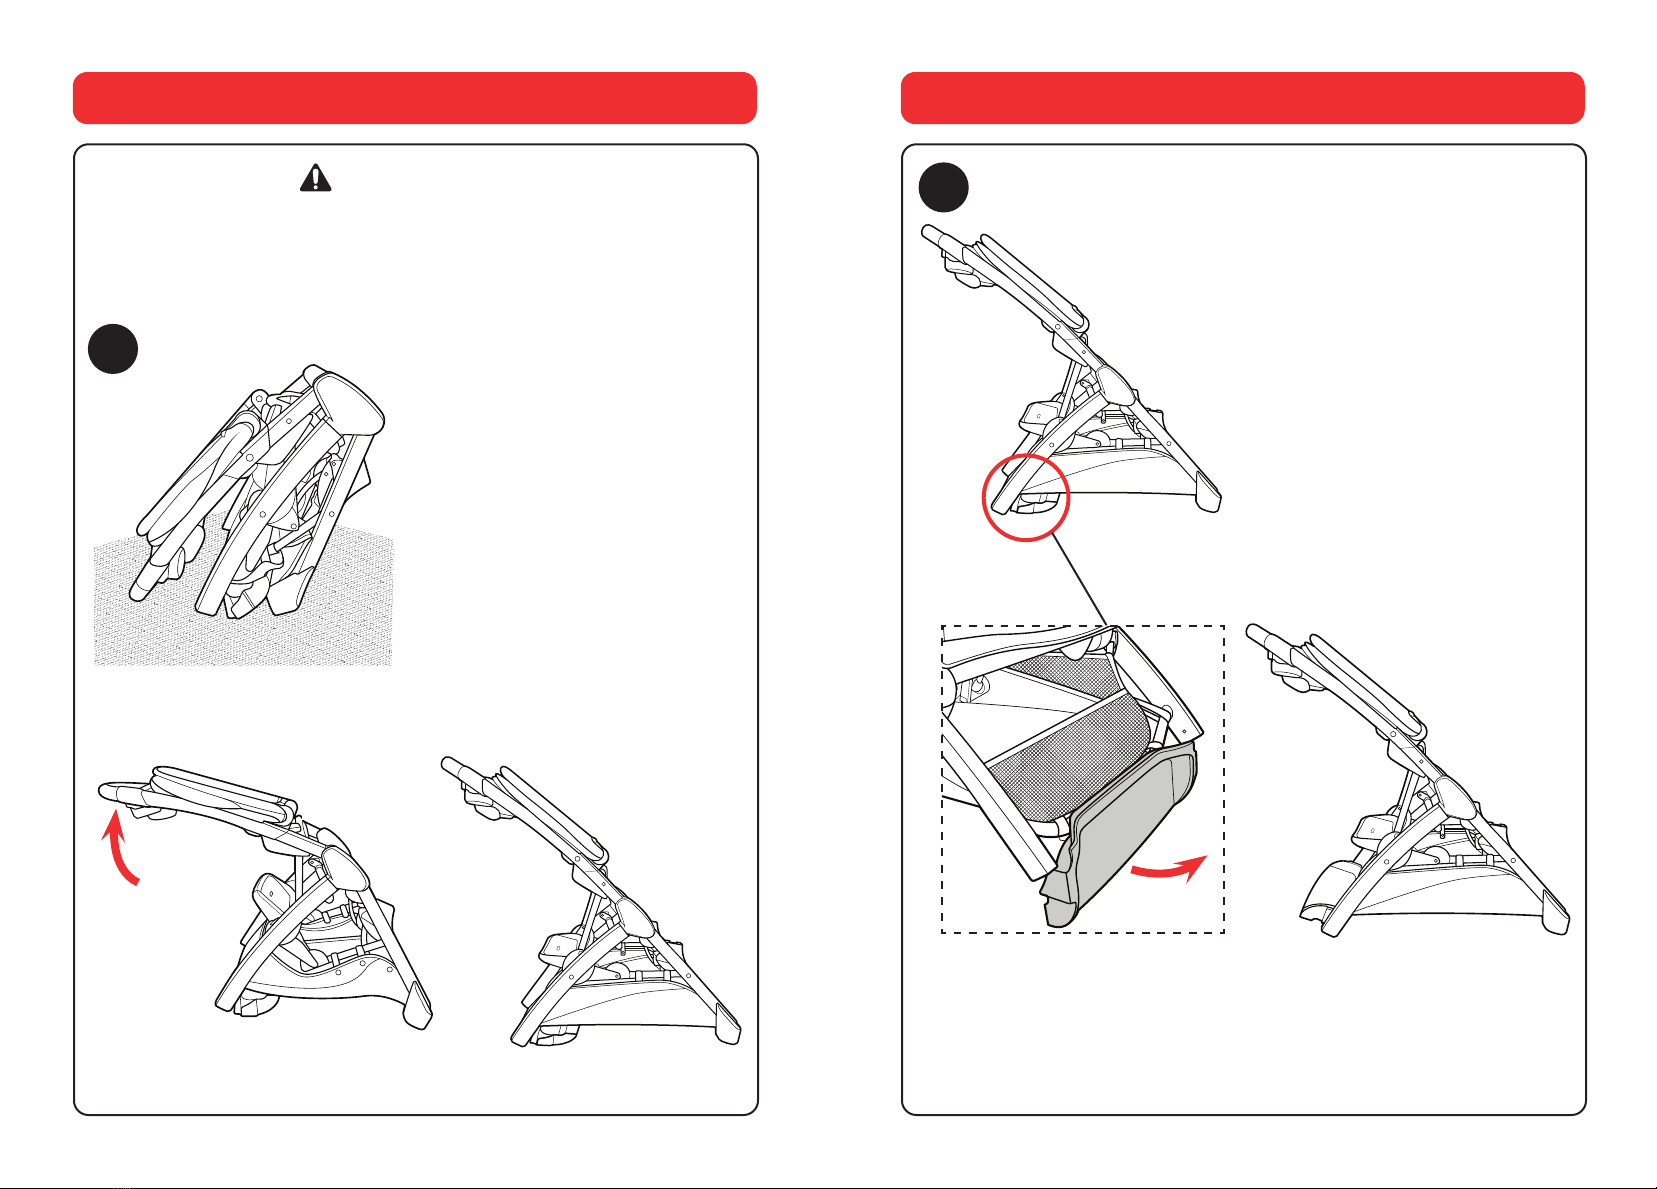
• AVOID FINGER ENTRAPMENT: Use
care when folding and unfolding
the stroller. Be certain the stroller
is fully opened and latched before
allowing your child near the
stroller.
• USE OF THE STROLLER with two
children weighing more than 40
lbs each (18 kg), and/or taller than
43 inches (109.2 cm) will cause
excessive wear and stress on the
stroller.
• Never use the Stroller with more
than 2 children at a time.
• It is recommended that the
platform be used by children who
are at least 2 1/2 years old, with
good balance and coordination.
• STROLLER TO BE USED only
at walking speed. Product not
intended for use while jogging,
skating, etc.
• AVOIDTIPPING! DO NOT overload
front seat, youth seat or standing
platform past the recommended
weight ratings.
• TO PREVENT A HAZARDOUS,
UNSTABLE CONDITION, never
place purses, shopping bags,
parcels or accessory items on the
canopy or handle. Do not place
more than 10 lbs (4.5 kg) in the
storage basket, or 15 lbs (6.8 kg)
in the Car Seat Adaptor Basket and
the Small Shopping Basket.
• DO NOT use storage basket as a
child carrier.
• Avoid burns. Never put hot liquids
in cup holder. Do not place more
than 3 lbs (1.4 kg) on the parent
tray/cup holders.
• NEVER ALLOW YOUR STROLLER to
be used as a toy.
• DISCONTINUE USING YOUR
STROLLER should it become
damaged or broken.
• AVOID STRANGULATION. DO
NOT place items with a string
around your child's neck, suspend
strings from this product, or attach
strings to toys.

4 5
Components
A. A. - Stroller Frame :
Youth Seat and Standing Platform
are fixed to Stroller Frame Accessory
Canopy is attached to Stroller Frame
B. - Front Wheels
C. - Rear Wheels
D. - Rear Axle Assembly
D.
C.
B.
Components
E. - Modular Seat with Canopy
F. - Infant Car Seat Adapter with
Removable Basket
G. - Small Shopping Basket
H. - Grip Bar
F.
E.
G.
H.

6 7
If you have hardwood floors or
linoleum you may want to
perform this step on carpeting
or lay down some protection for
your floors.
1. Stand the Stroller Frame (A) on
end, as shown. Locate the handle
and rotate the handle up and
unfold the Stroller Frame. Make
sure the frame is fully open and
locked by pressing down on
the handle.
How to Assemble Stroller
WARNING
When opening the Stroller, ensure that your child, or other children, are at a
safe distance. Ensure that during these operations, the movable parts of the
Stroller do not come into contact with your child.
1
“CLICK!”
2. To attach the Rear Axle
Assembly (D), rotate the Standing
Platform up into it's correct
position. This will allow the Rear
Axle Assembly to be attached
securely to the Stroller Frame.
How to Assemble Stroller
2

8 9
How to Assemble Stroller
4. To lock the Standing Platform
onto the Rear Axle Assembly, flip
the stroller over and turn both
levers, as shown.
The platform levers need to rotate
so that they rest on top of the
Rear Axle and lock the Standing
Platform in place. Pull on the
platform to make sure it is secure
on the axle.
4
How to Assemble Stroller
33. Line up the Rear Axle Assembly
(D) to the Stroller Frame. Make
sure the Standing Platform is
in the correct position as
shown in 3A.
Then attach the Rear Axle
Assembly to the Stroller Frame,
making sure both snap buttons
click into the holes on either side
of the Rear Axle mount.
Make sure the Rear Axle bar is
positioned below the Standing
Platform, as shown in 3B.
“CLICK!”
Snap
Button
B.
A.

10 11
How to Assemble Stroller
6. Attach the Front Wheel (B) to
the Stroller Frame by lining up and
inserting the Front Wheel Pin into
the corresponding opening on
the Stroller Front Leg, as shown.
Repeat for the other side.
Make sure both Wheels are
secure by pulling down on
Wheel assemblies.
6
How to Assemble Stroller
25. Attach the Rear Wheel (C) to
the Stroller Frame by lining up and
inserting the Rear Wheel Axle into
the corresponding opening on the
Stroller Rear Axle Tube, as shown.
Repeat for the other side. If the
brake pin interferes, lift the brake
pedal to release brake, or rotate
wheel until it does not interfere
with the brake pin and then finish
inserting the Rear Wheel Axle.
Make sure both Wheels are
secure by pulling out on
Wheel assemblies.
5

12 13
7B. Remove the Front Wheels by
pushing in on the Release Button,
just above the wheel (as shown).
And, at the same time, pull the
Front Wheel off of the Stroller
Frame. Repeat for the other side.
How to Assemble Stroller
7B
How to Assemble Stroller
7A. Remove the Rear Wheels by
pulling on the Release Lever, just
above the brake lever, as shown.
And, at the same time, pull the
Rear Wheel off of the Stroller
Frame. Repeat for the other side.
7A
If you need to remove the wheels

14 15
How to Use Modular Seat
9A
9A. Prepare Modular Seat (E) for
attachment to Stroller Frame.
Make sure the hub posts are both
in the same position, as shown.
If not, squeeze the recline handle
with one hand and rotate the hub
post with the other.
How to Use Brakes
8A. Push down on the Brake Lock
Levers located on each side of the
Rear Wheel assembly, to lock the
Rear Wheels.
8B. Pull up on the Brake Lock
Levers to unlock the Rear Wheels.
WARNING
Always apply the brakes whenever the stroller is stationary. Never leave the
stroller on a sloped surface, with a child onboard, even with the brakes applied.
8A
8B

16 17
How to Use Modular Seat
WARNING
This stroller features three harness positions. Always use a harness position
located ABOVE the child's shoulder line. If multiple harness positions are
above the child's shoulder line, use the one closest to it.
10A. The Shoulder Straps can be
adjusted to 3 height positions as
shown.
10A
3
2
1
How to Use Modular Seat
9B. Open the Seat Frame (E). Line
up and insert the attachment hubs
on both sides of the Seat Frame
into the lower attachment slots
on the Stroller Frame, as shown
(9C). Pull up on the Seat Frame to
make sure it is securely attached
to the Stroller Frame.
9B
“CLICK!”
9C

18 19
How to Use Modular Seat
11. This stroller has a 5-point
safety harness. The Shoulder
Strap Connector is designed to
break away from the Waist Clip
when not secured in the Crotch
Strap Buckle.
Make sure the Shoulder Strap
Connector is in the correct
position, as shown. Slide the
Shoulder Strap Connector onto
the Waist Strap Clip and repeat
for the other side. Then slide both
Waist Clips into the Crotch Strap
Buckle, as shown. Pull on both
sides to make sure the Clips are
secured to the Buckle.
11
How to Use Modular Seat
10B
10B. To adjust the Shoulder
Harness to another height
position, locate the D-ring on the
back of the seat as shown. Release
the hook and loop material at the
top of the seat back to expose
the seat board. Slide the D-ring
through opening on the seat back.
Then pull through the opening on
the seat pad. Re-insert the D-ring
into the correct height position,
and repeat for the other side.
Always use the same height
position for both straps.
Depending on Shoulder Harness
height position, D-ring may be
located below visible opening in
seat back.
Seat Front

20 21
How to Use Modular Seat
13 13. The length of the Shoulder
Straps can be adjusted by
pulling on the adjustment
buckles to tighten or loosen.
The length of the waist straps
can be adjusted. Press the tab at
the end of the Waist Strap Clip
and pull on the strap to tighten or
loosen, to better fit your child.
How to Use Modular Seat
12. The Safety Harness can be
released by pressing the button
on the center of the Buckle and
pulling both Waist Clips out.
Pull up on the Shoulder Strap
Connector to remove it from the
Waist Strap Clip.
WARNING
Never leave child unattended. Avoid serious injury from falling or sliding out.
Always use Safety Harness.
12

22 23
How to Use Modular Seat
15 15. To Extend the Seat Canopy,
locate extension panel under the
front edge of the Seat Canopy.
Pull forward on the extension
panel. Reverse this step to tuck
the extension panel back under
the front Seat Canopy section.
How to Use Modular Seat
14A
14B
14A. To open the Seat Canopy, pull
the front edge of the Seat Canopy
forward. Reverse this step to close
the Seat Canopy.
14B. The canopy has a mesh panel
that can be used for increased
airflow or as a peekaboo window.
The curved shape of the canopy
holds the flap in position. Pull
forward on the Seat Canopy flap to
uncover the mesh panel. Reverse
this step to close the mesh panel.

24 25
The Footrest can be adjusted to 4
positions.
17. Press in on both Footrest
Buttons and, at the same time,
rotate the Footrest up or down to
the desired position.
1. 2. 3.
17
4.
How to Use Modular SeatHow to Use Modular Seat
16 16. To remove the Seat Canopy,
slide the Canopy attachment clips
away from the attachment points
on the Seat Frame, as shown.
Store the Seat Canopy for
later use.
To re-attach the Seat Canopy,
position Canopy so the back
panel of Canopy is located behind
the seat frame. Slide the Seat
Canopy attachment clips onto
the corresponding attachment
points on the Seat Frame,
as shown.

26 27
How to Use Modular Seat
19. Locate the mesh organizer
pocket on the back of the seat.
WARNING
Never place more than 1 lb (0.5 kg) in seat back pocket.
19
18A
18A. To remove Armbar, press in
on the buttons located at the sides
of the Armbar, as shown. Undo
one side of the Armbar, and swing
away to the side (18B). Undo both
sides and remove completely
(18C). To re-attach the Armbar
insert the ArmbarTongues into the
corresponding openings on the
Seat Frame.
18C
18B
How to Use Modular Seat
Note: The Stroller is ready to use
with a child standing and a child
sitting in the Modular Seat .

28 29
Adjust the Waist Straps to
be snug around the child's waist.
21B. The length of the Waist Straps
on the Youth Seat can be adjusted.
Press the tab at the end of the
Waist Strap Clip and pull on the
strap to tighten or loosen, to
better fit your child.
21A
21A. Wrap the Waist Straps
around the child's waist and insert
the clips into the Crotch Strap
Buckle between the child's legs.
How to Use Youth Seat
21B
How to Use Youth Seat
20
20. To use the Youth Seat, fold
down the seat and unbuckle the
3-Point Harness.
WARNING
Excessive wear and stress on the stroller can occur when using the stroller with
two children whose weight totals more than 80 lbs (36.3 kg).

30 31
How to Use Standing Platform
Make sure the Grip Bar is attached
when using the Standing Platform.
23A. The Grip Bar will insert into
the hubs with the hand-hold loops
to the back of the stroller. Line up
and insert the attachment hubs
on both sides of the Grip Bar into
the upper attachment slots on the
Stroller Frame, as shown.
23A
How to Use Standing Platform
22. Fold the Youth Seat up to
allow the child to stand on the
Standing Platform.
Do NOT place more than 1 lb
in the Pocket located under the
Youth Seat.
22

32 33
24A
23B. Always have child use the
Grip Bar located behind the Front
Seat as highlighted. Make sure the
child has BOTH feet on the
Standing Platform at all times.
23B
WARNING
When pushing stroller, Do not allow child to stand on platform facing
backwards. Do not allow child to stand on seat. To avoid falling, child must
hold onto handles and keep both feet on platform. It is recommended that
the platform be used by a child at least 2 1/2 years old, with good
balance and coordination.
How to Use Standing Platform How to Use Accessory Canopy
24A. To open the Canopy, pull the
front edge of the Canopy forward.
Reverse this step to close the
Canopy.The Canopy position can
be adjusted by continuing to pull
forward on the front edge so the
Canopy rotates forward.

34 35
24B.The canopy has a mesh panel
that can be used for increased
airflow or as a peekaboo window.
The curved shape of the canopy
holds the flap in position. Pull
forward on the Canopy flap to
uncover the mesh panel. Reverse
this step to close the mesh panel.
24B
How to Use Accessory Canopy
25. To remove the Stroller Canopy,
lift up on the canopy clip tab and
twist it away from the frame down
tube. Repeat for the other side.
Store the Stroller Canopy for later
use.
To attach Stroller Canopy, fasten
both Stroller Canopy clips to the
stroller frame, making sure the
RIVET ON THE FRAME is centered
in the hole on the Stroller Canopy
Clip.
Note: It is required for the
Accessory Canopy to be removed
if using the stroller with an Infant
Car Seat in the top position.
25
How to Use Accessory Canopy

36 37
26A. With the Grip Bar attached,
locate two pin holes below the
Grip Bar handles, as shown.
26B. Attach the Small Shopping
Basket to the stroller frame. Tilt
the front of the Shopping Basket
down and insert both pins into the
pin holes below the Grip Bar (1), as
shown.
Then press down on both side
locking attachment points (2).
26A
How to Use Shopping Basket
26B
1.
2.
How to Use Infant Car Seat Adapter
Infant Car Seat Adapter and basic function:
· The Infant Car Seat Adapter will only attach to the stroller frame in
one direction.
· The Infant Car Seat Adapter can be attached to the stroller frame in
either the Upper or Lower Modular Positions.
· A Chicco Infant Car Seat will only attach to the Infant Car Seat
adapter in one direction, Parent-Facing.
· The Infant Car Seat Adapter includes a fabric basket that can be
used as an additional storage basket.
· The Infant Car Seat Adapter fabric basket can be removed by
unsnapping the fabric attachment points (10 snaps) from around the
adapter frame.
· The Infant Car Seat Adapter can be used without the fabric basket to
attach a Chicco Infant Seat to the stroller.
· The Infant Car Seat Adapter can be used with the fabric basket to
attach a Chicco Infant Seat to the stroller. Do not store anything in
the basket when attaching a Chicco infant seat.

38 39
How to Use Infant Car Seat Adapter
28
28. Open the adapter hoop and
locate the upward bend in the
adapter.This bend always faces to
the front of the stroller.
Line up theTongues on both sides
of the Infant Car Seat Adapter to
the slots on the Stroller frame as
shown. Push down until it clicks
into place. Pull up on the Infant
Car Seat Adapter to make sure it
is securely attached to the Stroller
Frame.
“CLICK!”
“CLICK!”
27. The Modular Seat can be
removed to attach the Infant
Car Seat Adapter. To remove the
Modular Seat, press the buttons
inside both hubs, as shown, and lift
up to remove the seat.
27
How to Use Infant Car Seat Adapter
WARNING
Do not remove the Seat from the Stroller frame with the child inside.
Table of contents
Other Chicco Stroller manuals

Chicco
Chicco Together User manual

Chicco
Chicco TrioMYCITY User manual

Chicco
Chicco BabyCoccola User manual

Chicco
Chicco S3 BLACK

Chicco
Chicco SKIP User manual

Chicco
Chicco SEETY User manual

Chicco
Chicco Miinimo 3 User manual

Chicco
Chicco FULLY User manual

Chicco
Chicco Capri User manual

Chicco
Chicco Urban User manual

Chicco
Chicco TRIO FOR ME POUSSETTE User manual

Chicco
Chicco trioLove User manual

Chicco
Chicco Goody Plus User manual

Chicco
Chicco STYLEGO up User manual

Chicco
Chicco Corso User manual

Chicco
Chicco TROLLEYme User manual

Chicco
Chicco active User manual

Chicco
Chicco GOODY XPLUS User manual

Chicco
Chicco Mini Bravo Plus User manual

Chicco
Chicco MULTIRIDE User manual