elsner elektronik RF-L UN-ST User manual

Radio dimmer RF-L UN-ST IP53 and RF-L LED-ST IP53 1
Radio dimmer RF-L UN-ST IP53 and RF-L LED-ST IP53 from software version 5.7 • Version: 16.05.2022 • Technical changes and errors excepted. • Elsner Elektronik GmbH • Sohlengrund 16 • 75395 Ostelsheim • Germany • www.elsner-elektronik.de • Technical Service: +49 (0) 7033 / 30945-250
RF-L UN-ST IP53 and RF-L LED-ST IP53
Radio Dimmer
Technical specifications and installation instructions
Item numbers
60544 RF-L UN-ST IP53
60545 RF-L LED-ST IP53
1. Description
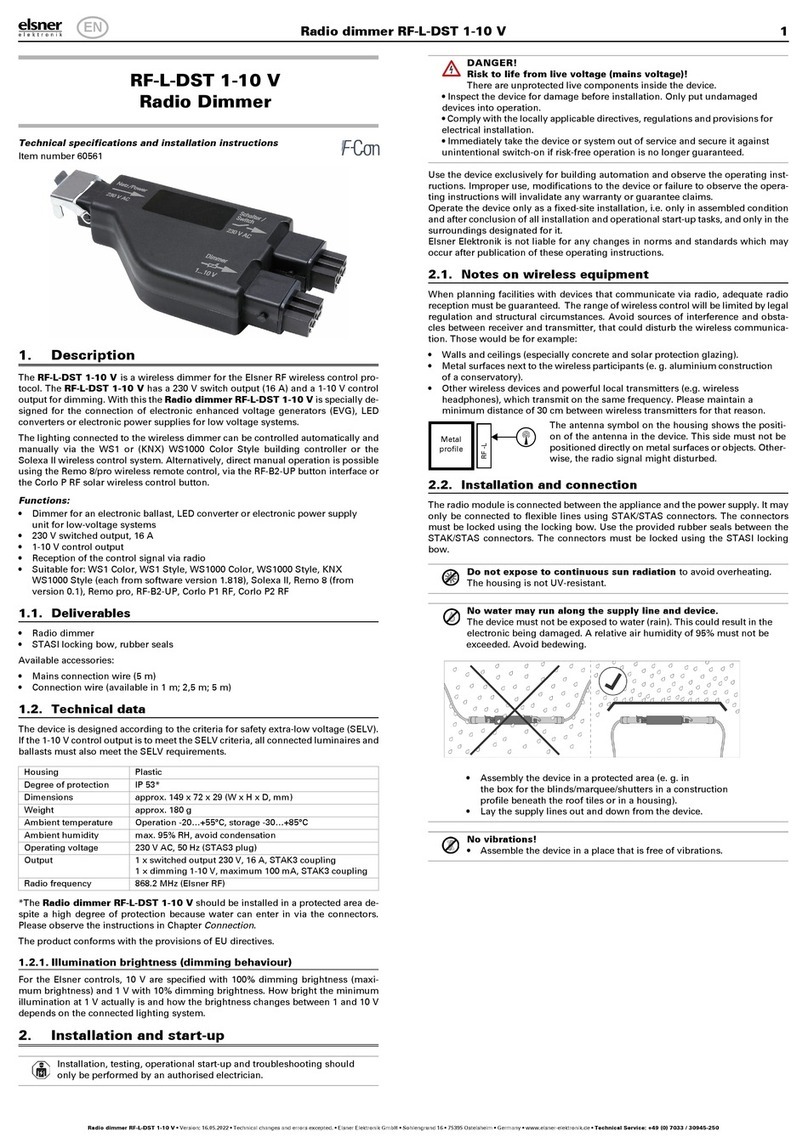
RF-L UN-ST IP53 und RF-L LED-ST IP53 are radio dimmers for the WS1 and
WS1000 Color or Style, WS1000 Connect controls and for radio control system So-
lexa II. A halogen or fluorescent light is connected to the RF-L UN-ST. The RF-L
LED-ST is provided for LED lights. The radio dimmer allows dimming in 1% incre-
ments.
A light connected to the radio dimmer can also be operated directly using the remo-
te control Remo 8/pro via the button interface RF-B2-UP or the solar radio button
Corlo P RF (without an additional control unit).
Functions:
• Universal dimmer with automatic load recognition (phase angle control/
phase sector control)
•RF-L UN-ST for hight-voltage/low-voltage halogen lamps in combination
with dimmable power supplies and for energy saving lamps,
load max. 300 W
•RF-L LED-ST for dimmable LED in combination with dimmable power
supplies, load 20 - 300 W
• Reception of the radio control signal
• Suitable for: WS1 Color, WS1 Style, WS1000 Color, WS1000 Style, KNX
WS1000 Style (from software version 1.8).
WS1000 Connect. Solexa II.
Remo 8 (from version 0.1), Remo pro, RF-B2-UP, Corlo P1 RF, Corlo P2 RF.
1.0.1. Deliverables
• Radio dimmer
Available accessories:
• Mains connection wire (5 m)
• Connection wire (available in 1 m; 2,5 m; 5 m)
1.1. Technical data
*These Radio dimmer RF-L UN-ST IP53 and RF-L LED-ST IP53 should be in-
stalled in a protected area despite a high degree of protection because water can en-
ter in via the connectors. Please observe the instructions in Chapter Connection.
The product conforms with the provisions of EU directives.
2. Installation and start-up
Installation, testing, operational start-up and troubleshooting should
only be performed by an authorised electrician.
DANGER!
Risk to life from live voltage (mains voltage)!
There are unprotected live components inside the device.
• Inspect the device for damage before installation. Only put undamaged
devices into operation.
• Comply with the locally applicable directives, regulations and provisions for
electrical installation.
• Immediately take the device or system out of service and secure it against
unintentional switch-on if risk-free operation is no longer guaranteed.
Use the device exclusively for building automation and observe the operating inst-
ructions. Improper use, modifications to the device or failure to observe the opera-
ting instructions will invalidate any warranty or guarantee claims.
Operate the device only as a fixed-site installation, i.e. only in assembled condition
and after conclusion of all installation and operational start-up tasks, and only in the
surroundings designated for it.
Elsner Elektronik is not liable for any changes in norms and standards which may
occur after publication of these operating instructions.
2.1. Notes on wireless equipment
When planning facilities with devices that communicate via radio, adequate radio
reception must be guaranteed. The range of wireless control will be limited by legal
regulation and structural circumstances. Avoid sources of interference and obstac-
les between receiver and transmitter, that could disturb the wireless communicati-
on. Those would be for example:
• Walls and ceilings (especially concrete and solar protection glazing).
• Metal surfaces next to the wireless participants (e. g. aluminium construction
of a conservatory).
• Other wireless devices and powerful local transmitters (e.g. wireless
headphones), which transmit on the same frequency. Please maintain a
minimum distance of 30 cm between wireless transmitters for that reason.
2.2. Connection
The radio module is connected between the appliance and the power supply. It may
only be connected to flexible lines using STAK/STAS connectors. The connectors
must be locked using the locking bow.
Do not expose to continuous sun radiation to avoid overheating.
The housing is not UV-resistant.
• Assembly the device in a protected area (e. g. in
the box for the blinds/marquee/shutters in a construction
profile beneath the roof tiles or in a housing).
No water may run along the supply line and device because water
can enter in via the connectors.
• Assembly the device in a protected area (e. g. in
the box for the blinds/marquee/shutters in a construction
profile beneath the roof tiles or in a housing).
• Lay the supply lines out and down from the device.
No vibrations!
• Assemble the device in a place that is free of vibrations.
Housing Plastic
Degree of protection IP 53*
Dimensions (without
locking bow)
ca. 147 x 36 x 29 (W x H x D, mm)
Weight approx. 140 g
Ambient temperature Operation -20…+55°C, storage -30…+85°C
Ambient humidity max. 95% RH, avoid condensation
Operating voltage 230V AC
Standby power consump-
tion
2 W
Input STAS3 plug (230 V)
Output STAK3 coupling,
loadable from 20 - 300 W (for RF-L LED-ST depending
on transformer also less than 20 W)
Radio frequency 868.2 MHz
The antenna symbol on the housing shows the position
of the antenna in RF-L UN-ST IP53 und RF-L LED-ST
IP53. This side must not be positioned directly on metal
surfaces or objects. Otherwise, the radio signal might
disturbed.
Metal
profile
RF-L-ST
EN

Radio dimmer RF-L UN-ST IP53 and RF-L LED-ST IP53 2
Radio dimmer RF-L UN-ST IP53 and RF-L LED-ST IP53 from software version 5.7 • Version: 16.05.2022 • Technical changes and errors excepted. • Elsner Elektronik GmbH • Sohlengrund 16 • 75395 Ostelsheim • Germany • www.elsner-elektronik.de • Technical Service: +49 (0) 7033 / 30945-250
2.2.1. Connection assignment
2.3. Establish wireless connection
1. Set the control unit and/or remote control or the button to teaching mode (obser-
ve the corresponding manual/data sheet)
2. Switch on the RF-L UN-ST IP53 und RF-L LED-ST IP53 voltage supply or shut
it off for at least 3 seconds if the unit is already supplied with power.
3. For 5 minutes after connecting the voltage, the RF-L UN-ST IP53 und RF-L
LED-ST IP53 will send a "Learn" telegram every 10 seconds.
4. The wireless connection will be established automatically. For building control
systems, the display will display "Device is learning".
5. The RF-L UN-ST IP53 und RF-L LED-ST IP53 will stop sending "Learn" tele-
grams once the reply "Learned" (for a learning process) or a control command is
received (in the event of a power interruption during operation).
2.4. Notes on mounting and commissioning
Device must not be exposed to water (rain). This could result in the electronics being
damaged. A relative air humidity of 95% must not be exceeded. Avoid condensati-
on.
3. Disposal
After use, the device must be disposed of in accordance with the legal regulations.
Do not dispose of it with the household waste!
1 Neutral conductor
2L
3nc*
PE
1 Neutral conductor
2 Lamp
3nc*
PE
* not connected
PE
PE
Input power supply
Plug for STAK3 coupling
Output Lamp
Coupling for
STAS3 plug
This manual suits for next models
3
Other elsner elektronik Dimmer manuals
Popular Dimmer manuals by other brands
Megaman
Megaman lightwaveRF Connect Series instruction manual
Lightronics
Lightronics DB624 owner's manual
Leviton
Leviton NSI DS8 Installation and operation guide
SMG
SMG Powerlight 612 user manual
Lutron Electronics
Lutron Electronics Energi TriPak Series Quick start quide
Domintell
Domintell DimMax 380SLX instructions
