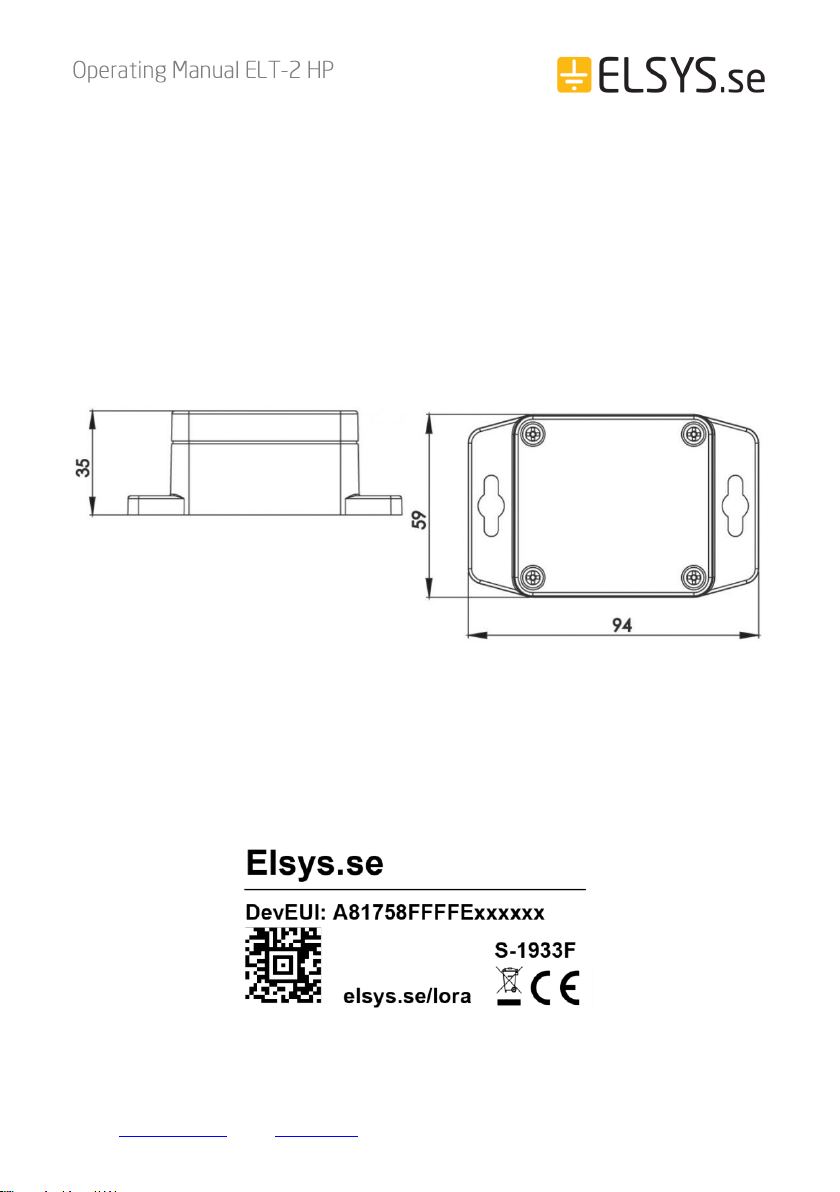
Elsys ELT-2 HP User manual

Elektroniksystem i Umeå AB Industrivägen 12, 90130 Umeå, Sweden
E-mail: suppo[email protected] ǀWeb: www.elsys.se
Specifications in this document are subject to change without notice.
©Elektroniksystem i Umeå AB 2019

2
Elektroniksystem i Umeå AB Industrivägen 12, 90130 Umeå, Sweden
E-mail: suppo[email protected] ǀWeb: www.elsys.se
Important safety information
Read this manual before attempting to install the device!
Failure to observe recommendations included in this manual may be
dangerous or cause a violation of the law. The manufacturer, Elektroniksystem i
Umeå AB will not be held responsible for any loss or damage resulting from not
following the instructions of this operating manual.
•The device must not be dismantled or modified in any way.
•The device is not intended to be used as a reference sensor, and
Elektroniksystem i Umeå AB will not be held liable for any damage which
may result from inaccurate readings.
•The battery should be removed from the device if it is not to be used for
an extended period. Otherwise, the battery might leak and damage
the device. Never leave a discharged battery in the battery
compartment.
•The device must never be subjected to shocks or impacts.
•To clean the device, wipe with a soft moistened cloth. Use another soft,
dry cloth to wipe dry. Do not use any detergent or alcohol to clean the
device.
Disposal note in accordance with ElektroG and WEEE Directive
2012/19/EU
The device, as well as all the individual parts, must not be disposed of
with household waste or industrial waste. You are obliged to dispose of
the device at the end of its service life in accordance with the
requirements of ElektroG in order to protect the environment and to reduce
waste through recycling. For additional information and how to carry out
disposal, please contact the certified disposal service providers. The sensors
contain a lithium battery, which must be disposed of separately.

3
Elektroniksystem i Umeå AB Industrivägen 12, 90130 Umeå, Sweden
E-mail: suppo[email protected] ǀWeb: www.elsys.se
Contents
Description......................................................................................................................................... 5
Main features of ELT-2 HP........................................................................................................ 6
Installation.......................................................................................................................................... 7
Installing external sensors ......................................................................................................... 8
External temperature sensor................................................................................................ 8
Analog input 0 –3 or 0 –10 Voltage............................................................................... 8
Powered analog input 0 –10V........................................................................................... 9
Pulse count (Pull up) ..........................................................................................................10
Pulse count (Pull down) .....................................................................................................10
Pulse count (Pull down) –External pulse.......................................................................11
Pulse count (Pull up) –S0 input ......................................................................................11
4 –20 mA input...................................................................................................................12
Water leak input....................................................................................................................12
Maxbotix distance sensor input.........................................................................................13
Meter (Decagon) sensor input .........................................................................................13
Pulse count (Pull up) –2 channels..................................................................................14
Pulse count (Pull down) –2 channels ............................................................................14
Switch input + Temperature sensor.................................................................................15
Sensor configuration......................................................................................................................16
NFC Configuration.....................................................................................................................16
Over the air configuration ........................................................................................................17
Application parameters.............................................................................................................17
Sensor behavior..............................................................................................................................17
NFC Read / Write ......................................................................................................................17
Sensor startup ...........................................................................................................................18

4
Elektroniksystem i Umeå AB Industrivägen 12, 90130 Umeå, Sweden
E-mail: suppo[email protected] ǀWeb: www.elsys.se
Sampling mode / Periodic measurement .............................................................................19
External sensors ........................................................................................................................20
Specifications ..................................................................................................................................21
Sensor payload format.............................................................................................................21
Regulations......................................................................................................................................22
Legal Notices .............................................................................................................................22
Federal Communication Commission Interference Statement..........................................22
Non-modifications Statement .................................................................................................23
Caution ........................................................................................................................................23
Industry Canada Statement.....................................................................................................23
Declaration of conformity ........................................................................................................23
5
Elektroniksystem i Umeå AB Industrivägen 12, 90130 Umeå, Sweden
E-mail: suppo[email protected] ǀWeb: www.elsys.se
Description
ELT-2 is a universal outdoor device for LoRaWAN® wireless network. It is
designed to be in extreme conditions and can measure analog or digital signals.
Use it together with electricity meters, flow meters, analog sensors, moisture
sensors and other external sensors. ELT-2 is enclosed in an IP67 box and have
four internal sensors: temperature sensor, humidity sensor, accelerometer and an
atmospheric pressure sensor. This is a battery-powered device equipped with
NFC (Near Field Communication) and can easily be configured from a
smartphone.
The barcode contains DevEUI and sensor type. This label is located at the back
of your device,
ELT-2-HP

6
Elektroniksystem i Umeå AB Industrivägen 12, 90130 Umeå, Sweden
E-mail: suppo[email protected] ǀWeb: www.elsys.se
Main features of ELT-2 HP
•Compatible with LoRaWAN® specification 1.0.3
•Measures ambient temperature
•Measures ambient humidity
•Measures ambient atmospheric pressure
•Detects acceleration
•Analog 0 –10 V input
•Digital input
•Direct connection to various external sensors and equipment
•Easy installation
•Easy configuration
•IP67 Classified
•Battery-powered
•Long-range communication
•Configurable over NFC
•Configurable over the air
•Ten years of battery life*
•Supported channel plans: US902-928, EU863-870, AS923, AU915-
928, KR920-923, RU864, IN865 & HK923
•CE Approved and RoHS compliant
*Depending on settings and environmental factors

7
Elektroniksystem i Umeå AB Industrivägen 12, 90130 Umeå, Sweden
E-mail: suppo[email protected] ǀWeb: www.elsys.se
Installation
1. Remove the front lid of the sensor by removing the four screws.
2. Install the battery. The ELT-2 requires one AA battery. The battery type
is 3.6V Lithium Battery (ER14505).
Caution: Using batteries other than the ones provided may result in loss of performance
and battery life, and also damage to the device. Dispose of properly, observing
environmental protection rules.
3. Connect any eventual external sensors.
4. Close the lid and tighten the screws carefully. Make sure that the cable
gland and antenna connection is tightened to prevent ingress of
moisture.
5. Mount the device by using the two holes on the sides.

8
Elektroniksystem i Umeå AB Industrivägen 12, 90130 Umeå, Sweden
E-mail: suppo[email protected] ǀWeb: www.elsys.se
Installing external sensors
External temperature sensor
Configured for 1-wire interface. Connect a DS18B20 compatible sensor. Select
“Temperature sensor 1 wire” in the application “Sensor Settings”. ELT input is internally
pulled up by 2.2kΩ.
Analog input 0 –3 or 0 –10 Voltage
Input signal between input and ground.
Select “Analog input 0-3V” or ”Analog input 0 – 10V” in the application “Sensor
Settings”. ELT input is internally pulled down.
/ 0-10V
/ 0-10V

9
Elektroniksystem i Umeå AB Industrivägen 12, 90130 Umeå, Sweden
E-mail: suppo[email protected] ǀWeb: www.elsys.se
Powered analog input 0 –10V
Input signal between input and ground. +3V present at B+ pin.
Select “Analog input” in the application “Sensor Settings”. Select “Eternal startup time”
and configure ON-time for sensor. External startup time is how long the sensor will be
powered before sampling value. ELT input is internally pulled down and the input
impedance is 7.4 kΩ
Switch Input (Pull up)
Input signal between input and ground.
Select “Switch (Normally open)”in the application “Sensor Settings”. ELT input is
internally pulled up by ~50 k Ω*.
10
Elektroniksystem i Umeå AB Industrivägen 12, 90130 Umeå, Sweden
E-mail: suppo[email protected] ǀWeb: www.elsys.se
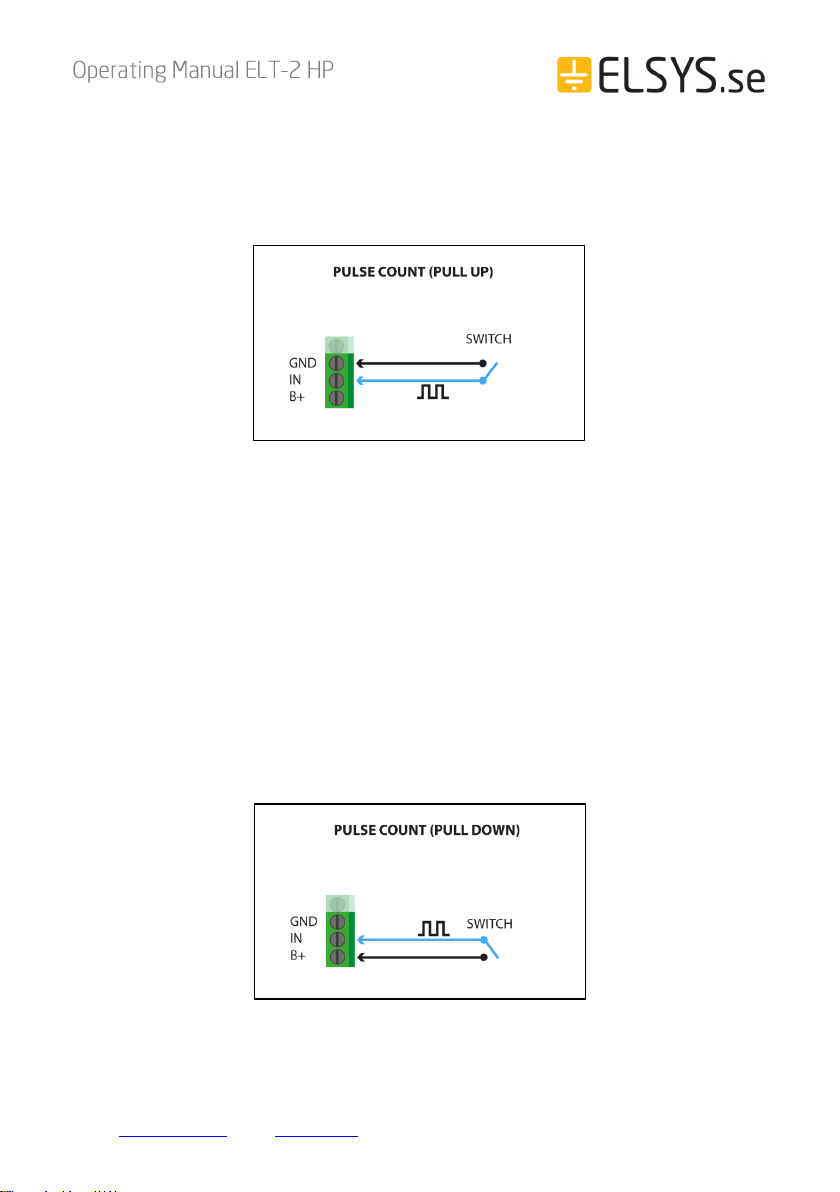
Pulse count (Pull up)
Input signal between input and ground.
Select “Pulse input (pull up)” in the application “Sensor Settings”. ELT input is internally
pulled up by ~50 k Ω*.
Pulse count (Pull down)
Input signal between input and B+.
Select “External startup time” in the application “Sensor Settings” and configure ON-time
for always on that is >1000000ms.
Select “Pulse input(pull down)”. ELT input is internally pulled down by ~50 kΩ*.

11
Elektroniksystem i Umeå AB Industrivägen 12, 90130 Umeå, Sweden
E-mail: suppo[email protected] ǀWeb: www.elsys.se
Pulse count (Pull down) –External pulse
Input signal between input and GND. Pulse signal from 3 to 12 voltage.
Select “Pulse input (pull down)” in the application “Sensor Settings”. ELT input is
internally pulled down by ~50 kΩ*.
Pulse count (Pull up) –S0 input
S0 signal between input and ground.
Select “Pulse input (pull up)” in the application “Sensor Settings”. ELT input is internally
pulled up by ~50 kΩ*.

12
Elektroniksystem i Umeå AB Industrivägen 12, 90130 Umeå, Sweden
E-mail: suppo[email protected] ǀWeb: www.elsys.se
4 –20 mA input
Select “Analog input” in the application “Sensor Settings”. Connect resistor parallel to the
input. Value of R can be calculated as 𝑈 = 𝑅 ∙ 𝐼. For full range, use 536Ωresistor.
(20mA will then read as 10V).
Water leak input
Connect water leak cable, sensor, or open ends to IO2 and IN.
Select “Water leak” in the application “Sensor Settings”. Range 0-255 depending on
conductivity.
13
Elektroniksystem i Umeå AB Industrivägen 12, 90130 Umeå, Sweden
E-mail: suppo[email protected] ǀWeb: www.elsys.se
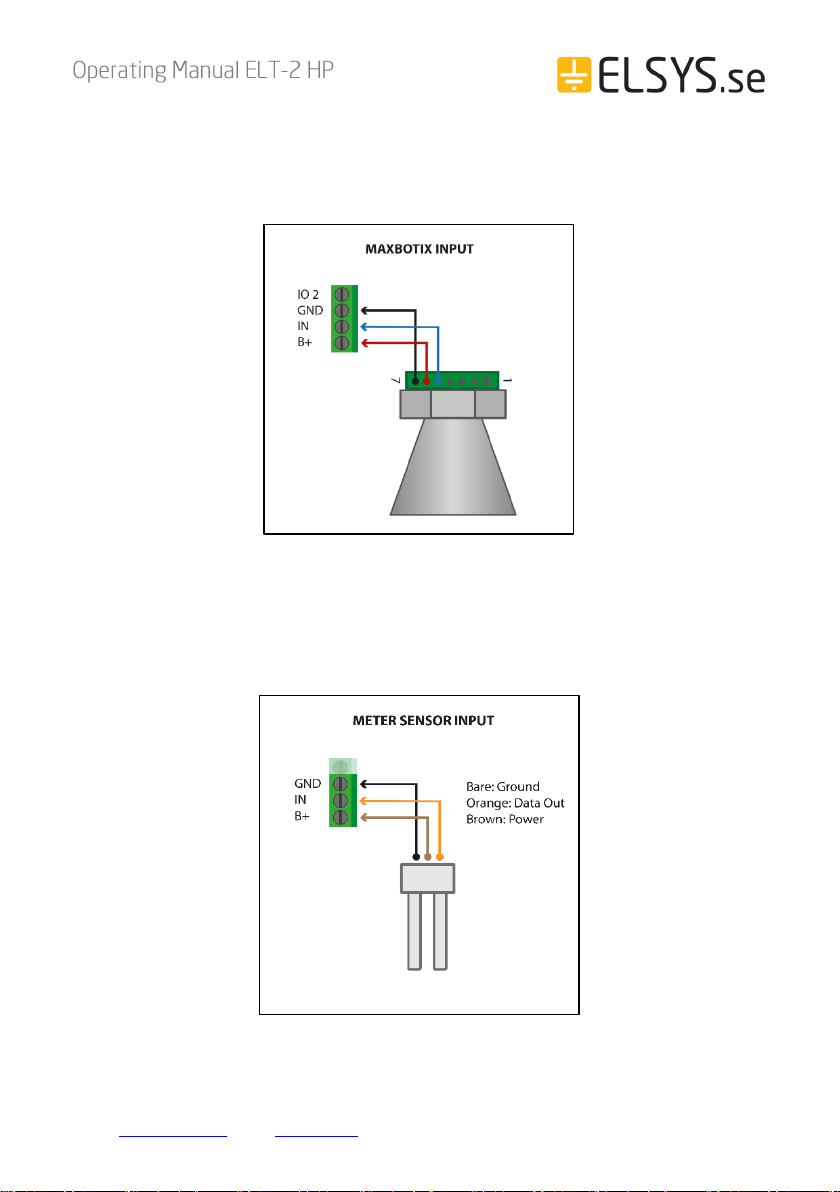
Maxbotix distance sensor input
Connect the maxbotix sensor according to the diagram. Try to use a short cable. Select
“Maxbotix” in the application “Sensor Settings”.
Meter (Decagon) sensor input
Connect the Meter (Decagon) sensor 10HS, EC-5 or ECH20 5TE according to the
diagram. Try to use a short cable. Select “Meter (Decagon)” in application “Sensor
Settings” or “Meter(Decagon) ECH20 5TE” if you connected ECH20 5TE.

14
Elektroniksystem i Umeå AB Industrivägen 12, 90130 Umeå, Sweden
E-mail: suppo[email protected] ǀWeb: www.elsys.se
Pulse count (Pull up) –2 channels
Input signal between input, IO2 and ground.
Select “Pulse input (pull up)” in the application “Sensor Settings”. ELT input is internally
pulled up by ~50 kΩ*.
Pulse count (Pull down) –2 channels
Input signal between input IO2 and B+.
Select “External startup time” in the application “Sensor Settings” and configure ON-time
for always on that is > 1000000ms.
Select “Pulse input (pull down)”. ELT input is internally pulled down by ~50 kΩ*.
15
Elektroniksystem i Umeå AB Industrivägen 12, 90130 Umeå, Sweden
E-mail: suppo[email protected] ǀWeb: www.elsys.se
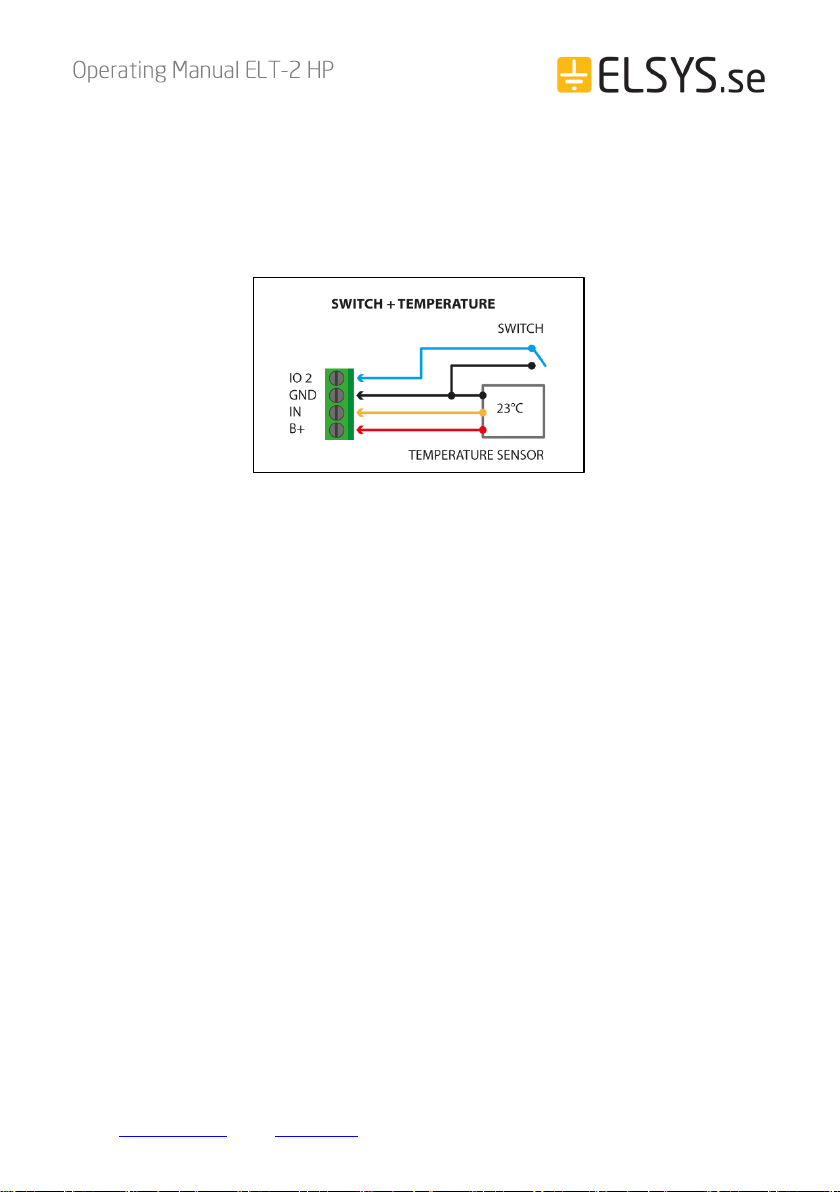
Switch input + Temperature sensor
Connect a DS18B20 compatible sensor according to the diagram. Connect a limit
switch, door switch, reed switch etc., between IO2 and GND. Select “Temperature
sensor + Switch” in application “Sensor Settings”. ELT input is internally pulled up by
~50 kΩ* on IO2.

16
Elektroniksystem i Umeå AB Industrivägen 12, 90130 Umeå, Sweden
E-mail: suppo[email protected] ǀWeb: www.elsys.se
Sensor configuration
All sensor settings can be configured via a smartphone application with NFC
(Near Field Communication) or over the air via the network server and downlink
data to the sensor. The sampling rate, spreading factor, encryption keys, port,
and modes can be changed. All sensor settings can be locked from the server or
NFC to make end-users unable to read or change settings on the sensor.
NFC Configuration
1. Download ELSYS “Sensor Settings”application from Google Play or App
Store (from iOS 13) and install it on a smartphone or tablet. The device
must support NFC.
2. Enable NFC on the device and start the application.
3. Place your device on top of the NFC antenna on the sensor.
4. Remove the device. Current settings will be displayed in the application.
5. Use the application to change any settings if needed.
6. Quickly tap the device on top of the NFC antenna to give the new settings
to the sensor. Make sure that the application confirms your new settings.
7. Wait for the sensor to reboot (5 sec), indicated by the LED flashing. Sensor
settings have been updated.
See the section “Help”in the application for more information.

17
Elektroniksystem i Umeå AB Industrivägen 12, 90130 Umeå, Sweden
E-mail: suppo[email protected] ǀWeb: www.elsys.se
Over the air configuration
All settings may be configured over the air via your LoRaWAN® infrastructure.
Please visit the support section on our webpage for more information regarding
downlink protocol.
Application parameters
All parameters for the “Sensor settings” application can be found in our settings
document. Please visit the support section on our webpage for more information.
Sensor behavior
NFC Read / Write
1. When reading or writing NFC
configuration data to the sensor, it starts
a timer and delays its action 5 seconds.
2. After the delay, the sensor determines if
the NFC data has changed or not. If the
data has changed, the sensor reboots
and starts from power-up.
3. Write your settings in the application
and then locate the NFC antenna of the
phone and sensor. Keep the two
devices close and don’t move them to
get the best connectivity as possible
when writing or reading data to the
sensor. Bad connection can be caused
by long distance, wrong location, or
rapid movement.
4. When you have written data to the sensor, let the sensor reboot and restart
before trying to write again.
You should always validate your settings by reading the NFC data after the
sensor has restarted.
18
Elektroniksystem i Umeå AB Industrivägen 12, 90130 Umeå, Sweden
E-mail: suppo[email protected] ǀWeb: www.elsys.se
Sensor startup
1. When the sensor starts up, it loads
configuration from the internal memory and
merges it with user configuration.
2. When the configuration is done, the sensor
writes the new configuration to the NFC chip.
The sensor always writes new configurations
to the NFC chip when something changes in
the sensor or if NFC data is corrupted by an
NFC writer or phone. The sensor always writes
the new configuration to NFC chip at startup.
3. When the configuration is done, the sensor
tries to join the network if OTAA (Over the Air
Activation) is enabled.
4. The sensor LED flashes orange when it tries to
join a network. It will try to join every 10
seconds initially. This interval will increase to
save battery, at most up to one time per hour.
5. After successful connection to a network, the
sensor sends a settings packet and enters
sampling mode.

19
Elektroniksystem i Umeå AB Industrivägen 12, 90130 Umeå, Sweden
E-mail: suppo[email protected] ǀWeb: www.elsys.se
Sampling mode / Periodic
measurement
The sensor makes periodic
measurements according to the user
configurations.
Schedule Transmission
The sensor transmits the data
according to the user
configurations.
20
Elektroniksystem i Umeå AB Industrivägen 12, 90130 Umeå, Sweden
E-mail: suppo[email protected] ǀWeb: www.elsys.se
External sensors
The sensor makes periodic
measurements according to the user
configurations.
External sensors may have additional
startup time. Configure the “External
startup time” according to this.
For best performance, use a cable as
short as possible to your external
sensor.
Table of contents
Other Elsys Accessories manuals

Elsys
Elsys ERS User manual

Elsys
Elsys ELT-2 User manual

Elsys
Elsys EMS Door User manual

Elsys
Elsys ERS Eye User manual

Elsys
Elsys ERS User manual

Elsys
Elsys ECO Series User manual

Elsys
Elsys EMS Series User manual

Elsys
Elsys ERS2 Series ERS2 Lite User manual

Elsys
Elsys EMS Desk User manual

Elsys
Elsys ERS CO2 User manual
Popular Accessories manuals by other brands

Silvercrest
Silvercrest SPB 2.6 A1 User manual and service information

SSC-LUXon
SSC-LUXon PALISO Assembly & operating instructions

Silvercrest
Silvercrest SRL 100 A1 operating manual

Colortronic
Colortronic BFC Series Operation and installation manual

Lowrance
Lowrance 1000 Addendum

Vega
Vega VEGAFLEX 86 operating instructions


