Emax Interceptor RaceView User manual

Thanks for purchasing the Tinyhawk II.
Designed in California, assembled in China.
EMAX
Interceptor RaceView
with Controller
(Goggle Ready)

Please read the disclaimer carefully before using
this product. By using this product, you hereby agree
to this disclaimer and signify that you have read
them carefully and completely. This product is not
suitable for people under the age of 14.
Adult supervision is highly recommended for kids
under the age of 14.
Please read the instruction manual and warnings
carefully. Before every play, make sure the battery
is fully charged and power connections are secure.
DO NOT run around crowds, children, animals or
objects.
EMAX ACCEPTS NO LIABILITY FOR DAMAGE(S) OR INJURIES
INCURRED DIRECTLY OR INDIRECTLY FROM THE USE OF
THIS PRODUCT.
Please follow the instructions to assemble and to
operate this product in a proper way.
Please run the model in a safe area away from
people.
Do not modify or use other parts and accessories
not approved for the use of EMAX.
Do not use this product in harsh environments
(such as winds, rain, lightning, snow, etc.).
Do not use this product in a strong electromagnetic
environment.
Please visit emax-usa.com or emaxmodel.com
for any updates or support needs.
Wheelbase 116mm
Maximum size
of the car 170mm
Car weight
(with battery) 86.5g
Motor 0820
Main Controller
3A ESC
2.5g Servo control
EMAX 2.4G receiver
Camera 600TVL CMOS camera
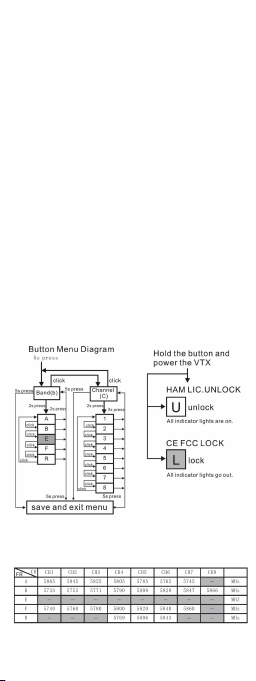
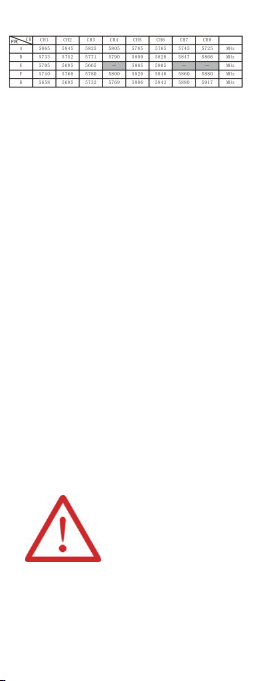
Transmitter 25mW Adjustable
frequency 37CH
Battery 1 Cell 300 mAh lipo battery
Disclaimer
Precautions
Support
Interceptor Parameter
Product specification
1

1.Interceptor × 1
2.Radio × 1
3.Instruction manual × 1
4.USB cable × 1
5.Screwdriver x 1
6.Battery for Interceptor × 1
Maximum appearance size 180*180*75(mm)
weight (without battery) 135g
Transmission frequency 2.4GHz ISM Band
2400MHz~2483.5MHz)
Output Power 22dbm
Modulation GFSK
battery 3×AA batteries
Product list
Interceptor Structure
Radio
Radio
2

This is a 2.4 GHz radio, The radio is powered with
3×AA batteries.
Power on and off by toggle the remote control
switch button. The power indicator light will turn
red when on. The red light flashes quickly when
the remote control battery is low.
1.Take out the USB cable, and connect the cable
to USB port on the interceptor .
2.Connect the other end of the line to the computer
USB port. While charging, the LED will light up;
when fully charged, the LED will light off.the
charging current is 500mA.
3.Disconnect the cable from the interceptor.
The radio comes already bound to interceptor. If
binding is necessary follow these steps:
1. Make sure the radio and the interceptor are
powered off.
2. Power on the radio, the power indicator light
will turn on. Press the bind button after power
on the radio. Then the radio enter bind mode.
The red light will slow flash after the radio enter
in bind mode.
3. Power on the interceptor, and ensure it is close
to the radio, the red light on the radio will steady
light when binding has been completed.
4. Repower the interceptor.
Battery
Charge battery of Interceptor
Operation
Power
Binding
3

1.When charging, please put this product on a dried
or ventilated area and keep it far away form heat
source or explosive product.
2.A battery when not in use for a long time will lose
its charge automatically. Charging or discharging
too often may reduce the life of the battery.
Always use caution when running and operating the
model in an open and controllable area. Please
learn the drive controls first before powering on the
interceptor to drive.
1.Turn left the steering regulating wheel, the car
will turn left. Turing left angle can be adjusted by
the degree of wheel twisting.
2.Turn right the steering regulating wheel, the car
will turn right. Turing right angle can be adjusted
by the degree of wheel twisting.
CAUTIONS WHEN CHARGING
Driving
Radio Stick Controls
4

Start by powering on your Radio. Interceptor comes
already bound to your radio. Power on interceptor
by sliding the battery into the battery tray and plugging
it in. Interceptor can drive for 20 minutes on a fully
charged battery. Stop interceptor when the battery
reaches 3.3v.
3.Pull the throttle trigger backward, the car will
forward. Adjusting the angle of throttle trigger can
adjust forward speed of the car. During the car
forward, quickly push the trigger forward to stop it.
4.Loosen the trigger to make it return the neutral
position when brake. Push the throttle trigger
forward, the car will backward. Adjusting forward
angle of throttle trigger adjust backward speed of
the car.
Drive Interceptor
5

To learn how to drive interceptor start by driving it
line of sight (no goggles yet).
1.Turn on the remote control switch of radio, then
turn on the car.
2.Put the car on the frame or stand, If wheel is
running self-motion, adjust the turned to fine-tune
of the radio until the wheel is still.
3.Slip the trigger of transmitter slowly, you can
observe the car whether it can go ahead or go
back.
4.Turn steering regulating wheel of radio to left or
right, and make sure the steering of front wheels
follow the instruction.
5.Put the car on the ground and stand behind the
back of the car. Squeeze the throttle trigger of
radio gently. If the car does not move in a straight
line, you can adjust the turned to fine-tune of radio
until the car moves in a straight line.
Interceptor VTX Settings
Line of Sight driving
Vtx Schematic and Button Diagram
6

1. Normal display
All LEDs on the VTX are normally off until the
button is pressed. To check band and channel
status click the button once quickly, and LED
starts to indicate frequency band and frequency
channel. First indicate the frequency band and
then indicate the frequency channel. After all 2
rounds of LED display cycles, all LED will be off.
2. Menu Entry / Exit
(1)Press the button and hold for 5s to enter the
menu. After entering the menu, BAND LED
lights up.
(2)Press the button and hold for 5s again to save
parameters and exit the menu. After saving
and exiting the menu, all LED goes out.
3. Band and Channel parameter change
After entering menu, short click button to switch
frequency group band(b)/frequency channel (C),
and the LED of the corresponding menu is lit.
4.Enter/Exit Parameters
(1) After choosing menu, press the button and hold
for 2s to enter parameter option. And the
corresponding LED flash.
Button Menu Diagram
CE and FCC unlicensed user chart
VTX Channel Settings with the Button
7

* From the factory this video transmitter is designed
to operate within CE and FCC unlicensed users
specifications. To use the unlocked features of this
VTX the user is required to have a HAM radio license
or prior consent from the FCC.
By purchasing this equipment, the user is agreeing
that they understand these responsibilities and will
operate the equipment legally. Emax cannot be
held responsible for your actions if you purchase
and/or use this product in violation of your
government's regulations.
1. When the car does not operate at all. Make sure
your transmitter or receiver power on and the
drive battery is charged enough.
2. If the car does not follow your operation and
control distance not enough long. Check if there
is enough power in the transmitter or receiver
batteries.
3.If you use the remote control to control the car,
The car out of control or abnormal performance,
please make sure the remote control battery is
powered enough and use high qu ality 3×AA
batteries.
Thank you for purchasing our product! Enjoy
Driving Interceptor.
Please pay attention to your surroundings.
Not Recommended for persons under
14
years of age.
Trouble shooting
Warning:
Unlocked FCC HAM licensed user chart
8
This manual suits for next models
1
Table of contents